Flowers for Our Times:

Over the past few years I have been intending to start selling giclee printed versions of my personal stitched work. The latest pigment prints available are unbelievably faithful in reproducing my finely stitched work…but where to start? Flowers – where else? I determined to develop some new flower embroideries for this venture.

Following on from revisiting my old research books and past work, I decided incorporate the flower embroideries with the Kantha stitched skies as in After Winifred. I took a beautiful bunch of dahlias and held them against a large scale Kantha Stitched sky in progress on my studio wall. I had been brought the flowers by Helen Reed, who owns Court House Farm and runs a seasonal cutting garden amongst other ventures. And where I hold drawing sessions in the summer months.

I also eventually started to work on an idea taken from a rare photograph of my garden Hellebores in a vase and in front of my scarf design of Hellebore flower heads. What is odd is that while Hellebores are one of my most favourite flowers, am not keen on Dahlias and did find myself reluctantly stitching them onto a small version of the Kantha sky. Below are the first 2 prints in the series Flowers For Our Times, on the left is Dahlias, on right, Hellebores

Reflecting on the Dahlias and Hellebore pieces (made between winter 2021 to early 2022) I felt as if I had made a definite link between my old and new work in order to make the really vivid giclee prints, available soon at Heart Space Editions. But although technically demanding, using the new Inktense dyes from Derwent, I decided that this was not the way forward that I had imagined it would be.

I returned again to my early flower work and re-read the catalogue of my exhibition of Flora’s Legacy, held in Bath in 2000 ( yes – so many years ago!!!!!) and realised exactly what was missing – symbolism – or the half hidden messages often contained within these earlier works.The centre-piece from the exhibition, Flora – the Roman goddess of flowers, had what was missing from my new works…the hidden meanings and humour – here some blackish, bawdy humour.

Turning to the many and various dictionaries of symbols I keep in the studio library I thought I would invent a bunch of flowers instead. The meanings of plants and flowers are universal and every culture has its own beliefs, sometimes conflicting – sometimes they are entirely in agreement: a poisonous plant is a poisonous plant. Out of curiosity I checked what the 2 bunches meant adding, the meanings to my original studies…..

I must admit that I was shocked, relieved, delighted and then excited to find that I had embroidered War, Scandal, Uncertainty, Instability and Sickness within 2 pretty bunches of flowers. But everyone else around me was spooked. So – they asked – where did I get this information from? Well in my books of symbolism, the most curious and confusing is The Language of Flowers – but oh the possibilities that it offers for mixed messages and hidden warnings amuse me enough to keep going with this theme.

Using just my old folders and Victorian books of flower meanings lead me to a brand new fully comprehensive dictionary by S. Theresa Dietz – published by Wellfleet Press, and the here I discovered far more arcane information than I had gleaned from my all my original sources.

So now what to do next – can you guess?

check the gallery section to see more outcomes of this ongoing project

Stitching a Sky

Pastel drawing of dramatic cloud hanging over the Welsh coast seen at dawn one Sunday in February 2020…Something wicked this way comes?

I want to show how my stitched work progresses; here is a very heavily edited set of images taken over the last 2 months – from July through to the end of August 2022. Not shown is the unpicking, pulling apart already stitched fabrics and rearranging that leads to frustration and doubt but mixed with delight, calm contemplation and my eventual recognition that, having captured my original vision of this ominous sky, I can stop working on it. The drawing above took less than 1 hour, the piece shown below, more than 8 weeks…..

Week 1

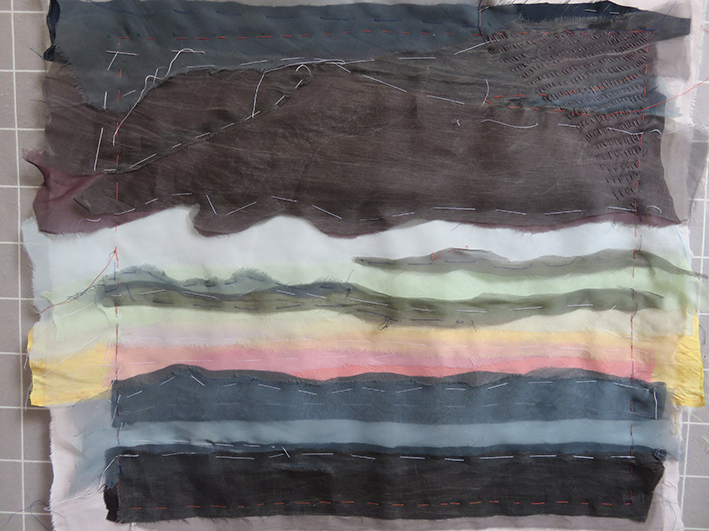
The first stages were quite tricky to lay out using strips of silk georgette onto a pale cotton ground, that had to be kept scrupulously clear of stray threads while building the applique ground.

Week 2

By the end of the second week I had managed to cut the clouds and baste them all into position, then I checked them against my original drawing. The tiny sample of energetic Kantha quilting inspired the way I attempted to stitch the cloud.

Week 3

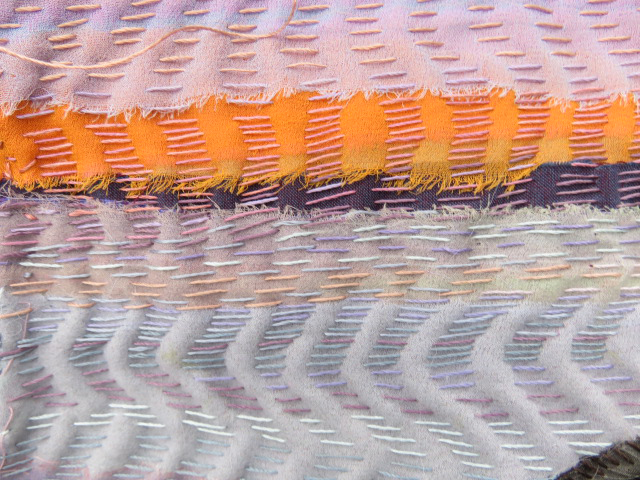
I started the running stitches in rows of single silk threads to create an undulating rippled surface. After a few unhappy days I stopped stitching, undid as little as i could get away with and inserted more pieces of rust coloured silk organza to give the cloud ‘depth’. The chalk drawing, above right, shows the paths I need to stitch along; I think stitching rhythms into cloth by using the Kantha technique is a bit like patting your head and rubbing your tummy at the same time – tricky!

Weeks 4 & 5

I was determined to use this piece of work to try to find a way of controlling the outer edges of the appliqued fabrics; usually when I make very large drifting Kantha Stitched Skies I leave them to be contained and wrapped out of sight when stretching the finished work. But here the view is much smaller as this black cloud did not extend the whole length of the estuary – it faded out just beyond my window frame. I looked at Georges Seurat (who is a great influence on the way I have developed the colour mixing within my stitched work) and adapted his painted canvas frames – his dots are my stitches ). And eventually the marsh starts to emerge, using large straight slanting stitches

Weeks 6 & 7

However as the stitching progresses the different tensions start to exert itself onto the fabric – where the stitches are close together the fabric width starts to shrink, which is to be encouraged as this gives the curious patterns that I feel are so like air currents…. So the side borders are unpicked and the the whole embroidery is squared up. When I had almost finished stitching I outlined the whole piece using a machine stitch to give me a better guide for the dozens of running stitched lines for the frame.

The finished work “The Dark Cloud” approx.18in ( 45cm) square

Drawing Drawing Drawing

I use drawing to express myself to myself. I feel that Drawing is the language closest to my heart; my second and most used language after English, followed by the most difficult to have mastered, Stitching. It is the foundation of my chosen discipline of hand-made stitched textiles and almost all my work starts with a drawing, sometimes just a scribble or as a written note, but it will be expressed as a drawing with enough information for me to proceed.

Scribbled thoughts are put down as lists for skies I see when waking up, and on whatever is to hand. The imagery is enough to lead me to another drawing…..

Very occasionally when I work from photographs, I will start an embroidery without a drawing – and it always leads to difficulties as I am torn between the ‘real’ thing as recorded by the camera and my initial vision of it. Basically the drawing is the first edit of the image, it concentrates me on what was important when I first took the photograph, but the camera sees everything and I get seduced too easily by captured colour, and sometimes the colour isn’t the same as my memory.

Below are various single pages from individual sketchbooks – the top 2 are observational drawings taken directly from life, the red in pen and ink is a detail from of my garden, the iris was from a friends garden. The the others are all working /design/ research drawings, (with added photographs of finished brooches)

I keep all my working drawings in a series of books that go back some 40 years! The types of drawings collected in them range from a scribble on the nearest available paper, as above, through to straightforward observational drawings that then get re-arranged or even collaged together

then eventually the detailed working drawings are assembled and kept together, and accompanied by any other research materials.

The images above are open pages of my own research books from different long term projects, they really show the way my mind works, both visually and mechanically.

The 2 pages below are anemone flower drawings made from photographs in a garden magazine many years ago for my Flora embroideries, they have inspired many many different pieces of work in a variety of materials; good drawings have their own energy and life.

a few of the many different works that have been generated directly by the drawings above.

The images above are of vitreous enamel dishes and a silk applique with a machine stitched drawing that plays with the idea of anemones, another name is windflower.

Occasionally I do make finished drawings ready for exhibition.

Three Noh Masks: crayon drawing on paper.

but somehow the stitching seems always to get in on the act.

Sanderlings flight postcard: paper, crayon, silk.

and here are I suppose my most personal drawings ( sad isn’t it) that just arrive onto any page near me, usually when I am talking on the phone to friends and colleagues, and sometimes prospective clients but always when i am fully engaged, they do not arise out of boredom. What is very strange is they have never changed over all the years I have been making them…

jngnhfv

Stitching on a Roof Tile!

The Curzon Cinema in Clevedon, North Somerset, https://www.curzon.org.uk is my favourite (actually our only) local cinema; it looks and feels like the picture houses of my childhood in the 1950’s. (photograph above courtesy of Go Bath Bristol) Saved by the community from total dereliction some years ago, it now has a major problem, the roof is leaking and needs major money for repairs. So there was a call – out for local artists to help – decorate an old roof-tile in any way whatsoever ………and they are being auctioned on line next month from 1st December 2019.

the headland of the Kilkenny Bay seen from our house and garden, on late sunny evenings…utterly magical.

The central curve reminded me of the the headland at the end of the bay where I live, Battery Point, on the Severn estuary, fanciful I know but I have many drawings of this view and have made many different types of work from the studies.

I tried many variations of colour scapes from my earlier drawings. I liked the glistening nylon shot fabric for the water, trouble is that the water of this estuary is never a deep true blue, air-force blue is as good as it gets. For some reason I started with the lump on the left…so the view was of the other end of the bay where the sun sets and all the colour emerges from…but it wasn’t working for me – then one morning I just changed it around so it looked like the Battery Point headland…I was suddenly on home ground..or should I say water?

I added the salt marsh fabric, a piece of green and orange shot cotton is the perfect colour of the marsh when the late afternoon sun lights it up in the autumn – the rest of the sky and sea seem purple in comparison.
The task now was to organise the layout of the fabrics so that they would lie in straight lines when they were eventually placed onto the undulating tile …this took some calculations as the tile is wedge shaped but the sea level and the salt- marsh horizons are straight….

I start to running stitch the sky …..but I have decided against the brilliant blue sea I hid it under a translucent layer of silk!

I used the simple running stitches of Kantha technique for this appliqué, I have to get the fabrics to stay together in a soft and malleable form so that I can easily manipulate the fabric over the lumpy tile.

I continue to stitch down the length of the tile – it takes several days but as always fascinating to handle the colour changes. The stitching is quite large and almost crude using a heavy gauge silk thread but very satisfying to do; usually when working this technique I use one single thread of silk and it takes ages and ages to cover the ground

As I continued to stitch the colours became muted and now the once brilliant orange sky was being challenged by the bright green of the salt- marsh; reluctantly I changed the fabric after several different variations of shot cottons had been tried, but there is enough going on in this small space as it is – hey ho!

eventually the finished piece is ready to be mounted onto the tile covered in wadding.

I then covered the tile in a layer of very thin wadding, sticking it down with thins lines of fabric glue so that I could continue to embroider the silk piece to it. I have evolved this technique for covering 3D shaped objects over many years of trial and error but this was a real challenge.

Having aligned the top of the stitching to the top of the tile I tacked it into position, then pinned it all along the undulations…it’s really tricky work trying to keep the horizon lines straight…all those years of pattern cutting came into play! The top and bottom were secured by over stitching onto the back of the tile wadding, pulling and stretching as I proceeded eventually it was securely stitched and bedded into position.

I am really liking the feel of the tile now it is so softly padded and am thinking of possibly making some more stitched covers for other objects – one day. Meanwhile my husband Stephen Jacobson, has painted another view of the estuary using the imprint of the tile manufacturer as a flag with a view of the band stand at Clevedon. And artist Alfred Stockham has painted eyes to create a curious face and called it ” The Man in the IronMask “

All the 40 odd tiles are for auction on the curzon.org.uk/art-on-the-tiles.