Stitching a Sky

Pastel drawing of dramatic cloud hanging over the Welsh coast seen at dawn one Sunday in February 2020…Something wicked this way comes?

I want to show how my stitched work progresses; here is a very heavily edited set of images taken over the last 2 months – from July through to the end of August 2022. Not shown is the unpicking, pulling apart already stitched fabrics and rearranging that leads to frustration and doubt but mixed with delight, calm contemplation and my eventual recognition that, having captured my original vision of this ominous sky, I can stop working on it. The drawing above took less than 1 hour, the piece shown below, more than 8 weeks…..

Week 1

The first stages were quite tricky to lay out using strips of silk georgette onto a pale cotton ground, that had to be kept scrupulously clear of stray threads while building the applique ground.

Week 2

By the end of the second week I had managed to cut the clouds and baste them all into position, then I checked them against my original drawing. The tiny sample of energetic Kantha quilting inspired the way I attempted to stitch the cloud.

Week 3

I started the running stitches in rows of single silk threads to create an undulating rippled surface. After a few unhappy days I stopped stitching, undid as little as i could get away with and inserted more pieces of rust coloured silk organza to give the cloud ‘depth’. The chalk drawing, above right, shows the paths I need to stitch along; I think stitching rhythms into cloth by using the Kantha technique is a bit like patting your head and rubbing your tummy at the same time – tricky!

Weeks 4 & 5

I was determined to use this piece of work to try to find a way of controlling the outer edges of the appliqued fabrics; usually when I make very large drifting Kantha Stitched Skies I leave them to be contained and wrapped out of sight when stretching the finished work. But here the view is much smaller as this black cloud did not extend the whole length of the estuary – it faded out just beyond my window frame. I looked at Georges Seurat (who is a great influence on the way I have developed the colour mixing within my stitched work) and adapted his painted canvas frames – his dots are my stitches ). And eventually the marsh starts to emerge, using large straight slanting stitches

Weeks 6 & 7

However as the stitching progresses the different tensions start to exert itself onto the fabric – where the stitches are close together the fabric width starts to shrink, which is to be encouraged as this gives the curious patterns that I feel are so like air currents…. So the side borders are unpicked and the the whole embroidery is squared up. When I had almost finished stitching I outlined the whole piece using a machine stitch to give me a better guide for the dozens of running stitched lines for the frame.

The finished work “The Dark Cloud” approx.18in ( 45cm) square

My Last Dream Pillow: Don’t Look Down

          don’t look down!

These rapid drawings below are early attempts to express one of my most vivid dreams lest I ever forget it…. But the dream was not ready to be forgotten, it has reoccured often in one form or another – evidently I have not learned its message; the loosening ladder rungs and the tiny impossible blue window never change

the earliest drawing above on the left has some written comments that I was interested in using for the embroidery also I seem to have both shoes on; the one on the right is scaled up for embroidering on a sheet! What was I thinking?

Here I am again some years later ( the shoes are getting looser) climbing out of the chaos of my scribbled darning designs for a book that eventually never got published!!!!! with a burning heart to the right and no way back down that ladder. Circa 1998.

So I recently decided to embroider it as a pillow for my ongoing project Make it Through the Night . It is a simple idea and my friends who saw the drawing were highly amused by me in my nightdress losing my shoes…but I started this piece just before the lockdown and now I see it in a very different light.

The most recent drawing I made using a photograph of me in my nightshirt climbing on a chair.
drawing now traced straight onto the pillowcase in water soluble pen – all the drawings alongside

The interpretations of dream referring to ladders are many and varied depending if you are climbing up or down, and a broken rung (just the one) means “you will never achieve your greatest ambitions” while “to lose a shoe is indicative that you have forgotten something important ” or “finding your direction in life difficult” – and as to the lack of underclothes whilst climbing a very high wall in your nightshirt……

I found stitching the ladder the most challenging piece of work, a vintage pillow has only a limited space for inserting embroidery hoops and working straight onto fine linen needs stretching. I preferred to use some natural linen yarns and whip them into position making a more fluid line – finding knots and drawing them became a fascination.

above are the various ways I managed to stitch the ladder into position, with and without a stretcher.

Now to the window: in some dreams it is impossibly teeny tiny, in others I get to go through it – only to find a steep and shaky descent on the other side into more blueness, the one thing always in common is that it is always a brilliant and shining deep blue

the background of the sky is painted with cotton dye, then embroidered in silk threads, it is high up in the farthest corner of the pillow case

and here it is finished – washed, starched and pressed as a proper piece of Household Linen

I feel now that it makes its own statement without the added words; and why should it balance? I mean, what am I describing?

AND it is only after finishing this that I see this is a perfect portrait of how I feel right now – just coming out of the strictest lockdown period….uncanny!

However, we were well into the current lockdown before I had found the impetus to finish this work. And while stitching I realised that I just wanted to stop this whole project that excavates very personal ideas, dreams, mottoes, and observations….I did have more ideas that I planned to stitch, but now I no longer want to make them. It has taken me over 10 years, off and on, to get here.

Now I aim to celebrate….


Embroidering a Pansy in 3 dimensions

stitched pansy in silk thread- Libby Butler

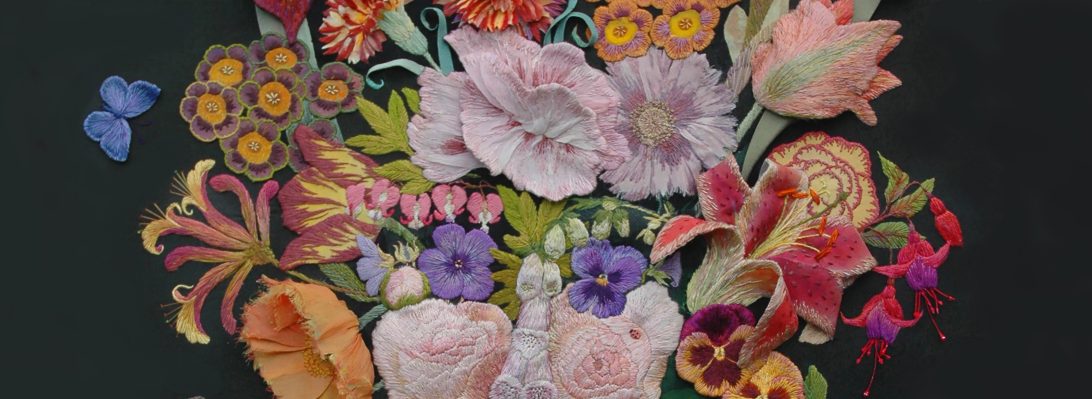
Stitching  3 dimensional flowers is a strange mix of observational drawing, refined stitching and alchemy; the transition of the flat stitched petals freed from their background and applied to form a flower is slightly surreal. I developed this particular skill while making the Flora Embroideries, using the pansy to metamorphose into different forms to develop faces.

winter flowering pansies

I had been asked by a regular Heart Space Studio student and volunteer, Libby Butler, to teach her to stitch a 3 dimensional pansy – her favourite flower, and knowing that she was a skilled embroiderer I agreed. What I did not know was if she could draw the flowers from life; this is the first essential stage as learning to select the colours and study the growth lines of the petals is most important to develop natural petal patterns – and looking really carefully to draw each petal really concentrates the mind for the stitching that follows.

selected pansy and the drawing equipment

Libby looked a little nervous when I handed her the jars of crayons after selecting her pansy – however after a nervous start she achieved a simple working drawing from which we could establish petal shapes and colourings, now to move to the fabrics….

simple drawing of the Pansy face

Now to the fabrics – first a thin silk fabric was selected and the individual petals from the drawing were traced onto it in pencil,  a light dye was then applied with a paintbrush to give a background colour.

dyeing the background fabric for the petals

When the dye was dry, a heat transfer fabric adhesive was ironed onto the back of the fabric and each petal was cut out and ironed onto a very fine silk gauze and placed in a small embroidery hoops ready for embroidery – the edge of the silk petal means that the stitches have very strong definition which will be needed later for cuttung out. The silks were matched to the drawing colours and using one strand only, the embroidery was started…

embroidering the individual painted silk petals

Libby worked one  whole petal (see above) by the end of the first day of the 2 day workshop, she then had 1 week to complete the rest of the petals…..she took the drawing home to work from – the drawing is what she is following not the real flower – this is why the drawing needs to be really carefully observed

stitched work brought in to the second session

On her return I found that she needed to work a fine blending thread over the transition between the dark purple and light yellow of the pansy to make it look natural but this was quickly achieved – attention needs to be given for the direction of  all the stitches so that they follow the lines of growth of the petal – but it is easy to see in bi-coloured pansies.

the embroidered petals are cut out

Once the embroidery was complete, the back of the fabrics was once again bonded with heat transfer adhesive and each petal cut out leaving a small area of surrounding silk. Each  petal was then pressed from the back while being stretched around the its edge, this sets the stitches and gives a very life – like undulation to the petal edge – but the stitching needs to be very dense to allow this to happen…..then taking courage in both hands the extra fabric is VERY carefully cut away – the bonding keeps the threads in place.

holding the back petal snipped and waiting to be pressed.

Now the flower formation can begin. On a fresh and final background fabric the original drawing was traced using a water-soluble pen, then each petal is embroidered into position starting from the back, only the middle area needs to be attached – the petals must be left free from the ground

attaching the petals to form the flower

The actual assembly does not take very long but it must be carefully structured so that each petal overlaps the one below it, the original drawing is again of vital importance to this process.

work in progress with an old embroidered sample we used as a stitching guide

Eventually each petal is placed and the inside edges of the of the petals are  is built up and over-sewn and a single central stitch finishes it – Da Da!

the final flower seen against the original drawing