fabric and buttoned flowers - Teresa Searle and Janet Haigh
Textile jewellery comes in all sorts of styles and fabrics, there seems to be a definite trend developing at Heart Space Studios for all types of textile jewellry classes and they are really popular.
felt and fabric beads by tutor Patricia BrownenThe very first class that we ran was making fabric beads with Patricia Brownen and we are running these classes again later in the summer; the mixture of wrapped threads, beads and felt makes for really luscious beads that are simple and surprisingly quick to make.
woven ribbon rose brooches - Janet Haigh
Next Saturday, 21st May, I am giving a workshop on making ribbon flowers, these are really simple, and can be used for all sorts of different things, brooches (as above) stitched onto hair slides, made into cards, or attached to a present, or even a small everlasting posy. I will demonstrate 3 techniques, woven as the rose above….
stitching ribbons as silk petals
stitched with fine ribbons or
ruched silk and organza flowers
ruched…it all depends on the quality and colour of the fabrics used that makes the difference to the flowers and at Heart Space Studios we have lovely and unusual vintage fabrics from which to choose..Hopefully I will show the results of the class in a future post – so watch this space.
wrapped and buttoned bangles - Teresa Searle
Meanwhile several of the other tutors also running fabric jewellry classes.Teresa Searle is taking a class simply called Textile Jewellry, on Saturday June 11th and her ideas look lovely.She has more varied ideas than me as she makes bangles, brooches and necklaces.
2 necklaces by Teresa Searle, one flowered and one scrappy fabrics and beads.
Two other tutors are making jewellry with felt, Janet Clarke, our regular felt-making tutor has designed simple and elegant round seamless felt bangles which you just want to make and wear several together. you will have this opportunity later in the summer. She also produces curious felt “stone” brooches – light as a feather but perfectly formed by her immaculate techniques and then there is the blue ‘alien’ brooch – see below…..
Whole felt bracelets by Janet Clarke shown with her felt stone brooches and her 'alien' threatening Debbie Bird's beaded felt heart brooches with one of my own appliqued ribbon and felt stitched badges
Debbie Bird makes brooches and jewellry from all sorts of stuff in her popular classes”Wear your Heart on your Sleeve”, below is a student’s first attempt at needle felt with machine stitching.
needle felted exotic flower - made at a previous Heart Space class.
Debbie’s next class is on 28th June, for all those who feel they might like to try her varied textile techniques to produce really personal jewellry.
Indigo dyeing - Heart Space Studios' alternative to washing
Heart Space Studios went blue last week – indigo blue, our first Shibori dyeing class by Teresa Searle who is a textile designer maker and author and now developing new workshops for us, her next class is textile jewellery and she is working on a course in experimental stitching for later in the year. When I walked into the class at mid morning there was plenty of experimental stuff going on.
starting the process and taking notes.
There were stones, elastic bands, thread, and all kinds of fabrics being worked on, from embroidered silks…..
Chinese embroidered silks tied with elastic
to cotton dusters.
cotton duster gets the same treatment
I even found someone stitching.
stitched dusterruched duster
The fabrics were also being wrapped around tubes and tied in a seemingly random fashion – I could be wrong – it may have been very mathematical.
tubular elastic resist - in more ways than one
After the morning’s work spent wrapping and tying all the fabrics were into put water to soak
soaking samples
while I organised lunch
lunch in the front studio
Simple lunches are always provided at our whole day workshops, I have found that eating together gives everyone, usually all complete strangers, a chance to catch up and see who does what, and very often as this is a local venue, find that they have all sorts of things in common other than a love of textiles. The food is kept simple – salads, soups, decent breads with fruit and cheese and we always cater for tricky diets – most of us have had allergy problems ourselves. Also it makes the whole experience more of a treat, students can just concentrate on the class for the whole day. Apparently this group thought they were getting wine when I brought out the stemmed glasses – fat chance – wine, then in charge of a dye vat! I don’t think so….must get new glasses to save further disappointment.
dip dying for gradated colour
Then outside to do the actual dying, the indigo needs oxygen (and it does tend to stink) to make the reaction from deep green to that beautiful singing blue…watching the colour change is always fascinating. Teresa gave a simple and informative demo and explanation of times and strengths of dye, rigged up a washing line and let them all get on with it while being on hand to help, everyone was so excited – especially me.
immersing the rolls of bound cloth in the dye bath.
The dyed pieces were then left out to dry, while the students got on with more experiments.
dip dye developing colour
colur developing in the open airFrustratingly I then had to get back home to meet and greet my own studio visitors but Jan Connett, one of the founding members of Heart Space Studios, stayed with the group and took the following pictures for me.
the most exciting moment - unravelling the ties
I wish I could have seen the faces of the students when the first ties were being pulled off – pure magic – as are the finished results.
unfurled wrapped fabric washed and hung out to dry.Wow!
If you want to try this with us keep checking theHeart Space Studios website for the next classes, Teresa is planning some different typed of shibori dyeing classes for later in the year.
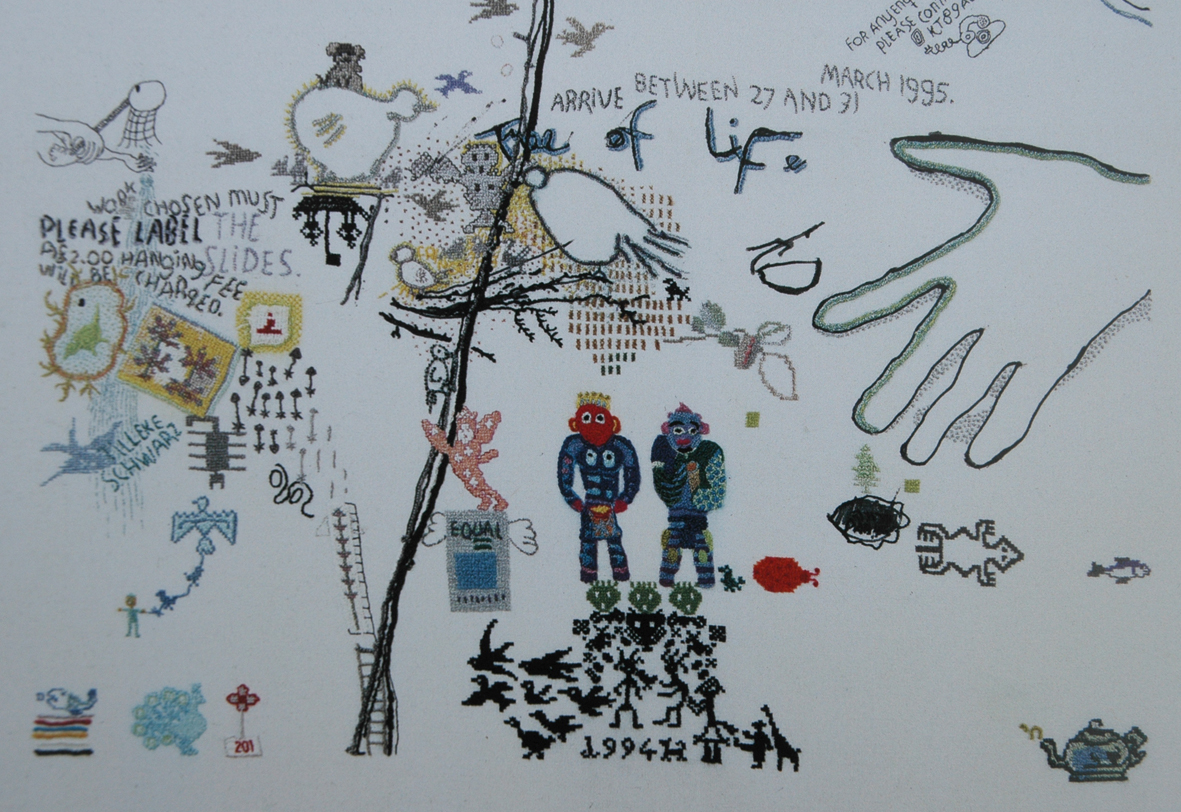
You know when you go to a textile exhibition and you just want to run away? I quite often feel like this for all the wrong reasons; but visiting ‘Word Play’ in The Museum in the Park at the Stroud International Textile Festival, I really wanted to just go home without seeing any of the other exhibitions on display throughout the town. The reason was seeing several hand embroidered panels by Tilleke Schwarz, some older works but one made this year.
I at once thought this will make a wonderful post because I was so freshly excited by seeing in the flesh – so to speak – work that I was already familiar with and this made me re-think what I was actualy doing within my own practice. So I asked permission to take photographs explaining that I wanted to show and discuss the work in my textile blog. But it was stipulated at the bottom of a sheaf of gallery documents – No Photography – even though I had already seen people taking photographs in the gallery……but in matters of copyright and blogging I really try to get permission were possible. So the work I am showing here is from my much thumbed copy of her excellent book Mark Making, copyright 2007 – ISBN: 978-90-70655-54-9 available from her website.
But this refusal wasn’t the reason I wanted to run – to say I was envious doesn’t quite sum up my feelings sitting outside the gallery later and waiting for my buddies from TFSW to take part in a Tea and Textiles walk round the Stroud exhibitions, what I was feeling was deflated. There was this wonderful set of work in a room full of other interesting works, some of which I know well and I felt dejected; why?
The exhibited works for the most part all had words in them, but some didn’t – more mark making or signs from Clyde Oliver – who showed handsome large lichen covered stones that had been drilled and stitched and I really did want to own one. Jess Turrell ( who I know well and is a member of the Stitching and Thinking group) showed her exquisite etched and enamelled words pieces; they somehow always make my gaze slide over the words when attempting to read them, so the surface of the objects becomes very important – even though I know this isn’t the maker’s intent – or is it? And then I realized that only in Tilleke Schwarz’s work, were you made to stop (even when the words are in her own language) her myriad amount of details make you attend to the work, stay in the moment, see the world from her varied and personal view points – which for the most part are humorous, wry, colourful, hand stitched, multi-layered, and ultimately worthy of prolonged attention.
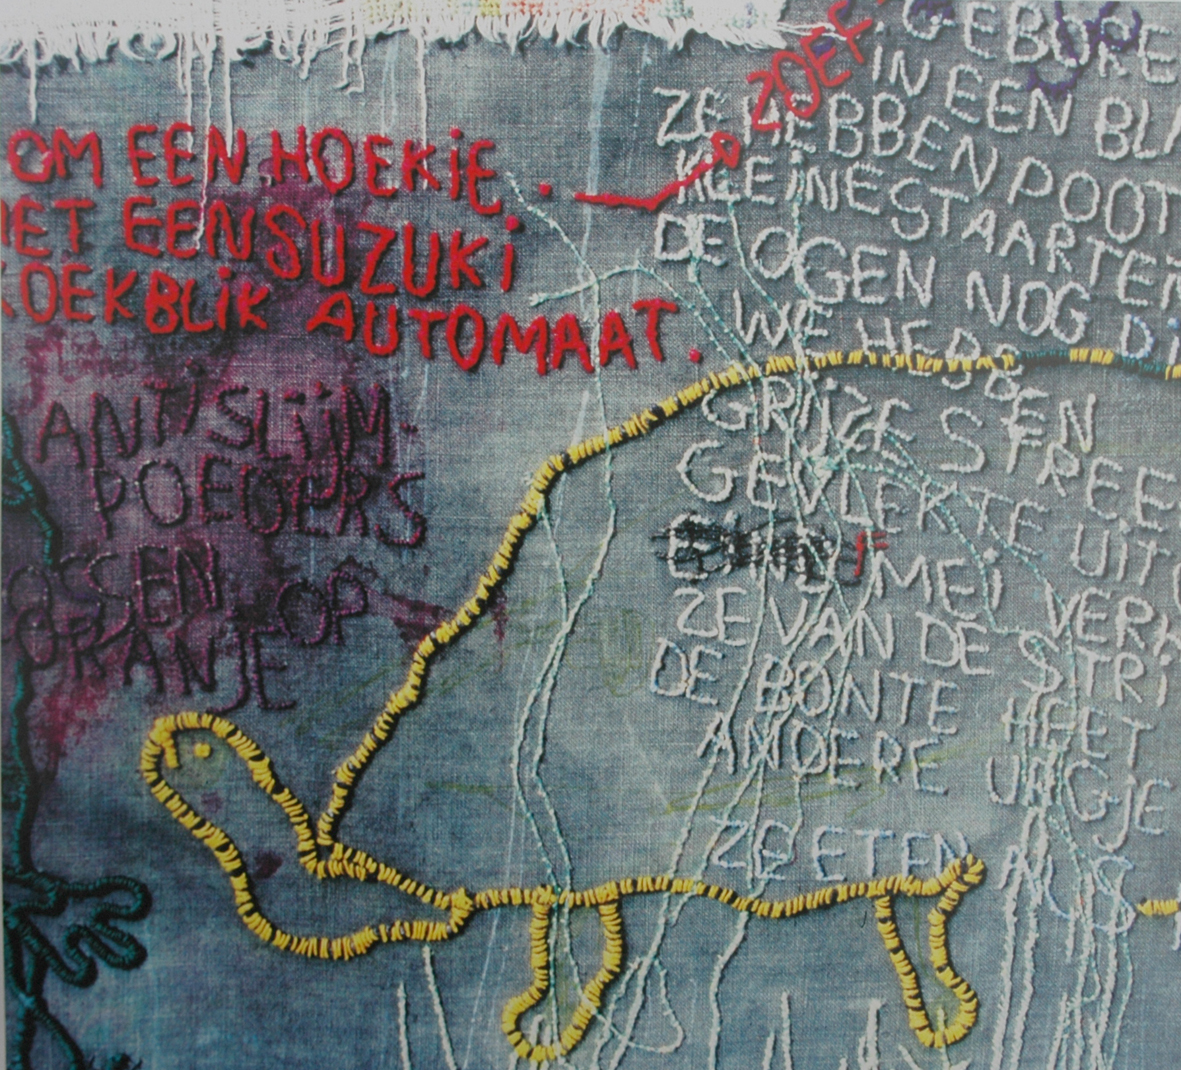
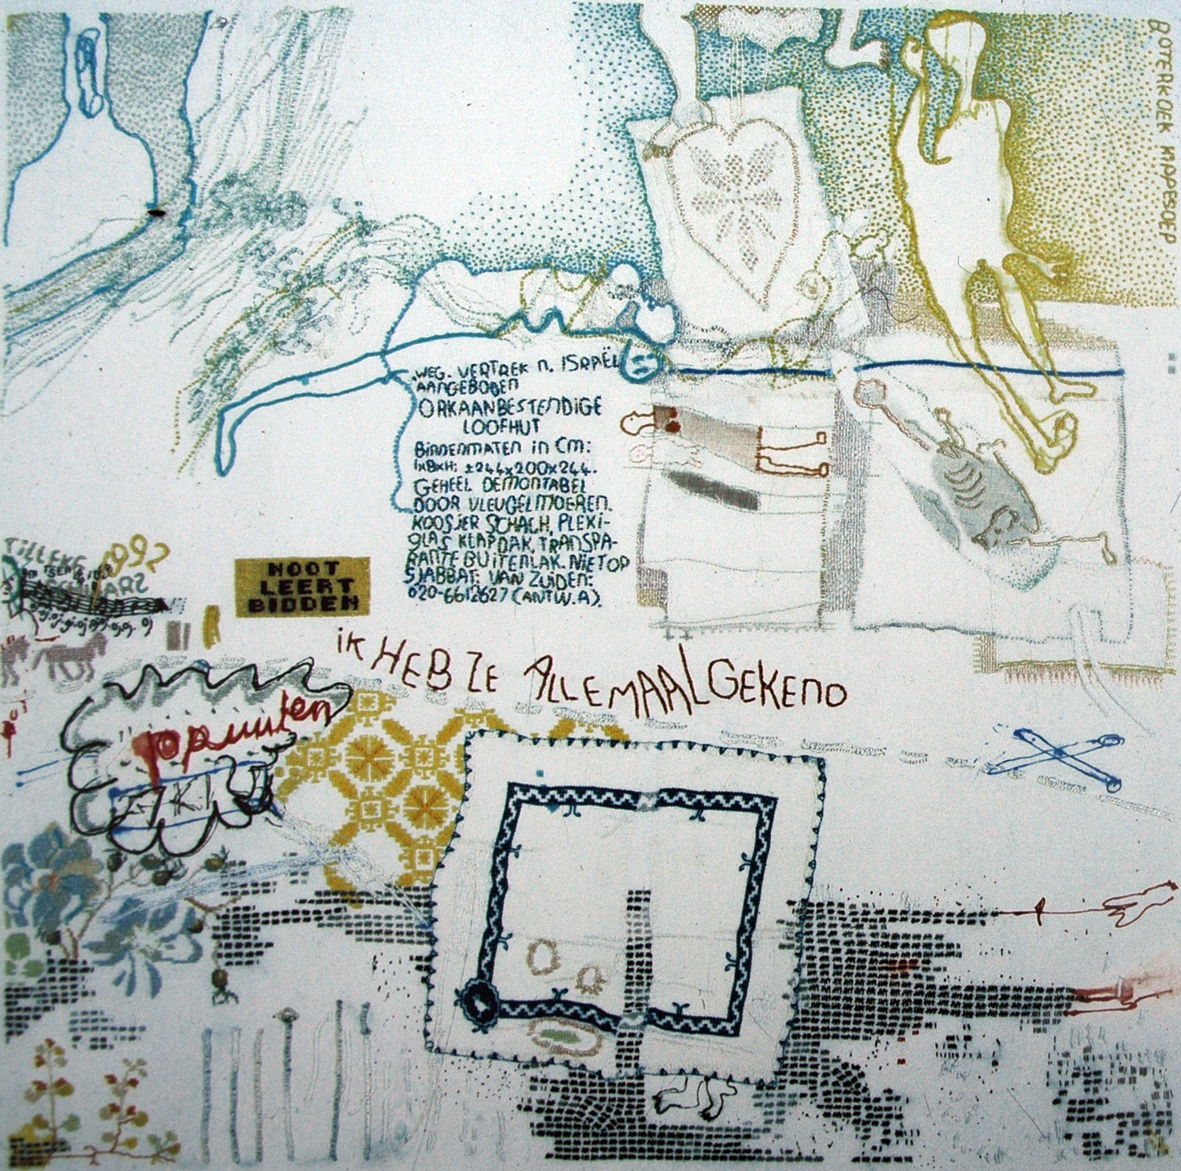
And what I did discover when looking at this work was that it was the actual stitched surface, the haphazard motifs and slogans made in a whole range of traditional hand embroidered techniques, that make you attend. The sheer variety of stitching techniques means that it is never tedious to try to decipher her images and messages, in fact they just make you smile in recognition as some motifs are from traditional stitching samplers and appear time and again as do the commonplace overheard remarks or slogans.
These are perfect samplers for our times, wonderful regenerated versions of our European embroidery heritage, made in the image of graffiti – the little cross stitched pairs of birds, the signing alphabets, the daisies and carnations, as well as couching, running stitch, back stitch, seed stitch, all subverting the past rigidity of teaching needlework to girls; no wonder our stitching hearts sing when we see them. These seemingly untidy stitches are perfectly controlled, the couched down ravells of thread are meticulously held with the tiniest of single stitches – this isn’t slipshod work. Stitch used in this way seems to me to embody the energy of our increasingly overloaded visual world, and as the stitch changes depending on what is being depicted, the sheer mastery of the maker’s own language of hand stitching is demonstrated. And this is what made me envious and questioning my own way of constantly changing materials and techniques – why haven’t I just stayed with the needle and threads and fabrics? Here the modern, fast- moving, hectic overloaded visual world we live in is illustrated in one of the oldest and most traditional and slowest textile techniques, hand embroidery.
But more than anything else, what completely got to me about these works was their freshly washed, starched, ironed and ultimately immaculately presented surfaces. Here is our domestic heritage for all to admire, here is a woman proud of her work and wanting us to see it at its very best. I could almost smell the clean fabrics and I could imagine the time consuming preparations of the cloths so that the framer had very little to do but simply place each work into position and seal the back.
And now I hear you ask, how come you have been able to use these images from a book which is subject to copyright? Well yesterday morning I emailed Tilleke Schwarz, because on her website she says to contact her for permission to use any images. I really did not expect to hear from her for some time, if at all….but by the afternoon I had a reply saying that due to phone cameras it is virtually impossible to keep track of taking photographs of work any more…..if only I had the time to go back to the exhibition this week armed with this information – but my own Open Studio calls.
I have not been posting blogs for some weeks and above is the reason. I decided to do this open studio for North Somerset Arts Week early last year when life was less hectic i.e. before I opened Heart Space Studios. So for 2 weeks I have been playing catch up. In fact I am still so busy that I am writing this between meeting and greeting visitors on the second day of open studios event.
small section of enamelled sculptures in my spring garden for Arts Week
I have an enamelled garden in situ all year round but it needs bit of repositioning for the open days – so the first thing I had to attend to, well not me exactly – my niece Julie Dunn (who runs Trug, a garden design company) was happy to come and help me – she spent the whole of Easter tidying and replanting my winter ravaged garden into shape.
Julie hard at work in the ravaged garden
The other more major concern was that I had no new work to show for the Severn Sea Artists group – I had intended to make a series of enamelled panels of the coloured skies of the estuary – but time was running out – but I just had to get these made somehow. So I set to work, first I made some simple striped embroideries to get me thinking about the colours again and from these flowed the enamels skies.
embroidered silk evening sky
embroidered silk dawn sky
I started work using the samples I had done but informed by the 8 or so silk embroideries I have made to date. Back in the enamel studio I assembled some large strips of copper and drilled them so they could be strung by 2 wires not exactly stitched but much quicker to make…..
strips of copper annealed ready to be enamelled with one I made earlier
working out the colour striations against an embroidery on the floor of the studio!
I decided to liven up the stitched areas with beads, this has made me rethink how I may make some larger pieces in future.
beading the wires to connect the panels
The finished pieces are small and irregular as I made them out of random off – cuts of copper I had left over from other projects. I had intended to show these in the garden but I decided to show all the other work with them including the early research drawings.
the finished enamel panels in the exhibition in my cleaned up enamel studio
meanwhile back in the garden the larger enamel panels are displayed, I would really like someone to commission me to make a sky on this scale…….
larger patchwork enamel panel and flowers
enamel pots of flowers and topiary
But the main part of my exhibition is inside my tiny conservatory
inside the enamelling studio/conservatory
view through my husbands exhibition into the enamel room
I am sharing the open week with my husband Stephen Jacobson who is showing his paintings of the estuary and we are members of a group of 7 artists who use the estuary as inspiration, called The Severn Sea Artists we have made a trail from one venue to another and I made textile banners to advertise us, I am hoping that they withstand the gales that are blowing down the estuary this week.
I have actually managed to sell an embroidered sky between the times I have been writing this post this morning – way to go!
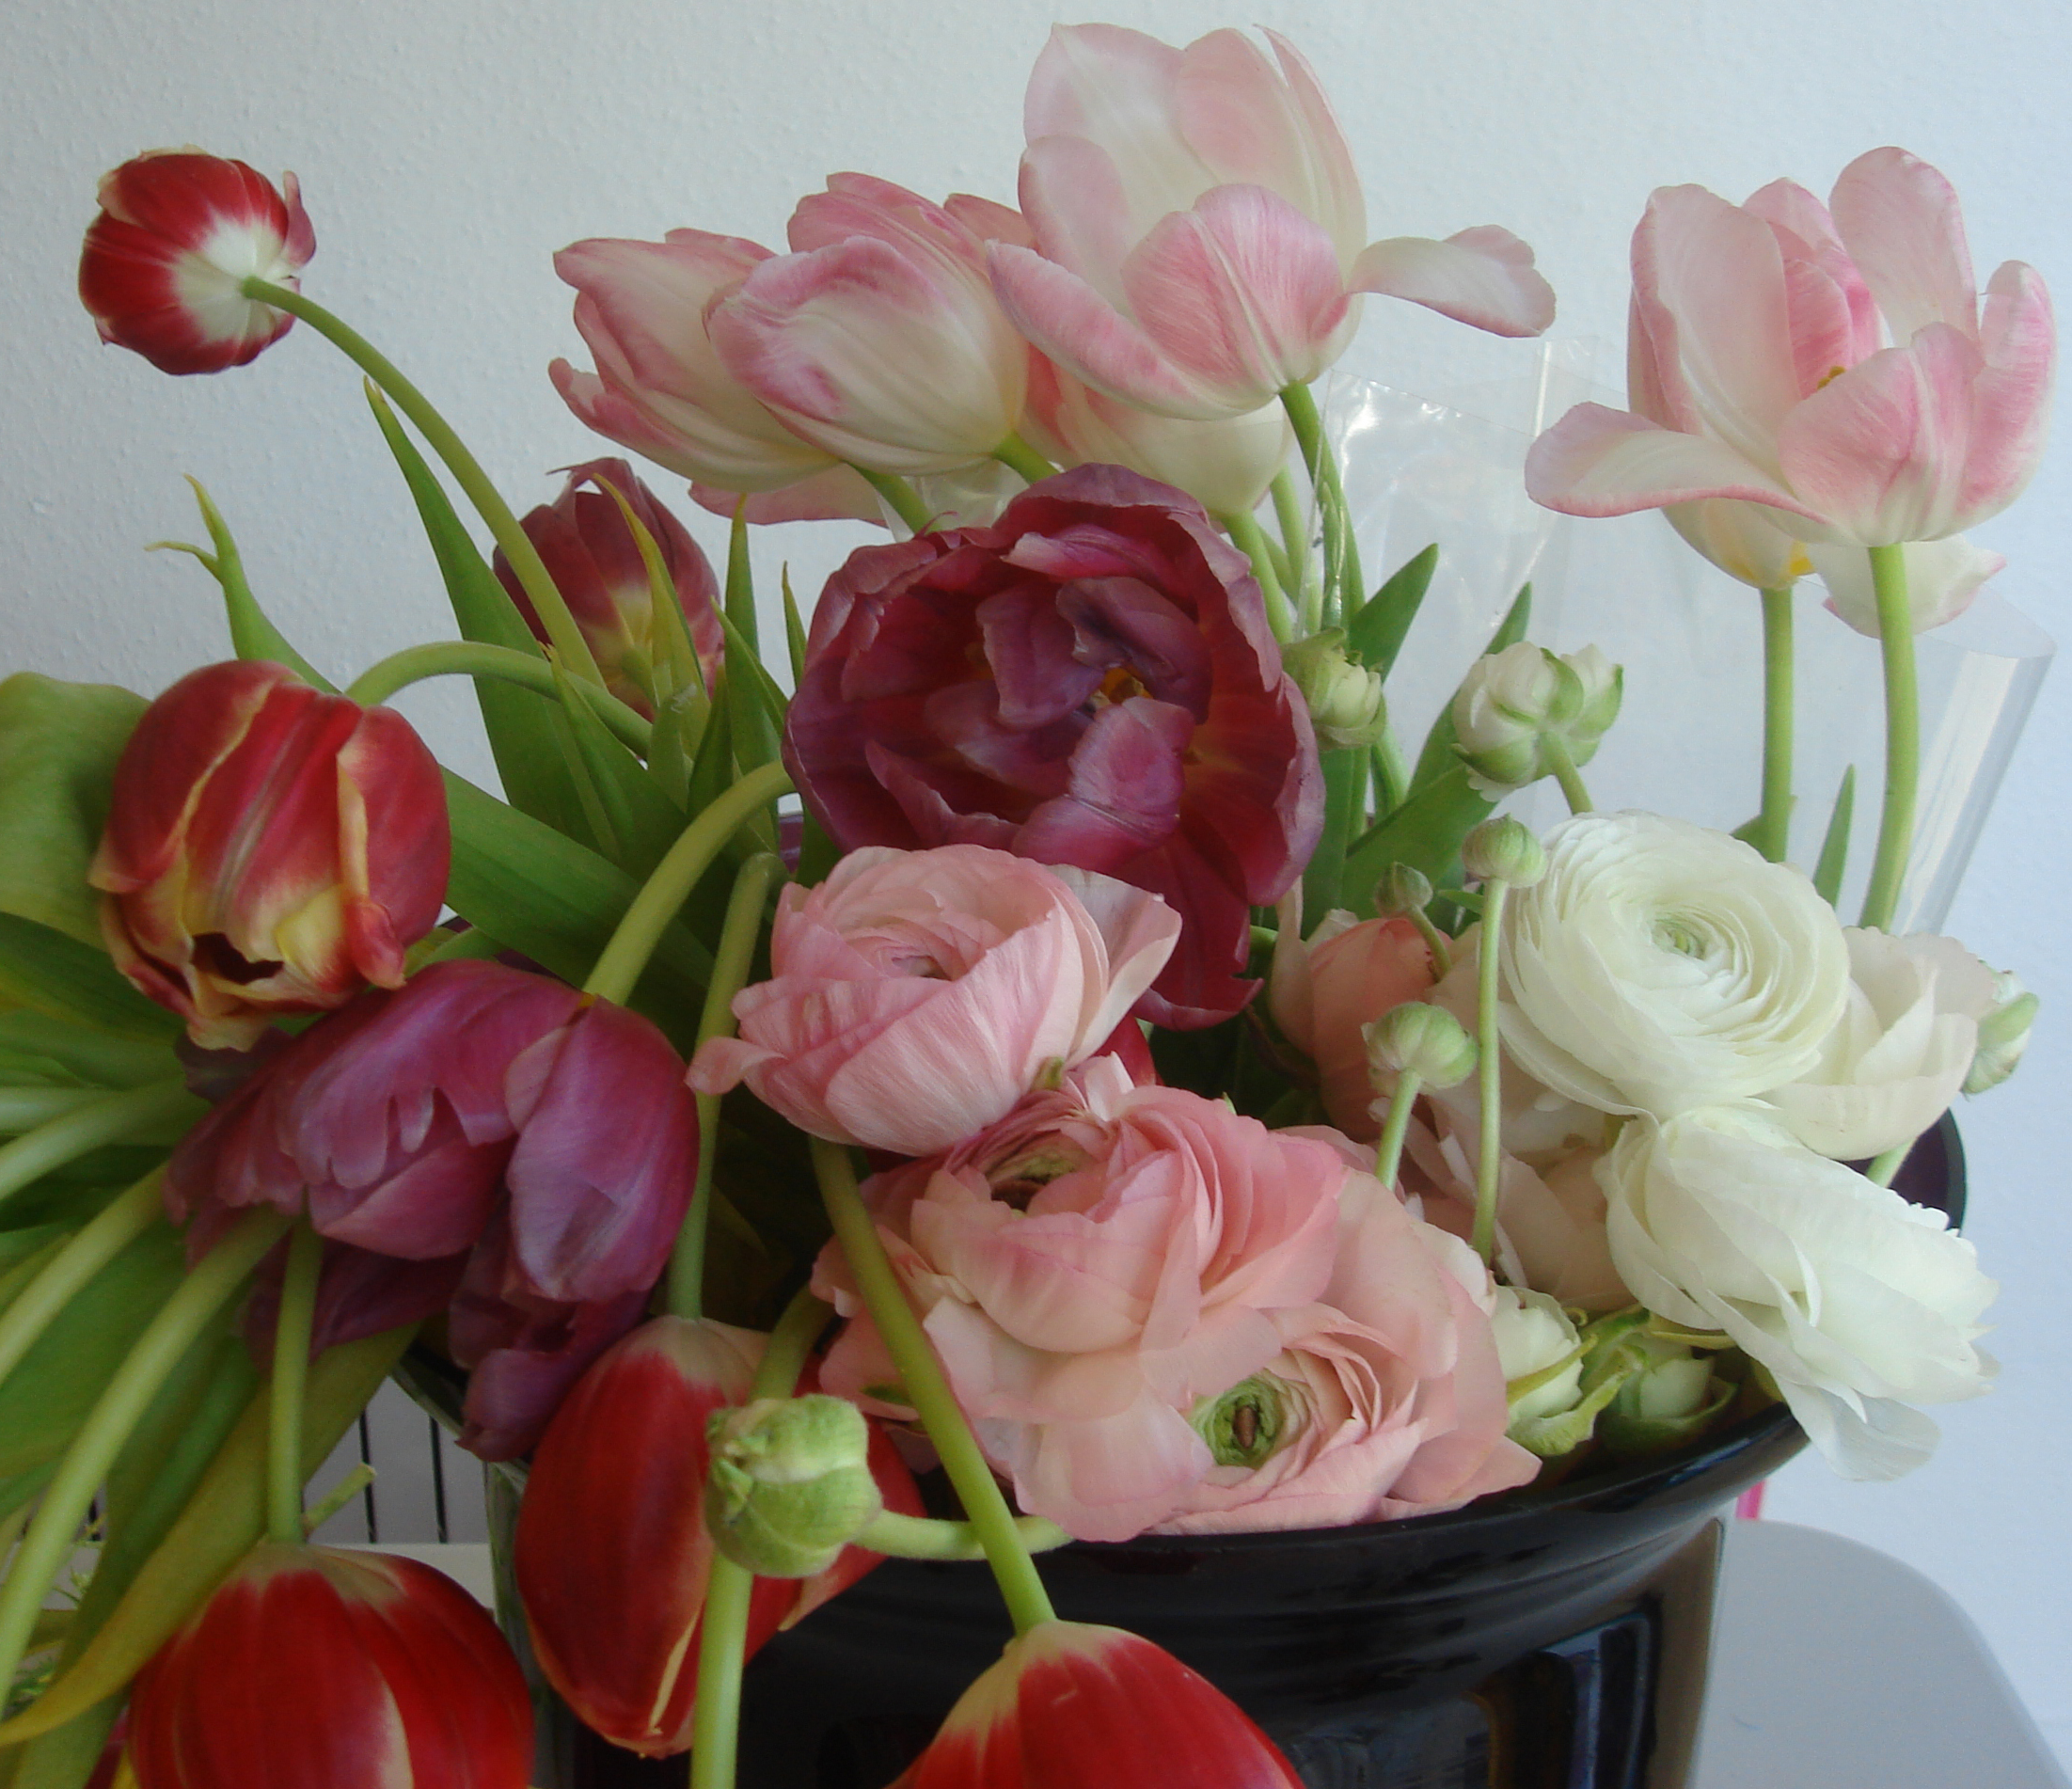
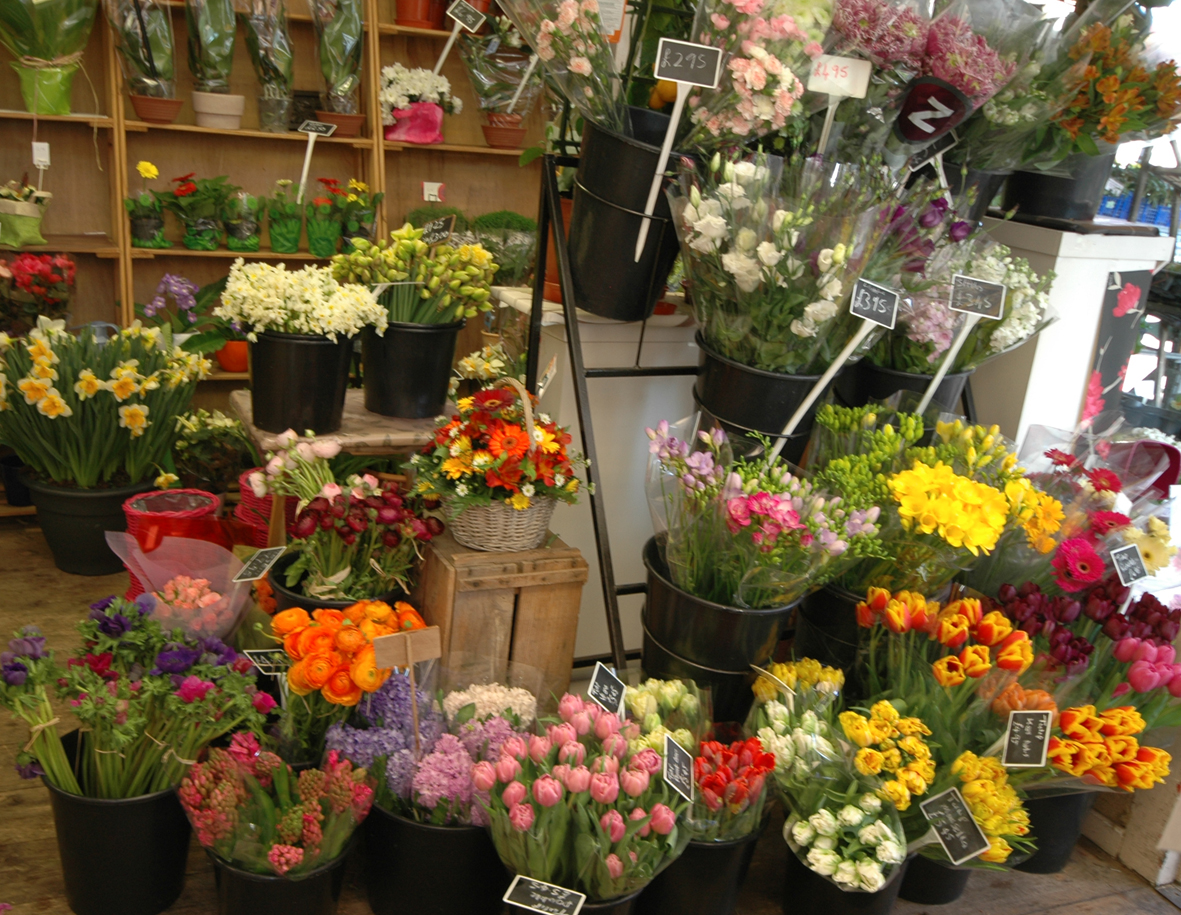
I have just given my first “Flower Drawing for Stitching” class at Heart Space Studios – to just 2 people – still early days for the new textile workshops but I have committed to teaching everyone, regardless of numbers, for the taster days, ie. one day workshops to whet the appetite for the longer 6 and 10 week classes. But the first thing I had to do was to go and buy the flowers – always a treat. I asked the local florist, Barry Toogood, for some dying tulips and he didn’t look at all fazed but immediately went to the back of the shop and produced 2 lovely bunches of floppy stemmed tulips – for free.
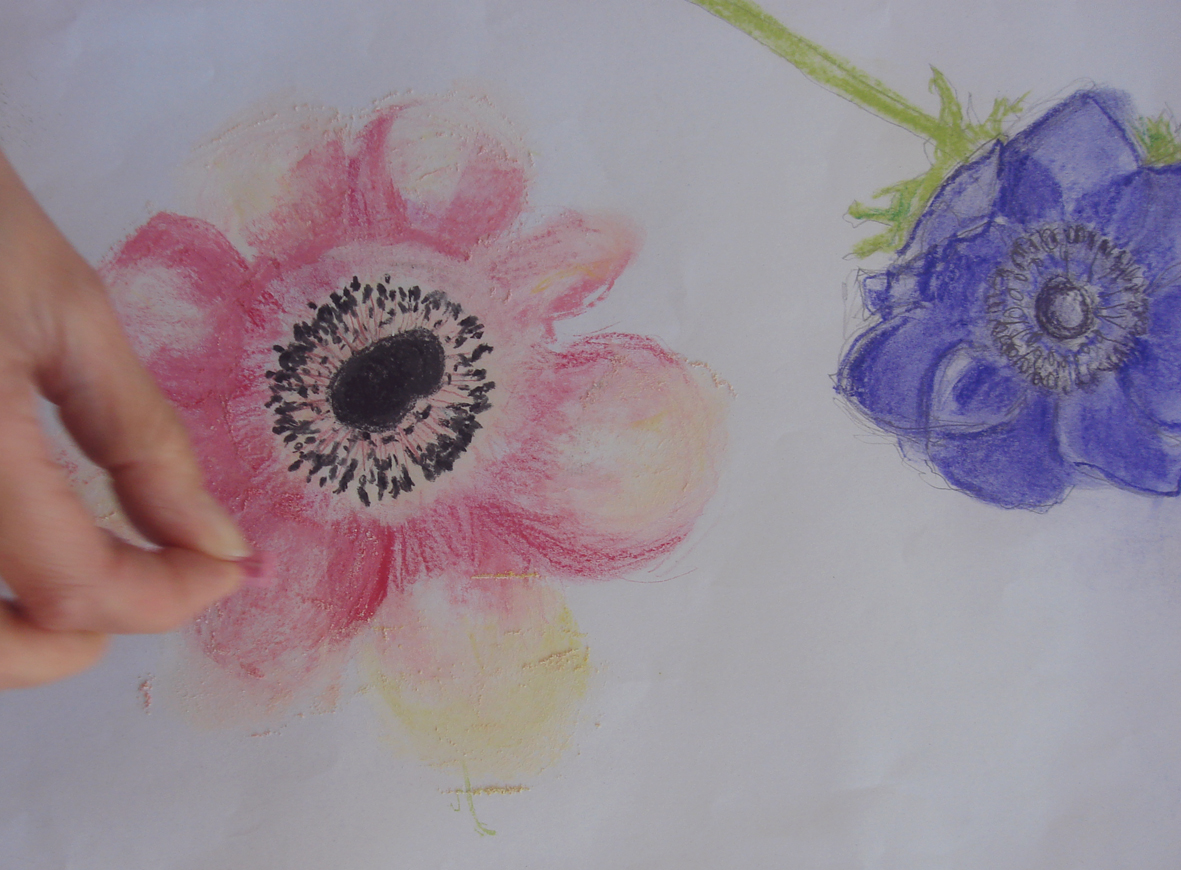
I also bought, ranunculas large pinks and whites, and a bunch of my favourite florists flowers ( on account that I cannot grow them myself) anemonies – in MIXED COLOURS – these are difficult to find now as the style police seem to have gained control over anemone growers so that they are often sold in bunches of one single colour – what a ludicrous thing to do – surely what everyone loves about anemonies – apart from the sooty black centres, the undulating stems and their ruff of brilliant green petals – is the wonderful mixture of glowing clashing colours; magenta, purple, crimson, palest mauve, softest pinks and whites suffused with lime and pistachio.
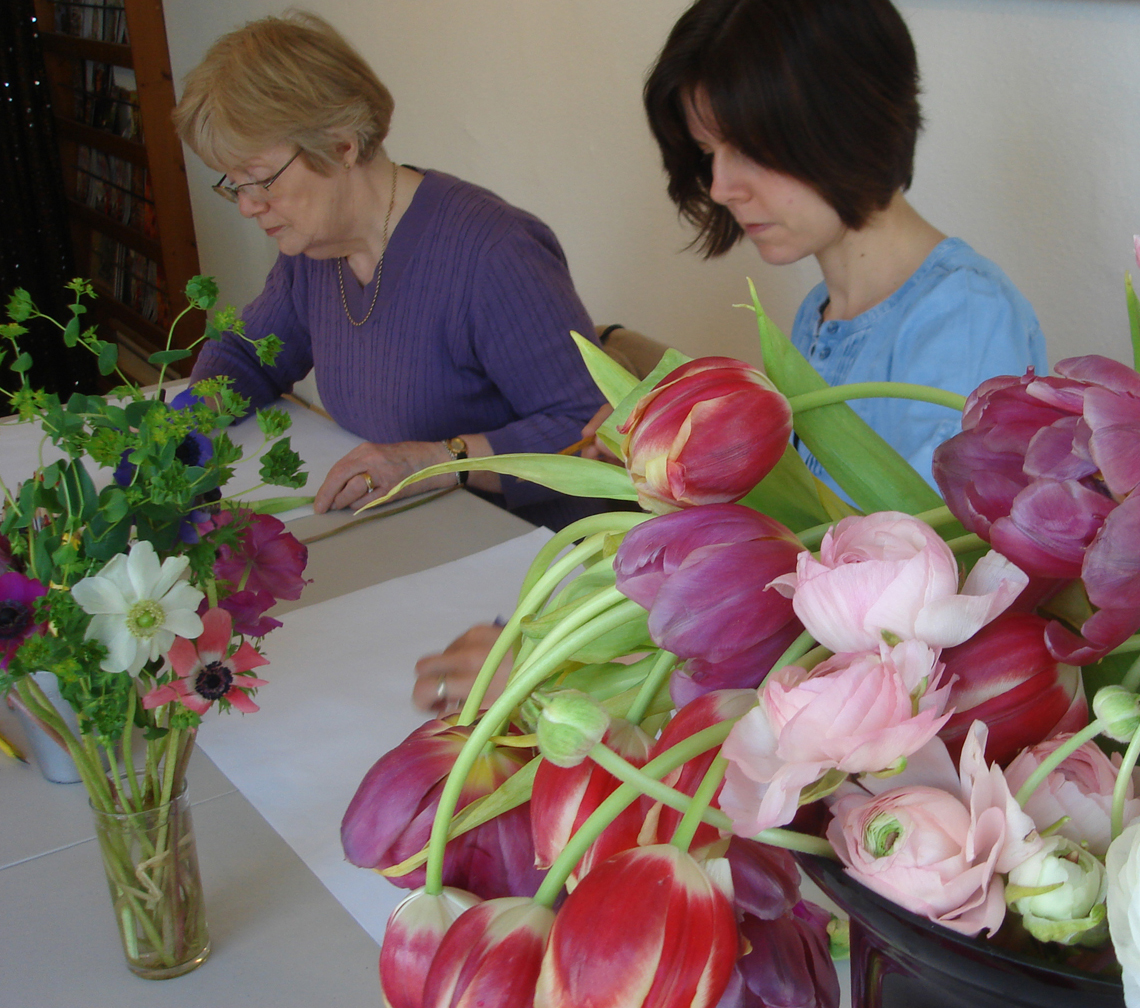
My two students had totally different attitudes to the flowers and the way they worked; but they both started off in exactly the same way when I asked them to choose one flower and just draw it for 10 minutes ( I always like to see just what people do when left alone, it tells me so much even though everyone is always very nervous when they start to draw in classes).
And 99% of people I teach always pick up a pencil, draw a shape and fill it in with colour, which is a waste of time and deadens the drawing by “filling in syndrome”
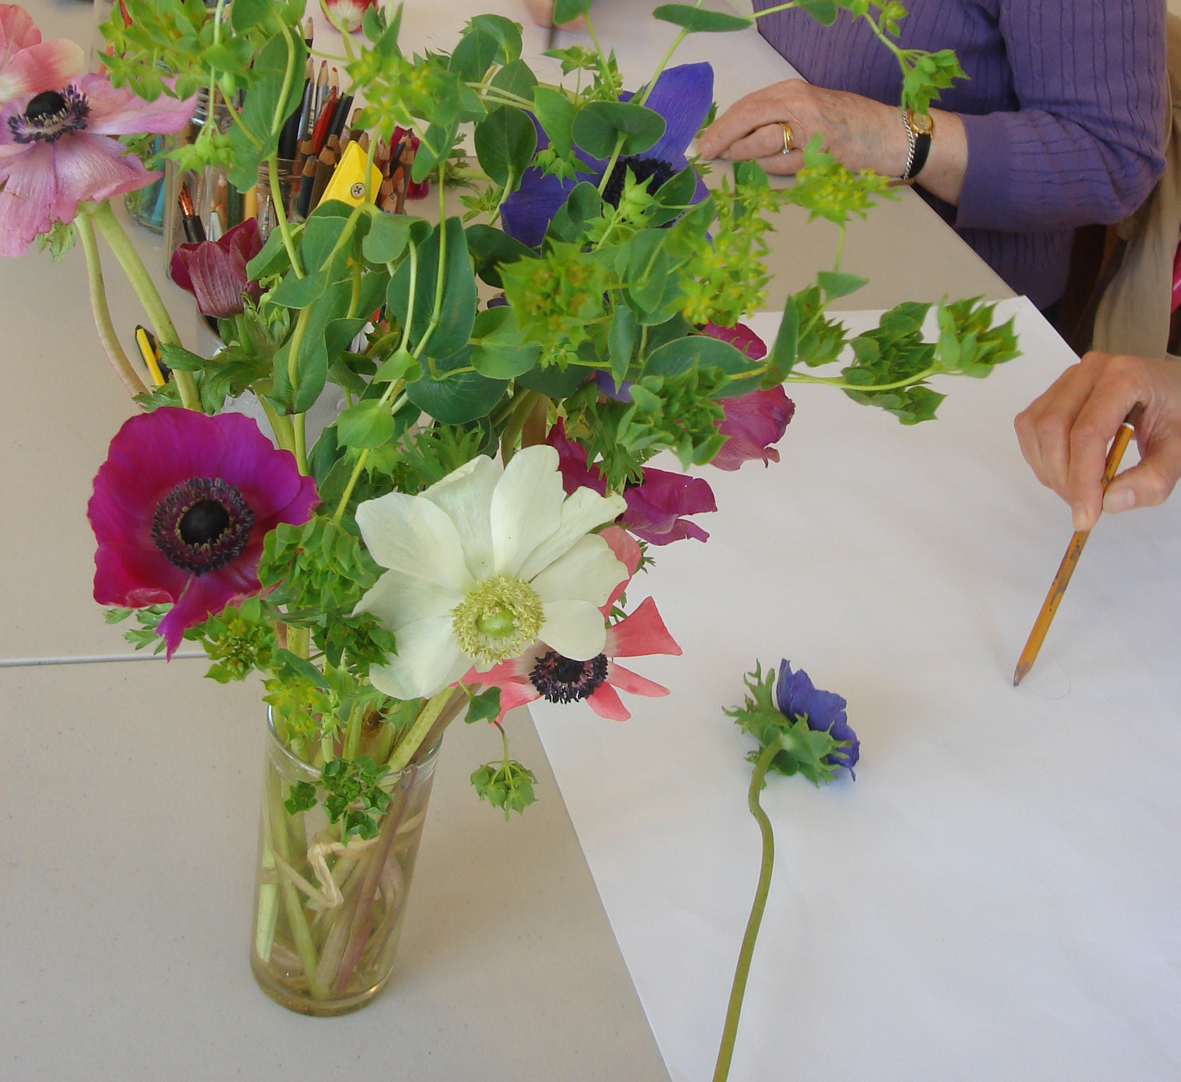
Occasionally, very occasionally, the colours are picked up first but I always start with the colours – I mean – what is your first response to most flowers, apart from scent which we aren’t dealing with here? So my first exercise in drawing classes is usually colour blocking then drawing outlines.
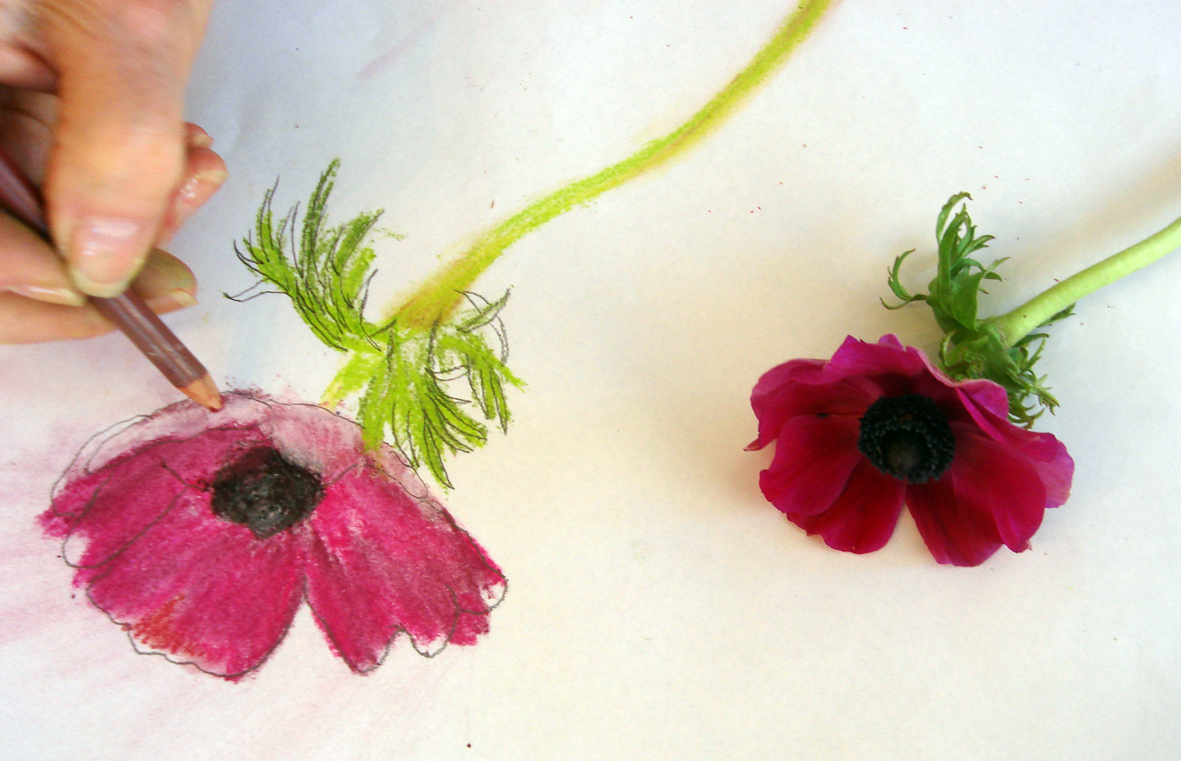
I must admit they were both very diligent with my ‘strict mistress’ teaching style, and were soon developing lively studies to develop embroideries later.
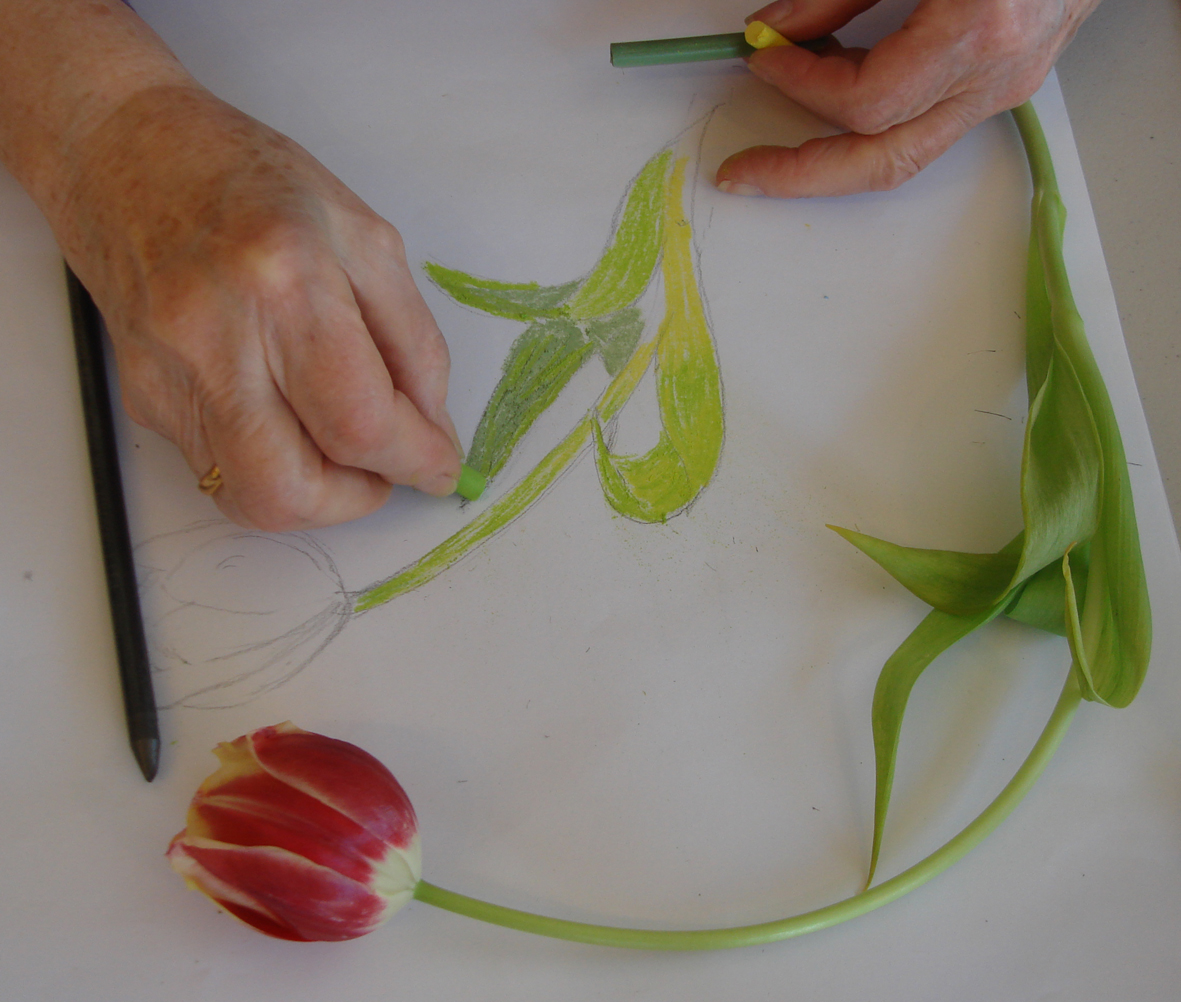
Choosing different media to suggest different surfaces also controls the scribbly or nervous “one of these lines must be correct” type of drawing.
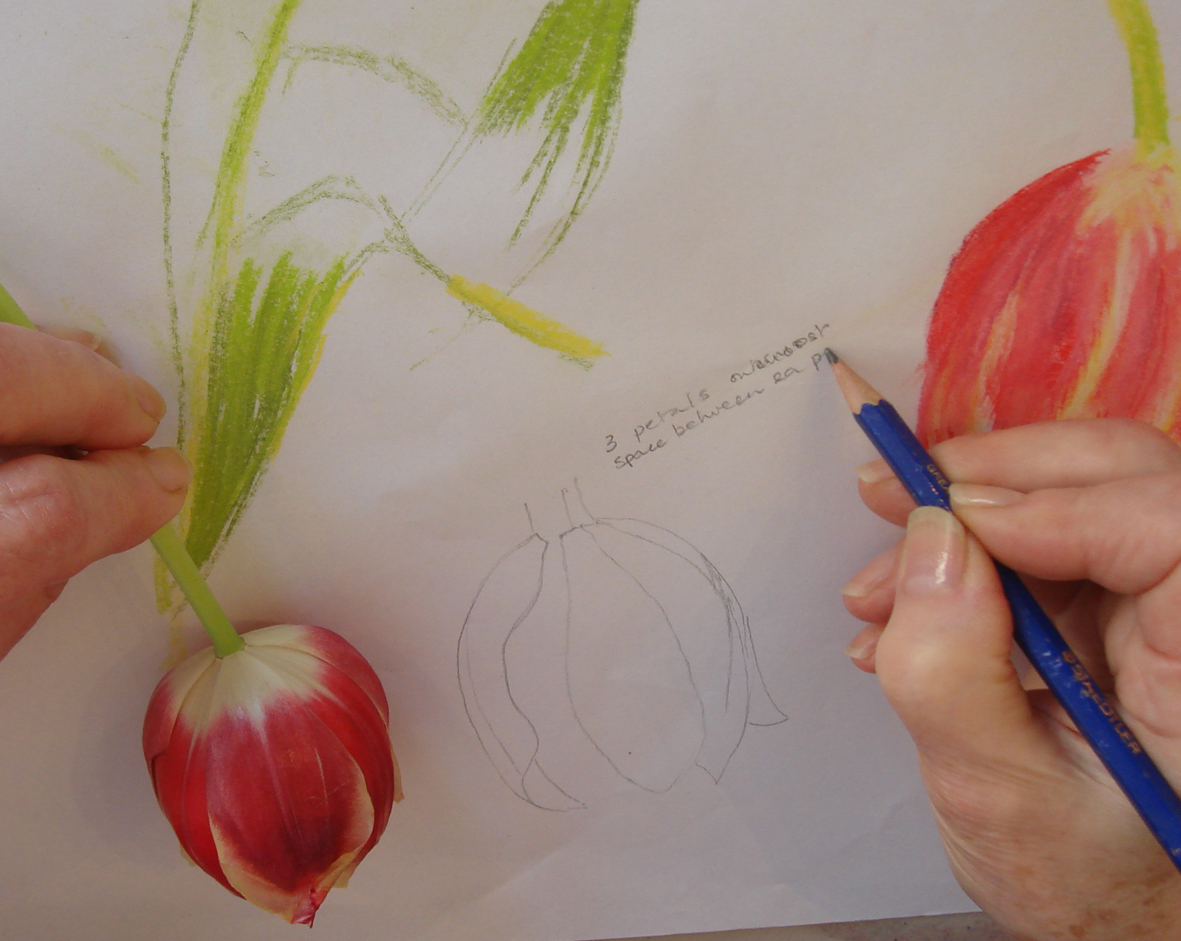
In the afternoon each student had to choose a drawing to stitch…and put the flowers away….this really tests the observational studies.
Ann White carefully made some line drawings and notes about petal sequences and the results of her studies carry her through to the applique stage where she was able to use her lovely marbled silk that she had brought with her from another course.
I learnt a lot from this class myself, timing is essential if students are to achieve a decent piece of work in a day…it proved impossible to finish such an intensive set of research and sampling in the time, even though these students were experienced before they came to the class – so I need to adjust my way of working for the short classes but observational colurs and line drawing will always remain the starting point for flower embroidery.
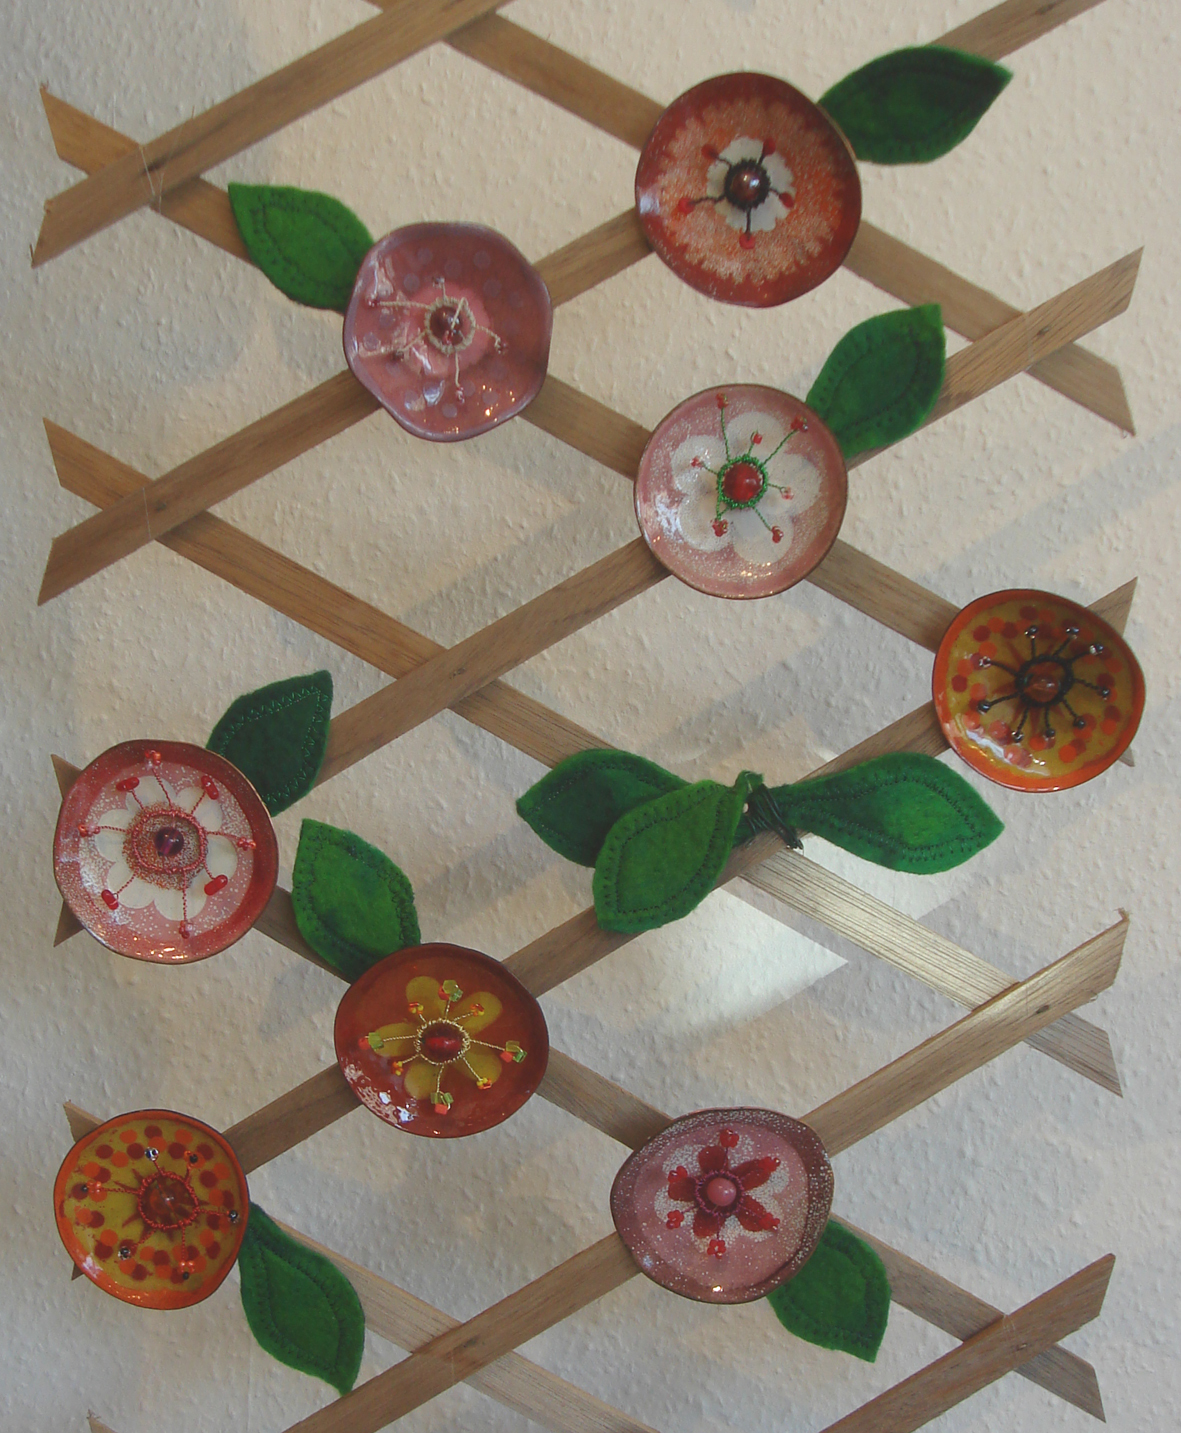
But one of the real joys of teaching in this new studio, is meeting like-minded people, and to prove this point Sue brought a piece of vitreous enamel flowers on a trellis that she had made at another series of classes in Bristol. I was so impressed and delighted and not a little envious of her work – as it seems much wittier than my own enamel flowers – that they now hang in the Heart Space Studios window.
map showing journeys of delegates attending the TFSW conference
Last weekend all the samples for the Mending at the Museum project was exhibited for the very first time. They were exhibited at a conference, ‘Mapping – Where Are You Now? – held by Textile Forum South West. Dawn Mason, my collegue and I have been out and about lately giving papers and exhibiting the work achieved by the Stitching and Thinking group. Two weeks ago we gave a joint paper at a symposium on current textile reseacrh for the Textile Society (where we were applauded for developing new methods for practice based reseacrh)and then Dawn gave a presentation at the conference that had the joint themes of mapping and networking.
samples shown at the one day temporary exhibition at the back of the conferecne hall
The conference was very lively and most interest early on revolved around Chrome Yellow Books – even as they were setting up people were browsing and buying – including me.
Chrome Yellow setting out their wonderful array of desirable books
This was really more than a conference as we had many hands-on opportunities to network, notably Kirsty Hall the blogger who helps you to blog better – if you want help to get started or develop your website or blog – visit her sites – or just visit her sites for really lively ideas and projects.
Mapping TFSW members to help members see who lives near them and where we all are now - Taunton
The mapping project was a good opportunity to show everyone present just who was near to them within the south west – the big pompom in the middle is Taunton where the conferecne was held about the centre of the whole region. there was a whole pom pom vibe throughout the day – to find out more go to our TFSW website
pom pom making classes at the mid day break
And there was also a fascinating small set of strings of hanging hearts from the Heart Felt Project, run by TFSW member Jan Connett
Heart Felt hearts
But for me the tiny exhibition of the Mending Samplers was a major triumph, it has taken 2 years to get the Stitching and Thinking project to the point where we can see just what we can make together as a group and Dawn and I were amazed by the way the samples really came together as a group show.
Mending Samplers "Work in Progress" exhibition
The group were obviously all influenced by a few samplers , a red and white rolled stitch sampler bougth by me at an Oxfam shop years ago and an ethereal darning sampler form the Bristol museum and Art Gallery’s collection.
child's 20th century mending sampler
Quaker school mending sampler
The small exhibition caused a lot of interest and comment within the audience – and people were wanting to join us for more workshops and future exhibitons.
Dawn Mason's embellished collage with Steph Wooster's hanging wrap and Jess Turrell's mended tableware
Jilly Morris - stitched plasters and velum torso.
Dawn Mason stitched papers and mended jugs by Hanne Rysgaardmended by me. with small sample of porcelain by Hanne mended by Basil Kardasis
my handkerchiefs and mending - motto plate - mended by Jess Turrel
mended sweat shirt by Matt Benton with box of darning brooches, Dail Behennah - who was the key-note speaker at the conference
I have recently been interviewed at Fairfield School in Bristol for possible inclusion in a programme for the BBC School service, where local news and events are recorded and made into broadcasts by pupils throughout the country. I was being interviewed by 4 teenagers who were asking me questions about Heart Space Studios and what we did there. I had taken samples of what we were making, a felt vessel and some beads that had been made at the workshop with Patricia Brownen one morning and then developed into jewellery by Sharne Lott in the afternoon.
beaded bracelet made in one day at Heart Space Studios.
I also took some old fabric designs of mine which I thought would make a good idea for a workshop. I had been reminded of them last week in the Sew Personal workshop ‘ stitching messages’ when I was teaching people how to stitch all kinds of writing into fabric. One of the students found an old satin embroidered fabric in my stash and wanted to adorn her message with the woven roses.
sewing ribbon roses into written message
fabric stash at studios with a vintage embroidered rose material
I asked the pupils who were interviewing me which of the things they would like to make given the opportunity – market research – and they were intrigued by the fabric samples
my embroidered flower fabric samples
detail of applique flower fabric
I asked them what they would want to do with the finished embroidery and one said stitch it onto a t shirt, another to make a hair slide out of it – or a brooch – That’s a good idea I thought…so went back to the studios and made some brooch samples.
ribbon flowers cut out and backed ready for brooches
So a big thank you to the girls at Fairfield and their teacher Caroline Sutch who invited me to talk about the new studios and for giving me a really good idea for a new workshop at Heart Space.
selection of old and some of my new beaded heart pincushions
Although I have not set out to just make hearts at the classes at Heart Space Studios they are proving very popular in several different textiles workshops. I decided to make my first teaching workshop on how to make the stuffed and beaded hearts that were popular to give as love tokens or birth presents in the late 19th century. Hand made with pinned patterns and messages they were often made by men away in the forces as presents for those left behind. Now they make small gifts for all sorts of occasions and are highly pleasurable to make.
But before the fun of pinning the beads starts you have to make them and this takes quite a bit of manipulation and a lot of sawdust. They need to be so full that a straight pin will stay put when stuck into the surface to hold the beads. I always have to stuff and stitch them several times to get the tension correct.
They also need strong stitching to hold the stuffing in and I always like this “scar” that is made – it looks very surgical and one of the hearts made at this class retains this scar idea on the front of the finished heart to great effect.
stitches holding sawdust in place.
Getting a good shape to the hearts takes some pulling and punching as well as a few retaining stitches, it was interesting how different and individual the hearts looked even at this stage. Maybe we all have a perfect heart shape within us.
pinning messages in place on Crazy patchwork base.
Two of the class decided to make “Crazy” hearts – small pieces of fabric are pinned into place and them the edges covered with ribbons or beads. One of these hearts was made by a mother for her son who is a soldier, and she made it to remind him of home – a nice reversal of the original soldier and sailor makers sending them home.
this Crazy heart was made for the sheer joy of playing with the luscious fabrics, ribbons and beads
Another heart had a message pinned in to it a rueful comment about the maker, first the message needs to be written in place though and this is quite a tricky piece of designing so it is back to the drawing board before she was able to get her message to fit perfectly in the elegant shape.
writing in position ready to pin - Jan Connet,
The finished heart was brought to me to photograph later when she had finished it – I like the difference the livid scar gives to the well-known saying.
mended but rueful heart.
By coincidence Jan Connet and Liz Hewitt, 2 of the makers shown in the post are responsible for organising a conference for TFSW to be held later this month in Taunton Somerset it involves Mapping and Networking and as I chair TFSW I am shamelessly adding the flyer to this post in the hope of attracting even more people to enjoy a textile networking day.
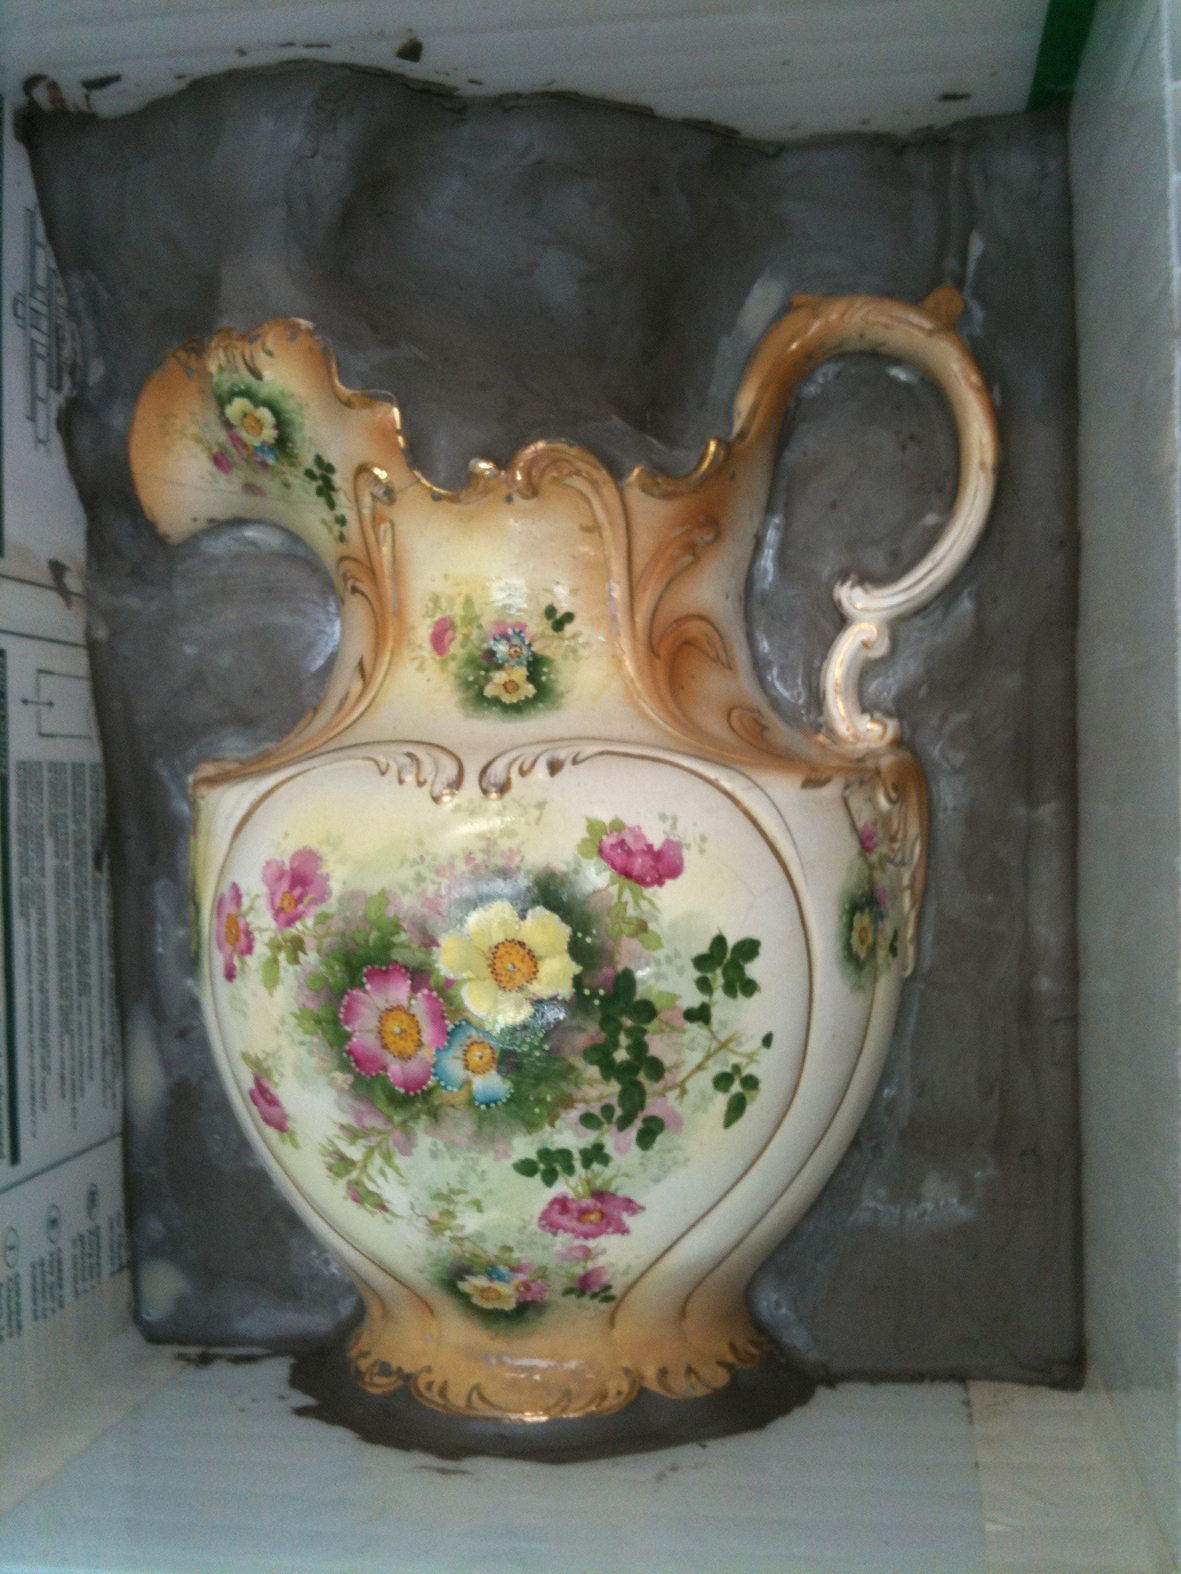
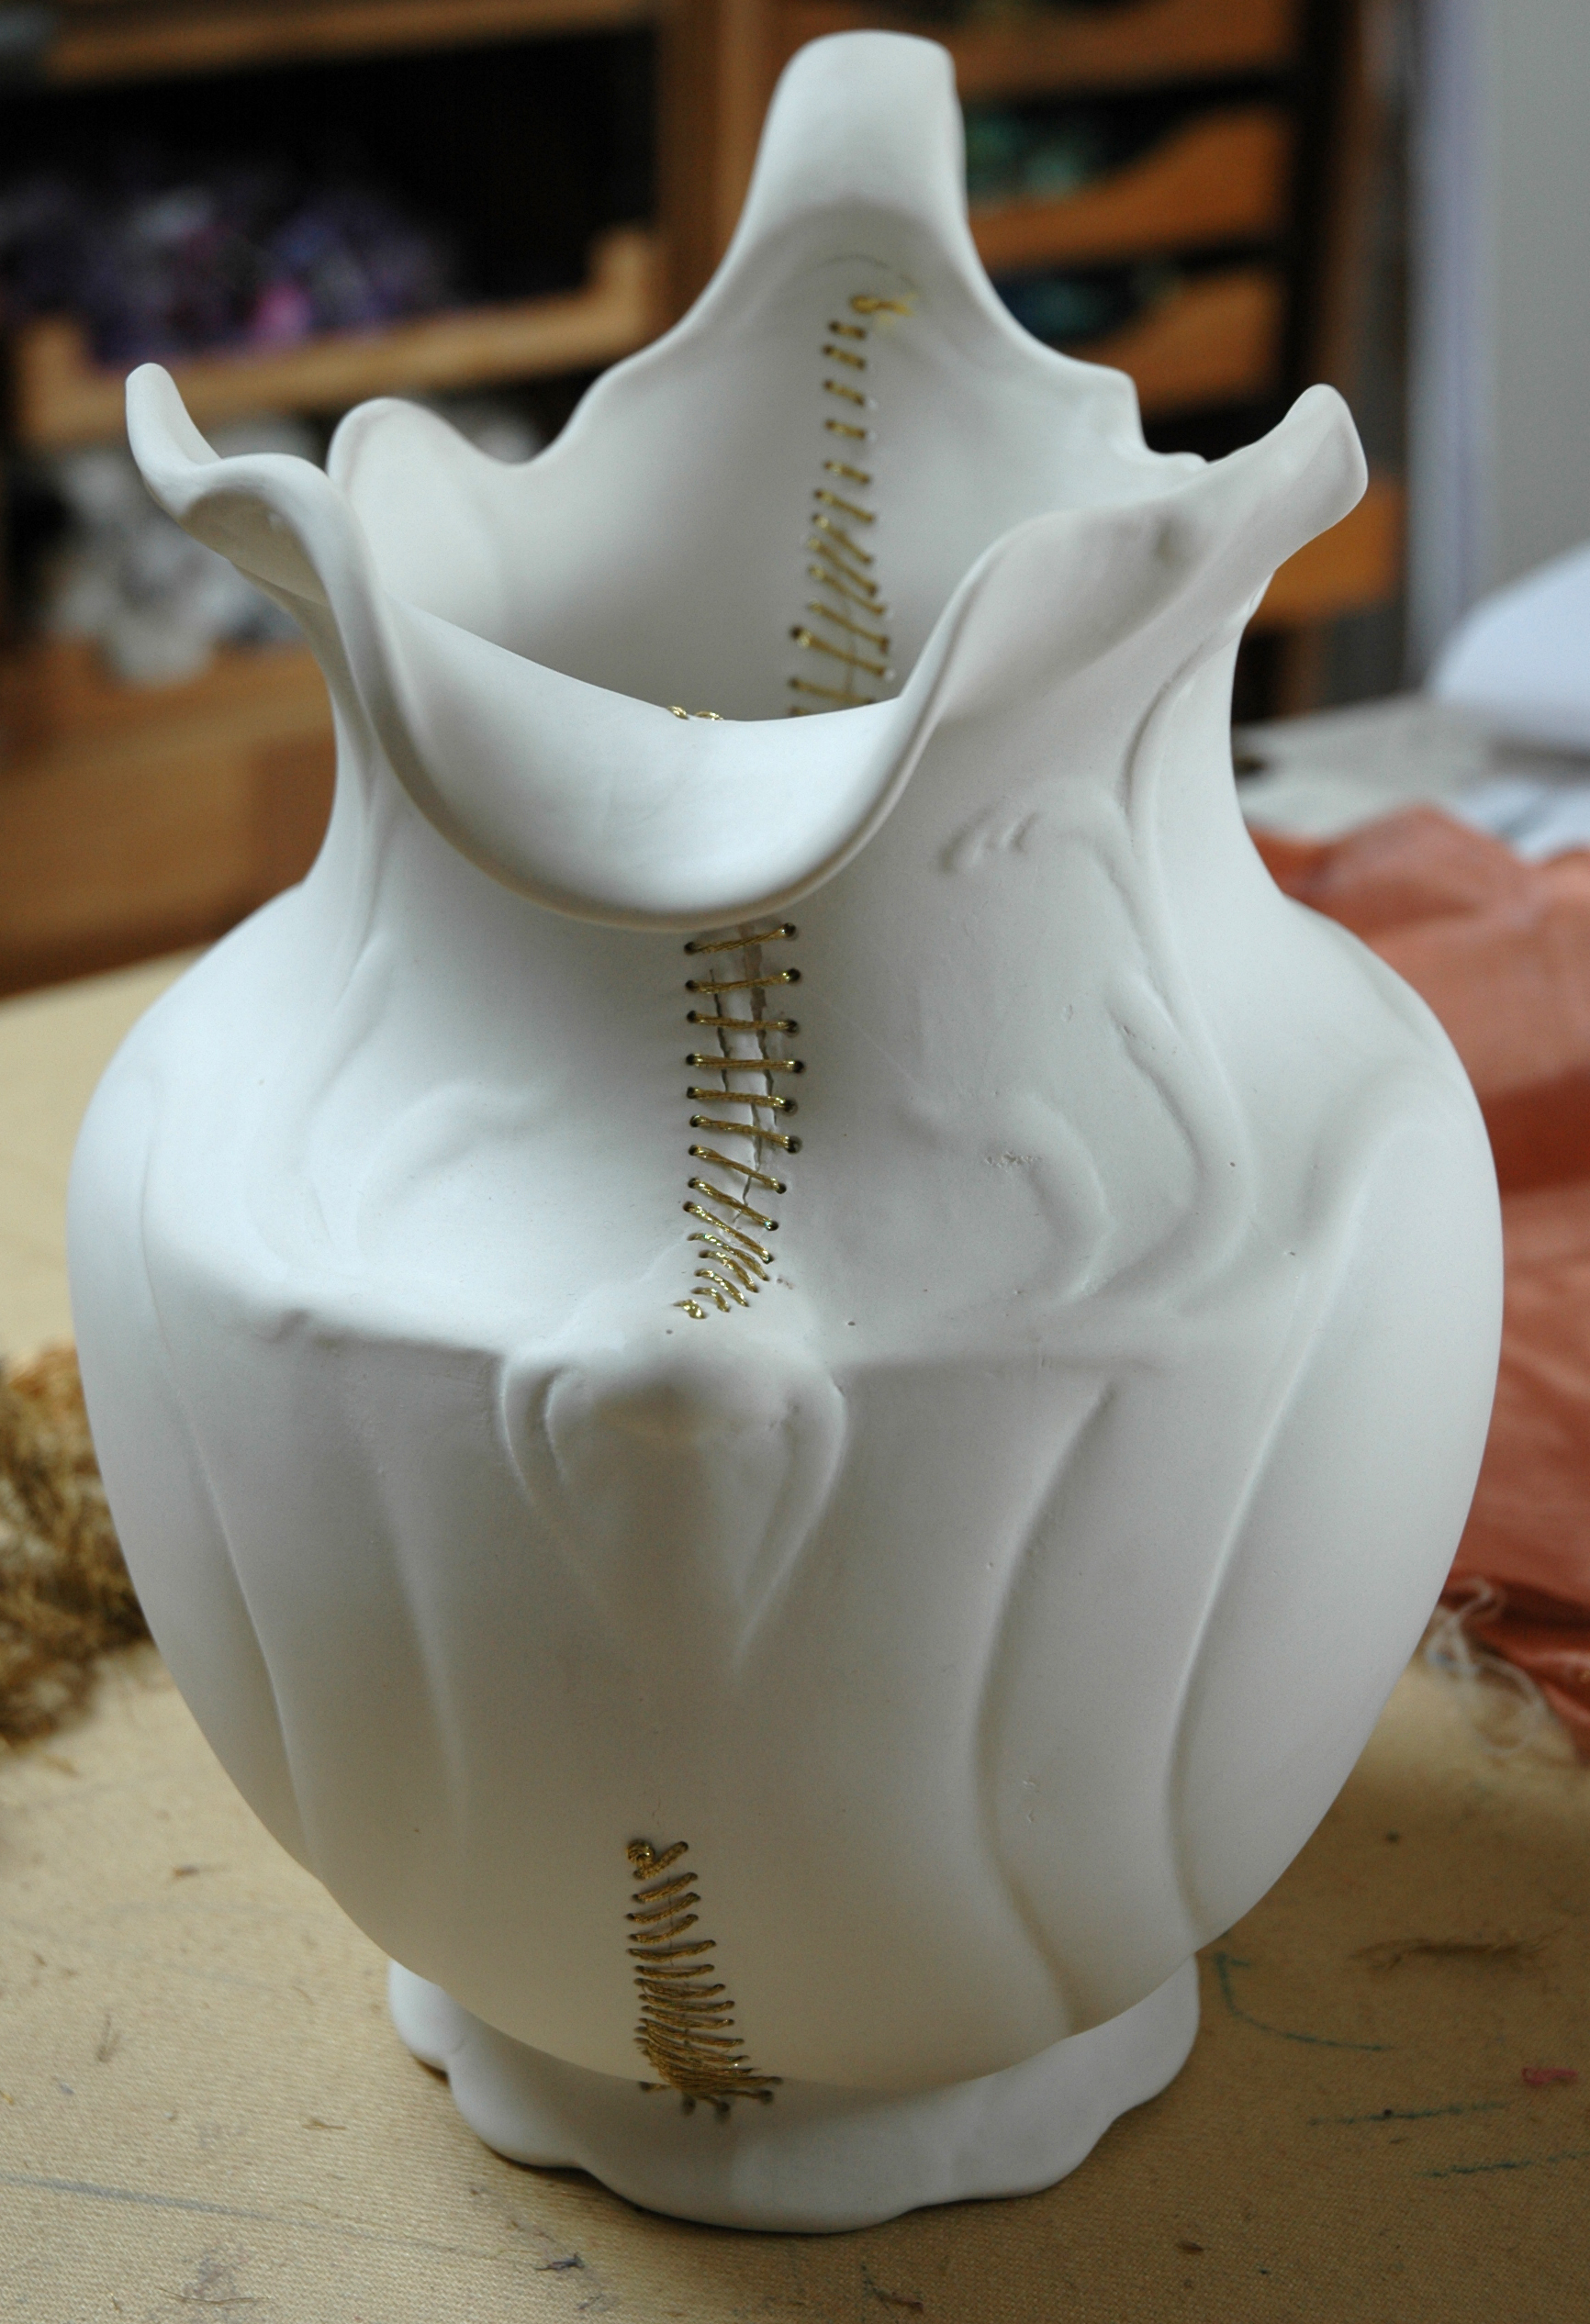
And by an even happier co-incidence the mended ceramic pitcher shown in “mending goddess fights back” will also be exhibited.
This is a heartening story for menders everywhere. Regular readers will recollect ceramicist Hanne Rysgaard‘s total disregard for mending generally – and mending ceramics in particular – in the previous post ” Oops!”. where I showed the beautiful flowered jug she decided to rebirth as a completely whole and perfect object.
The mold was made and the porcelain poured and then I waited to hear how it appear after firing and what she wanted to decorate it with – but the next time I heard from Hanne was a frantic angry email – Subject “Arrghhh” saying simply “jug got stuck in the mold” Do you also hear the Mending Goddess laughing?
But I knew exactly what she would do now – smash it and start again – so I immediately phoned her and told her to just put pairs of holes either sides of the breaks and I would stitch it back together later; and then we talked a lot about how we have to hear and act on the universal messages we receive…. till she calmed down and agreed.
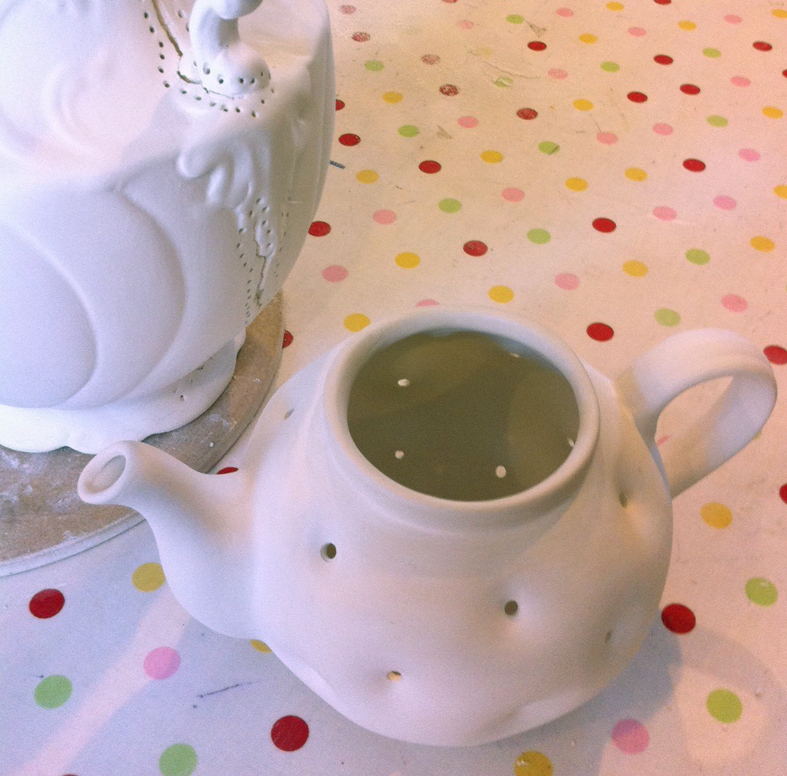
The next set of images some minutes later made me seriously worried ( see above left) these were truly horrible stab wounds, but later that evening I received another email saying “really liking making these holes now – with a drill” and the holes were getting everywhere
Eventually the jug was fired a second time and placed against the second cast, which only had a slight neck wound, when the third cast appeared perfect, Hanne confessed to being disappointed – nothing to play with and drill.
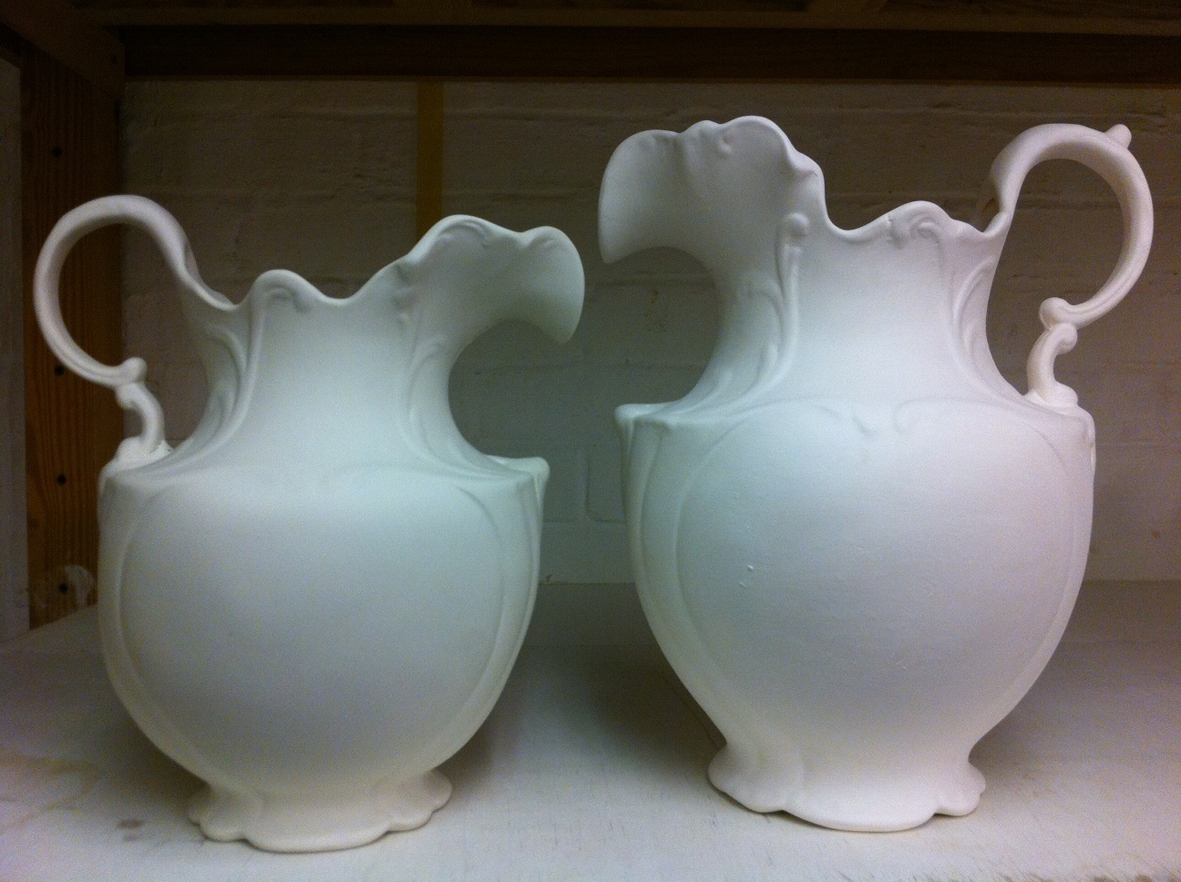
The jug had lost a a fair amount of size after the 2 firings, above shows the jugs after one and 2 firings, and the original is bigger again. It is interesting to see the whole collapse of the first jug, Hanne says it has “sat down” and that is a very descriptive phrase for the odd shape – but we are about to take this poor sad failure and make it look like some one cared about it.
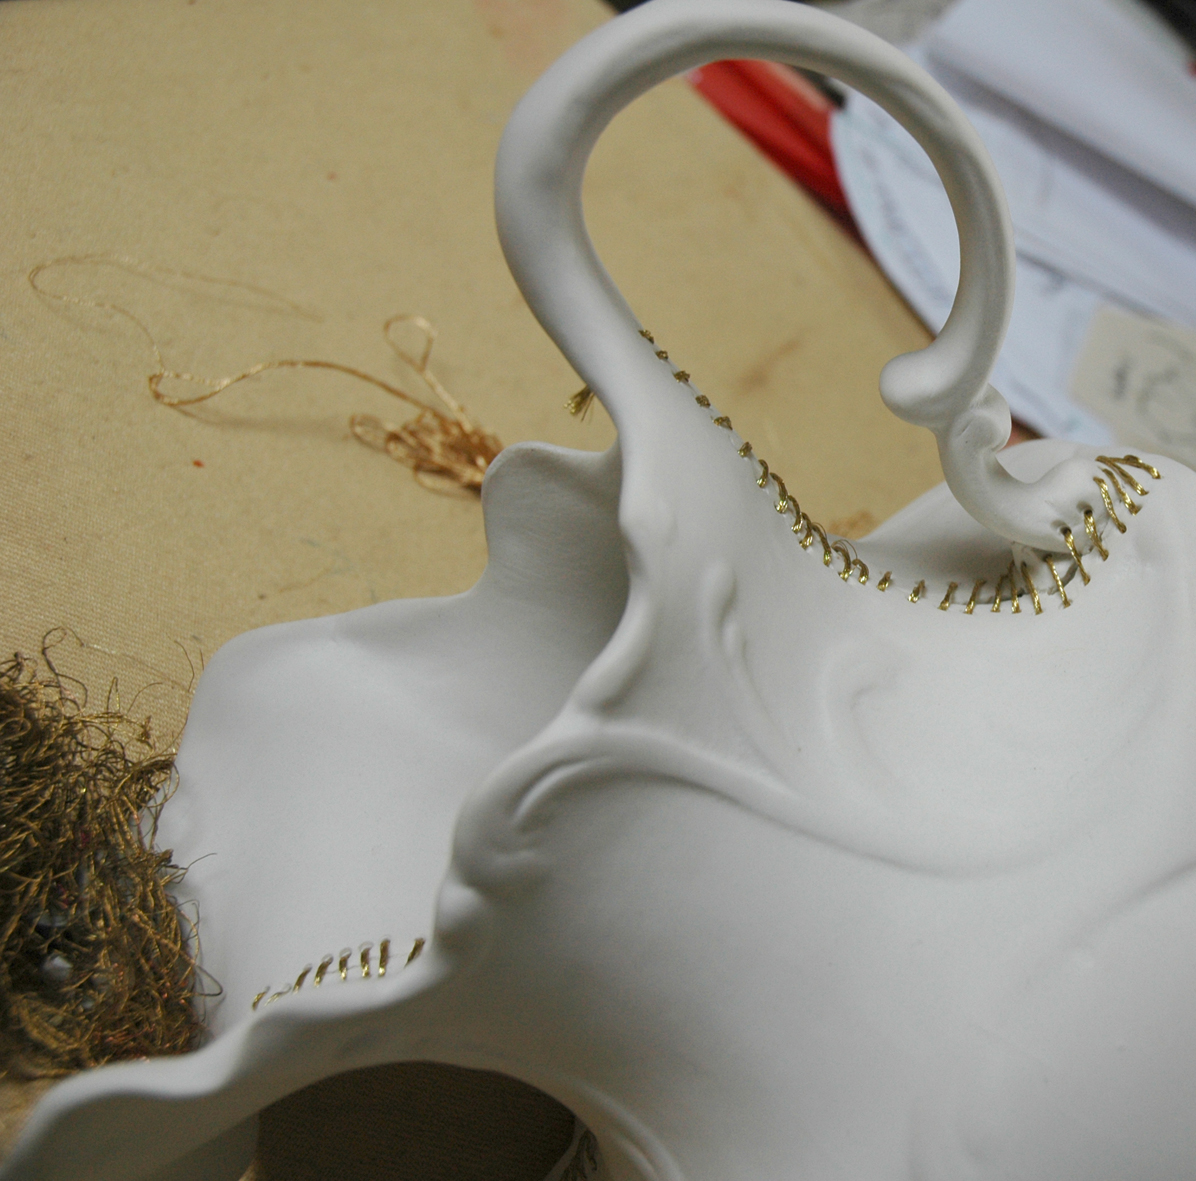
At first we both thought red stitches would make it look right but some aspects of the gaping wounds looked both sexual and scary when stitched in blood red – so gold was agreed.
The stitching was problematical although in essence very simple, I used curved needles to navigate the undulations of the shape and also the stitching needed to look as good inside as well as out.i worked on this for several hours getting the stitches to look as if they were planned perfectly.
But the finished piece makes such a strong impression that all our stress has been worthwhile.
and when I eventually took it to the next meeting of the Stitch and Think group, who are working on the mending project, this is the reaction I was wanting to see – Hanne delighted with her mended ceramics.