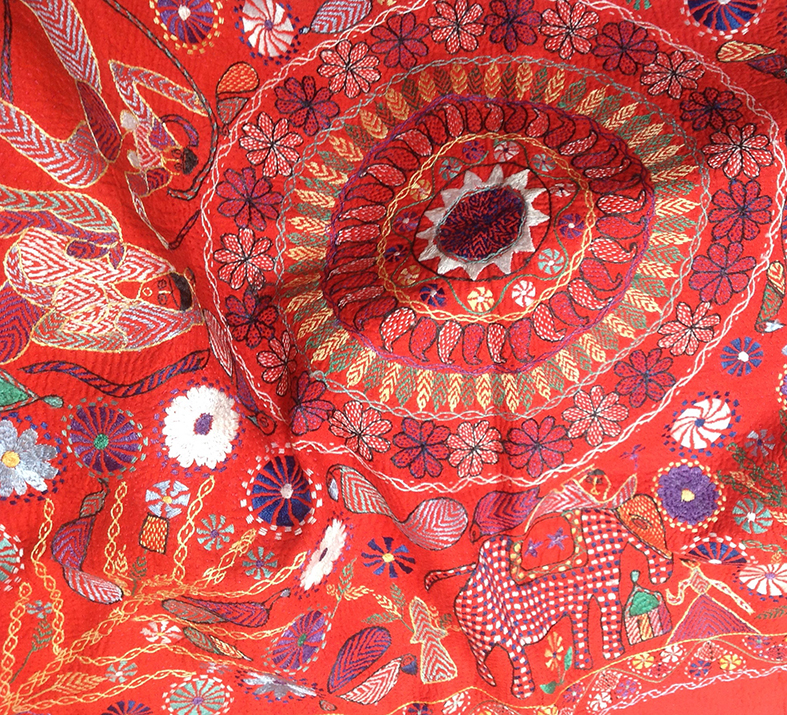
Indian modern Kantha fabric – from Liz Hewitt’s collection – wonderful patterns to start us all stitching
New to Heart Space Studios – Kantha Club; started as so many people who have been to our day classes, tutored by Susi Bancroft, have become fascinated by this simple method of hand quilting. We have 3 trial sessions being held once a month – each meeting is 3 hours long – enough to get re-acquainted with the technique and start something to take home to develop further.
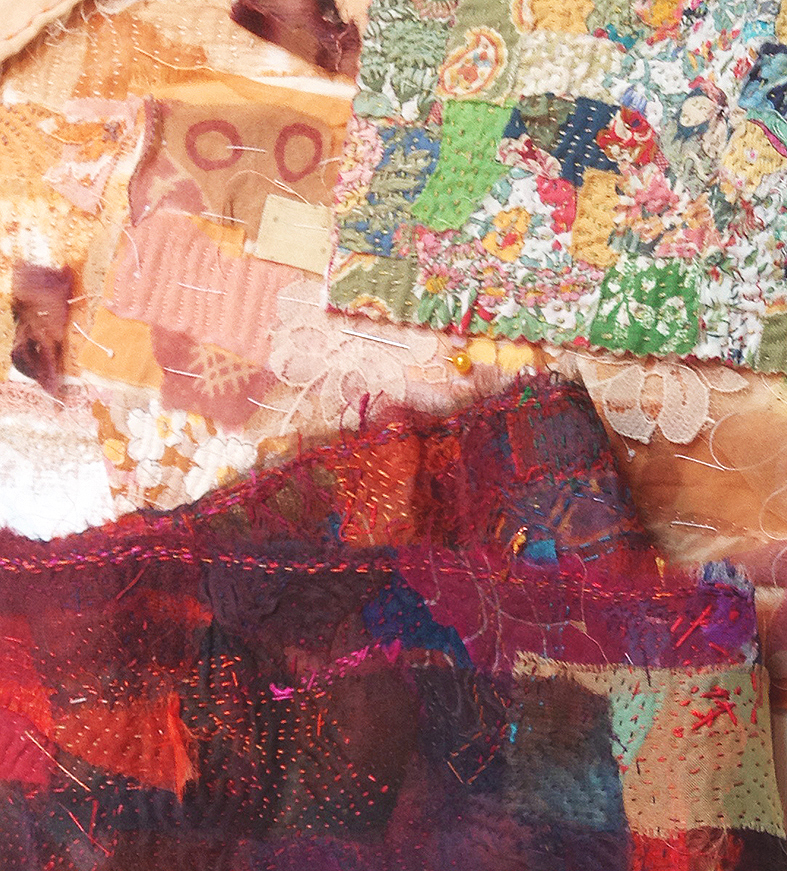
3 different Kantha pieces from Susi s collection demonstrating the different types of fabrics, colours and patterns afforded by this technique
Susi, had brought lots of different pieces from her own work, the most interesting for me are the tiny patches of patterned fabrics all held together with simple rows of running stitches and by allowing frayed and ripped fabrics to be caught in place, dense and rich cloths have been developed.
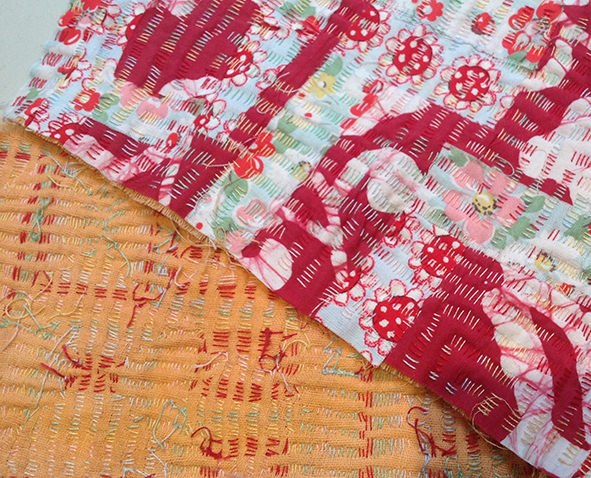
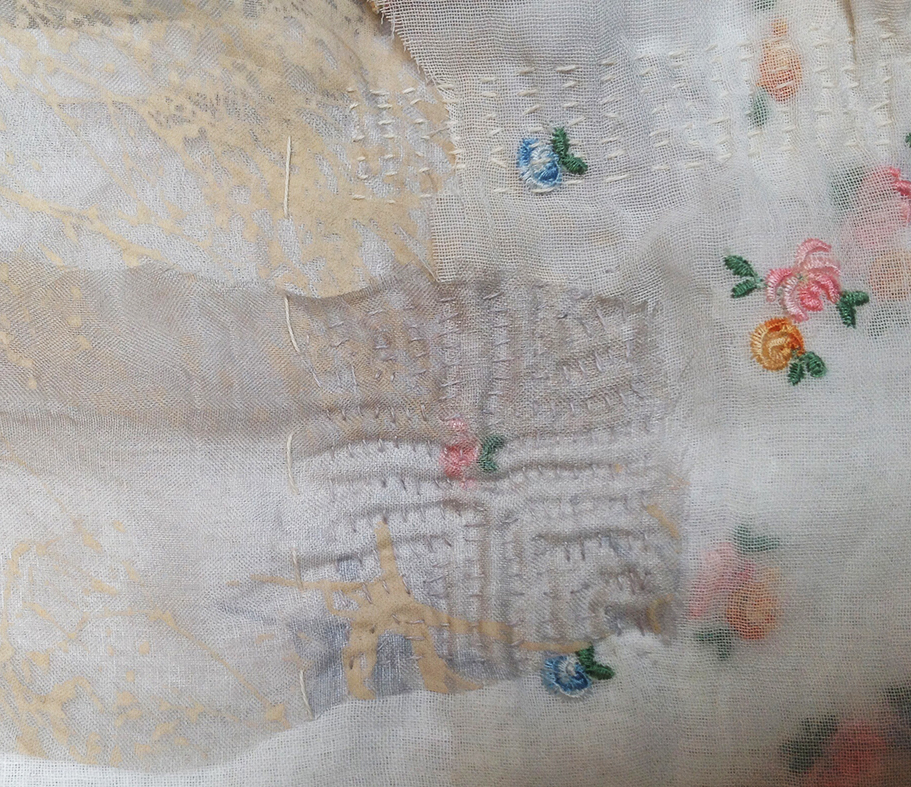
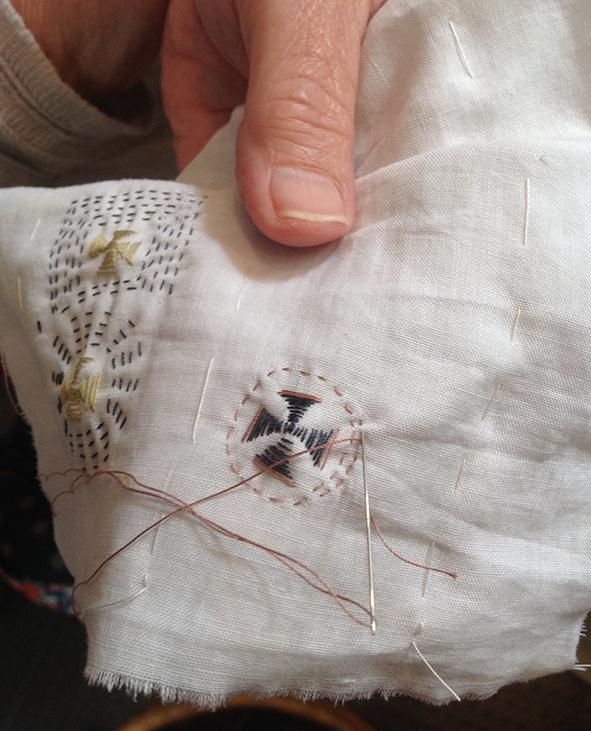
One of the things that I find interesting in Kantha is that each side of the cloth looks different depending on the choice of fabrics – so a simple ground will show up the stitches but a patterned ground is given another layer of pattern – the fabric below shows this very clearly.
Kantha strip showing back and front of the stitching – intriguing
Several people had brought in their own samples, some from earlier classes that they now wanted to develop….others already used the technique for their own practice and just wanted to meet up and develop and discuss the work with other people – we are hoping that the new textile clubs we are planning at Heart Space, will enable like-minded people to develop new work together….the 2 pieces below are by makers who has studied Kantha previously, Kay Swancutt, and Liz Hewitt ,
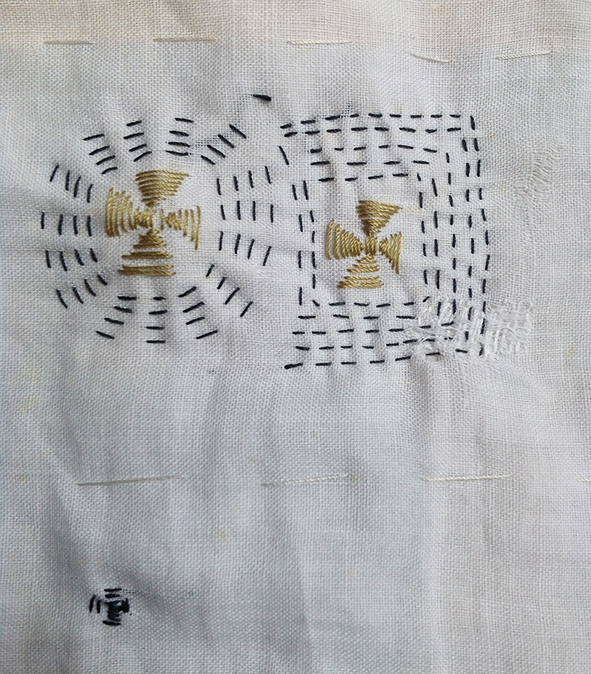
beautifully simple stitching by Kay Swancutt
detail of Liz Hewitt’s densely stitched Kantha hanging
but some people although used to stitching, came along for a new experience – they brought other types of things – the different types of work were really interesting, I am looking forward to seeing how everyone develops in the coming months.
small perfectly stitched quilted heart – but enough to get a maker to the next stage of developing new ideas and techniques
beautiful etheral embroidered and lacy fabrics combined with Kantha stitches by Nicky
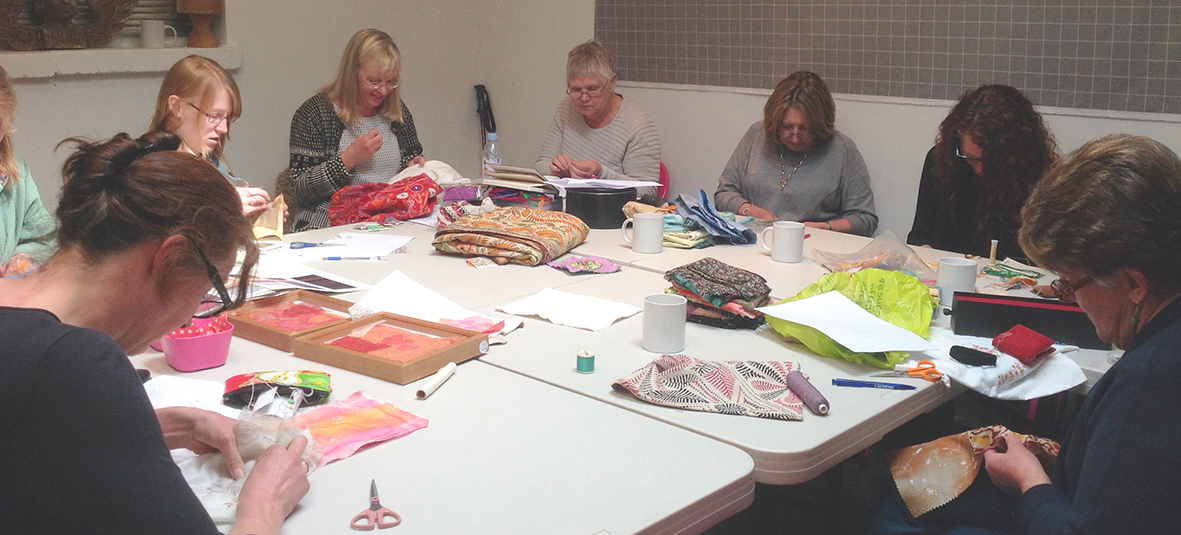
After the introductions we all started to work on our own projects
the club gets down to real stitching, and Nicky is stitching the piece above right
I have joined the club as well as I want to develop new work using this technique – I have played with this way of setting up rhythms across fine fabrics and I brought in several pieces of old work to demonstrate how I wanted the work to develop – I want to make a stitched sea/sky/land scape – very large using images from my photographs of the views of sunrise and sunsets from my windows at home.
series of my sky photographs from over the Bristol Channel
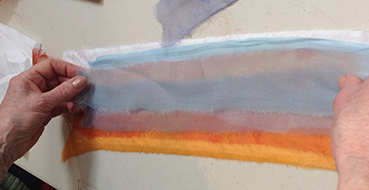
my first attempt at putting the sky fabrics together
I am layering transparent fabrics so that many subtle colours are made to represent the sky, then held held in place by rows of running stitches. As my home view includes a stretch of the Severn Estuary and the Welsh hills, the textures and rhythms of the water, mud flats and tidal salt marsh in front of the house, could successfully be rendered using this technique, we will see…
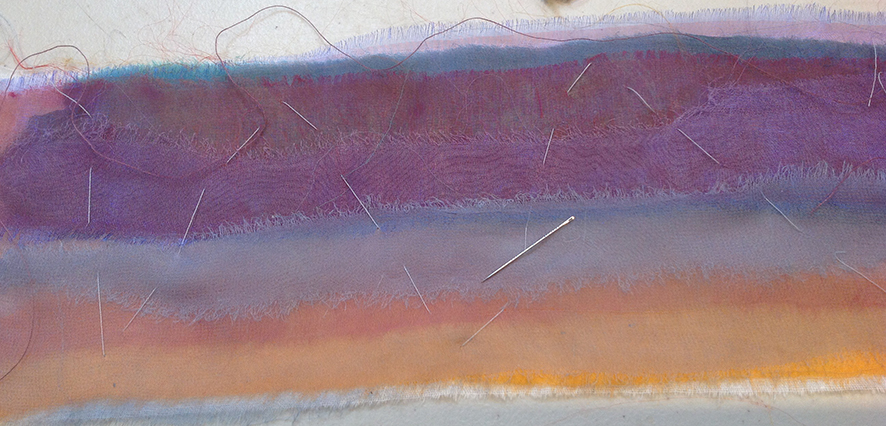
the layers of transparent fabrics are eventually held in place by massive tacking stitches
when everyone got to working Susi provided us with background fabrics and a wonderful array of her own threads, as well as books and a variety of other materials to help us help ourselves.
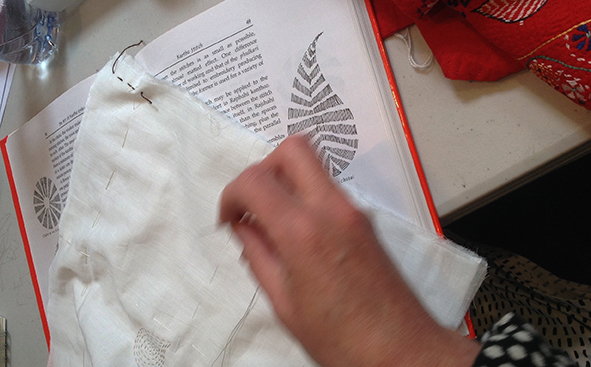
Susi’s own stash of threads; and just visible my “kantha bible” The Techniques of Indian Embroidery by Anne Morrell
Several people started developing different motifs as samplers, using the books that Susi provided..
continuing older work using new inspiration
working a sampler directly from the books provided
So we ended the first week with everyone having a piece of work to develop (or not!) for the next meeting…there were a few surprises in store.Some people had started new pieces and developed different techniques….
embellishing a ready printed fabric is a really good way to get started…
some really adventurous samplers have been started..
Vibrant Kantha motif sampler on hand dyed base – Naomi Clarke
then there was this perfectly ordered piece of quilting on top of a traditional Indian fabric heart
Heart Kantha by Jo Hurst
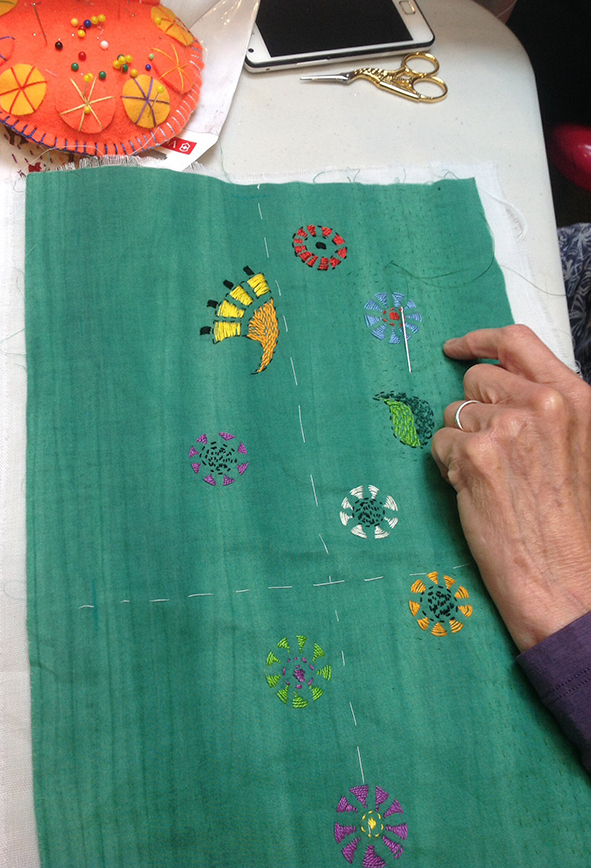
Others continued to develop their own work – I do like the ancient next to the modern in the image below – traditional stork embroidery scissors, hand made pin cushion and mobile phone!
continuing to develop the first colourful sampler – Jo Hurst
The motifs seem to be very popular but, like me Anne is trying some new colour background fabrics strips – really looking forward to seeing this develop
strong coloured ground strips for experimental work by Anne Harrington
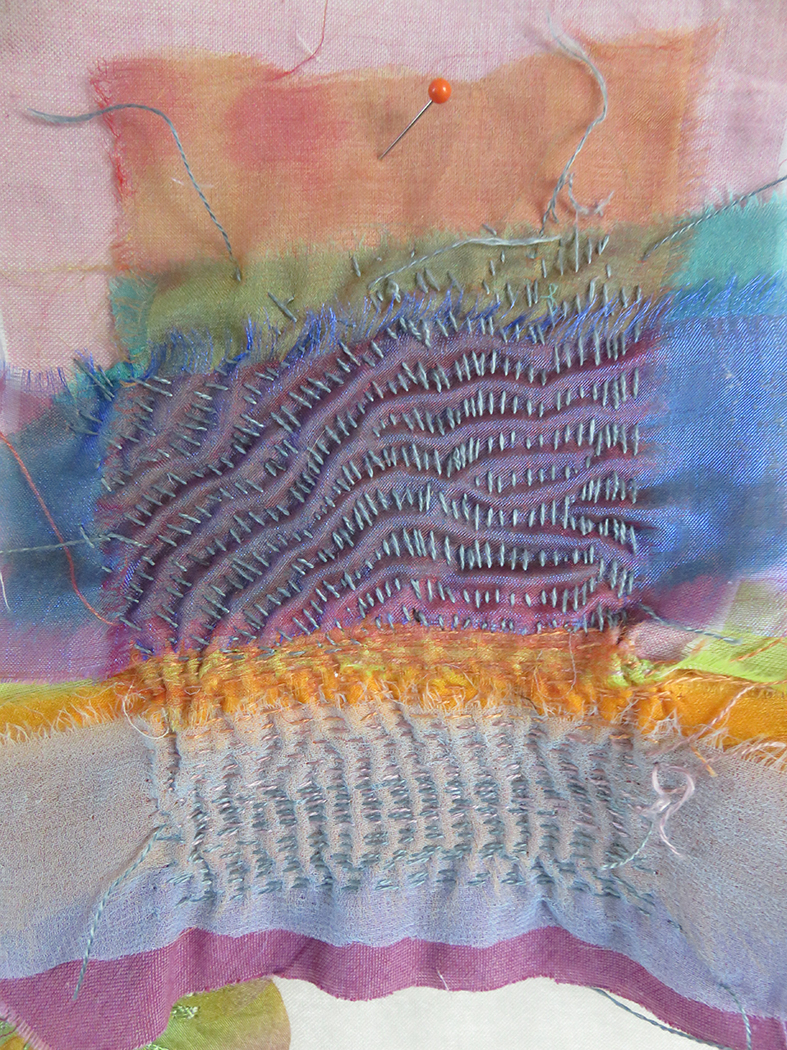
I hope she has more luck than I did! Eventually I want to make a large piece of work – at least 1 metre wide – so I had started off using wide strips – but found that the rhythms of the stitches started to develop a mind of their own, which I couldn’t get to grips with – so I chopped my original work into smaller segments and really let the running stitches go where they would – it is very exciting to work with…..but where do I go from here?
my tiny but wayward stitched sampler of sky and sea kantha
Well – where else but back to the third Kantha club meeting to see how everyone else has developed and if they all feel that they want to carry this experimental approach forward into a functioning club, with membership, regular meetings, guest speakers, exhibitions and all the other benefits joining a club entails….watch this space.
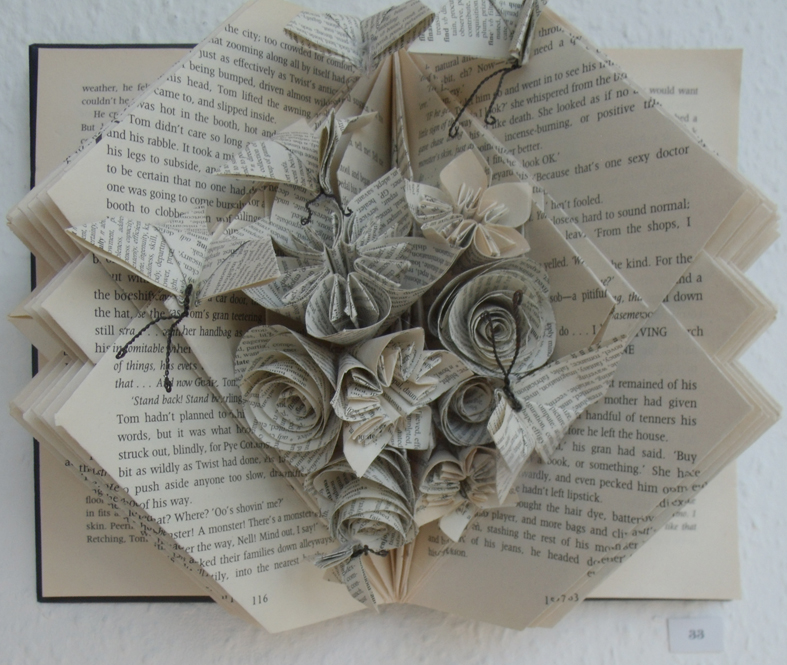
folded book of flowers and butterflies – Ilaria Padovani
The world is full of surprises. You invite a group of people to develop ideas together in a studio in order to make work for a themed exhibition over a period of 6 weeks, then they go away and come back 3 weeks later with something completely different – Hey Ho! BUT sometimes the things they bring back are so different and you realise that they have taken a new direction because of the theme – what could be a better result?
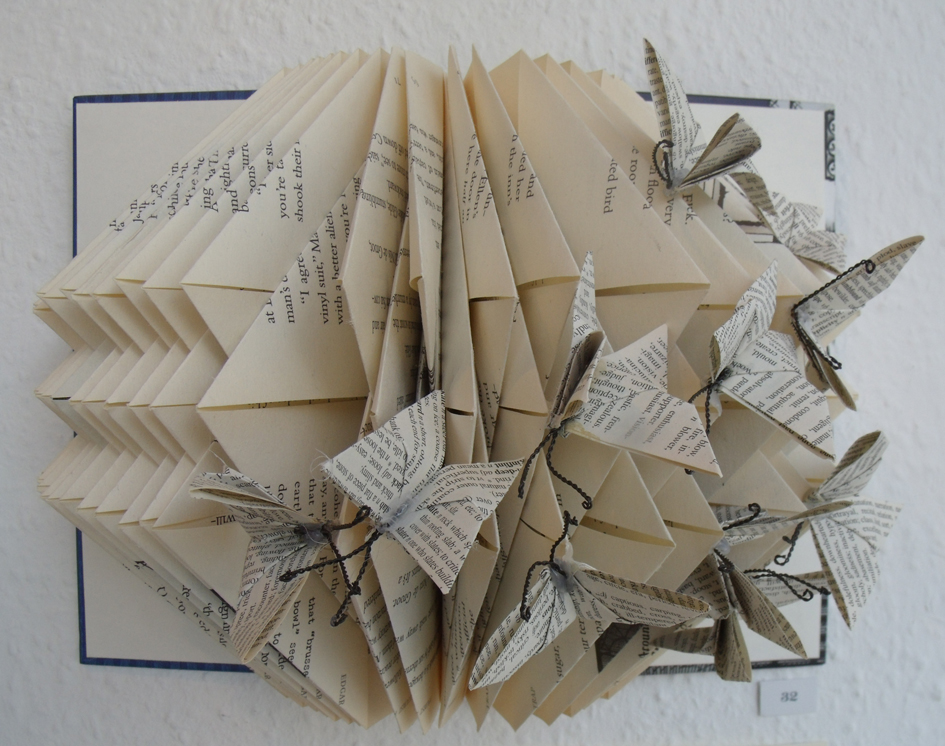
folded book with moths- Ilaria Padovani
So when Ilaria Padovani, who is a volunteer at Heart Space Studios, arrived the day before the deadline with 4 folded and paper sculpted books, I could only gaze in amazement (she was making a flight of patchwork butterflies last time we spoke)! I had asked everyone to write a few sentences about why they had done the work, knowing from experience that most people engage more easily and trust the words they read, rather than the images they view – I have the opposite point of view but that’s anther story!
‘VERBA VOLANT, SCRIPTA MANENT…Spoken words fly away, written words remain…’
“This was my big sister’s reply to a letter I had written to her pontificating on how to raise her child. Although my intentions were good I had been arrogant and hurtful to someone I love dearly.After her phone call, I stayed up all night thinking of a way to show her how deeply sorry I was for my inconsiderate missive. I had wished the words I had written could have flown away from the page like a flutter of butterflies.
I started folding the pages of a book she used to read to me as a child. I folded a kaleidoscope of butterflies and arranged them soaring out of the pages. The making was cathartic to me and so was her forgiveness on receiving the book”.
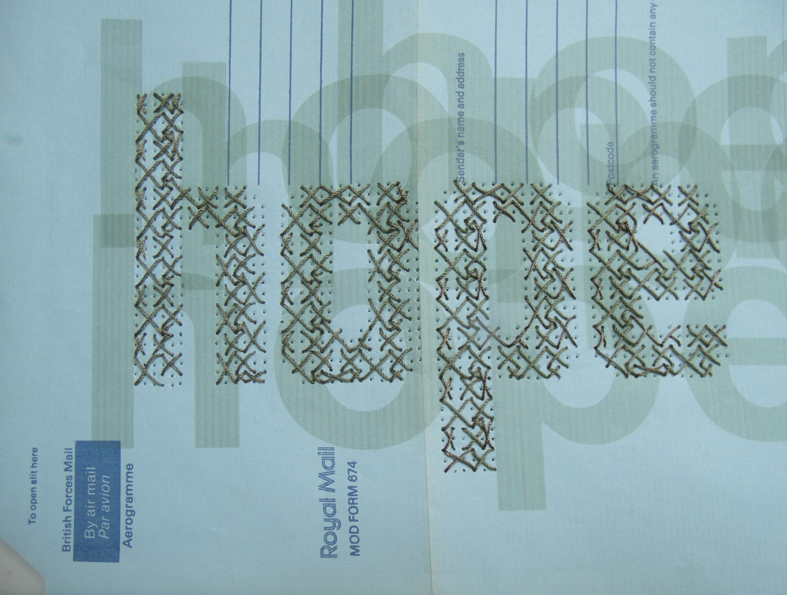
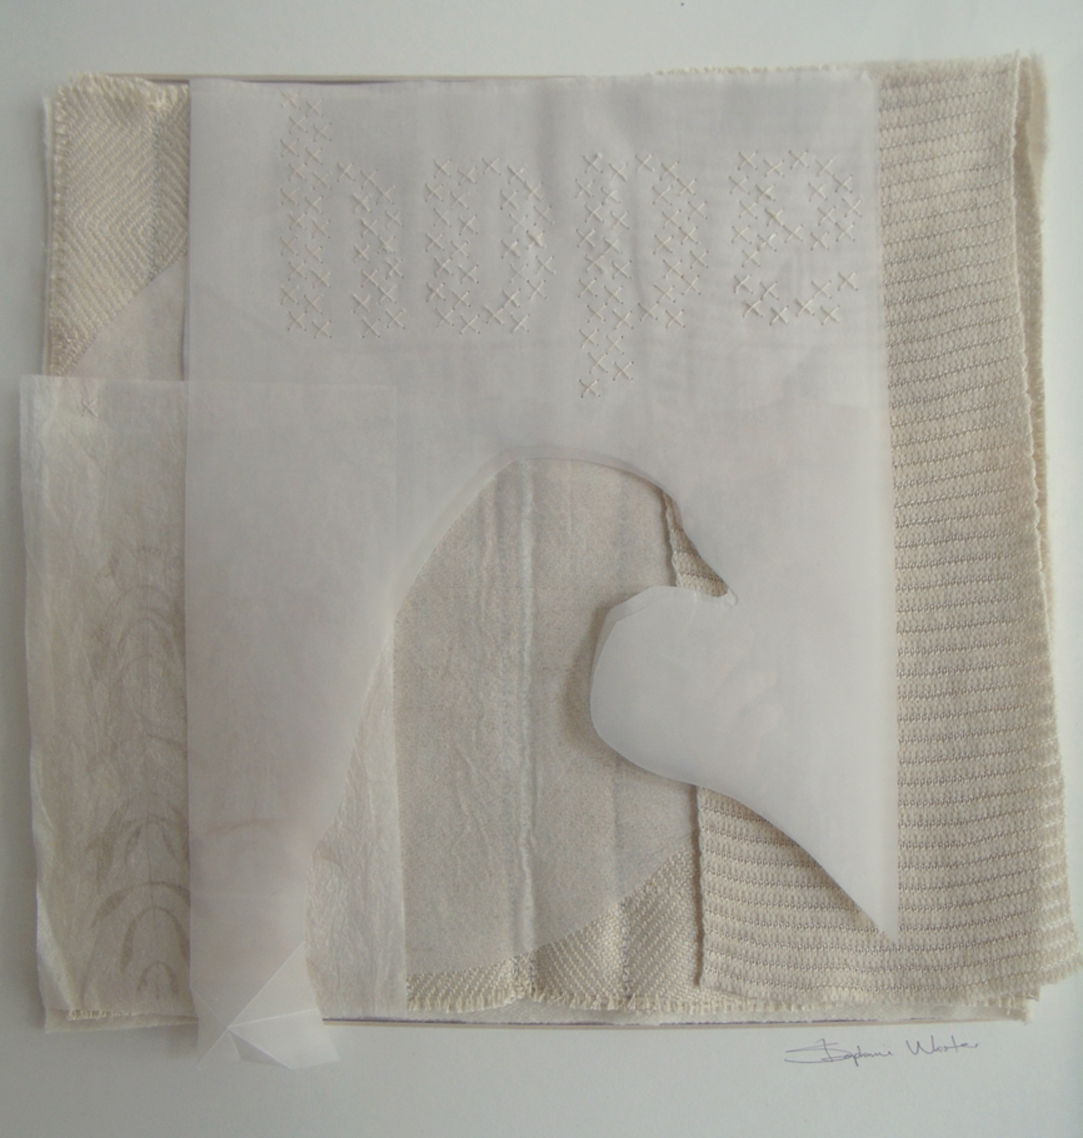
stitched and printed air mail letter – Steph Wooster
Writing was a theme for many of the pieces in this mixed media exhibition. Steph Wooster, was researching ideas about carrier pigeons, doves and messages of peace, so this old airmail letter has been printed and then embroidered in cross stitch with a the one thing that you can’t give up when waiting for news. Steph’s images are truly mixed media, she prints, knits and embroiders onto papers and fabrics of different densities – layering the multiple sheets of images and text together.
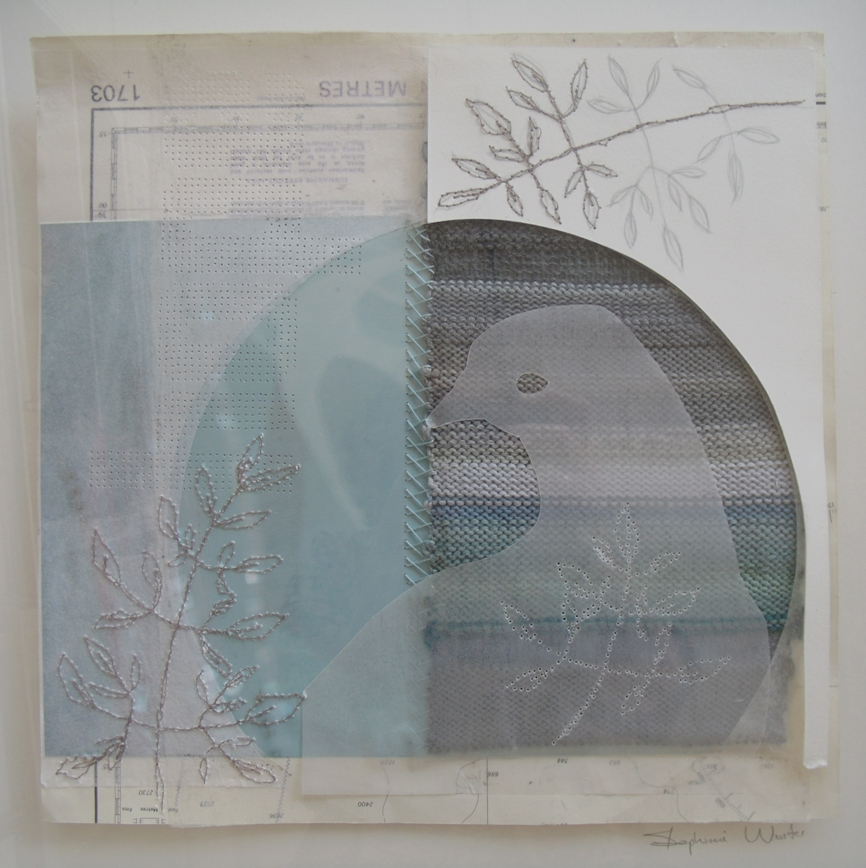
multi-media layered image of pigeons and laurel branches – Steph Wooster
multi-media Hope dove – Steph Wooster
” I have an ongoing interest in mixing media, materials and processes. Attending workshops at Heart Space has introduced me to paper-cutting and patching processes that I have explored further with my knitting, stitching, printing and sketching. Making work for Things with Wings I immediately thought of pigeons. I love pigeons, grey, common, mundane and overlooked. Their invisibility and homing instinct led me to layering maps, graphs, envelopes, knitting, photographs, feathers and tracing paper. I wanted to show the humble pigeon as cousin of the dove who brought Noah the olive branch, embodying hope for the future.”
Mary Bishop has used her own hand-writing to inscribe poems and rhymes that have been illustrated by embroidering into papers and fabrics. I always recite this rhyme when I see any magpies – its an old English saying. Mary has condensed and enriched her first sample idea that she was working on in the studios to make these encrusted applique and collaged pieces.
Magpie’s nest – Mary Bishop
My inspiration for this piece was my workroom which is like a magpie’s nest, full of bits that glitter and are pretty, things that cry out to be reused. I really enjoyed reflecting it in this nest
ladybird, Ladybird – Mary Bishop
I love ladybirds, so pretty and attracted to colour, I was really inspired by my many colours of threads to build up this flower bed and the cobweb to illustrate this lovely poem.
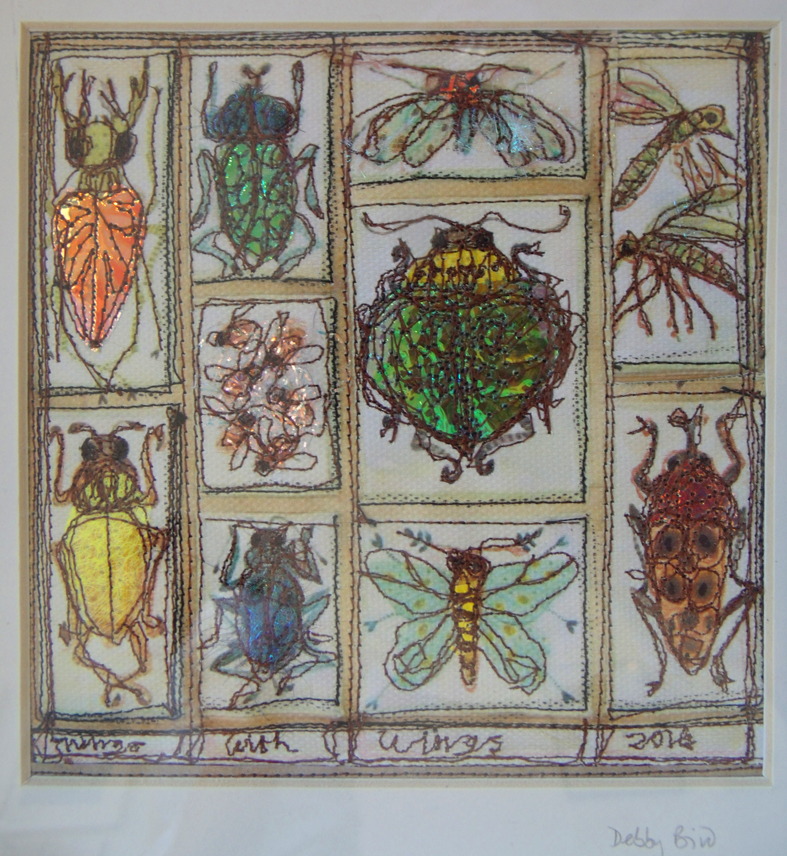
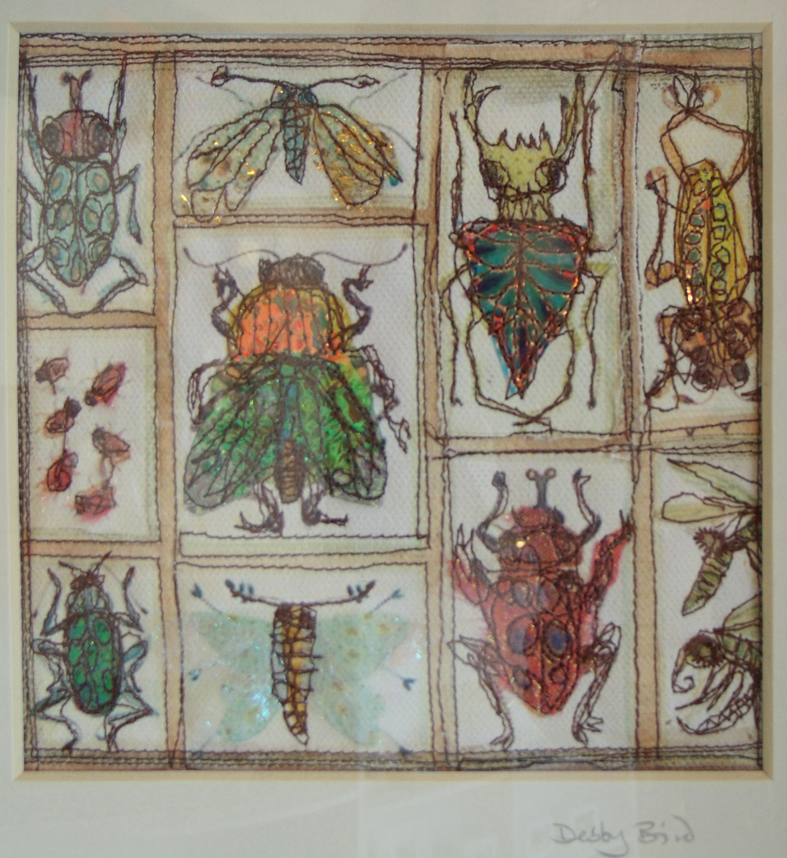
Keeping with framed pictures, Debby Bird made some really popular (and fast selling) beetle things, some with wings but the main interest for all the viewers was the materials she used, interference foil that distorts the light rays into rainbows of different hues being the most fascinating. The free machine-stitched insect boxes illustrate her idea that many insects are as precious and beautiful as jewellry displays.
Things With Wings – Debby Bird
Flying and Crawling Jewels – Debby Bird
“Despite being overlooked and under-loved , Insects are the most successful of the worlds’ species . They are so varied and often more beautiful than the most precious gems, yet they can take off and disappear before you get a proper look.
My free-stitched specimen boxes are representing the energy of live bugs just gathered for a quick inspection before they fly home!
There are classes is this technique by Debby in the new Heart Space Studios Autumn programme of workshops
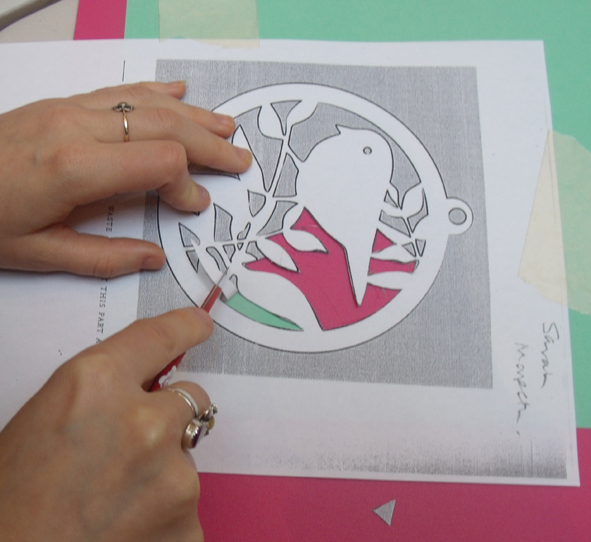
Sarah Dennis cuts paper by hand and the results are stunning, she conducts her very popular workshops, both day and evening sessions, for Heart Space Studios. The 2 large pieces of work attracted a lot of admiration, people can’t believe that they are looking at a hand made piece of such simple means. I like her simple explanation for the genesis of her things with wings…..
Deep Blue – papercut – Sarah Dennis
I love nature; these pieces were inspired by watching a David Attenborough documentary.
Deep Blue was created after watching a scene where the ocean and the sky met together – watching a bird dive from the sky and the whale swam around the surface of the ocean in a circular motion, the fishes sprung out of the waves into the sky. I wanted to capture the movement and life of that moment in paper.
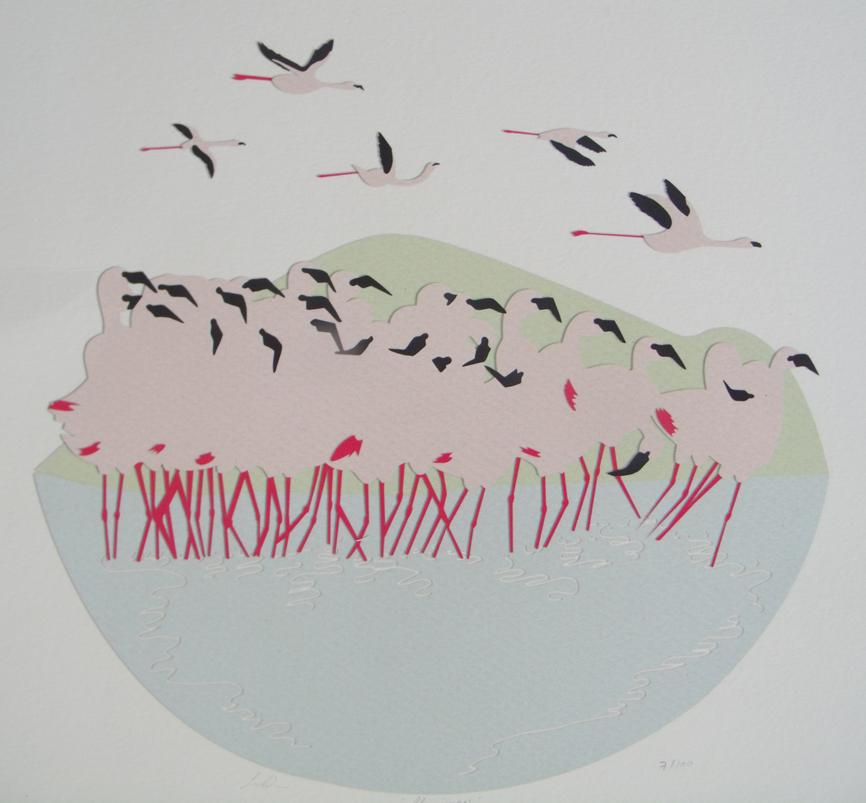
Flamingoes, paper cut – Sarah Dennis
Flamingos is a response to how astounded I always am by the incredible journeys that animals make to survive. I try to exemplify the beauty of nature through the delicate detail of paper.
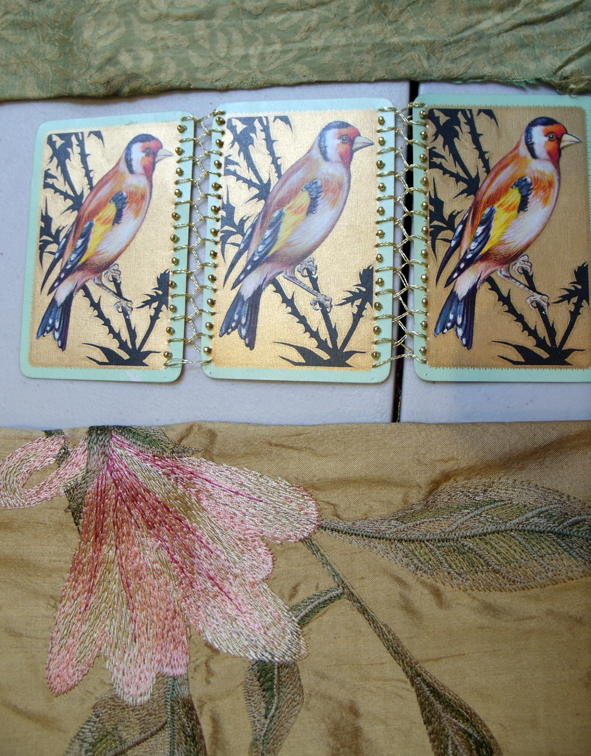
Some people are really good with the words that they use to describe how they developed their imagery – Sophie Bristol, our administrator – studied History of Art for her BA hons. degree at the Courtauld Institute, so I was not surprised by her eloquence when she wrote about the piece that, at first glance, looks to be just a highly decorative triptych.
gilded triptych – Sophie Bristol
One of my greatest past-times is exploring flea markets, making chance discoveries of overlooked gems, which might not be particularly valuable, but are lovely none-the-less.
I recently stumbled across a pack of playing cards at a market, and was drawn to the gilded image of a bird on the reverse. The picture fascinated me because it was both beautiful and slightly sinister. I decided to incorporate the cards into a piece for the Wings and Things exhibition, using hand-embroidery skills, beading, and mixed-media techniques to continue to explore the tension between the beautiful and the macabre.”
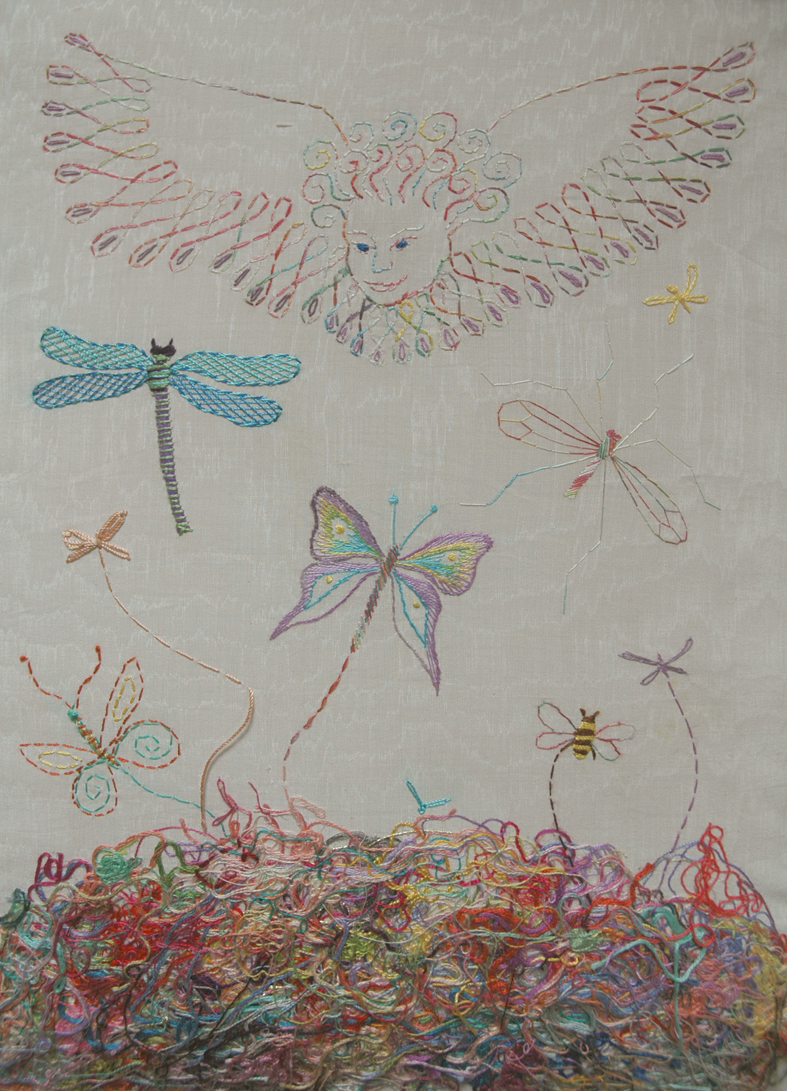
Alas, my own framed pieces are very conventional – I had to make them relatively quickly at home in any spare time I could find, so relying heavily on my stitching skills, I made what I hope are amusing images of the ends of things….
“One of the daily tasks of running Heart Space Studios is sweeping the studio floor. Things found on the floor though, are often lovely – scraps of silk, ravels of multi-coloured threads and scatterings of beads; but as they are so small and dusty they usually get binned.
the Apotheosis of the Embroidery Thread Ends – Janet Haigh silk hand embroidery
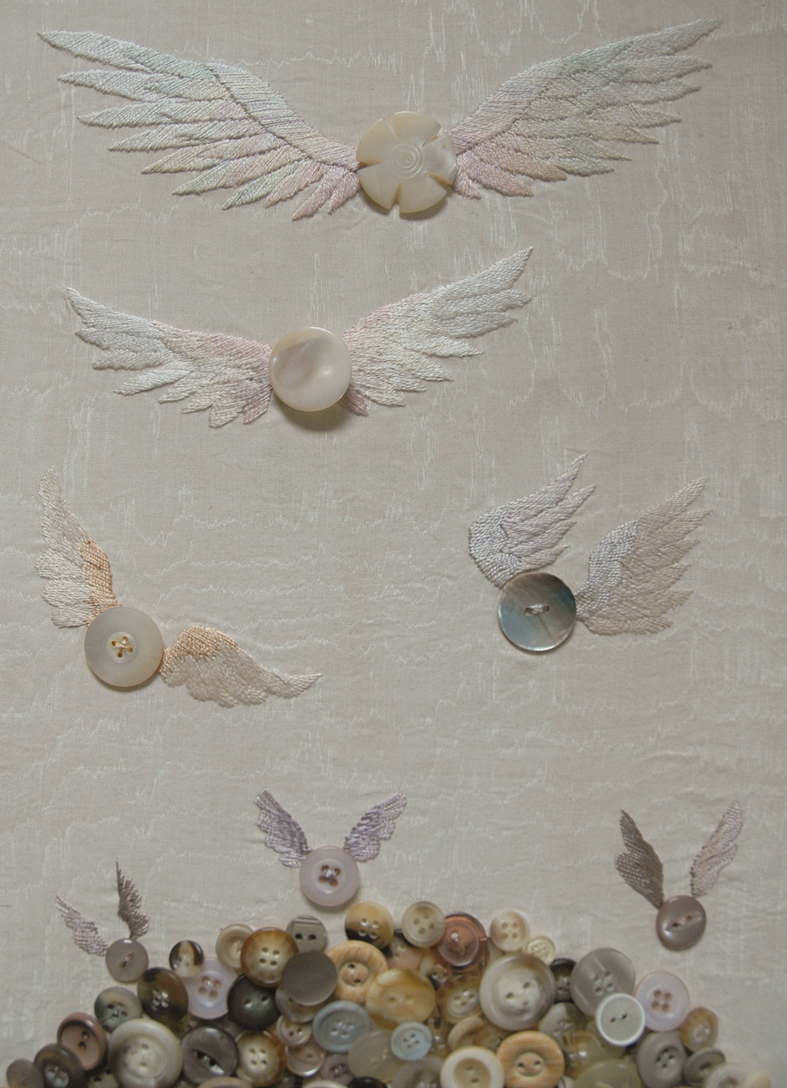
Buttons are another matter, they get used here for eyes and noses for toys made at children’s parties; but after a few months only the brown and beige buttons are left in the tins. I suspect that most homes harbour a tin of odd brown and beige buttons….
the Apotheosis of the Beige Buttons – Janet Haigh, silk hand embroidery
I got to thinking “Ideally, what would happen to the beige buttons that no-one wants, or the teeny scraps of ragged fabric and threads? Where would they go, what would they become”?
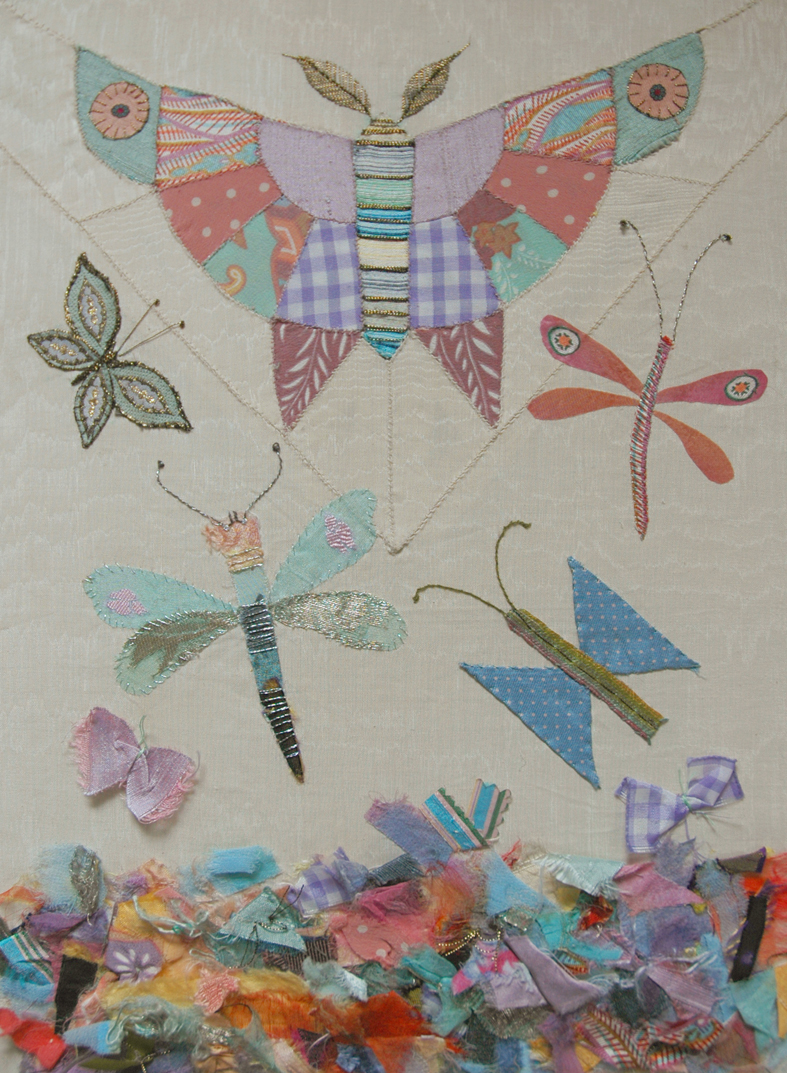
the Apotheosis of the Fabric Scraps – janet Haigh, silk applique and patchwork
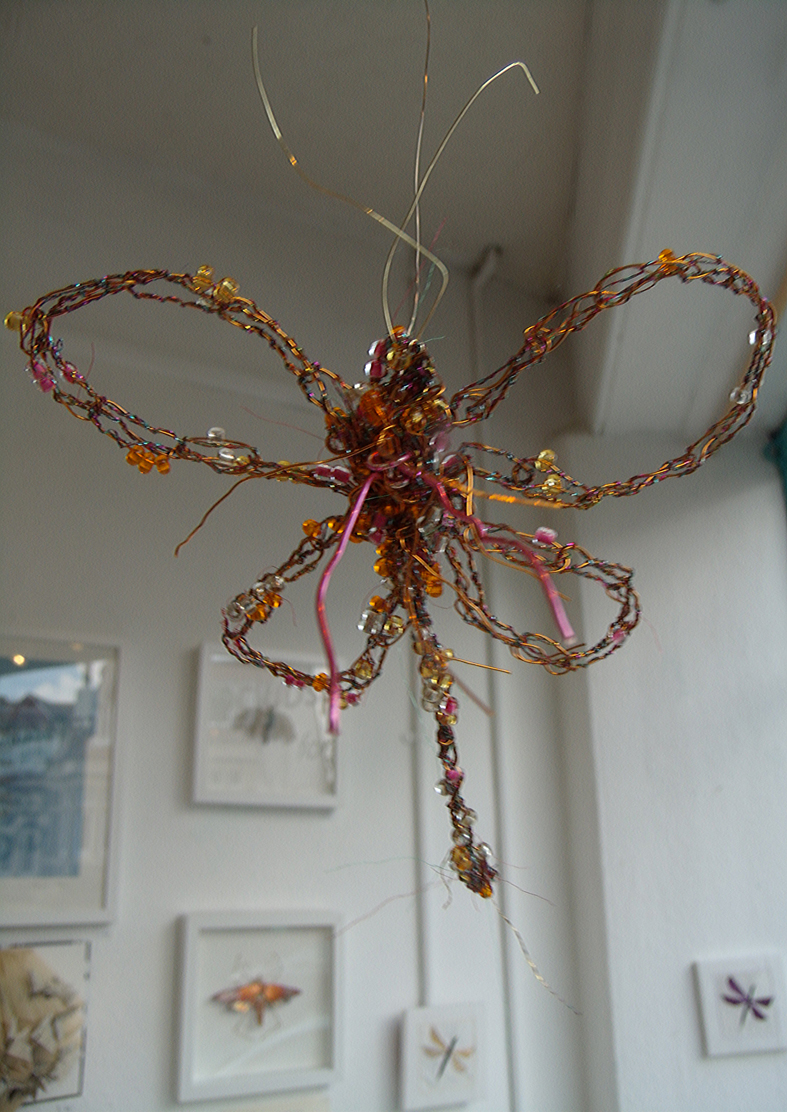
So now we get to the things out of the frames – I feel that out of the frame is perhaps a better way to develop work like this – so we had a flight of dragonflies from Susi Bancroft, rather difficult to photograph, so here is just one; he looks kind of menacing – but as Susi says……
One imaginary winged creature – Susi Bancroft. wire and beads
“ inspired by my delight in watching dragonflies in flight whilst walking by the river. From pale green delicate ethereal things, to flashes of bright iridescent colours skimming the water, I caught my breath watching them. These creatures are an interpretation, a play on ideas. My mind wandered around the real as well as imaginary – the beauty of nature and the fantasy of invented things with wings – from fairies to surreal stinging insects! These may hang indoors or outdoors – catching light and breeze and hopefully raising a smile!
Made on the sewing machine from wire wrapped in glittery metallic thread with seed beads I pre-threaded on the wire – a somewhat exciting technique which requires some nerve!
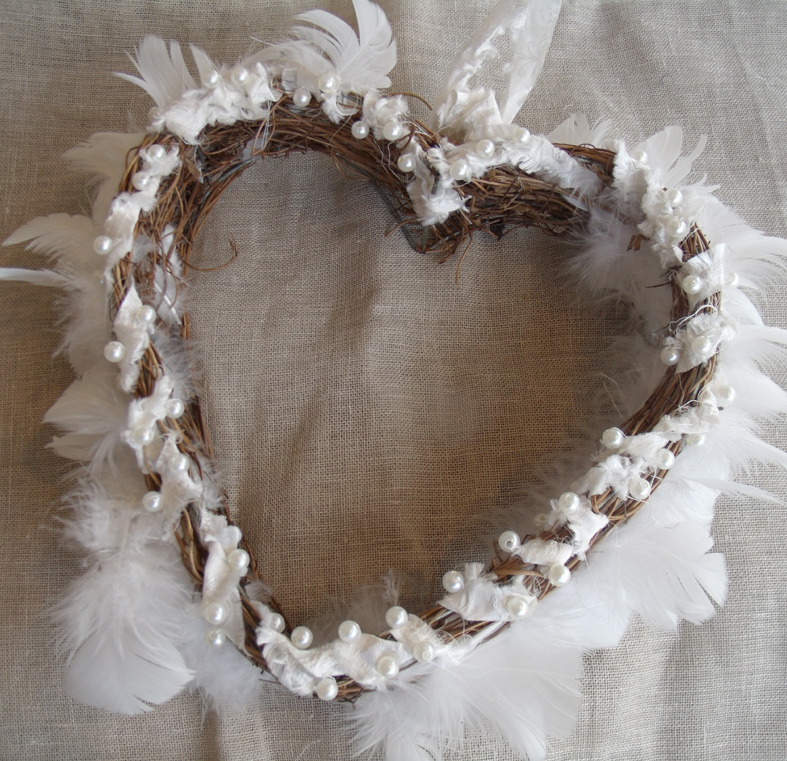
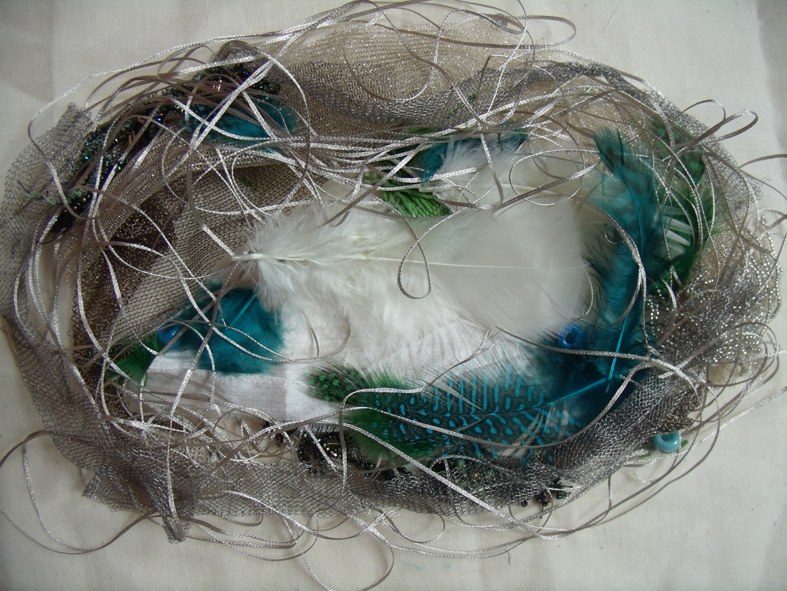
But where are the things without wings? Well for a start there are lovey simple feathered heart shaped hangings form Jane- Marie Mahy, our display manager.
Feathered Beaded Heart – Jane-Marie Mahy
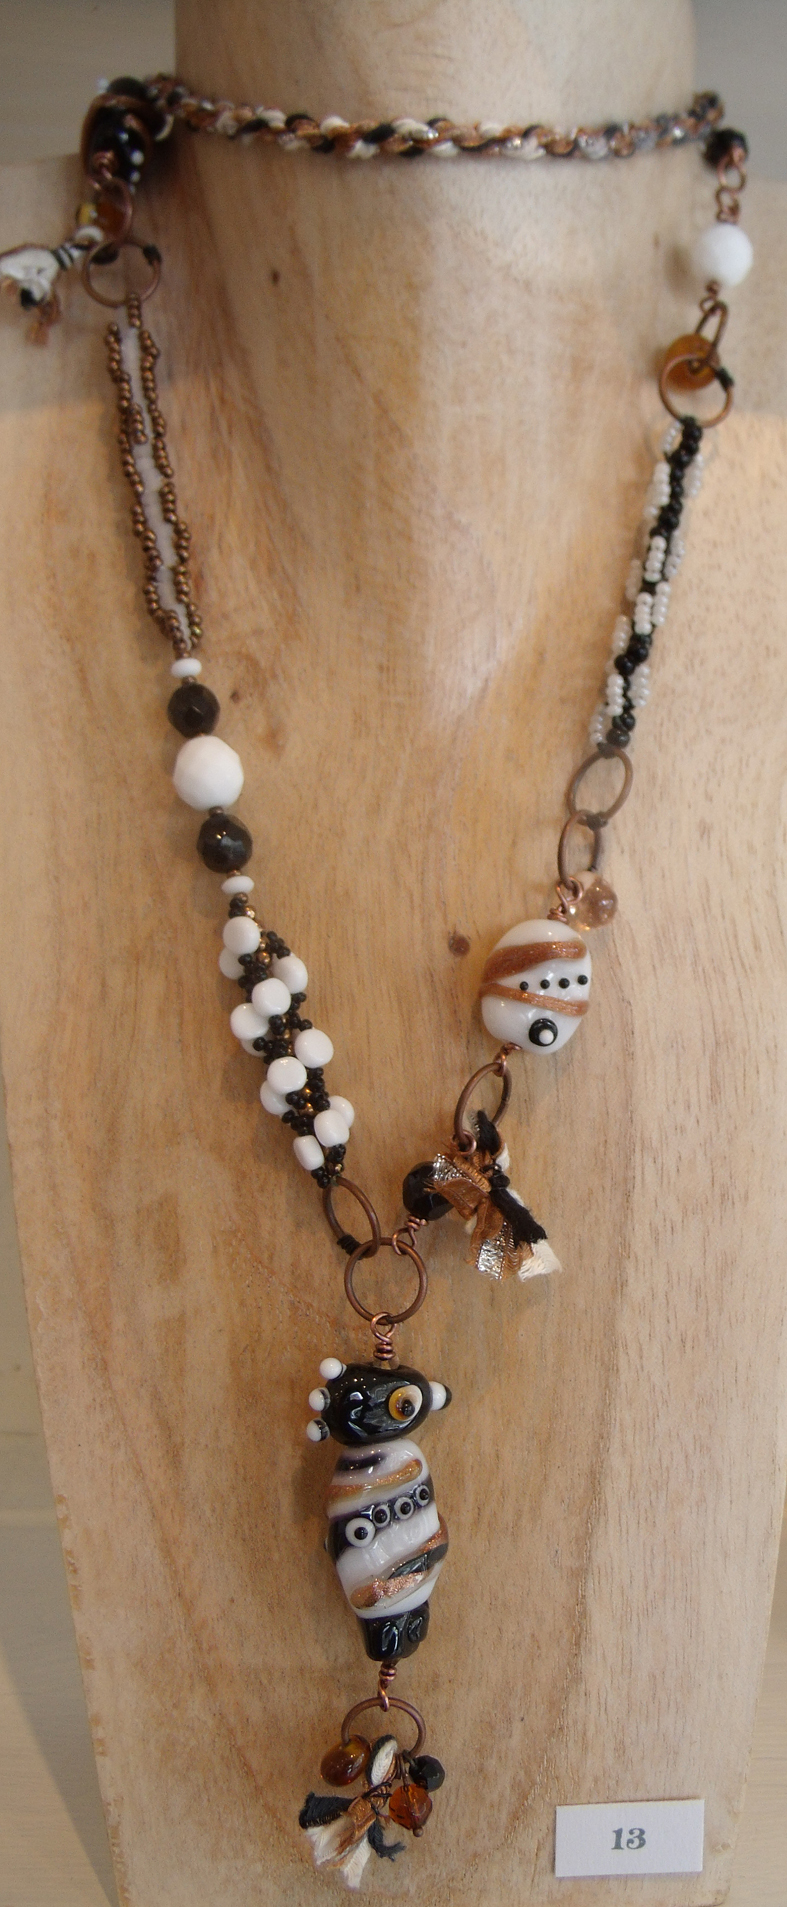
” I was inspired by the work I have done in the past for Heart Space Studios simply decorating willow hearts which are rustic in texture against different found objects – lovely old beads, buttons and lately clock faces. Feathers were the obvious things to add to the hearts for this project and making them into these angelic hearts”.And unusual beaded necklaces made by Ilsa Fatt, who teaches beaded jewellry making and often using her own lamp- worked beads as inspiration..
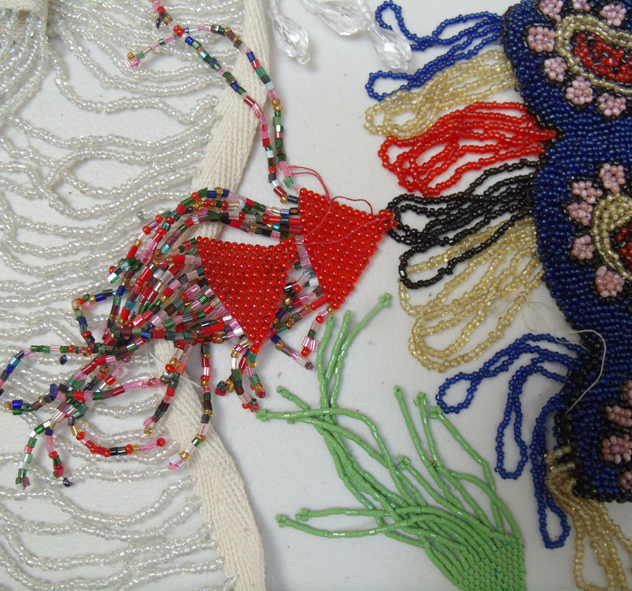
black and white necklace _ Ilsa Fatt
Re Necklace – Ilsa Fatt
“The seed for the idea of Spirit-Bird necklaces came not from a bird, but a beetle. I was thinking about the sacred Egyptian scarab beetle, which led me to thoughts on the strange Egyptian bird-headed gods. These were in my mind when I first started making glass beads for the Heart Space exhibition.
As I worked, I became more and more drawn to the idea of the bird totems of the Pacific North West coast, such as the thunderbird that can shape-shift into human form. The little glass birds that finally emerged are things-without-wings, but for me they embody the idea of wings, and of the power of imagination’s flight.
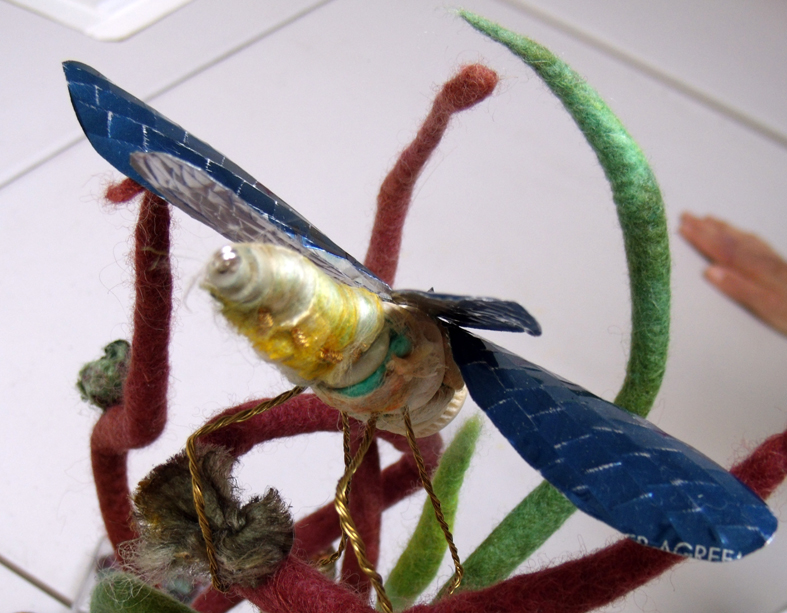
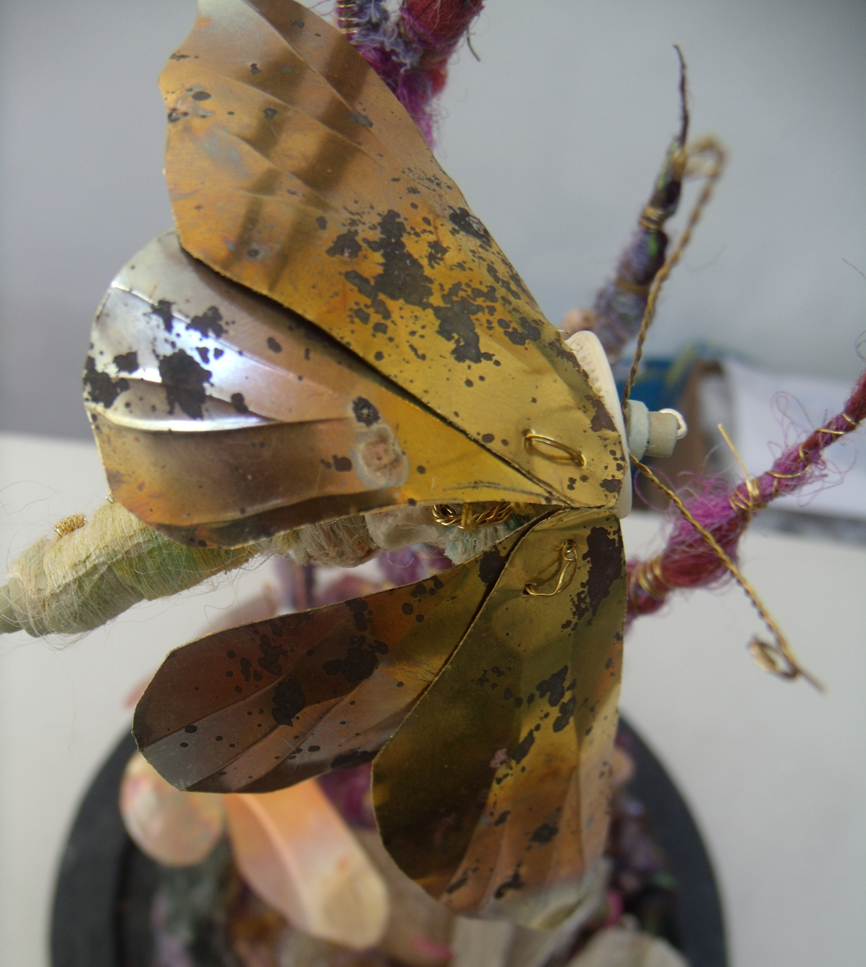
And now for both things with and without wings from Kirsten Hill-Nixon, who works with us teaching felt-making but has many other skills to be developed. she really took flight (sorry) with her imagination for this project.
The image below does not do justice to this piece – it lives under a vintage glass dome so is very hard to see with reflections everywhere – It is made up from some dyed and embellished real chrysalis – and the strange beings that have escaped from them…the twig is felted wool but everything else is metal and glass, with found objects like large beads and parts of domestic plumbing as well.
Curious Chrysalis – Kirsten Hill-Nixon
“What a Great Title – ‘Wings and Things’ – ‘Things’ could be literally anything! And with winged shoes, aeroplanes, sycamore seeds and half the animal kingdom to choose from – what should I do? I spread out all my shiny objects, threads and fabrics on a large table, things I have been hoarding for years waiting for an opportunity to use them – and here it is.
detail – Dragonfly, embellished chrysalis, tin foil, wire and beads – Kirsten Hill Nixon
There is always a moment of great excitement finding a shiny beetle in the garden; that unexpected flash of sparkling wing on the dragonfly – so Bugs it had to be. Small and precious like jewels, my winged things would need the protection of a glass dome just like the exotic specimens in a Victorian museum collection
I spread out all my shiny objects, threads and fabrics on a large table, things I have been hoarding for years waiting for an opportunity to use them – and here it is.
sheer invention – Bugs – Kirsten hill-Nixon
and just one more from this set of Things with Wings
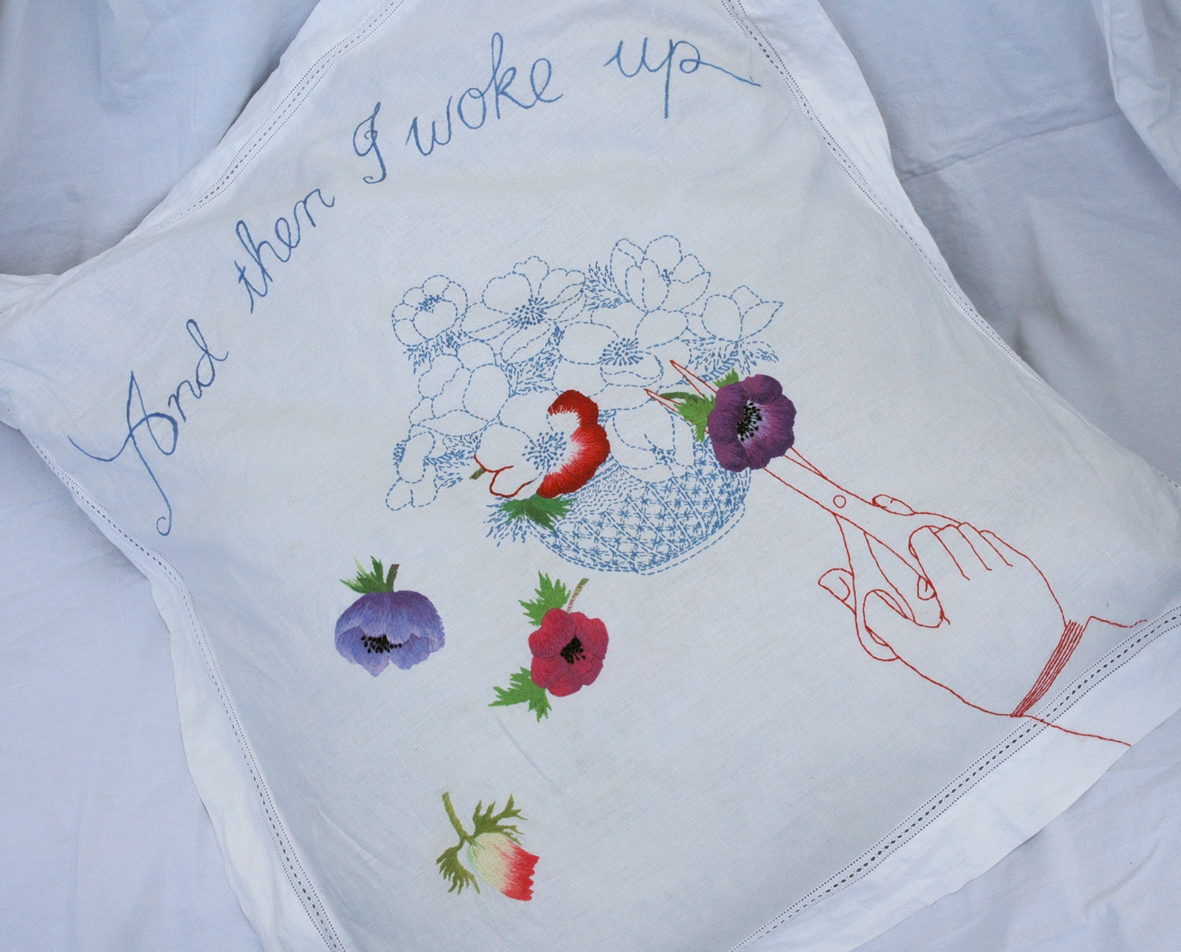
I seldom feel that my work fits easily into contemporary textile exhibitions – it often looks too colourful, or too decorative, or even too old fashioned in its simply stitched narratives…but recently I have work exhibited in a group exhibition that feels like I belong. “Construct – eight textile artists explore identity” is showing at the Ruthin Craft Centre in North Wales. Much of the work is expressed in the form of stitched domestic textiles: tablecloths, curtains, quilts and some clothes, and so my own embroidered counterpanes, bolsters and pillow cases of dreams feel very much at home.
Hand embroidered Dream Pillow from my ‘Make it Through the Night’ series
I was invited to submit work earlier this year by Dr. Melanie Miller whom I met when we both gave presentations at the Textile Society’s annual conference, Embroidering the Truth in 2013. Melanie’s presentation was an up to the minute resume of textiles by recent graduates from MA courses; mine was an overview of my embroidered narrative commissioned works over the past 40 years. Melanie worked with June Hill to quickly bring a focused exhibition together and also developed with Lisa Rostron, at Lawn Creative, an excellent and beautifully produced catalogue – well worth buying for a stand alone document even if you don’t catch the exhibition.
printed patchwork bed cover – Caren Garfen
Walking into the exhibition space the large and airy gallery looks fresh and the work on the walls looks clean and tidy – it also looks resolved. I often feel that much modern art textiles look like work in progress, like they have just been snatched out of the hands of the maker – full of possibilities and open to suggestion… but here is a varied range of ideas on identity, simply expressed with a rare degree of intent.
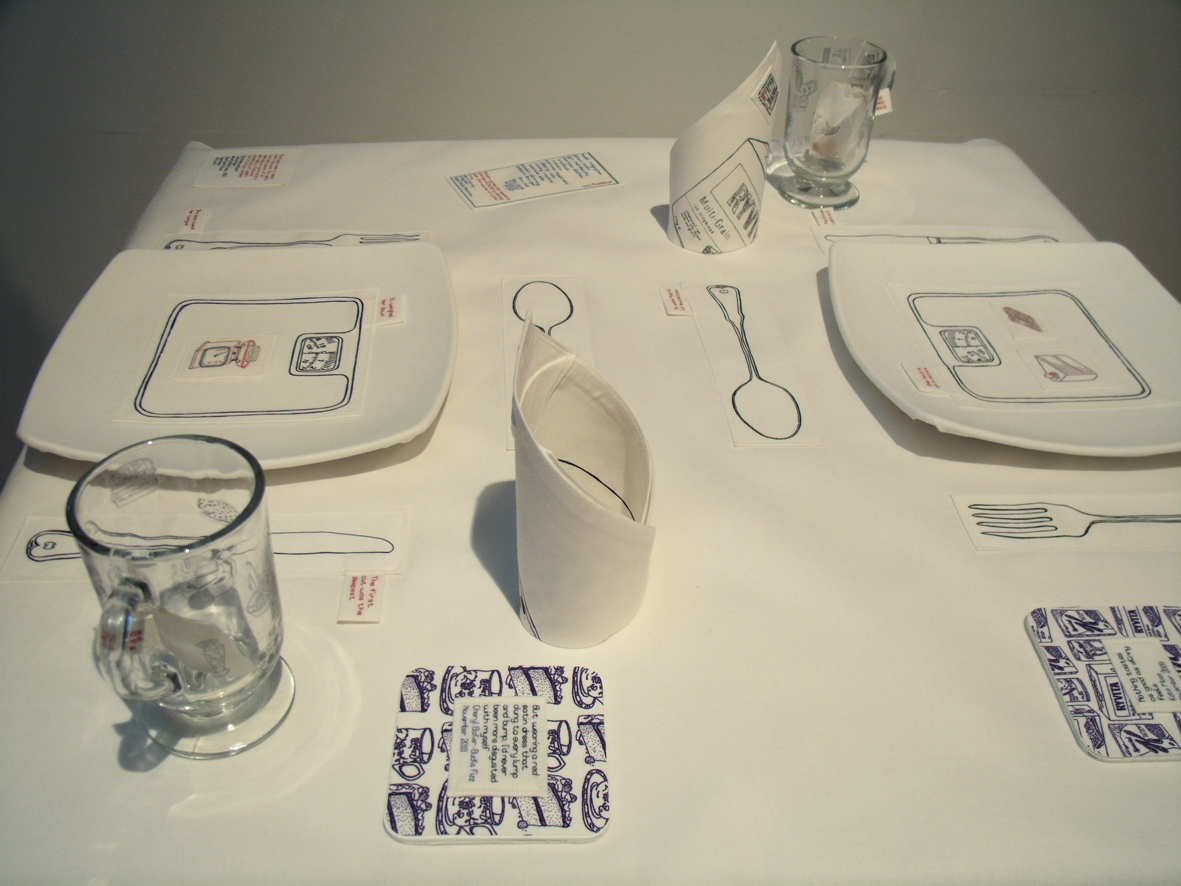
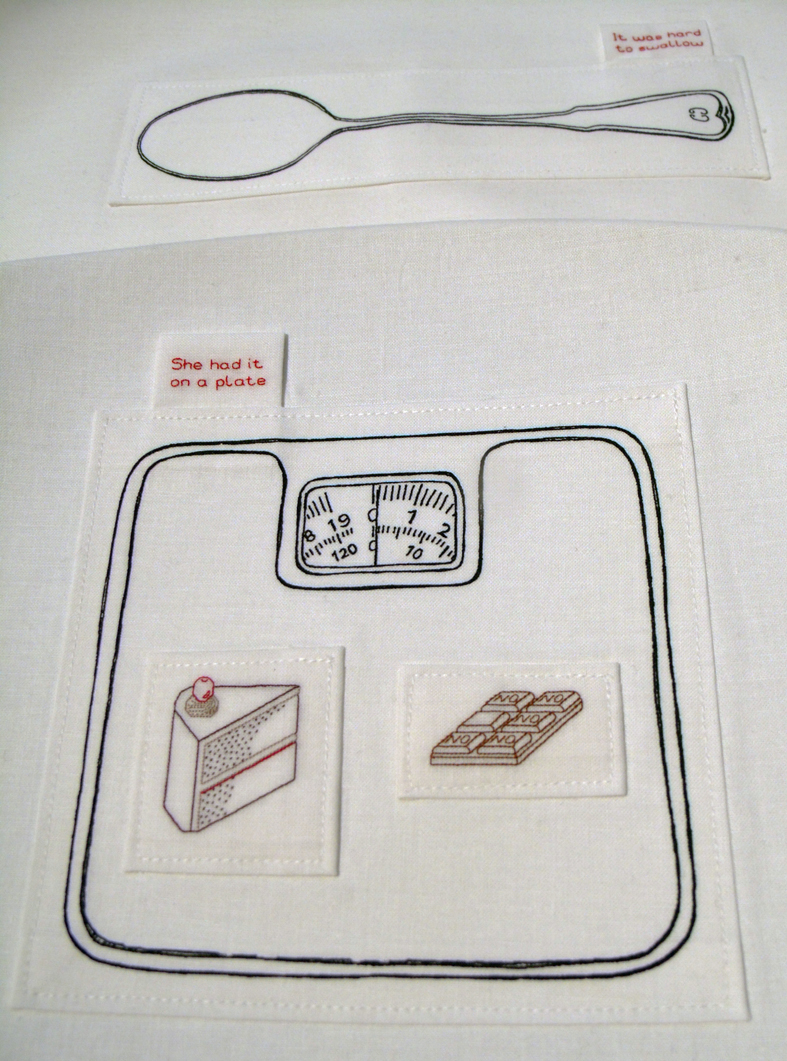
Don’t Make a Meal of It detail. Caren Garfen
The work of Caren Garfen has many overlapping concerns with my own; she uses popular phrases and she employs a sly humour to subvert. Caren meticulously hand stitches screen printed images with messages found in advertising aimed at women to conform as thin glamorous domestic goddesses
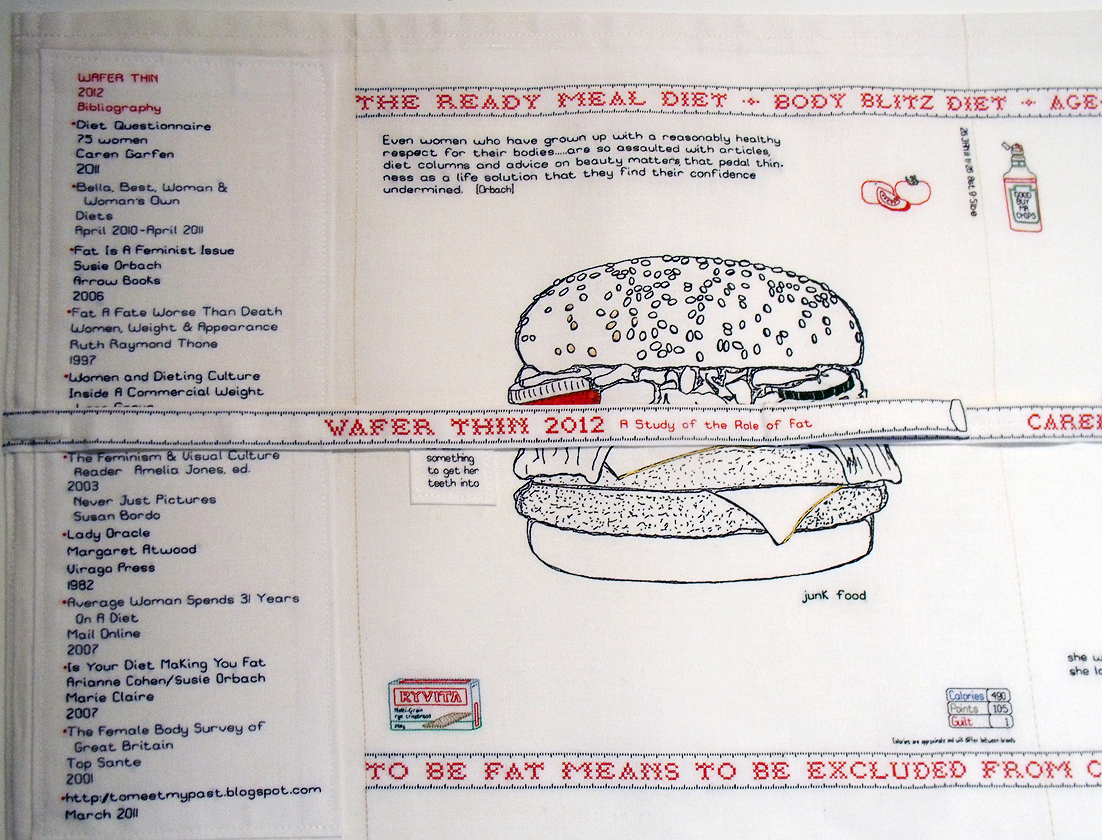
Wafer Thin – a study on the role of fat – Caren Garfen
Several of her pieces depict ranges of domestic tasks that usually fall to women to manage; the relentless repetition of her imagery, whether patched, printed or embroidered, echoes the repetitious nature of all domestic work, after all – a woman’s work is never done. The roll of fabric printed and hand embroidered for ‘Wafer Thin’ is 10 metres long!
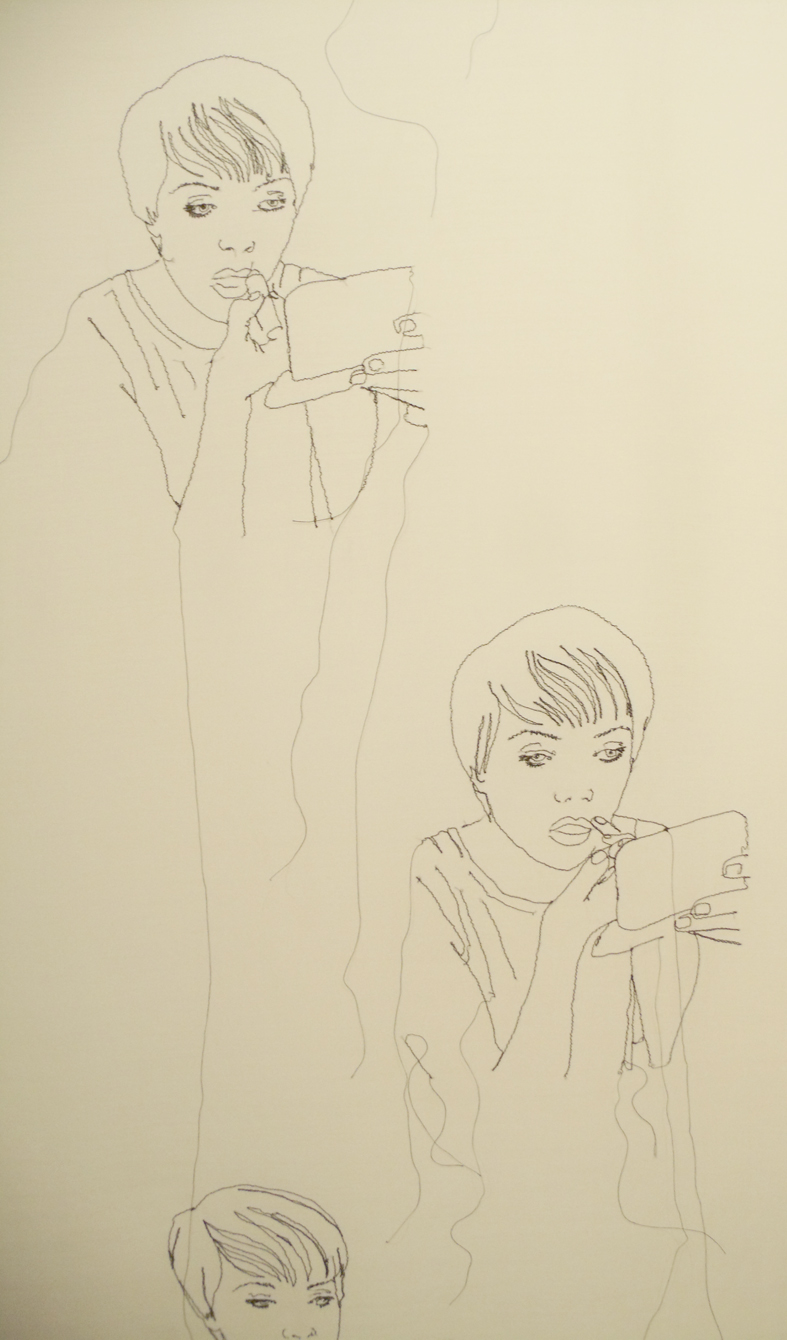
Sarah Puts her Lipstick on – detail Naomi Ryder
Repetition is also a device used by Naomi Ryder – she records a daily task for many women – putting on make-up; for some a chore (me), for others a delight. By repeating the same but slightly varied image over a length of fabric she shows the time and energy spent on getting our public ‘identity’ in order before we go outdoors.The continuous daily tasks that women are expected to devote their time to – cleaning, ironing, shopping – she depicts by machine embroidering acutely observed small-scale line drawings onto lengths of sheer fabrics that recall net curtains.
detail of Katherine’s Day, Naomi Ryder
Women’s work undertaken to construct an acceptable public identity is a subject shared by these 2 makers – but what of the men? Interestingly Nigel Hurlstone, I know, takes extreme care over his own personal presentation but as yet has never chosen to reflect on this in his work.
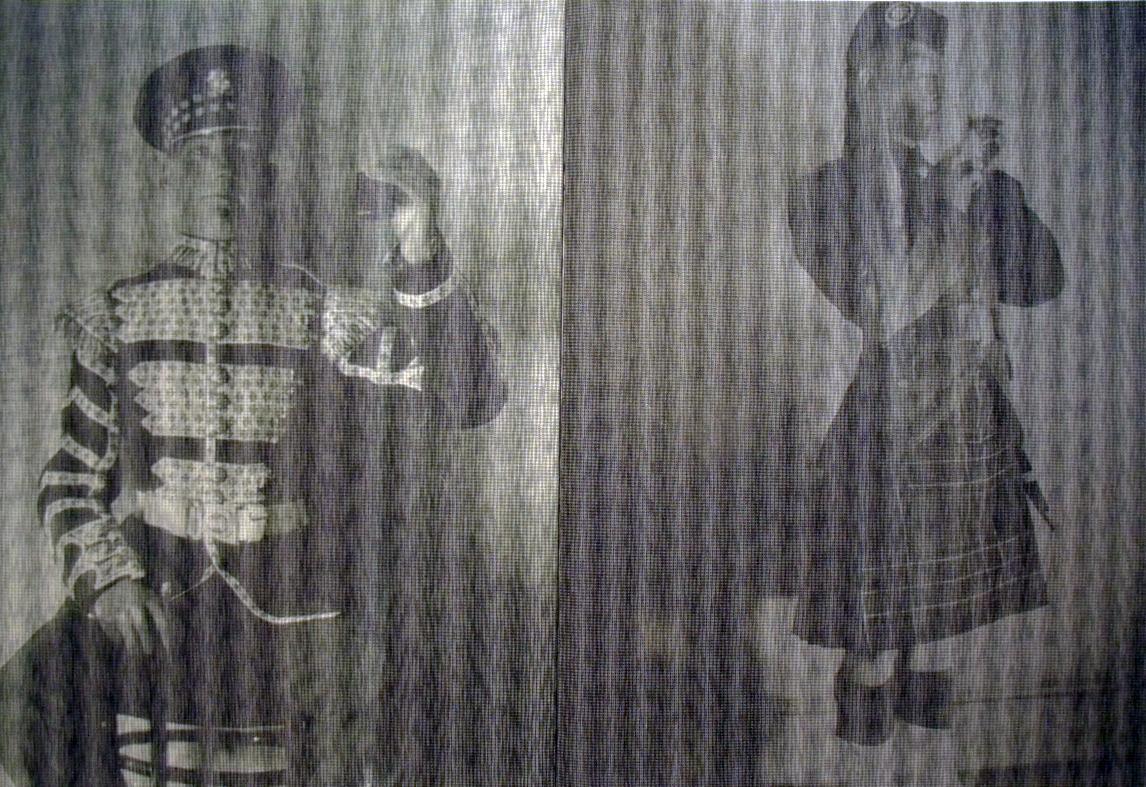
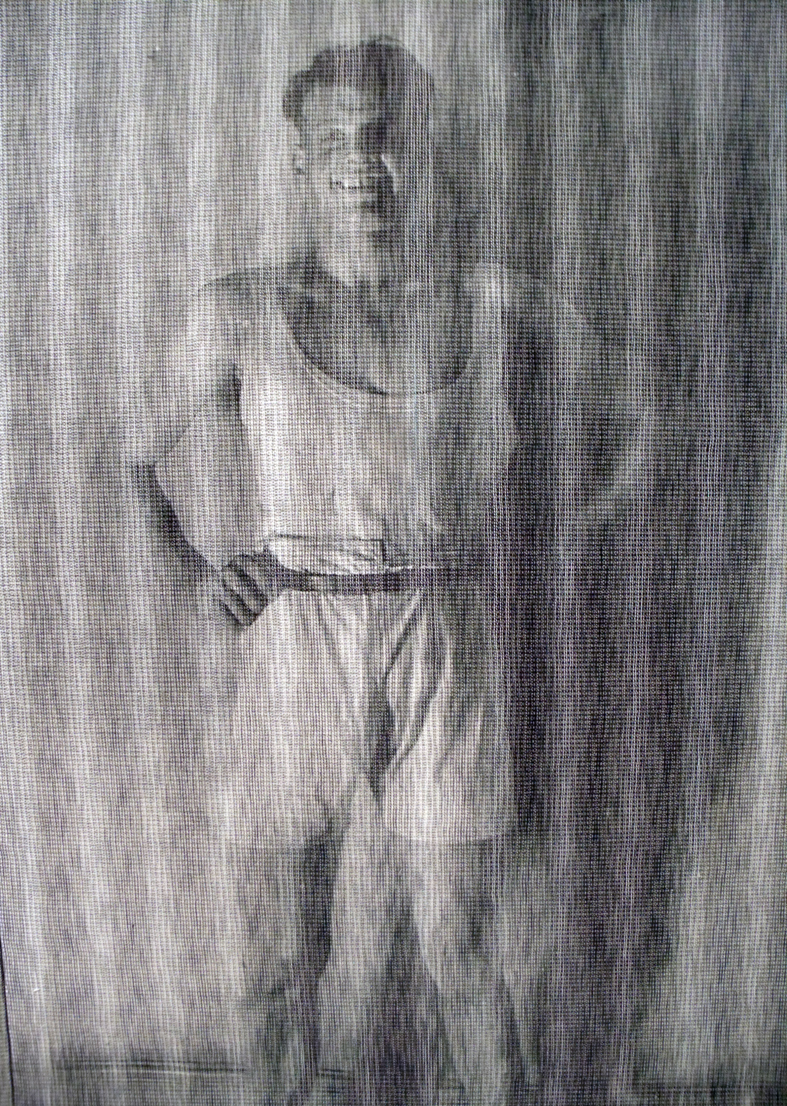
Nigel’s powerful group of stitched photographic portraits of men who have been very carefully costumed, create an ambivalent atmosphere – half jolly japes and half menace. The 9 pieces of work shown are based on a set of portraits of young men, taken between 1918 and 1950, in what could be construed as ‘fancy dress’ but presumably dressed up , or down, for the sexual delight of the photographer.
machine embroidered photographic imagery – What Pleasure by Nigel Hurlstone
The men were dressed either as street urchins or soldiers and they were apparently picked up on the streets and then posed to conform to a sexual identity desired by the photographer…to my mind they look to be highly amused by the proceedings…..
However – the tight rows of machine stitching make the fabrics look like moire or water-marked and obscure the almost life-sized photographic images. I think this makes them initially more easily accessible to the viewer as we aren’t exactly sure of what we are seeing. The actual fabric is compelling, you can’t ‘read’ it easily and this allows the viewer an excuse for deeper scrutiny – close up and personal. The original subject matter was never meant to be for the public gaze, at first glance the men look happy though not exactly innocent, but somehow when we are closer we are aware of an undertow of sleaze or is it menace?
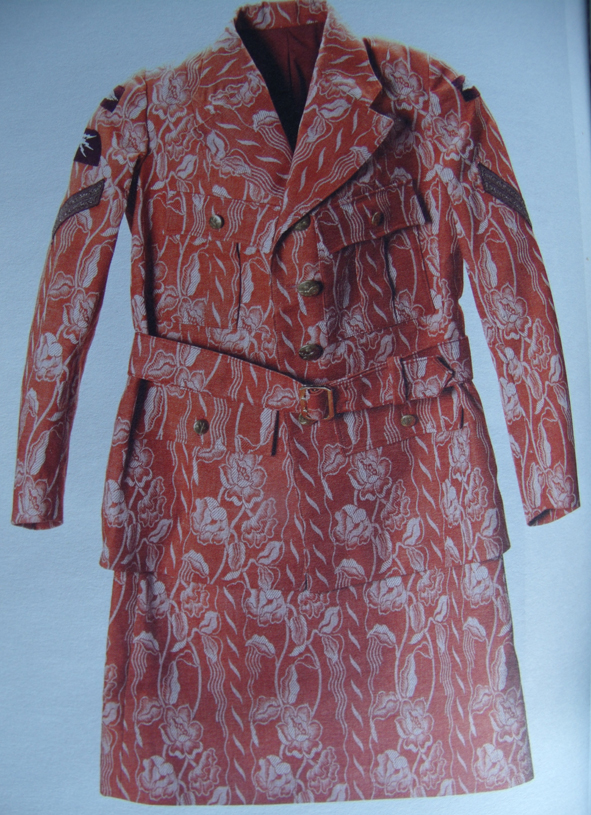
Curtains to Independence – Women’s Auxiliary Service uniform made from vintage curtain material – Val Jackson
War and its effect on women’s change of identity is clearly a personal issue for Val Jackson. Her work deals with reflections upon her mother’s life – the uneasy transition from performing vital and fascinating war work in contrast to the traditional role of wife and mother. Inheriting her mother’s effects, including her correspondence during the war, made it clear to Val that this transition had been difficult. The arresting burnt -orange curtain fabric uniform very neatly combines the 2, opposing? halves of a woman’s working life – the professional and the private.
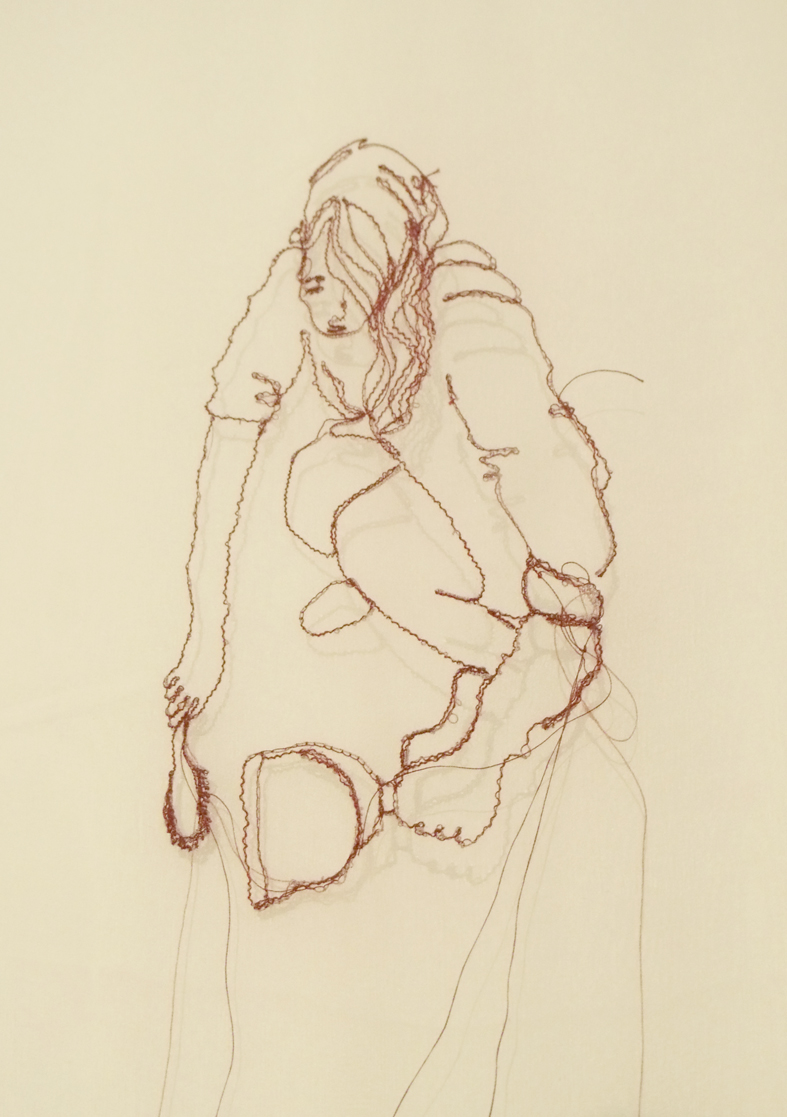
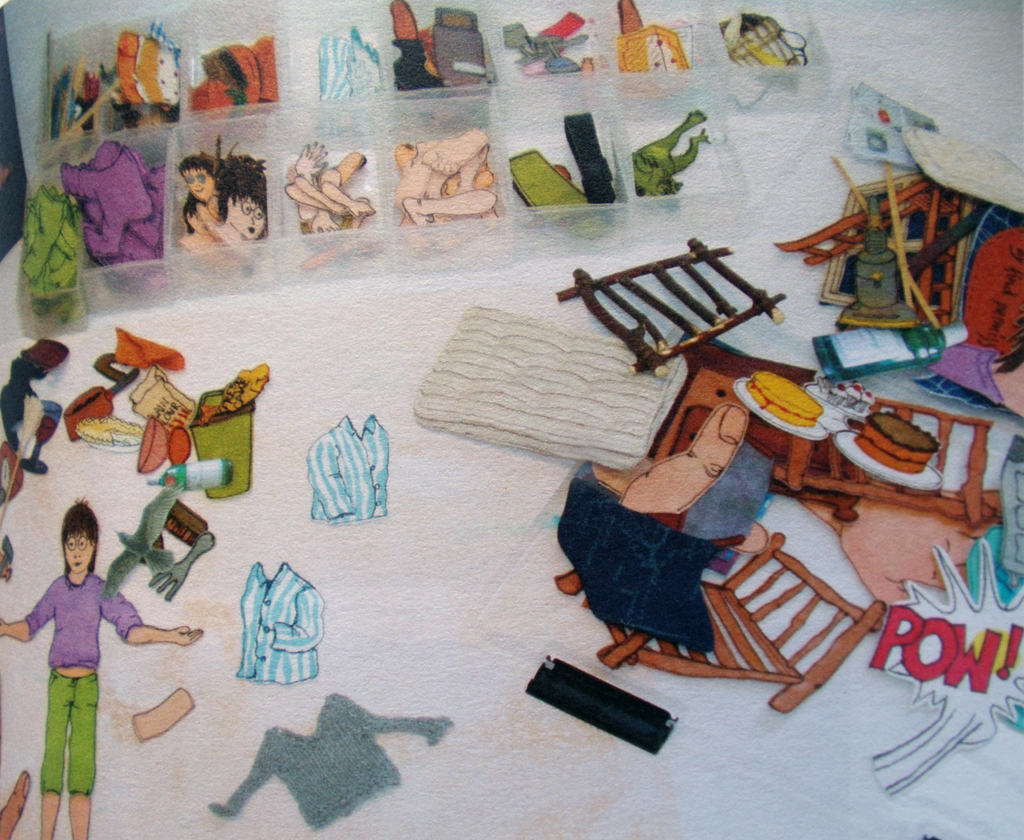
fabric figures ready for stop motion animation by Linda Barlow
From my own observations of friends and colleagues, the pull between motherhood and making your own work as an artist is a major modern predicament. Linda Barlow uses humour and cartoon representations to depict the complexities of managing this situation. Based on interviews with 8 such women she has made a short animated film – ‘Artist Mothers: a series of observations regarding the frustrations of being an artist and a mother”. It does what it says on the tin – refreshing not to have a punning title – I am guilty of the over use of puns myself…note for later.
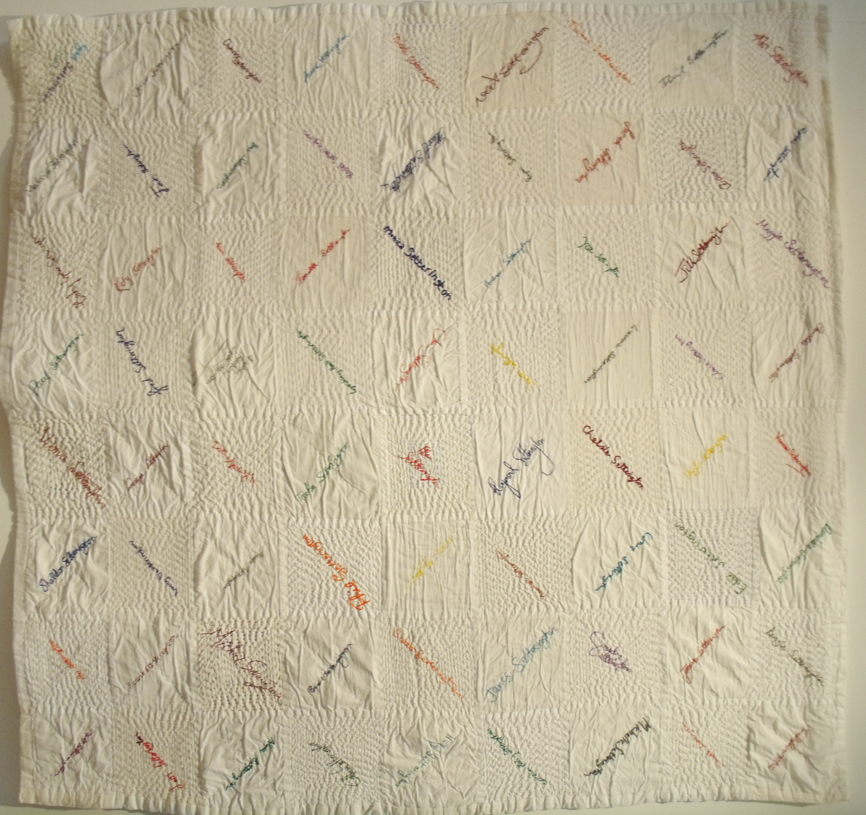
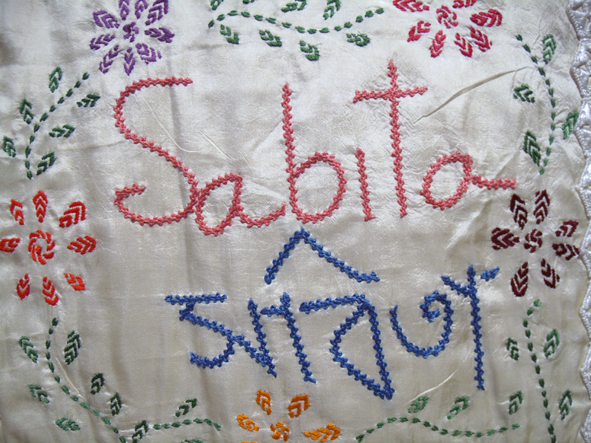
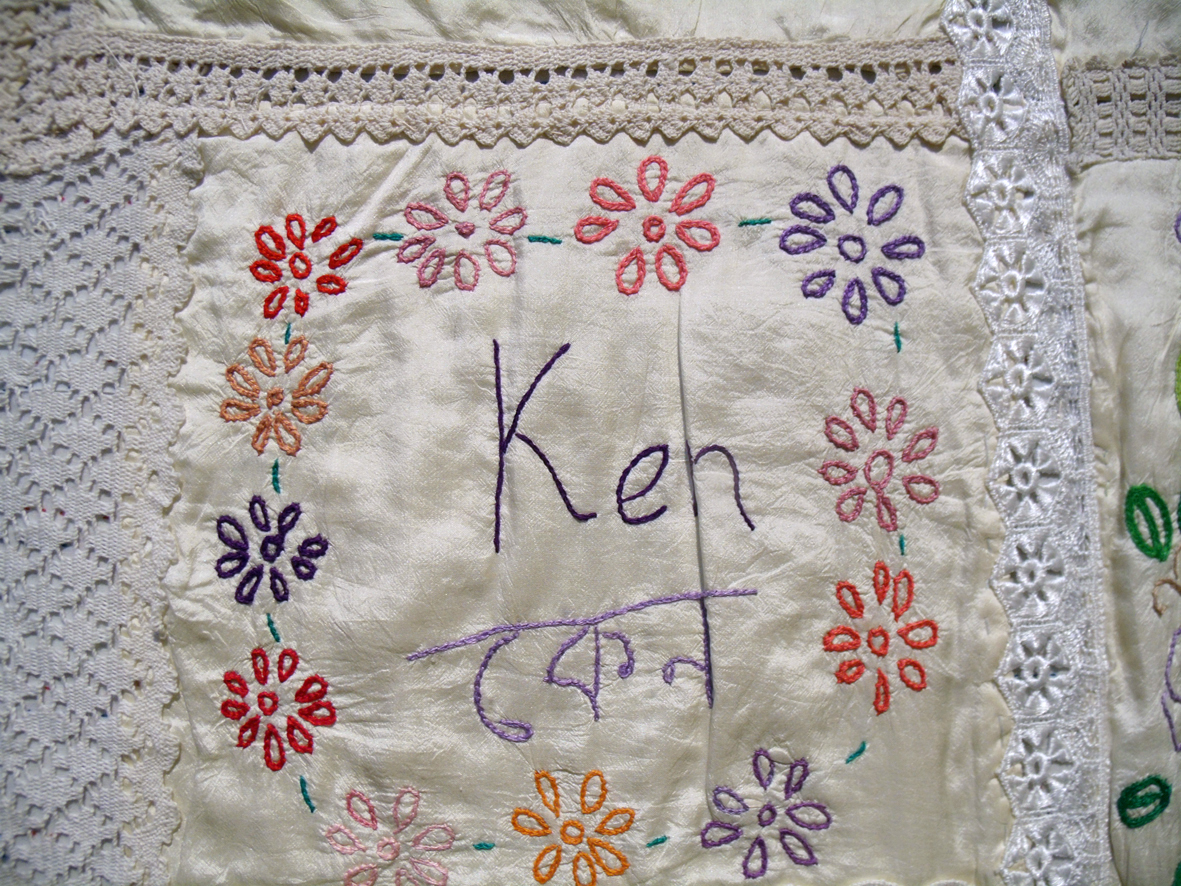
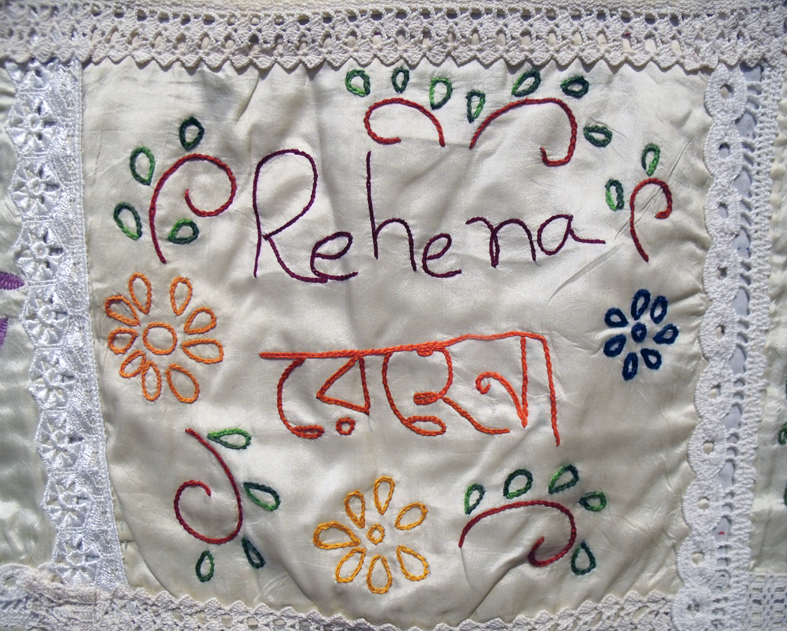
Women artists often choose to who work within a community – I always think that this is half way between being a social worker and an artist and a really decent thing to pursue. Two such people have this type of work exhibited; Deidre Nelson,who has chosen to work around the world, using textiles as a means of defining the social history of an area, often working with local groups of people, and Lyn Setterington – who makes quilts based on the Kantha technique.
Signature quilt – Lynn Setterington
Lyn also works on textile based projects within communities; quilt making is historically a community based production, so her own interest in the history of her chosen medium makes a natural lead to this activity. She has recently become fascinated by Signature Quilts and I share this interest – Crazy Quilts – which fascinate me, often contain signatures and messages and they do make the mind start the journey to who exactly made this. There is at present, in artists’ textiles, a fascination with writing as evidenced here – and as part of the education programme at Ruthin Craft Centre I have undertaken to teach 2 workshops for different styles of hand stitched writing while the exhibition is still showing in July.
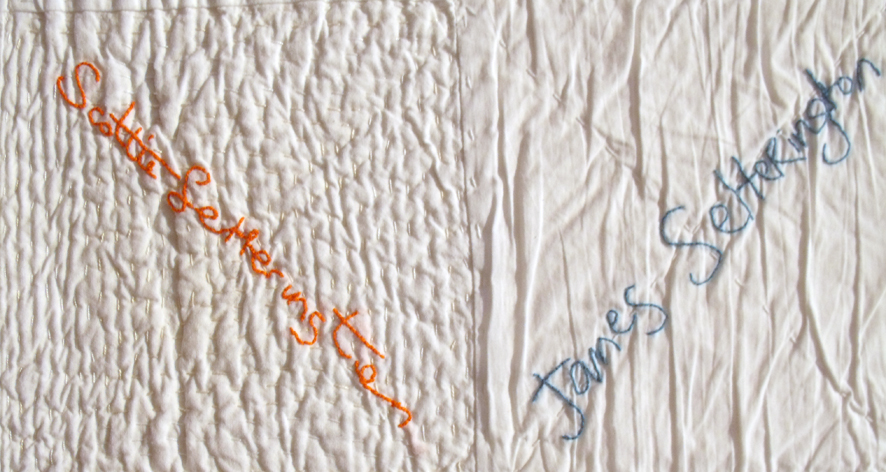
family names quilt detail- Lyn Setterington
Lynn sees the signature quilts as a form of social networking, as she brings groups of people together to make to celebrate their local community. A richly embroidered quilt stood out in the exhibition, the Streepur Quilt
I enjoyed the wealth of embroidery that was evident on the quilts. Rich in many different stitches they are a testament that decorative embroidery is alive and well somewhere in the world. I can see pattern darning, running stitch, chain stitch, back stitch and coral knot just in these 4 samples as well as crochet and Broidery Anglaise even if machine made. I also like the change in “taste” that this quilt brought to the exhibition, they had so much energy and joyfulness – but maybe that is just a reflection of my identity as an embroiderer at heart.
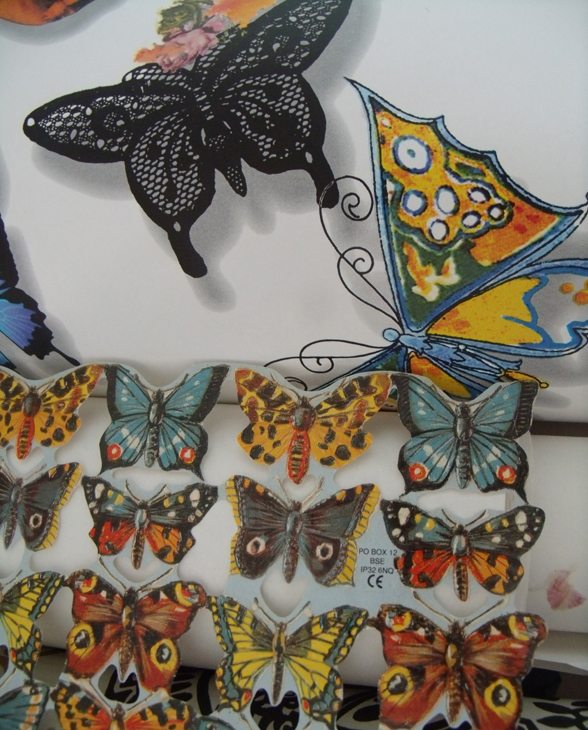
research workshop materials -printed paper butterflies
‘Wings and Things’ is the working title for an exhibition being developed for the local community’s annual “Westbury Park Festival”.…last year we hosted a drop-in making felt flowers – this year we are show-casing the talents of the staff and tutors at Heart Space Studios – so no pressure!
research workshop materials – feathers
Each of the 11 people who opted to work towards the theme have committed themselves to attending up to 3 research sessions when we all work together to make a mixed media exhibition – by mixed media I really mean any materials that can be connected to textiles, either physically or metaphorically. ‘Things with Wings’ was an idea proffered by Debby Bird (who else?) who is a busy tutor at the studios and a major force for developing new ideas for classes. We are working together to make an unusual and hopefully amusing exhibition
selection of glass beads for workshop materials
It is always fascinating to see how each person responds to any given the brief: we had asked for any ideas and drawings/ samples of work ready to be discussed on the day – we wanted everyone to participate in helping one another develop ideas, otherwise working in a group can be really distracting.
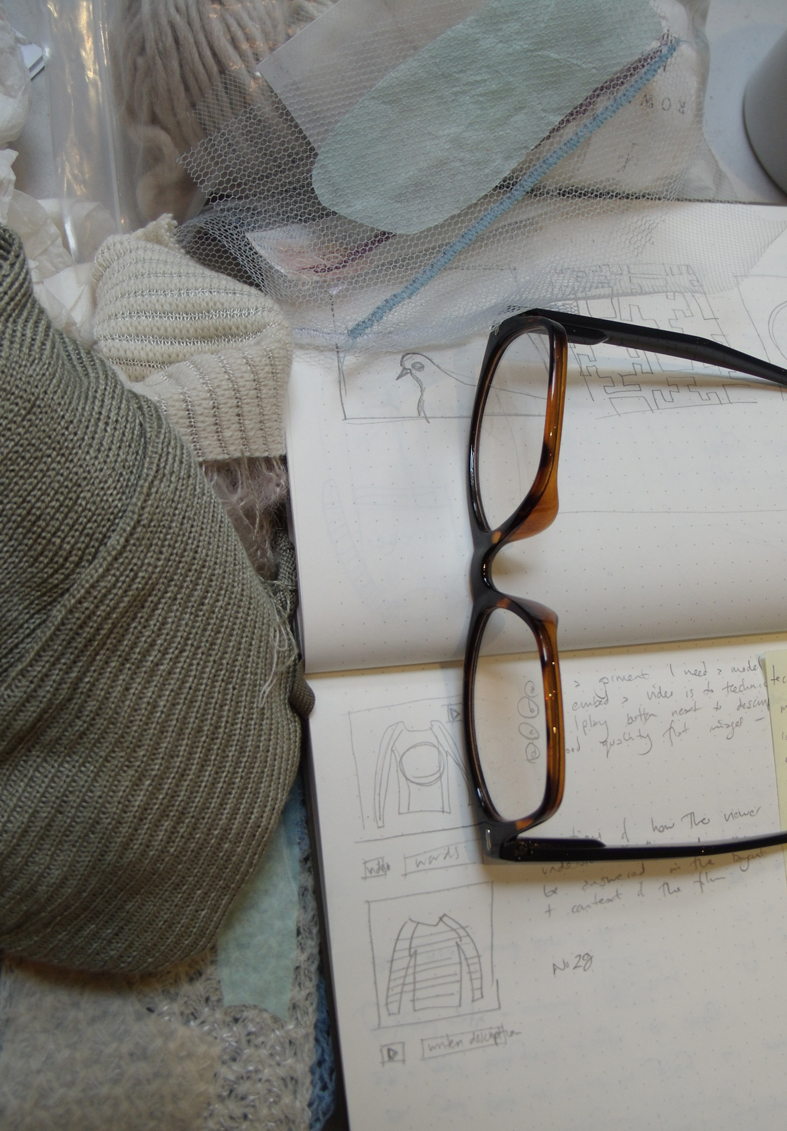
Step Wooster brought the real thing
teeny tiny drawing book of ideas with pigeon coloured materials – Steph Wooster
Steph Wooster brought several real birds wings that she had been given by a local game butcher, plus some tiny drawings in the goes-everywhere-with-her-sketchbook. She placed the book open at a pigeon drawing next to a bag of – to my mind – Pigeon Coloured materials….
Ilaria Padovani’s grandmother’s patchwork design re-sampled for the project
Ilaria Padovani, brought a couple of samples specially prepared for the day – one a pair of collaged wings which was bright and busy, but another patchwork made from a pattern that her grandmother had made for her as a child it was her favourite winged thing – the dragonfly – and it is full of flight!
We immediately advised her to just make lots and lots of them in all sorts of different colours and to exhibit them flying randomly across the walls. I had brought in several frames to establish various sizes of each piece – Debby and I needed to have an easy hanging session prior to the exhibition opening. It was decided to wrap the dragonfly patches around small stretched canvasses and so keep them light and airy.
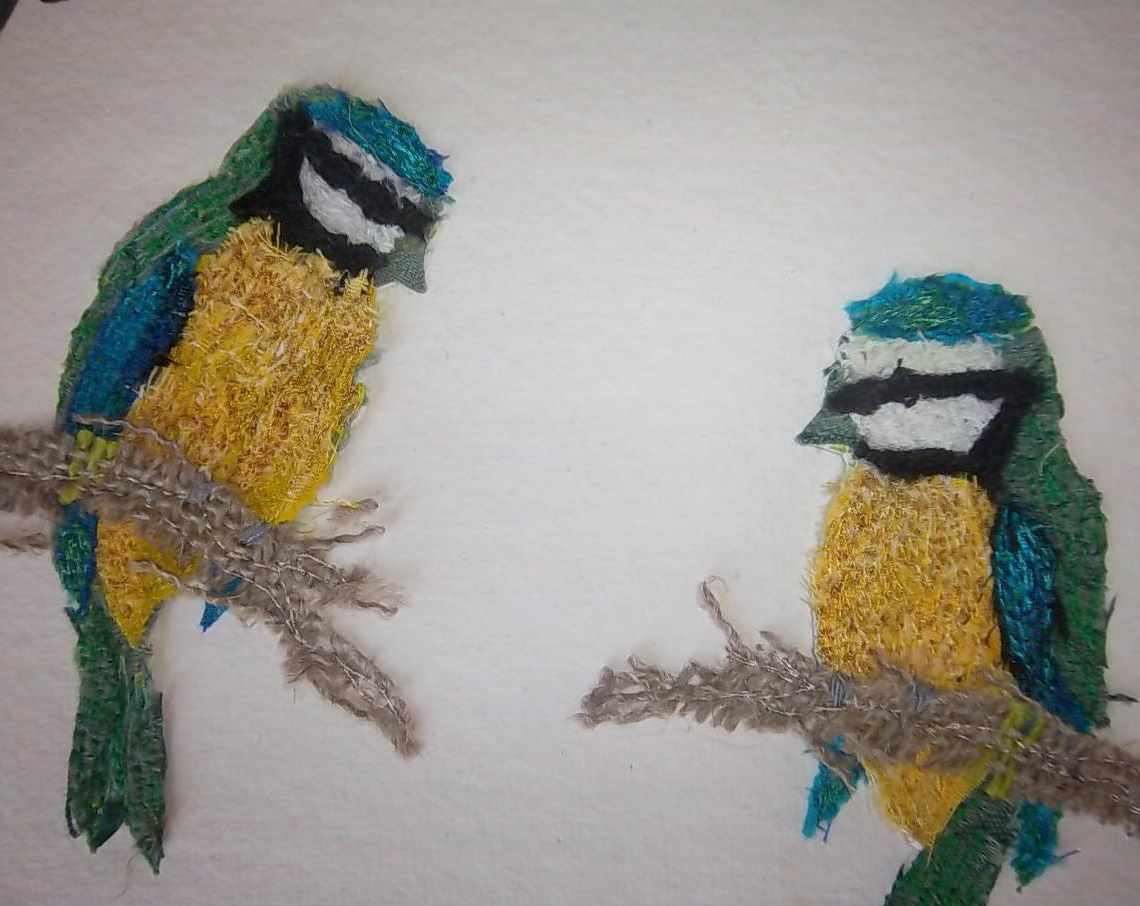
Mary Bishop – appliqued and embroidered birds
Many textile artists, regardless of name, work with bird imagery; Mary Bishop has made several pieces of bird related embroideries and so she brought a few of her early samples and an open mind, as it was her first tutor’s making group attendance. She is really taken with the idea of Magpies – after all they do like bright shiny objects and we always have lost of those at Heart Space.
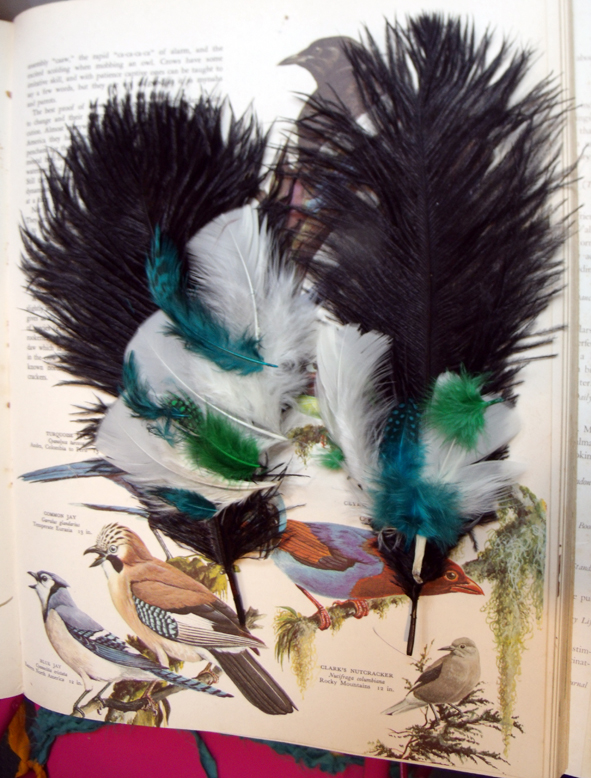
glamorous feathers placed on top of a vintage bird book I had brought to the workshop – a really good idea for further collages here.
beads and feathers for Magpie’s stash
I thought she should start with the nest – I mean she can easily do the birds at home alone – but the nest and it’s contents could be found in the studio stash….I asked her to just find lovely things a magpie might steal from us and then to make a nest from them, later she can choose to use parts of it as a sort of grounding for the birds or develop other ones from other materials….the ideas are endless here.
starting to make the Magpie’s first nest – Mary Bishop
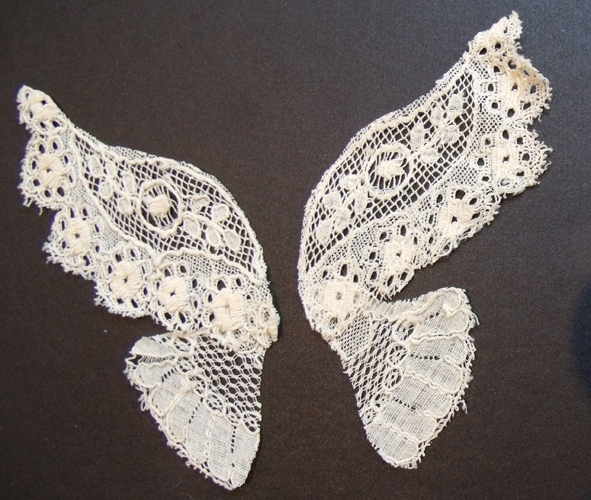
Some people had already started making flying things from textiles, Sophie Bristol has carefully cut wings from a length of vintage lace..the ways ahead were obvious, lots of different wings from different laces just needs to sort out the bodies – rich ground for playing with all sorts of media. However……
beginning of a cut lace butterfly – Sophie Bristol
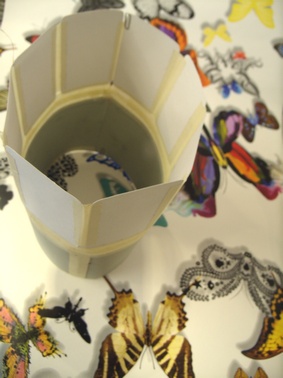
striped of silk fabrics to make into a 3D bird cage….a really innovative idea and a lot of interesting work to develop.
during the introduction when everyone had to show and talk about their own ideas she liked the idea of making a cage from a sample made in an earlier workshop.
She set about making a prototype in card and tape to ascertain the sizes and shapes required – but what will the cage contain?
cylindrical cardboard sample for Sophie Bristol’s birdcage
One way to use a themed exhibition is to try something new or an idea that has been on the’ back-burner’. I think Kirsten Hill-Nixon thought this way. She arrived with lots of well organised materials, books and ideas – lots of drawings in her research book and a firm grasp of what she wanted to achieve…it’s a tall order!
like a cabinet of curiosities – Kirsten Hill-Nixon’s research materials
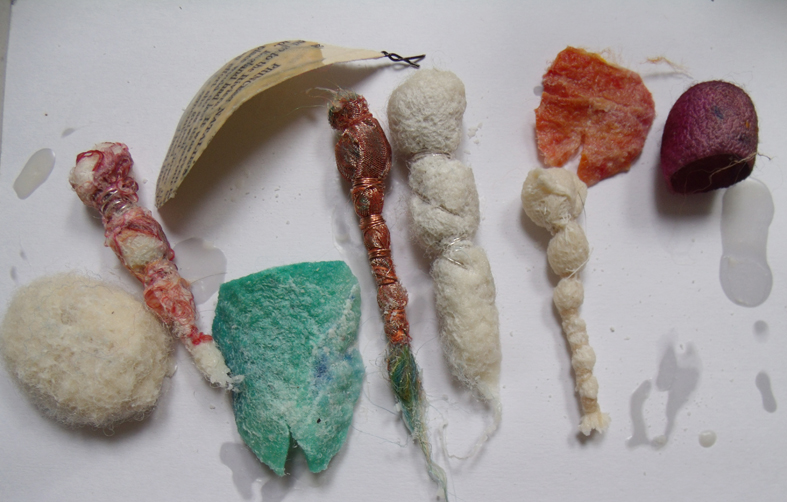
Kirsten wants to make a series of exhibits of ‘natural’ objects trapped under glass domes…she is making different types of what look like fungi and cast off chrysalis shells. She is making them out of all types of fabrics, waxed and “preserved” – I found these curious things near a batik kettle – where are the winged things that maybe emerged form them?
waxed casts and wrapped objects for Kirsten Hill-Nixon’s curious collections of post-flight litter?
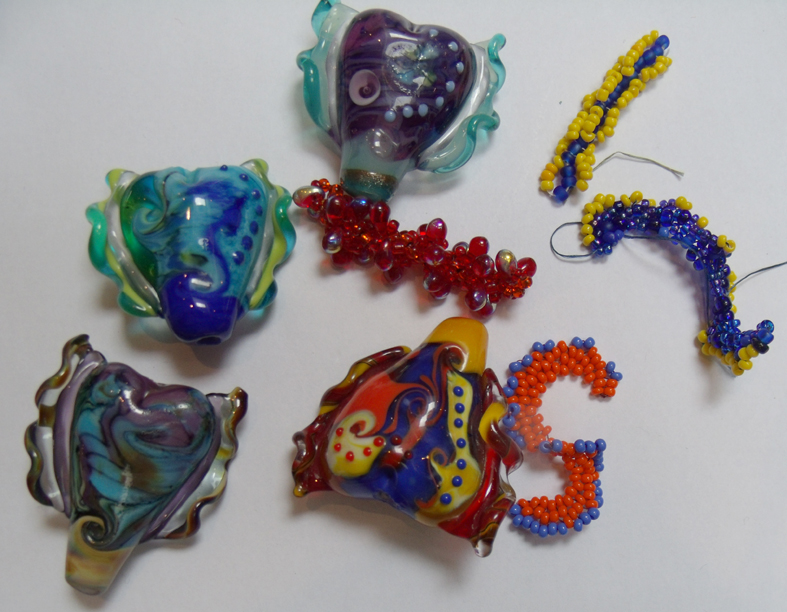
Ilsa Fatt had already designed and made several beads that were based on hearts with wings but the general consensus was that she should make bigger beaded wings –
Hearts with Wings glass beads – plus some wriggly beaded ‘things’ – Ilsa Fatt
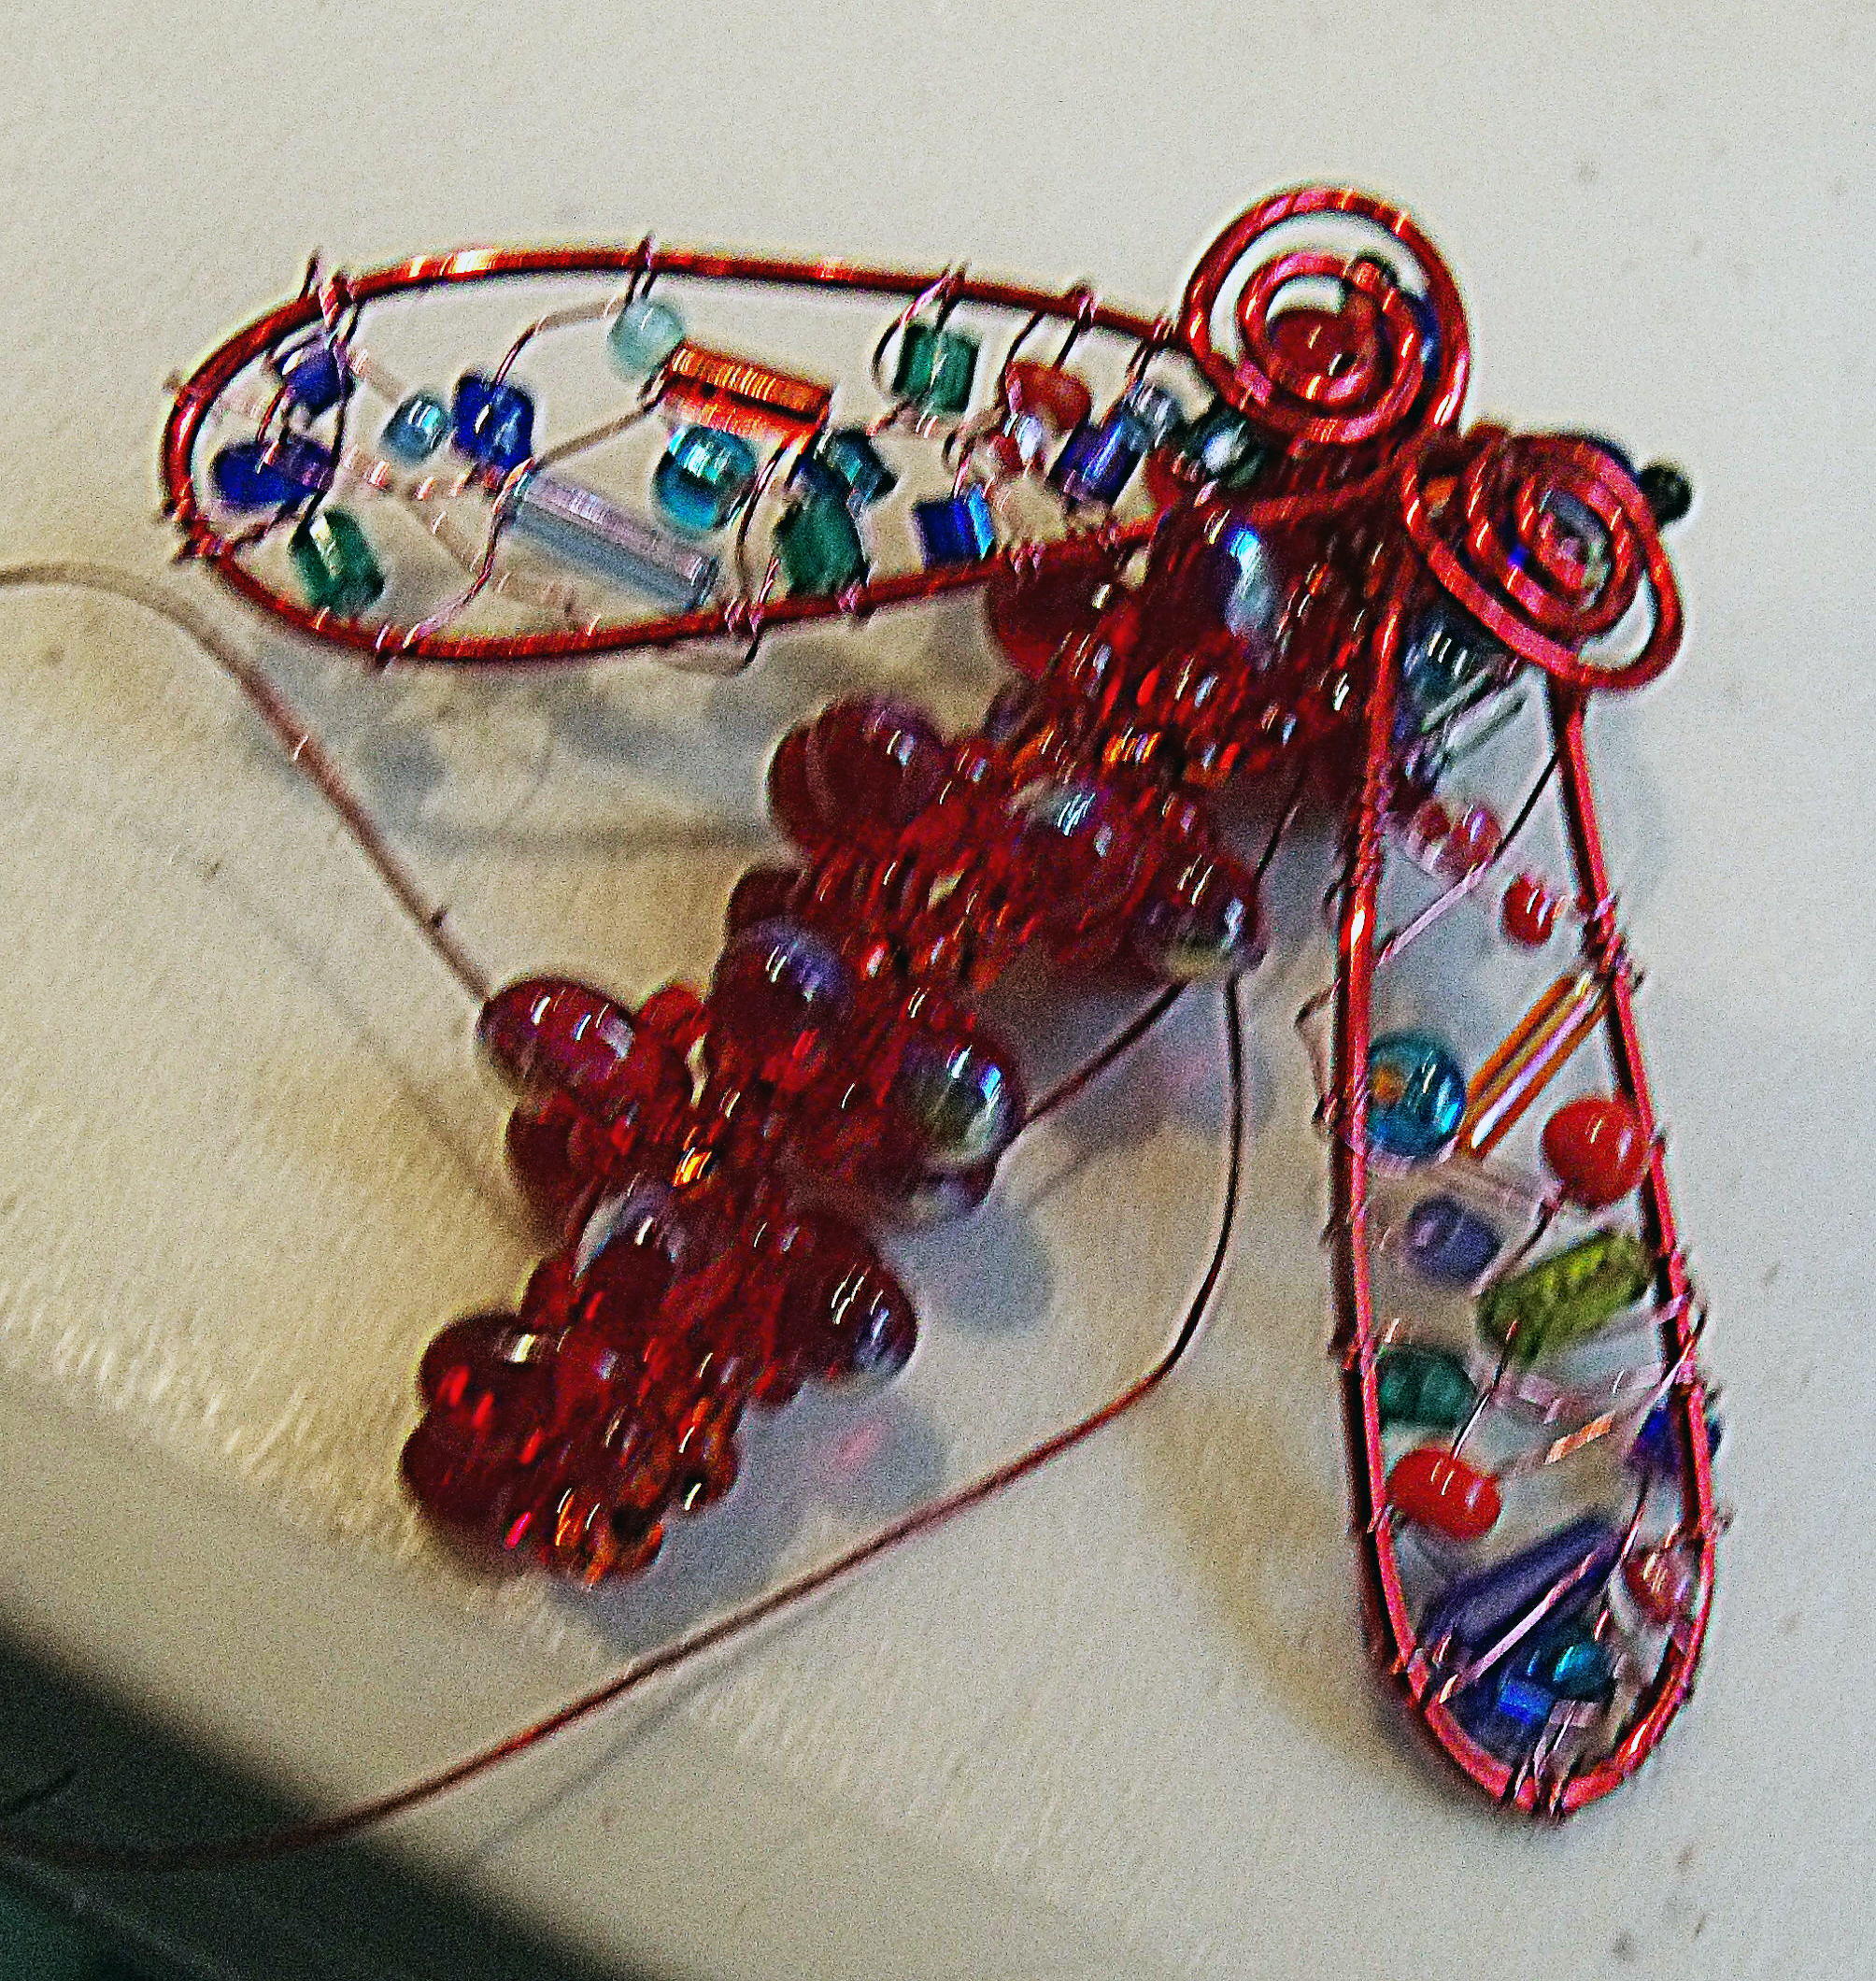
twisted beaded wire winged thing – Ilsa Fatt
Debby Bird had made lots of tiny wings and insects using twisted silver wire and she suggested Ilsa make some and by the end of the session when the red beaded winged thing emerged we all wanted to wear it, either as a brooch or worked into a necklace.
Silver wire shapes with opalescent threads ready for sampling – Debby Bird
Debby Bird always has lots of different media to develop into new and desirable objects and images…she excels in hunting out amazing new products and manages to incorporate them into her work…unlike the rest of us! She had made several different samples prior to the session but the thing she settled down to was an idea from her paper cutting experiments.
perforated paper dragonfly design – Debby Bird
the results of a long time piercing the paper with a needle was ethereal and beautifully nuanced when see against the skylight. I am looking forward to seeing how this essentially simple idea is developed into further work….all sports of light fitments and holders could be made – I must give her some vellum to sample.
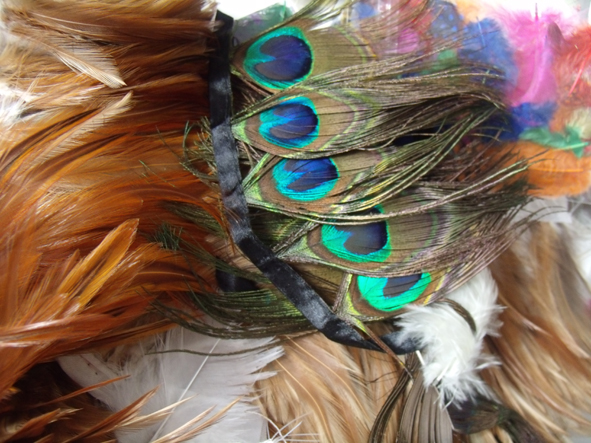
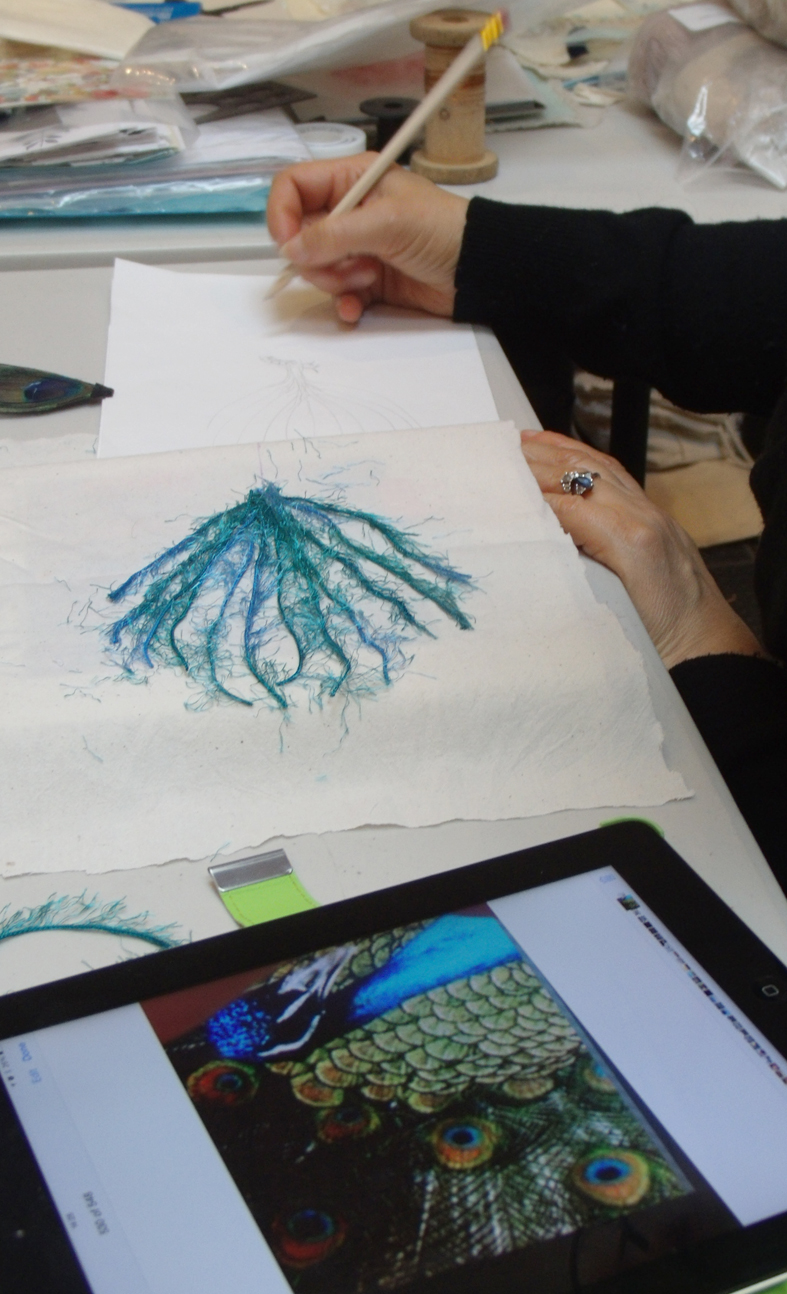
new research tools for our latest volunteer, Ceema McDowell
Sitting next to Debby, who by piercing paper was working with one of the most primitive way of making a mark, was Ceema McDowell, busily using the most modern of research tools to develop her peacock design…the strands of random dyed woollen yarn is reassuringly traditional.
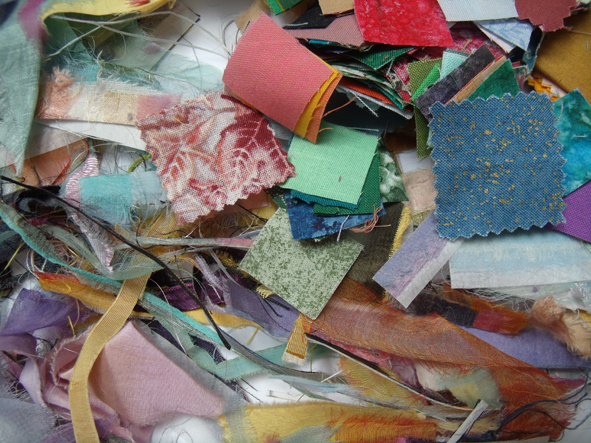
Threads found when sweeping Heart Space Studios workshop floor
And to me – what did I get to do? well not a lot on the day but I have had a frivolous idea for this project – it is not at all what I usually concern myself with, but it would not go away….so I told the group to see how they would react – they laughed but said it could be really interesting.
One of the daily chores of running a workshop -based studio is sweeping the floor before and after every workshop – and there always seem to be tumbleweeds of threads and fabrics under the tables and in the corners…
left over fabric scraps from my own studio floor
as well as spilled beads or left over buttons…….it was the buttons that made me ponder: why are there always masses of Beige Buttons left unused in any button collection?
Beige buttons fly to button heaven with silk embroidered wings: sample idea by Janet Haigh
I started to imagine where all the unused beige buttons will eventually go; will they fly off to a beige button heaven? Will they then become pearl buttons when they were beatified? I also thought of the threads and the fabric scraps…what would become of them if they flew to heaven – how would their wings look and what’s more – what would their eventual version of heaven look like?
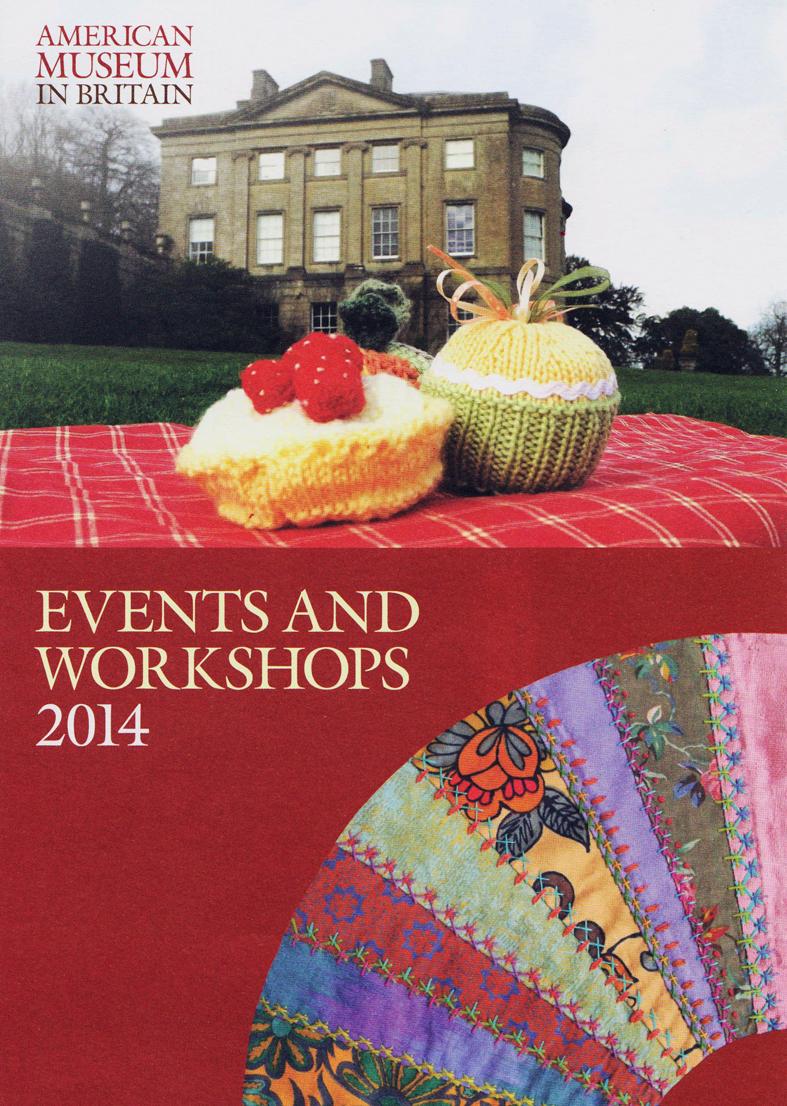
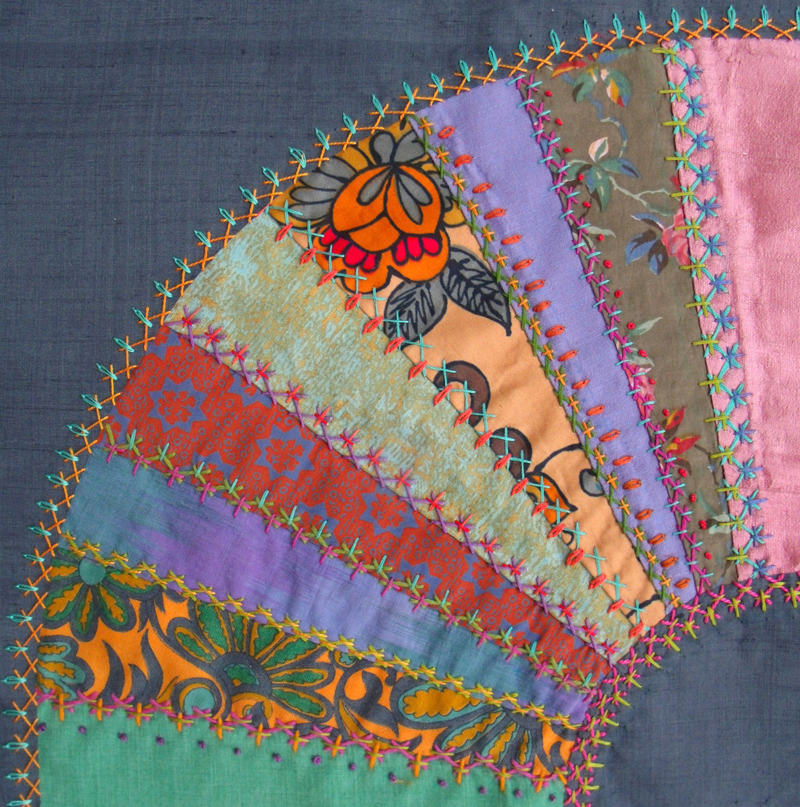
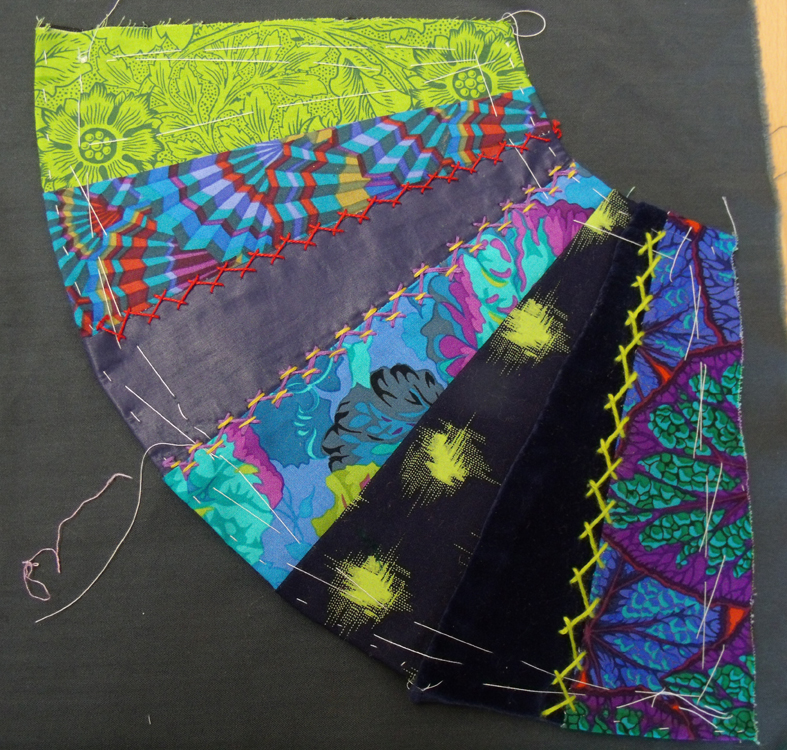
My Crazy Patchwork fan design on the cover of this season’s events catalogue at the American Museum.
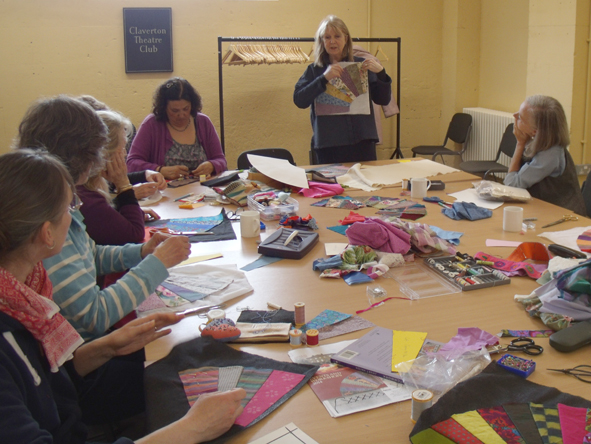
I have been getting out and about recently and have been taking a workshop at the American Museum in Britain, which is situated just outside Bath. I have been asked to deliver 2 day long workshops by their education officer, Zoe Dennington (who found me via this blog). Zoe asked me to use Crazy Patchwork techniques for classes to run at the same time as the current vibrant Kaffe Fassett exhibition being held at the museum for several months.The second class is in October to make a crazy patched and beaded heart.
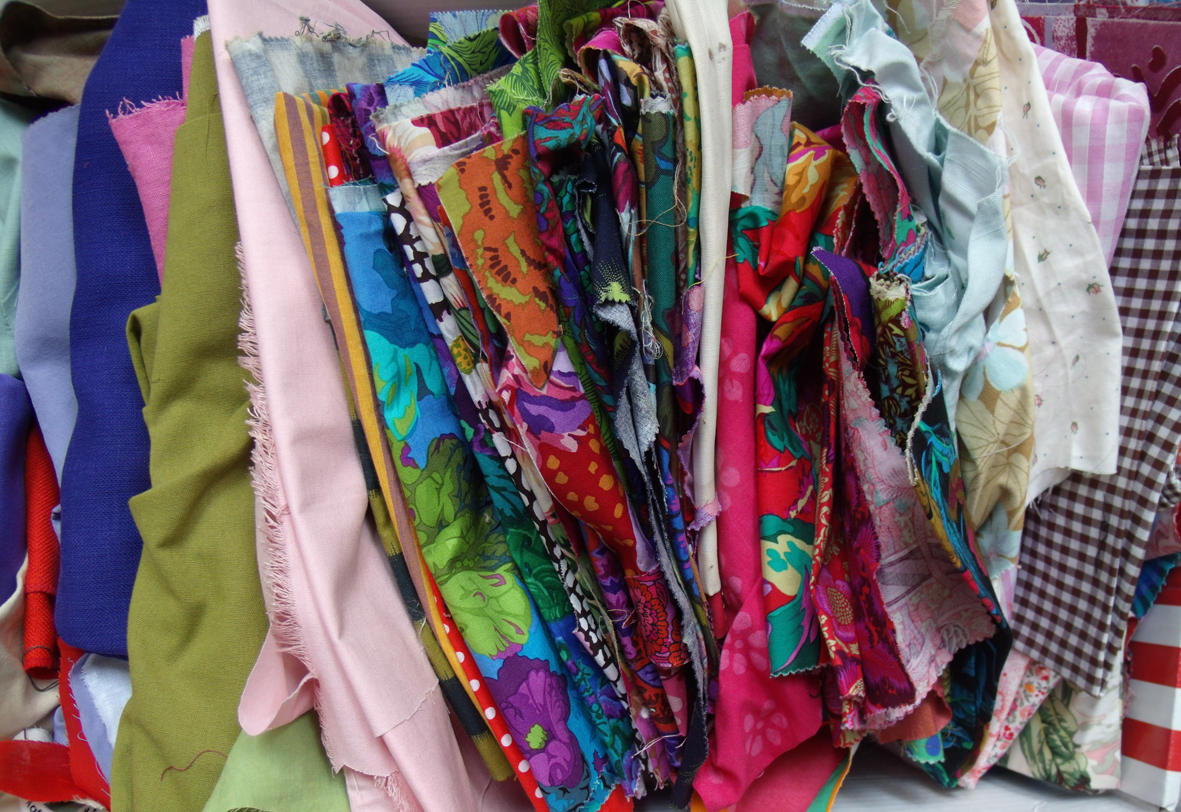
the range of fabrics that I took for use in the workshop
Luckily I was given a batch of cotton samples of fabrics designed by Kaffe Fassett to use in my workshop by a friend, Susan Berry ( who produces his very popular patchwork and knitting books) and they certainly livened up my Heart Space Studios fabric stash….I had designed a special project for this session, a simple design of a fan and one of the most popular motifs used in traditional of Crazy Patchworks.
the original crazy fan design used for the programme cover
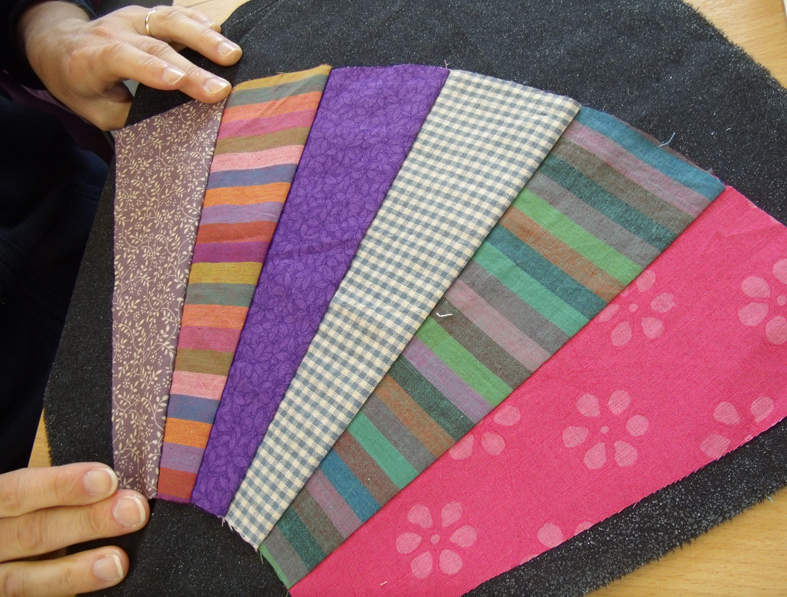
I reasoned that if I provided patterns for the patches then things might go quickly and everyone would finish – well that was the idea! We started off by choosing the fabrics for each fan – there are 7 sections in the design that I had created for the class, which means less embroidery than my sample.
this range was chosen from the fabrics brought by me to the workshop
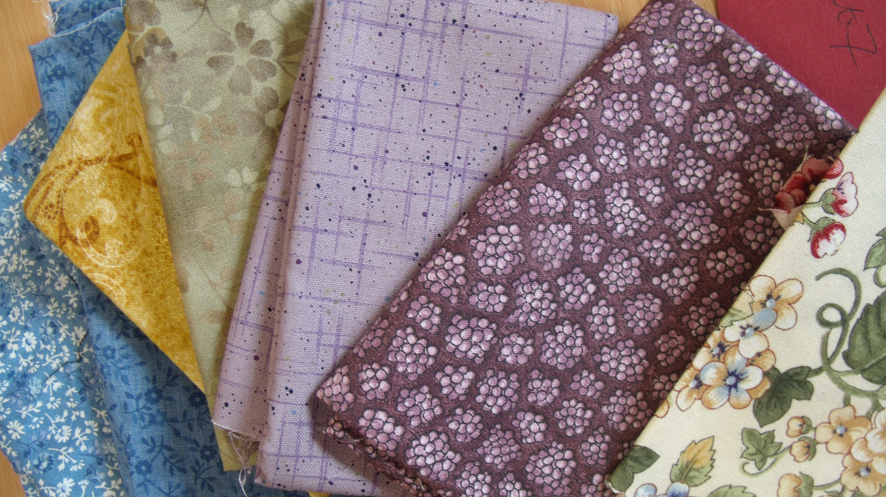
subtle and softly coloured fabrics brought by a student to the class
I had also asked people to bring whatever they liked of their own materials as well. The fabrics chosen were quickly organised into many different striped bands – I explained about balance of pattern to plain fabrics and crucially for a small colour scheme, to separate a few colours from the patterned fabrics and use them as plains or solids to show up the patterns. And not to worry too much about getting the colours perfect at this point as later the coloured stitching over the seams would help with the colour co-ordination of the whole piece.
vibrant fabrics for chosen for the fan design
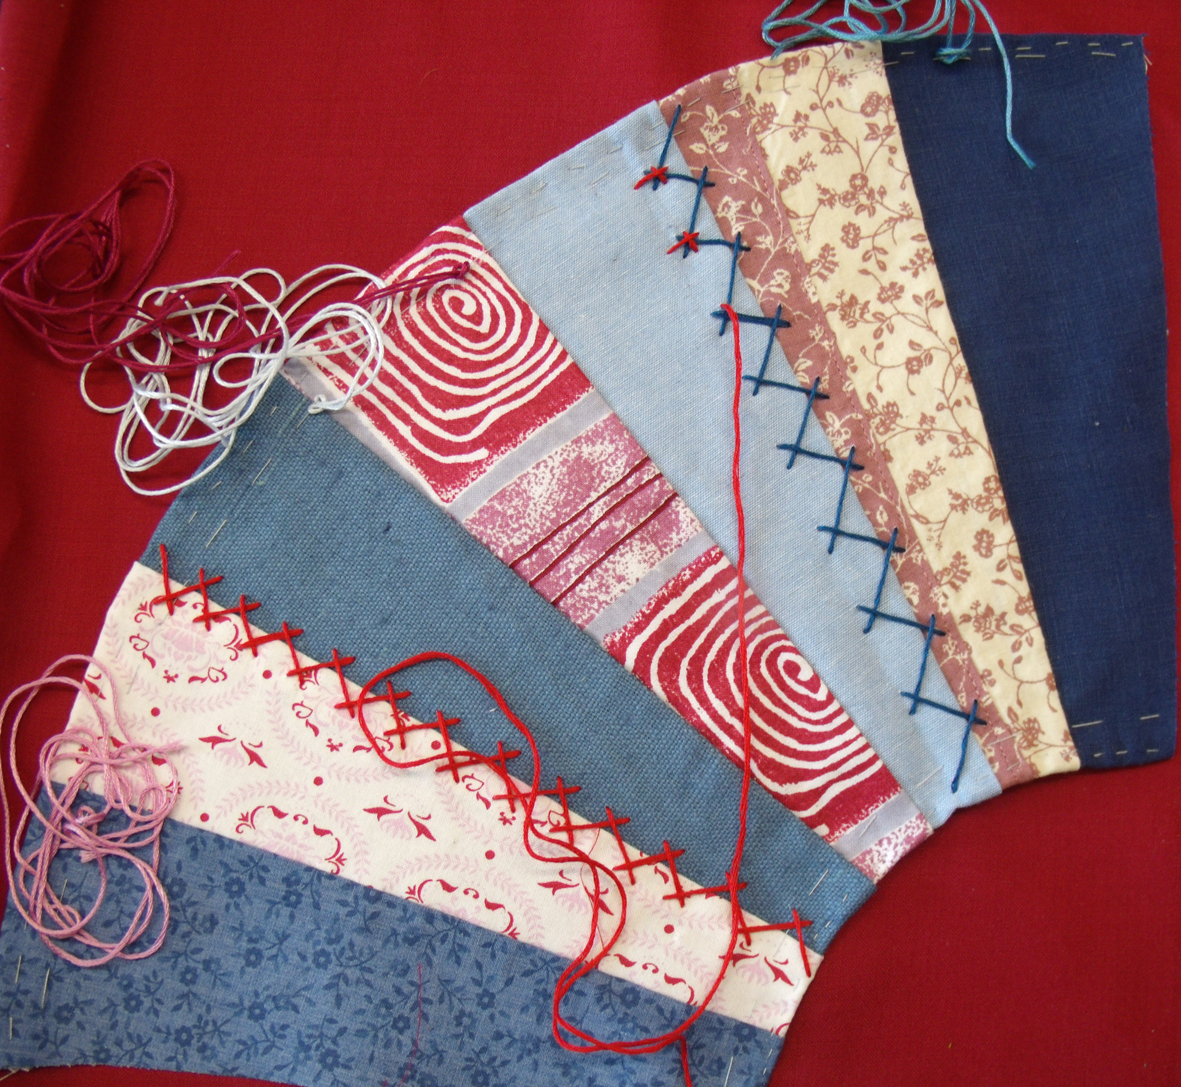
Red white and blue – always a good clean colour combination
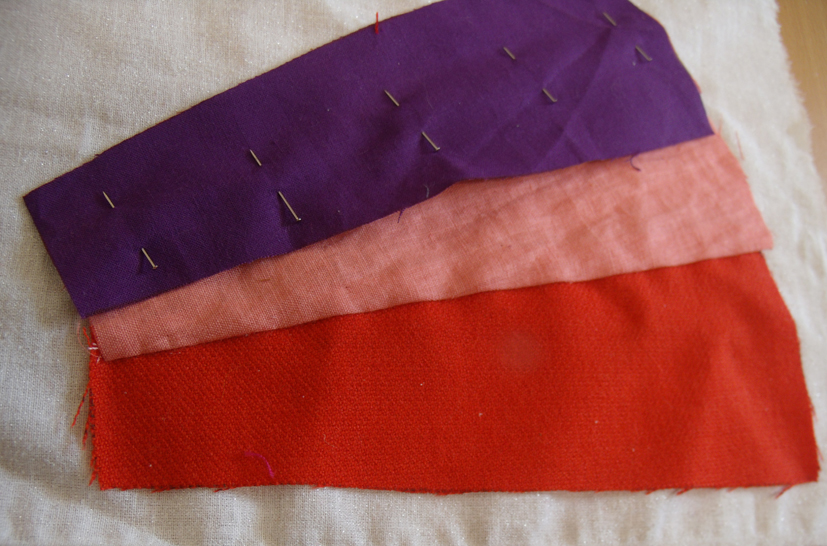
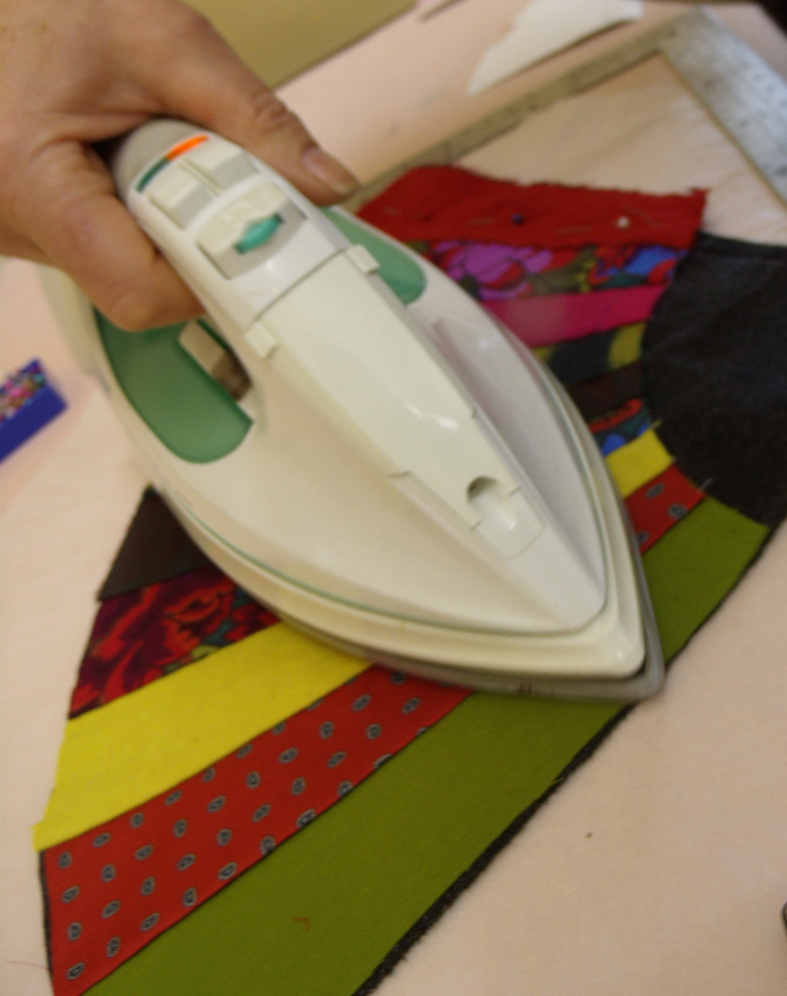
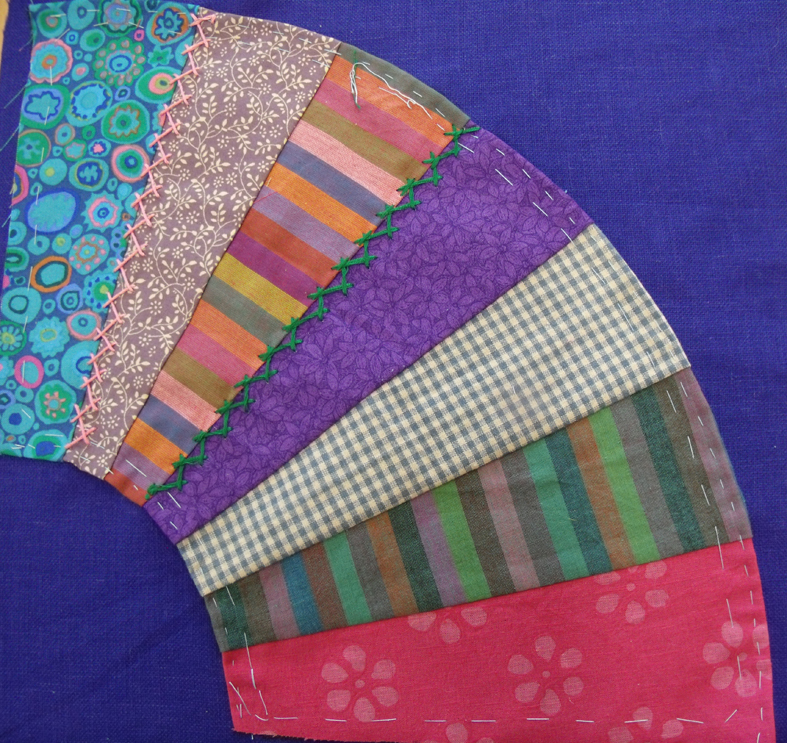
organising the fan sections is much easier and quicker than for usual odd shapes of crazy patches. The sections were laid over one another and then pinned and using running stitches held section by section till the fan was complete. The complete arrangement was then pressed onto the special heat activated fabric backing
Brilliant colour for the start of stitching the fan into its finished position
. Once the fan had been pressed and trimmed the next task was to find the coloured ground to applique it onto…I find that this is quite a good way to get people to appreciate the difference that different coloured grounds can make to the overall piece.
a rare shot of me teaching – explaining how to deal with coloured ground fabrics using a soft and subtle piece of patchwork.
Sometimes soft colours can be made bolder if placed on very dark grounds and brilliant colours more muted if placed on a toning ground. It is also a chance to reassess the colours prior to embroidering the seams which also fix the fan to the background
the fan shape against a black ground
same fan against a brilliant blue ground – note a new patch on the left hand side to make a more balanced fan
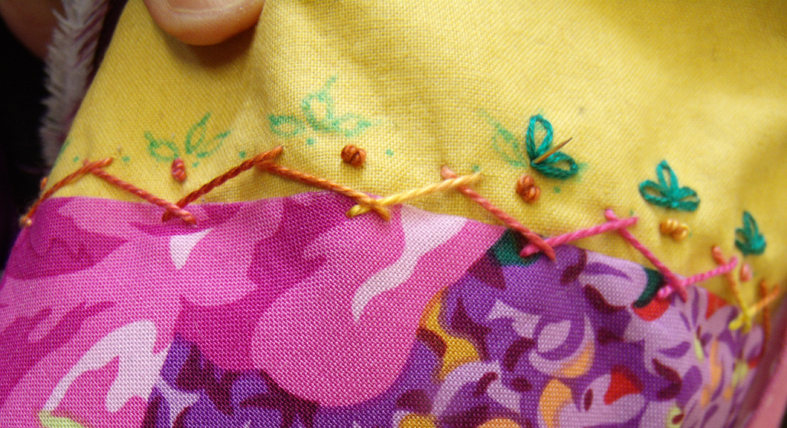
Now to start embroidering – I had chosen to demonstrate 1 basic row of herringbone stitch and then show how to add extra stitches or I should say decorations…it is my favourite decorative embroidery stitch as it can be developed so that it looks almost like a braid. But to begin just a couple of well spaced rows…and then the extra colours can be added.
this vibrant fan design is made even more brilliant by contrasting colours
I like to use contrasting coloured stitches on the seams – they are very obvious but then I do not think it worth doing any decorative hand embroidery if it isn’t to be noticed!
the brighter the contrasts the richer the decoration here the colours sing out
although up close and personal the colours are very vibrant the more colours added to each row of stitching the softer the colours will appear more subtle
the addition of yellow running stitch to the bright pink herringbone stitch makes it less vibrant
when soft colours are used to not much affect then the herringbone variations allow for extra emphasis – this is why I really like this particular stitch – it gives a lot of opportunity for invention
the addition of French knots and detached chain stitches enliven this row of muted herringbone
At the end of the session we put all the unfinished patchworks together on a table to assess them for further additions…. you can now see the affect that the Kaffe Fassett fabrics had on the works – but you would not think by looking at this picture of some of the group around the table that they actually liked what they are looking at !
Crazy critical assessment!
. Everyone faithfully promised me that they would finish the fans and send me photographed results – watch this space…….
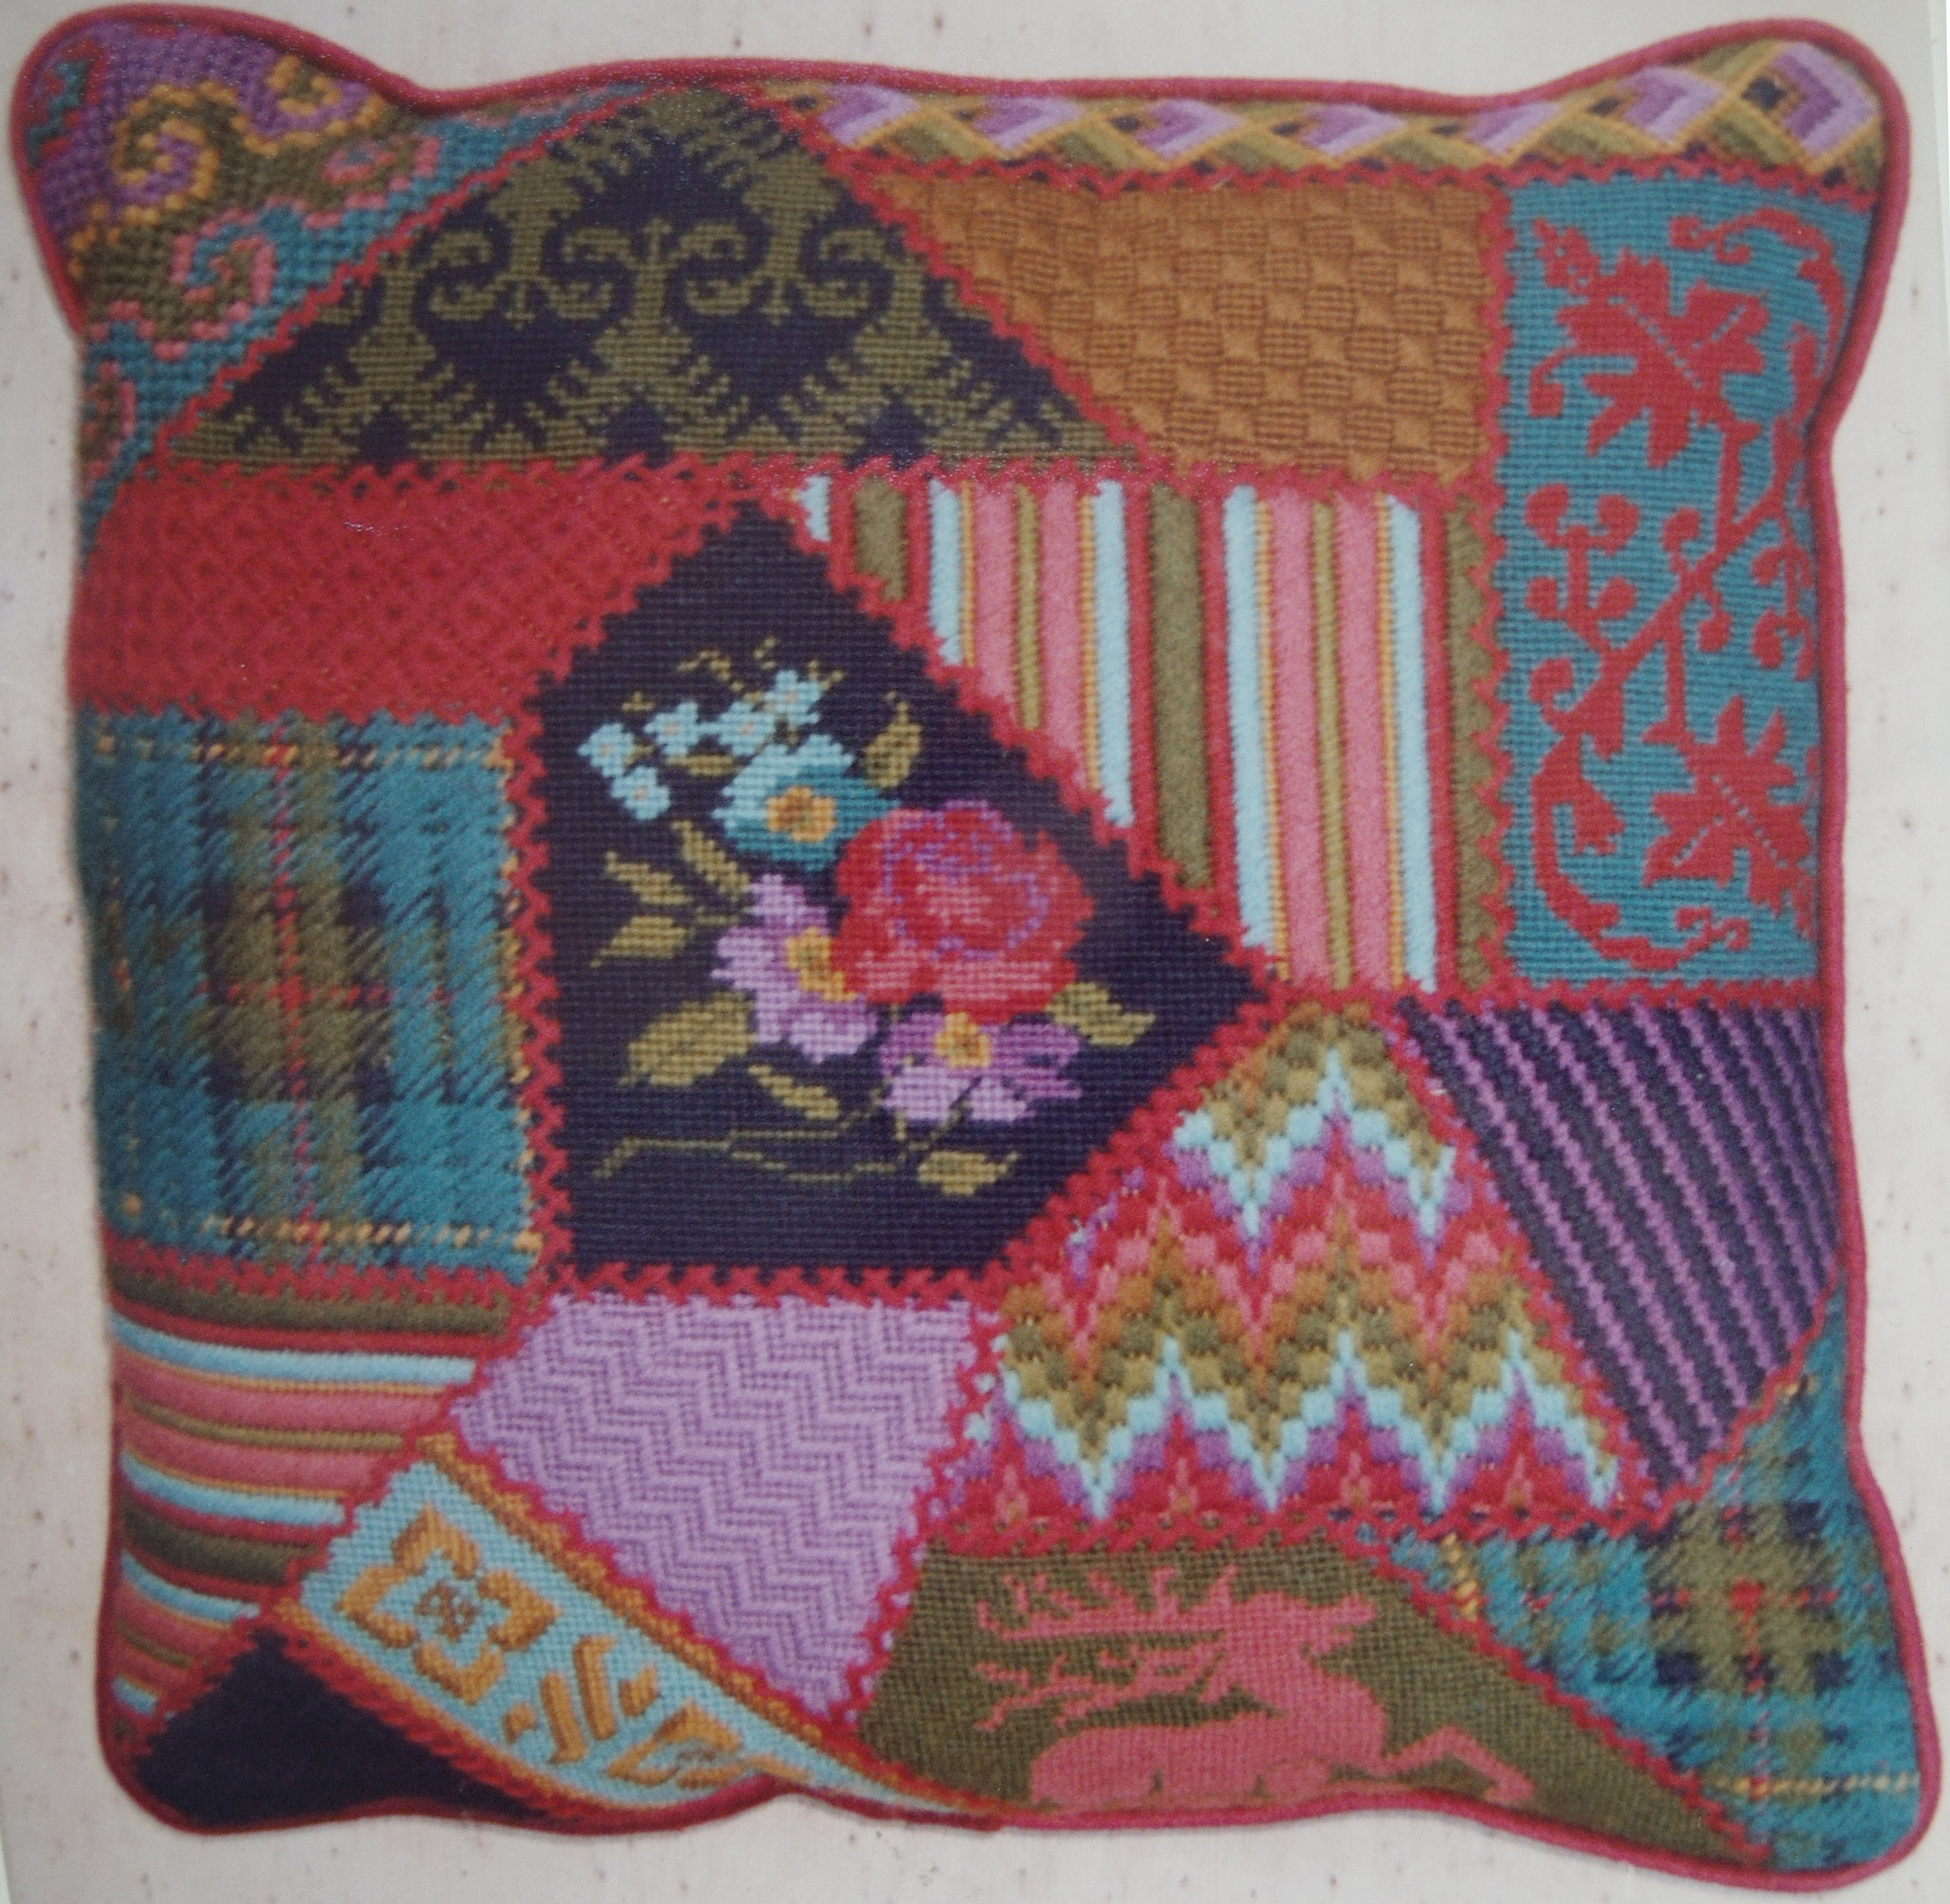
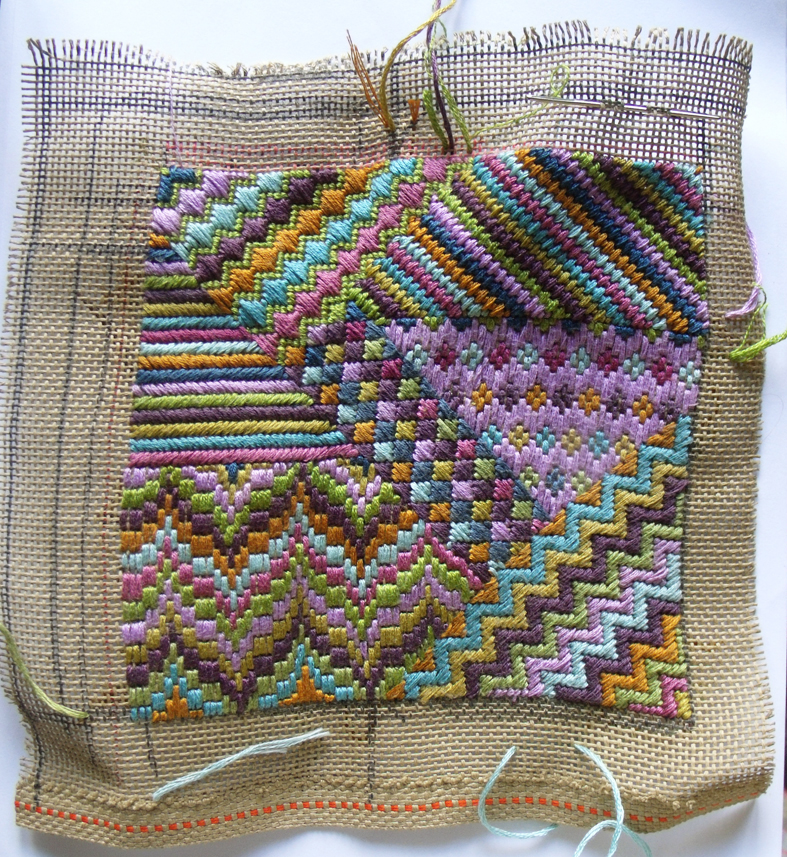
‘Crazy Berlin’ one of my early commercial designs for ‘counted thread’ canvas embroidery
I have had a few problems getting to grips – literally – with hand embroidering again (not to mention eating with fully functioning knife and fork ). So in order to get back to my normal working life of designing, stitching and teaching, and not being given any specific physiotherapy for my now fully mended broken wrist, I decided to return to the very beginning of my stitching career – Canvas Work.
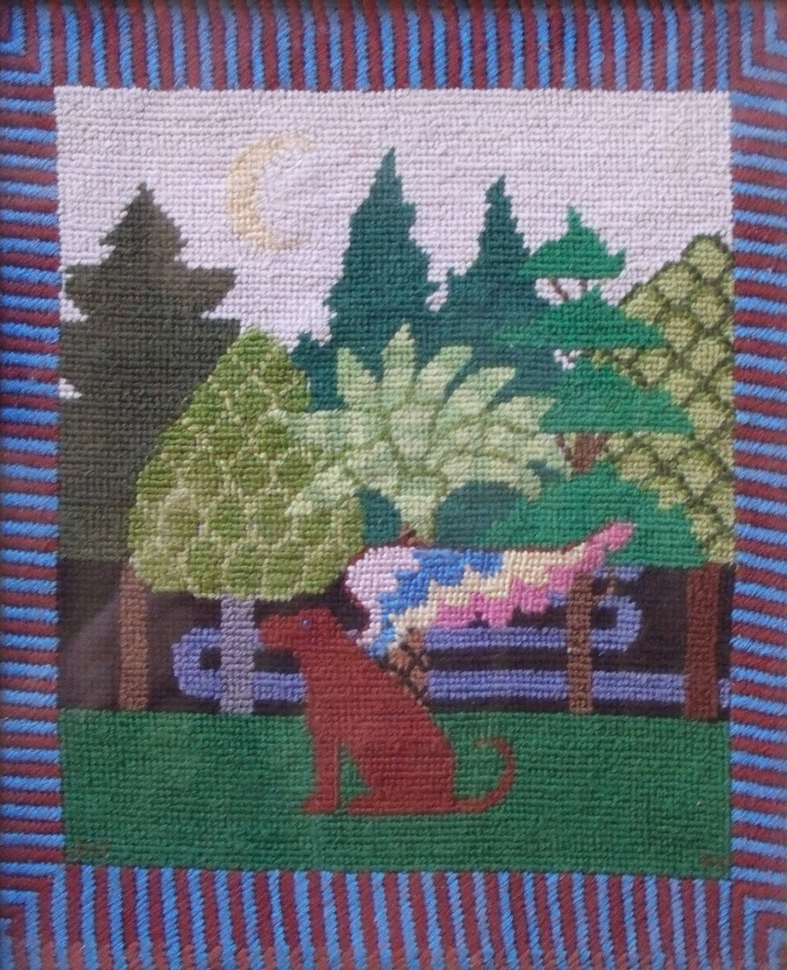
My first embroidered picture – Dog with Wings and Radiator 1971
I had lost almost all of my strength and most of my dexterity when the plaster finally came off my right wrist, and although the drawings were OK the stitching wasn’t. The main thing about canvas work is that it is worked on an open mesh ( that has to be completely covered) so the needle can be easily inserted into the square hole instead of having to push it in and pull it out. It is easy and repetitive move which is what I needed to get some strength back.
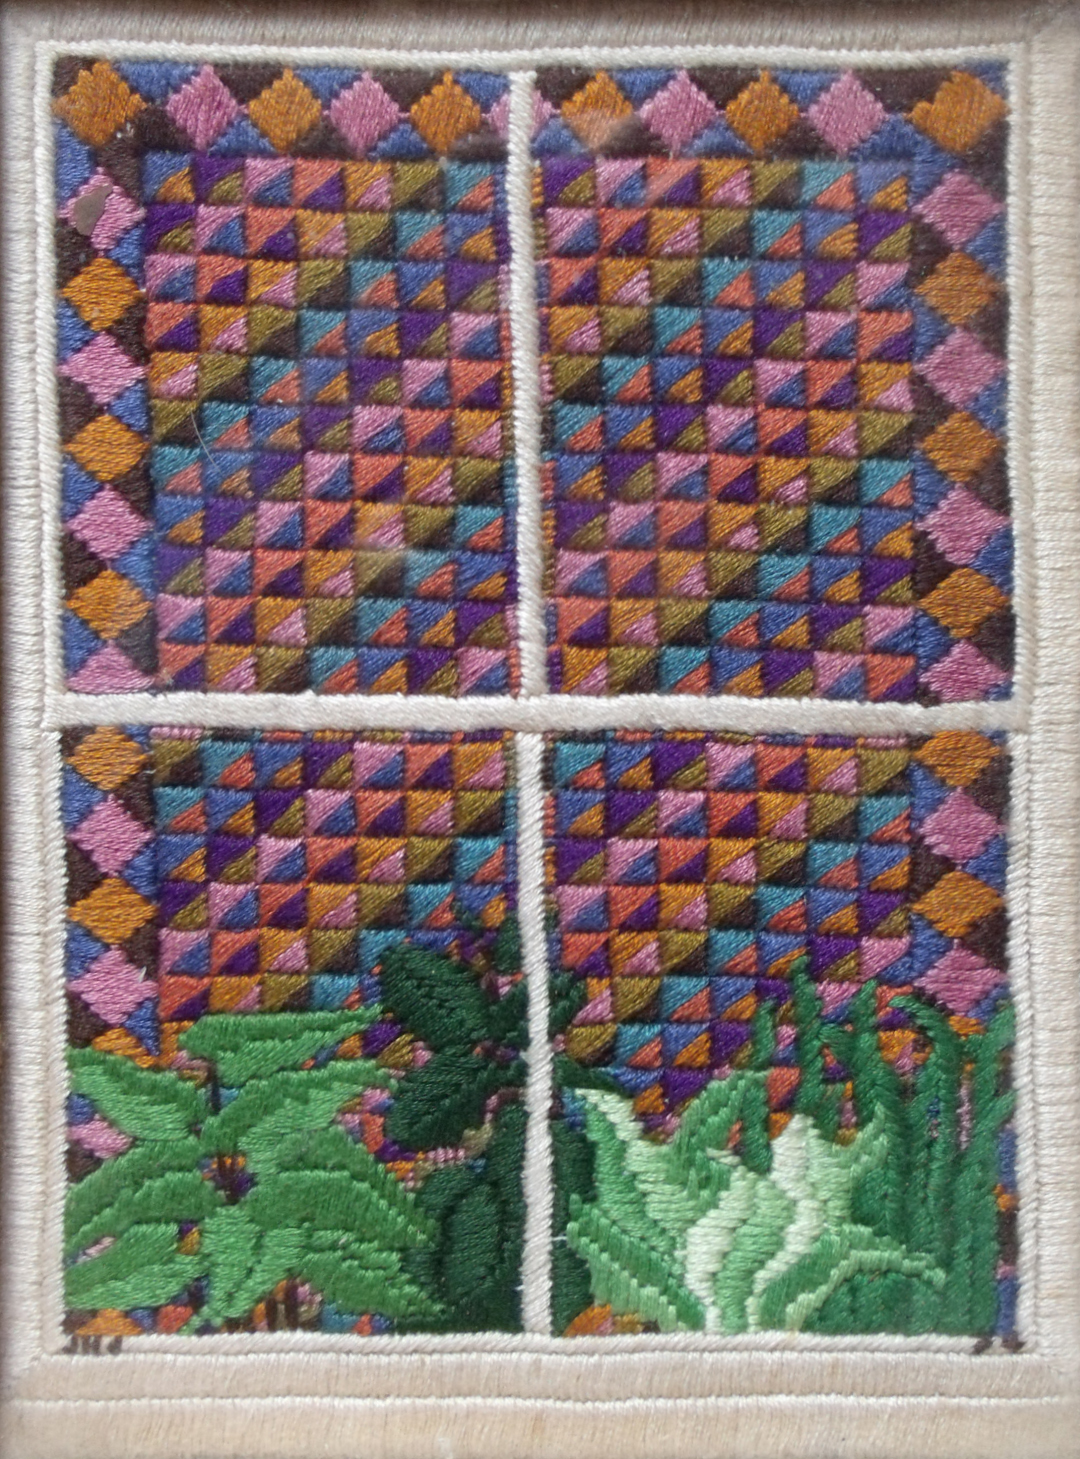
the view through my London flat’s window into a neighbour’s window -1973
So I got all my old canvas work embroideries off the walls in the house and realised that they were all pictures of things – either real things like the window above (where I could see past the plants to a large American patchwork quilt hung on the wall) or completely imagined scenes like the brown angel dog in a landscape – cruel friends mocked my early design and stitching techniques for the stream, by calling it Dog with Radiator! But mocked or not, I had found a new and exciting way of working – hand embroidery – and one that I intuitively knew was to be a very long-lived fascination.
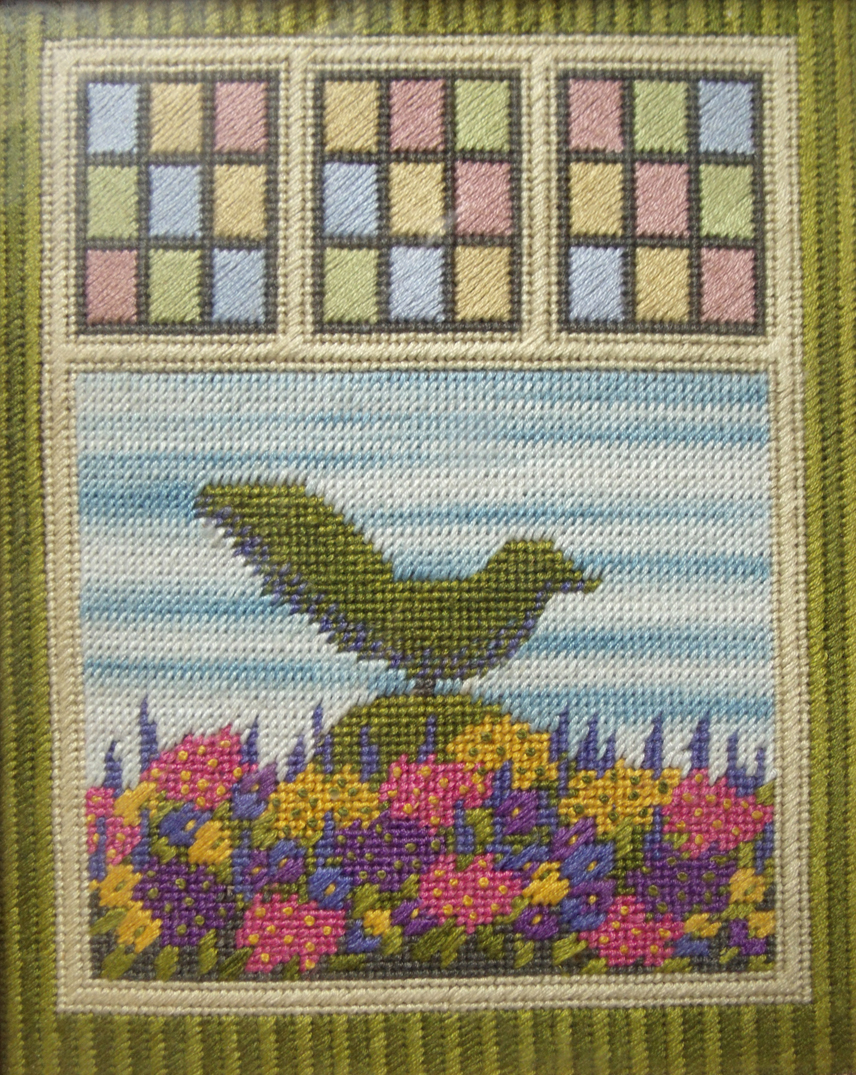
one of a series of seasonal canvas embroideries with leaded light window
I enjoyed the tension between trying to make things look natural but realising them within a strict structure; window frames were a perfect subject to further “contain” my scenes and formal garden design became a real passion – accessed through old gardening books and visits to some famous English Gardens. Topiary became an enduring passion as it seems almost childish in its simplicity of form but very sophisticated in its visual impact, I find the larger specimens often intimidating – specially the animal and bird forms.
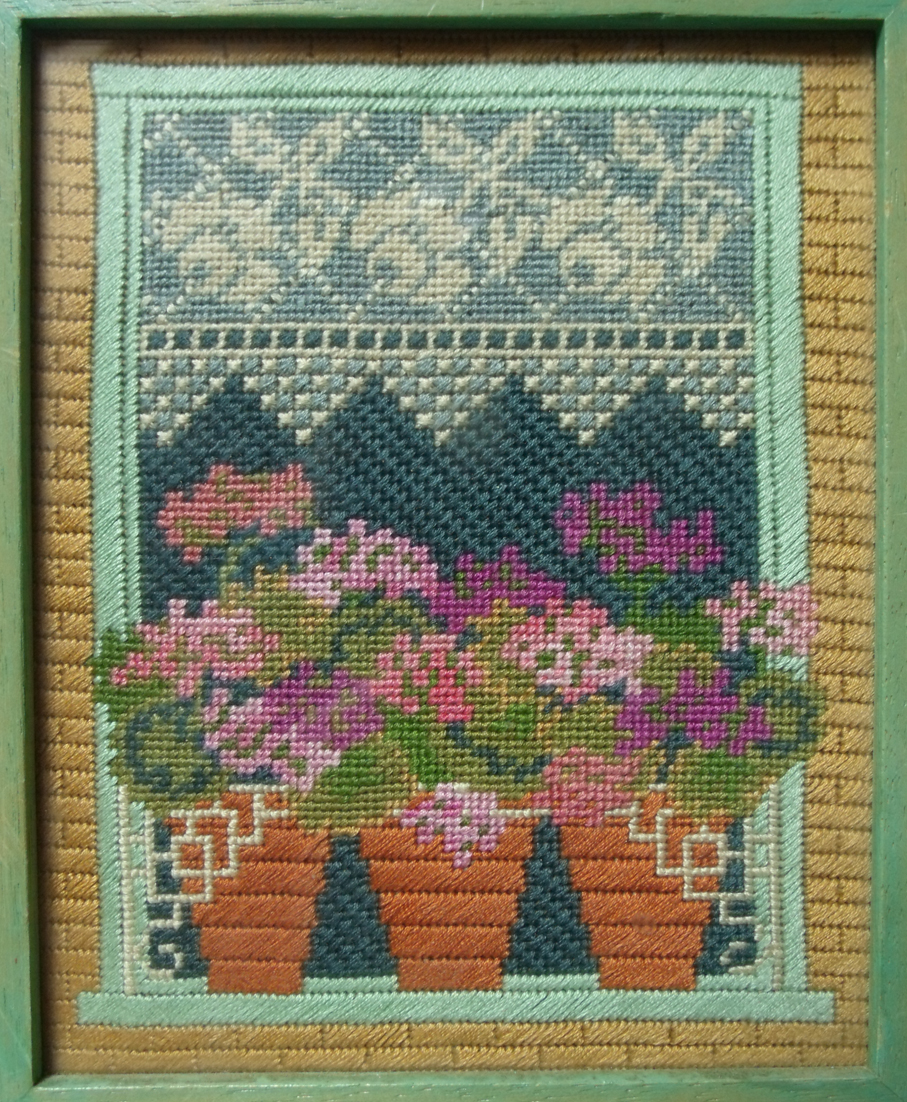
very formal lace curtain and geraniums window, developed from drawing while on holiday in France
I started to design many of these embroideries and my first exhibition of embroideries was called Canvas Work at The Francis Kyle Gallery in London. Most of the pictures were sold, but I still retain enough to show my progress. In the early pieces there is an interest in the repeating patterns that can be stitched using the regular grids alongside the more descriptive stitching in tent stitch. But eventually the random stitches asserted themselves as I became fascinated by atmospheric colour and started to blend my threads to make new colour combinations.
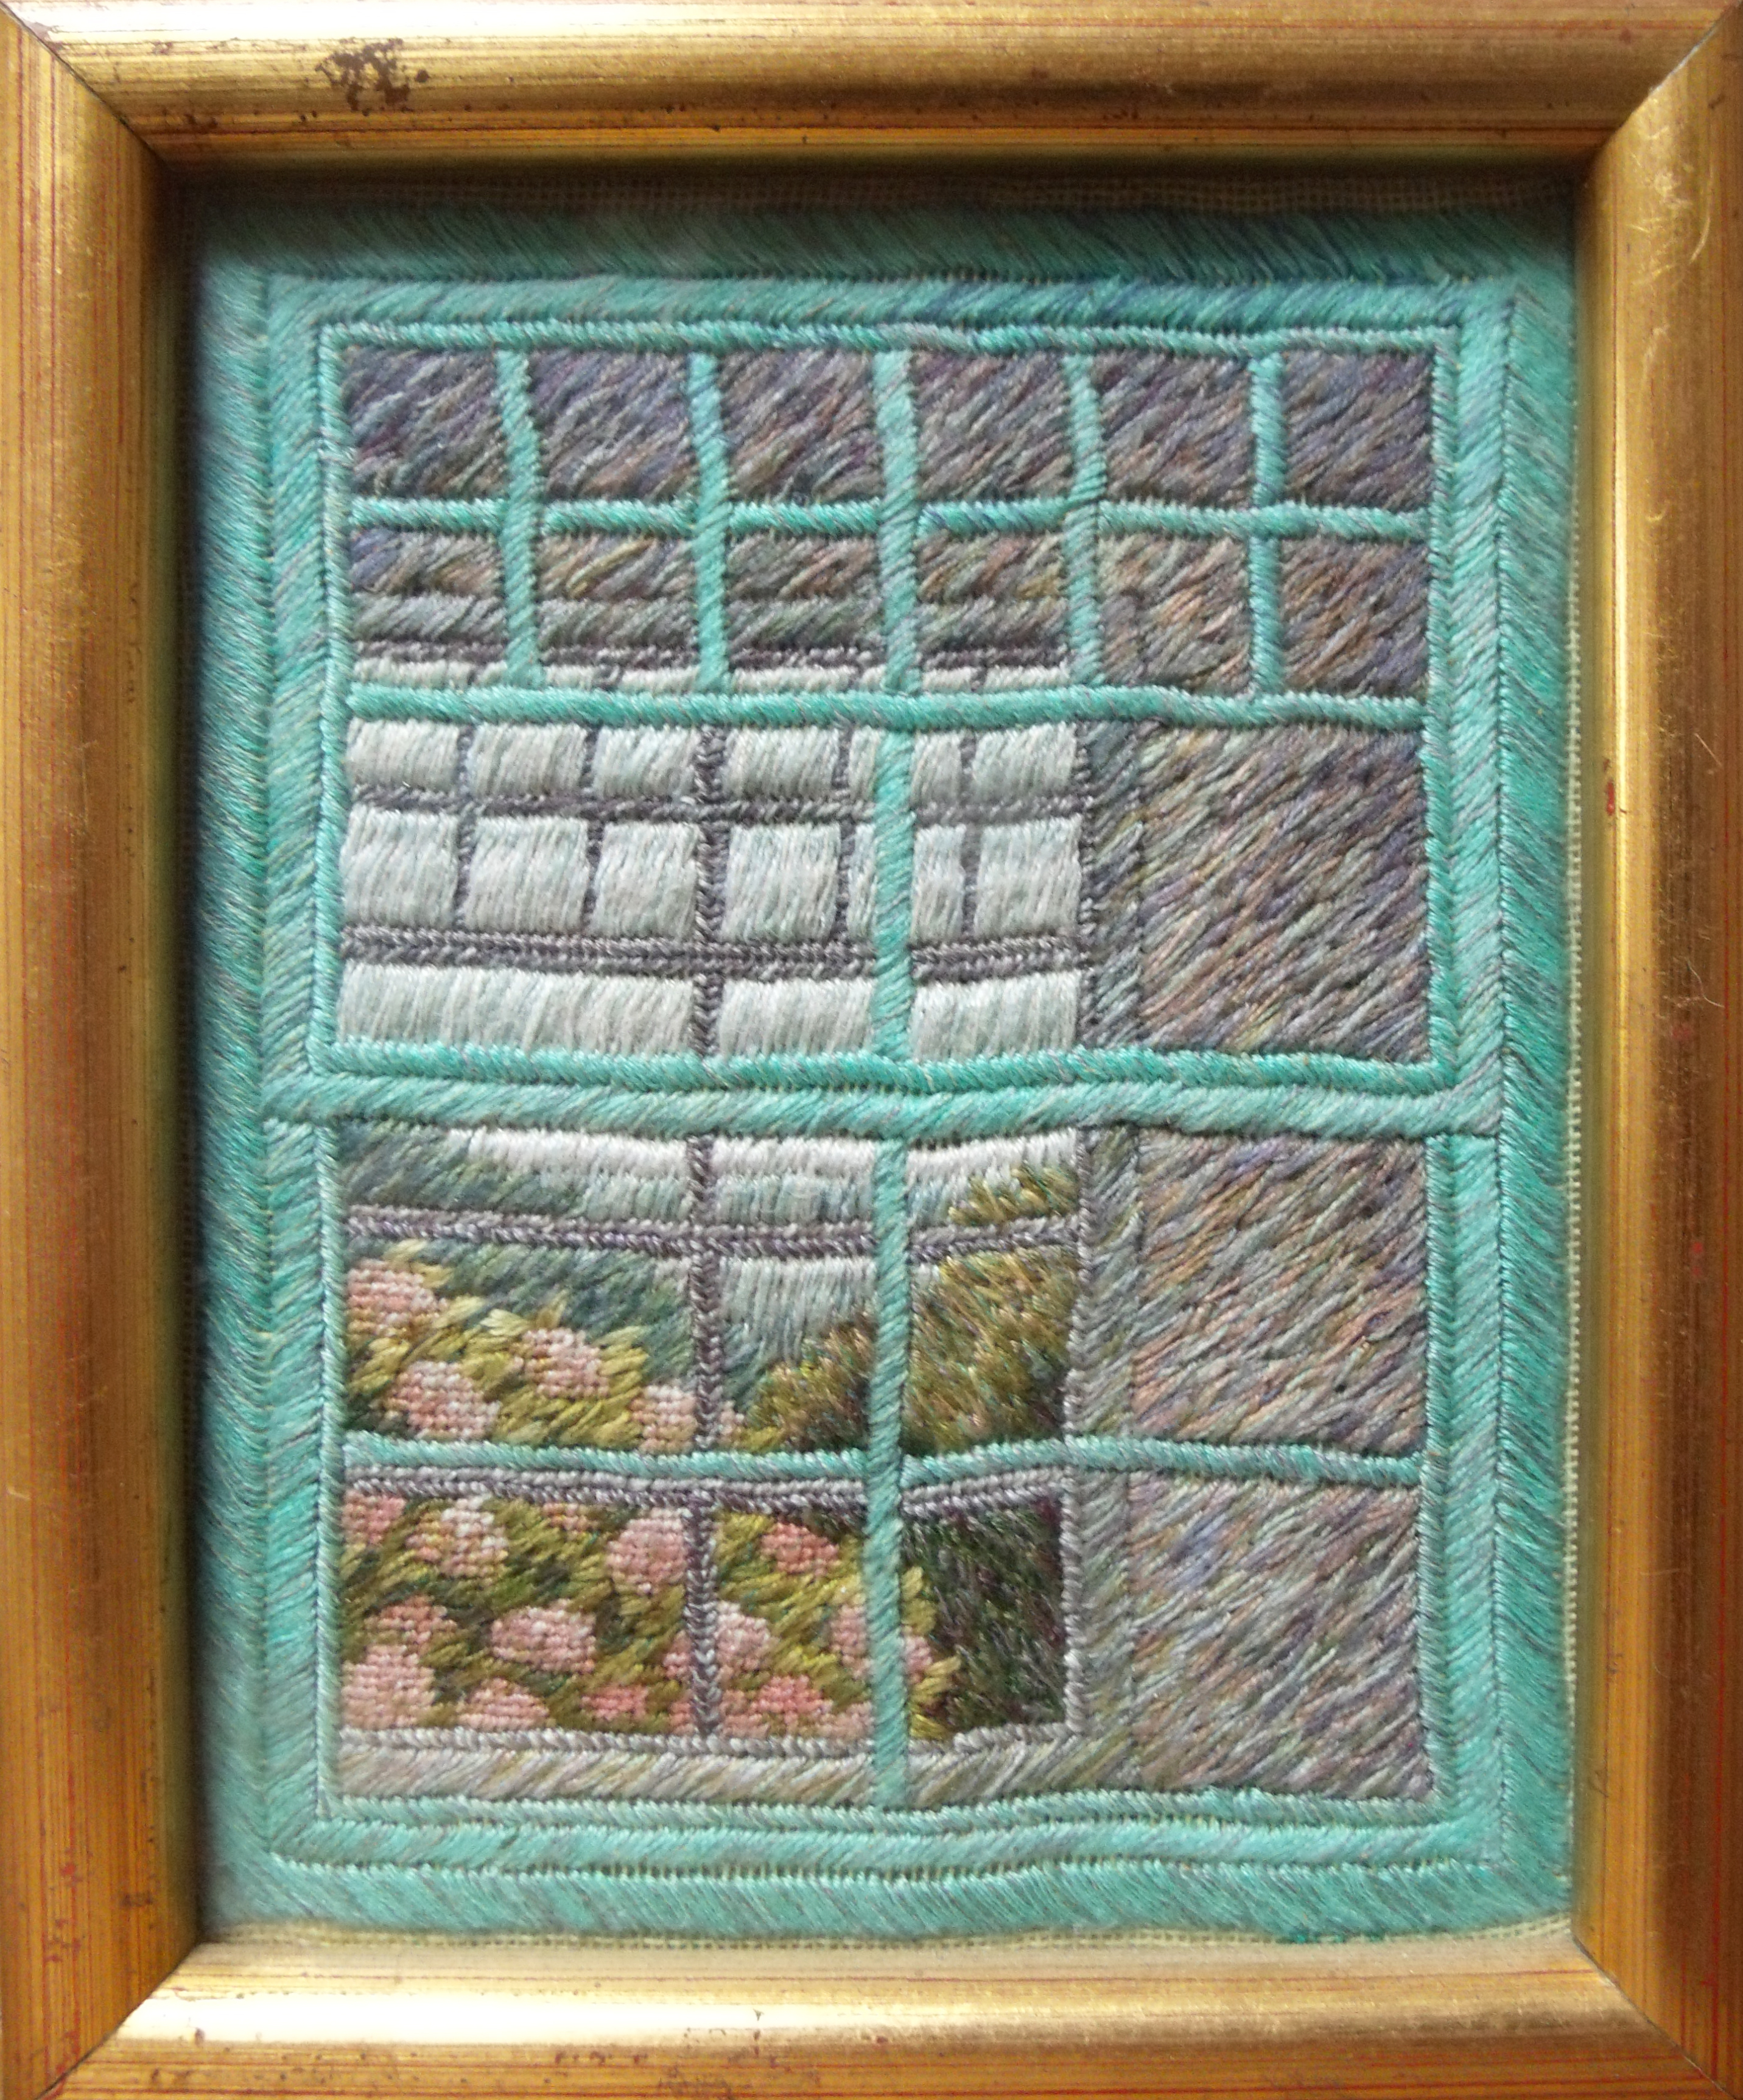
Cornish window, here the the frame has become a victim of my random stitching which distorts the canvas.
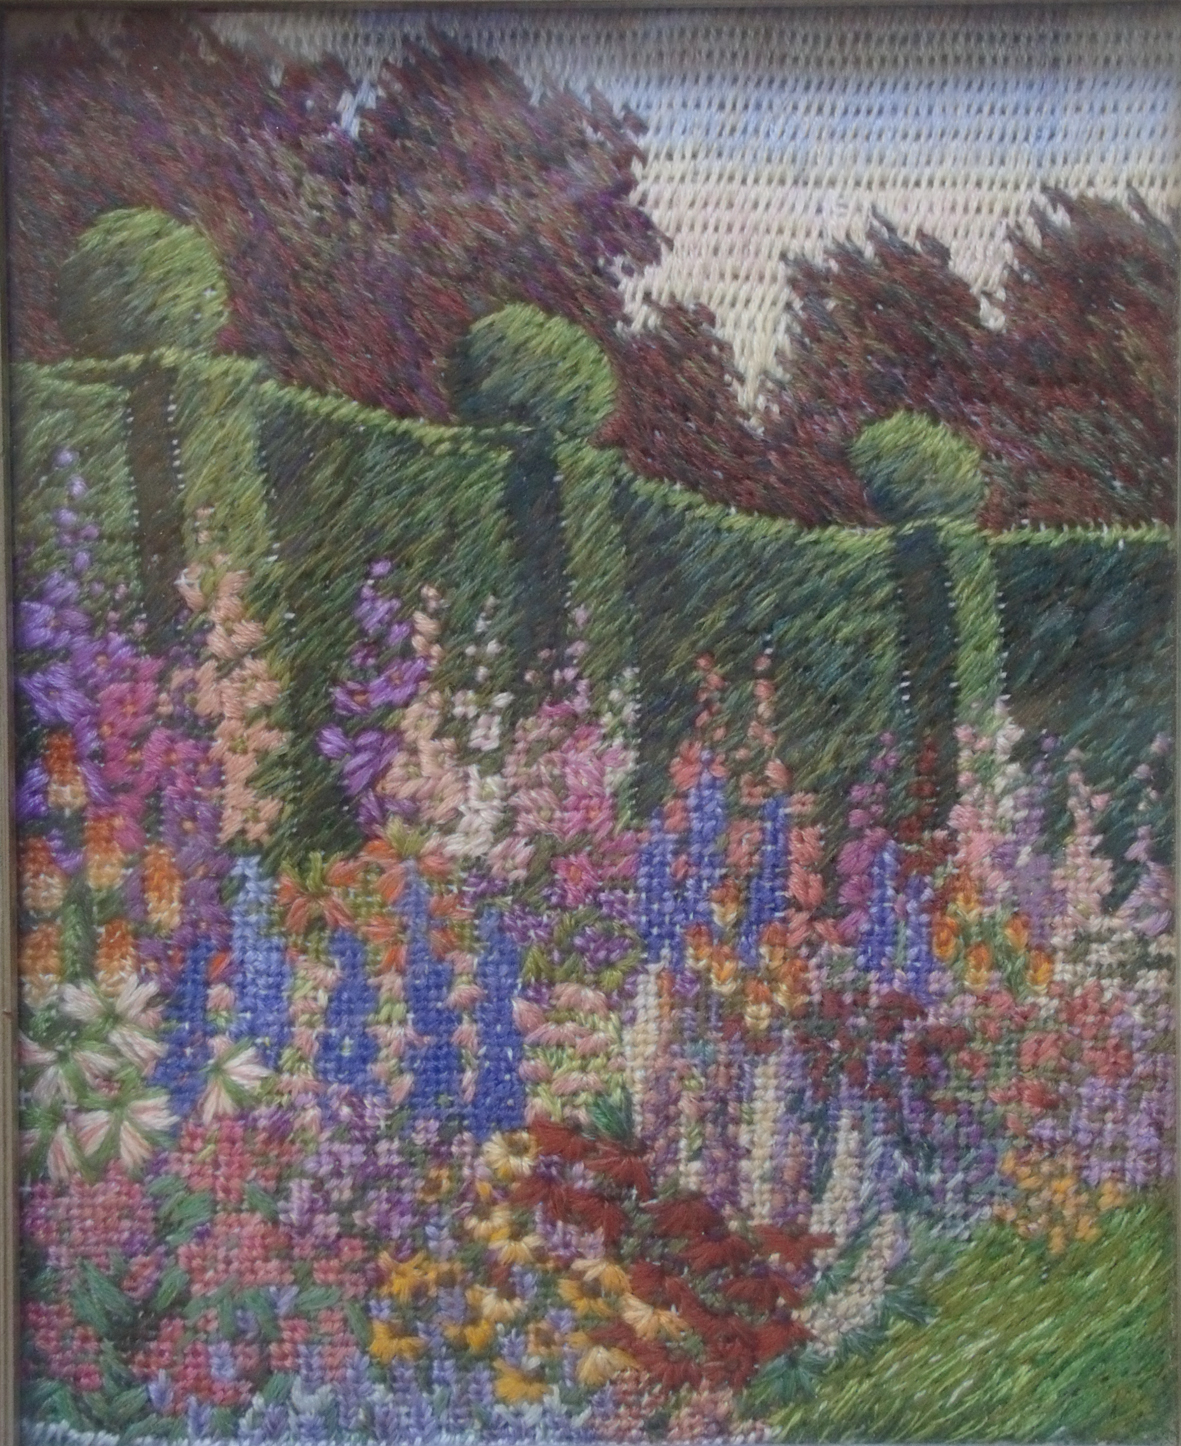
My last canvas embroidery of gardens shows how far I had strayed from the rigours of the canvas weave.
my last canvas work of gardens, an imagined rendition of a Gertrude Jekyll planting plan.
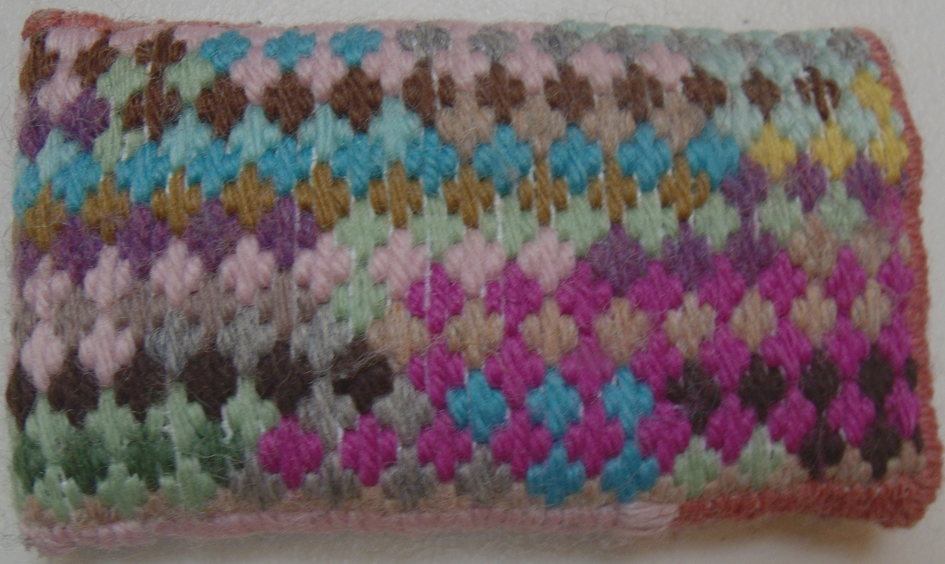
So returning to canvas work gave me a real sense of returning to my embroidery roots. I didn’t want to get involved in designing a scene, I was more interested in just getting the use of a precise stitch and a stronger grip, so I opted to make a counted thread design. I remembered seeing and photographing a tiny wool canvas work purse that belonged to a student at Heart Space Studios.
tiny wool counted thread embroidered purse
I set about making a small square of canvas embroidery based on Crazy Patchwork – my favourite embroidery design system at the present time. I drew a random set of shapes in waterproof ink onto a 12 holes to the inch canvas – big enough to become either a case for my glasses or mobile phone.
drawing round an old glasses case for a pattern
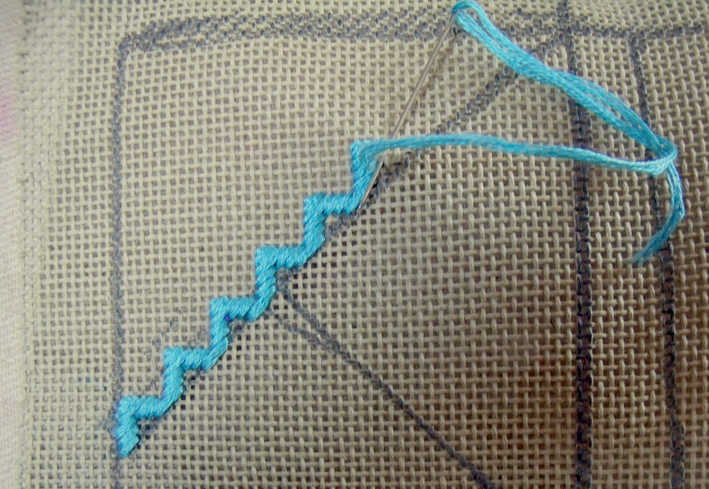
embroidering zig zag stitch onto the canvas
I decided on a colour range and selected stranded cotton threads and stated to stitch working from an old needlework book for all the different patterns. The patterns are lovely and have wonderful names, my favourite name is “Encroaching Gobelin” I can just imagine something out of a fairy tale, I use this stitch for blending colours but didn’t need it for this design.
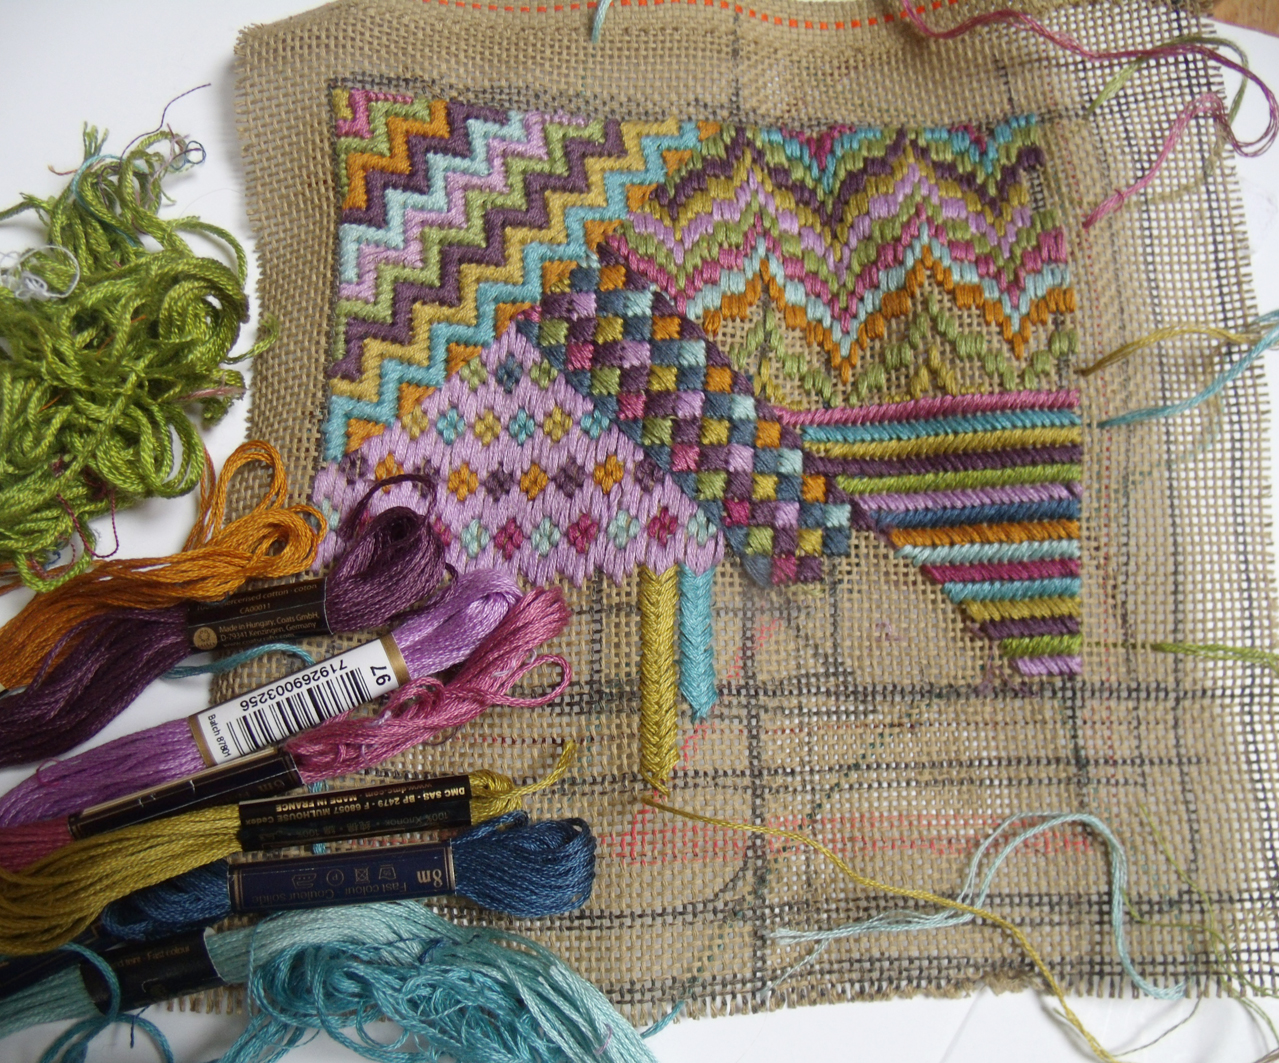
developing the coloured stripes using an old needlework book for reference
I decided to use a series of striped lines of stitches to make up the crazy patch shapes, usually counted canvas is worked in solid colour blocks – like the cushion at the head of the post.
the work progresses – very slowly due to changing my mind on the colour combinations
The work was extremely slow to make – it took me the better part of 2 months to complete, mostly because at first it was very painful and tiring to keep the my hand stitching, but also because I kept changing my mind on the colours. Usually I work to a design or colour swatch that I have designed before I start , but this wasn’t really work, this was therapy!
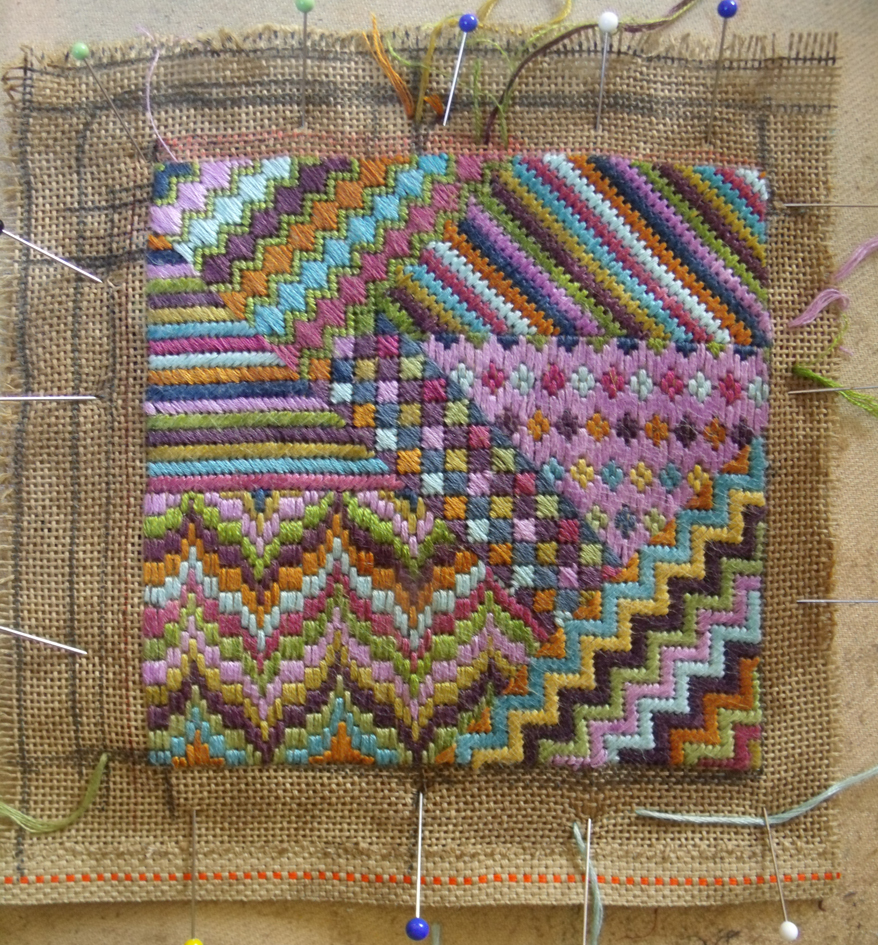
finished canvas work – unstretched
the finished work is often mis-shapen due to the pull of the directional stitching, but this type of canvas is sized, meaning it has a weak glue in it that can be activated by dampening allowing the work to be stretched back into shape,
the dampened canvas is pinned and stretched into a square format and left to dry naturally
I had initially thought to develop a day workshop at Heart Space Studios to make a similar design, this type of embroidery is not often seen these days so it would be good to resurrect it, and the use of the striped and lively colours makes it look very zingy…but I would need to make a series of workshops to develop it – more like 6 sessions… so maybe I will reconsider this at a later date.
Simple sample of machine embroidery by Susi Bancroft
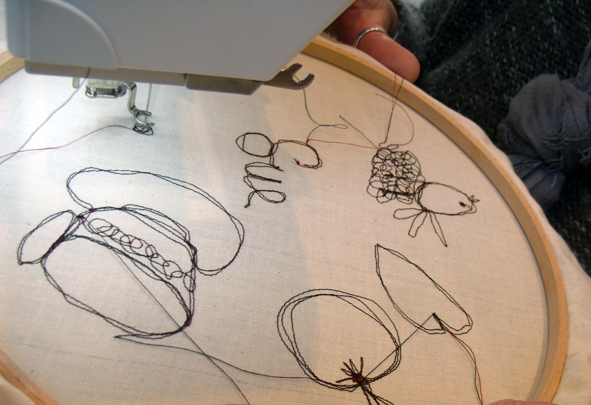
“Taking a line for a dance” is a good way to describe what happens with free machine embroidery…the freedom with which the needle can stitch patterns, images and even writing very fast – is really fascinating to watch. First disengage the feed dog – I just love that name for the row of teeth embedded in the metal plate below the needle….
free machine embroidery using a hoop and the sprung needle
and either using a specially sprung embroidery needle, with or without the old school embroidery hoop to keep the fabric tight, it is possible to move the fabric enabling the still needle to make lines of stitches.
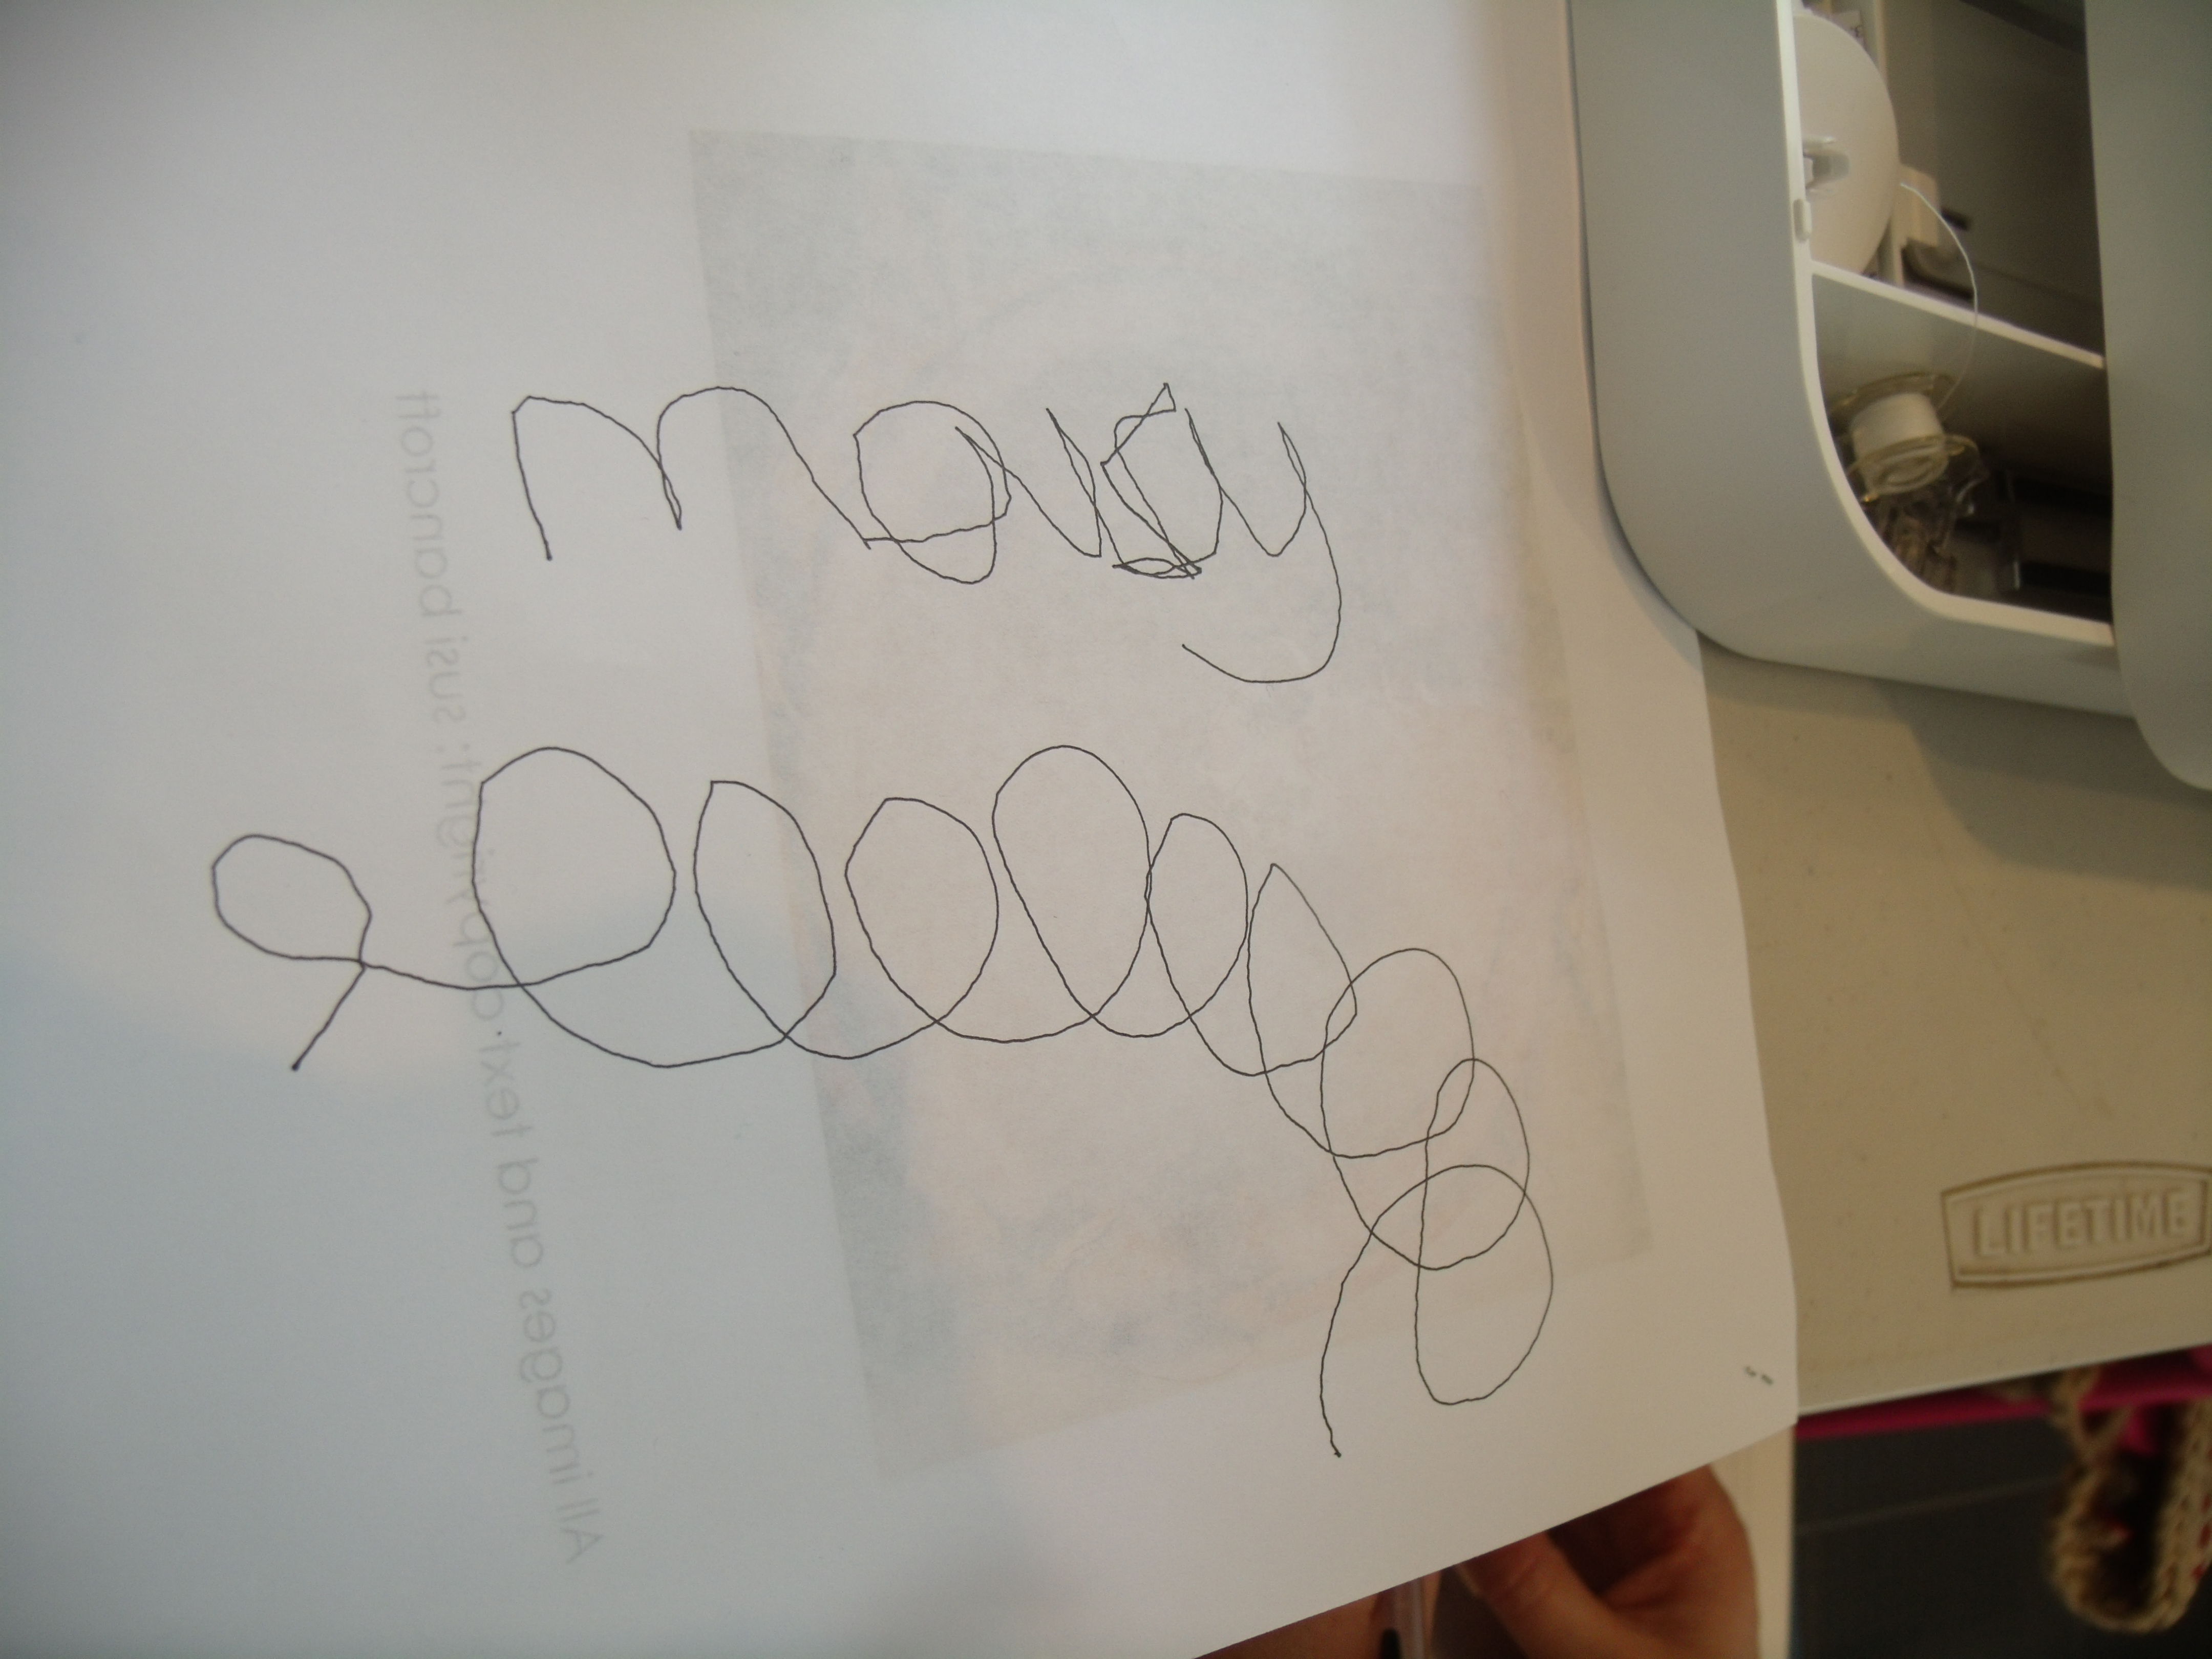
first drawing by moving the paper and not the pencil
moving page animal drawing – dog or cat?
Recently at Heart Space studios, Susi Bancroft taught a group of students how to achieve this technique in just one afternoon. First she got everyone to try to write their names or draw something by moving the paper while someone else held the pencil steady…with very unsteady results…but this is how machine embroidery works. She then got everyone stitching with reference to the drawings and suddenly things started to happen – fast
The first attempts at machining were definitely stronger than the pencil drawings. Susi always gets everyone to stitch in black cotton on white calico first, to gain a strong contrasting line..
first attempt to stitch drawing and writing
writing and dog drawing
It didn’t take long before everyone was feeling a lot more confident and really getting to grips with larger scale drawings
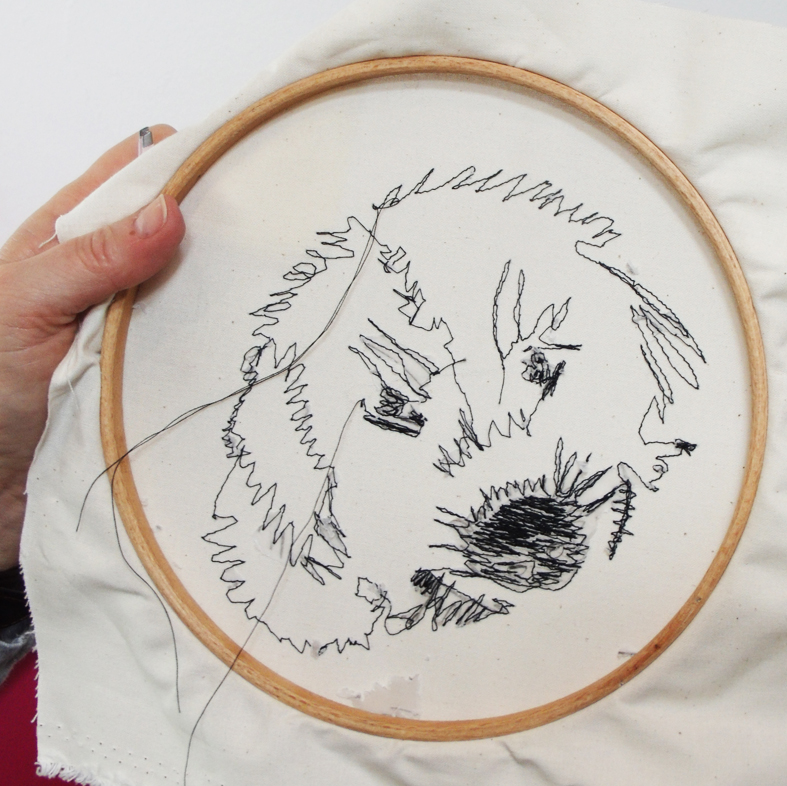
freely machine stitched dog portrait
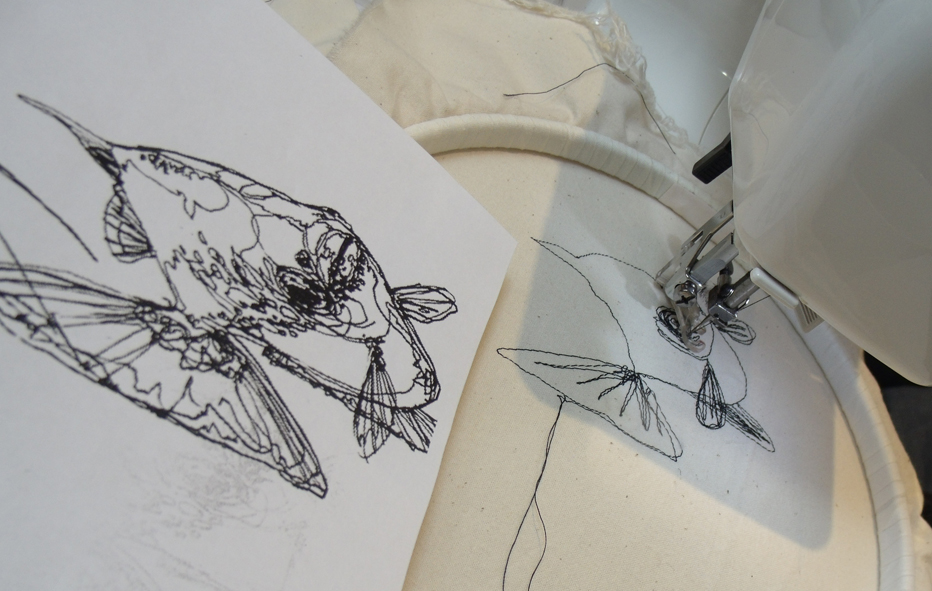
One of the exercises offered was to copy a black and white drawing a drawing – with remarkable results considering no guide lines had been drawn beforehand.
copying a line drawing of a fish – a free embroidery challenge.
Susi had also brought in a book of samples of her own work and showed the students these to demonstrate what else could be achieved now they had the basics…
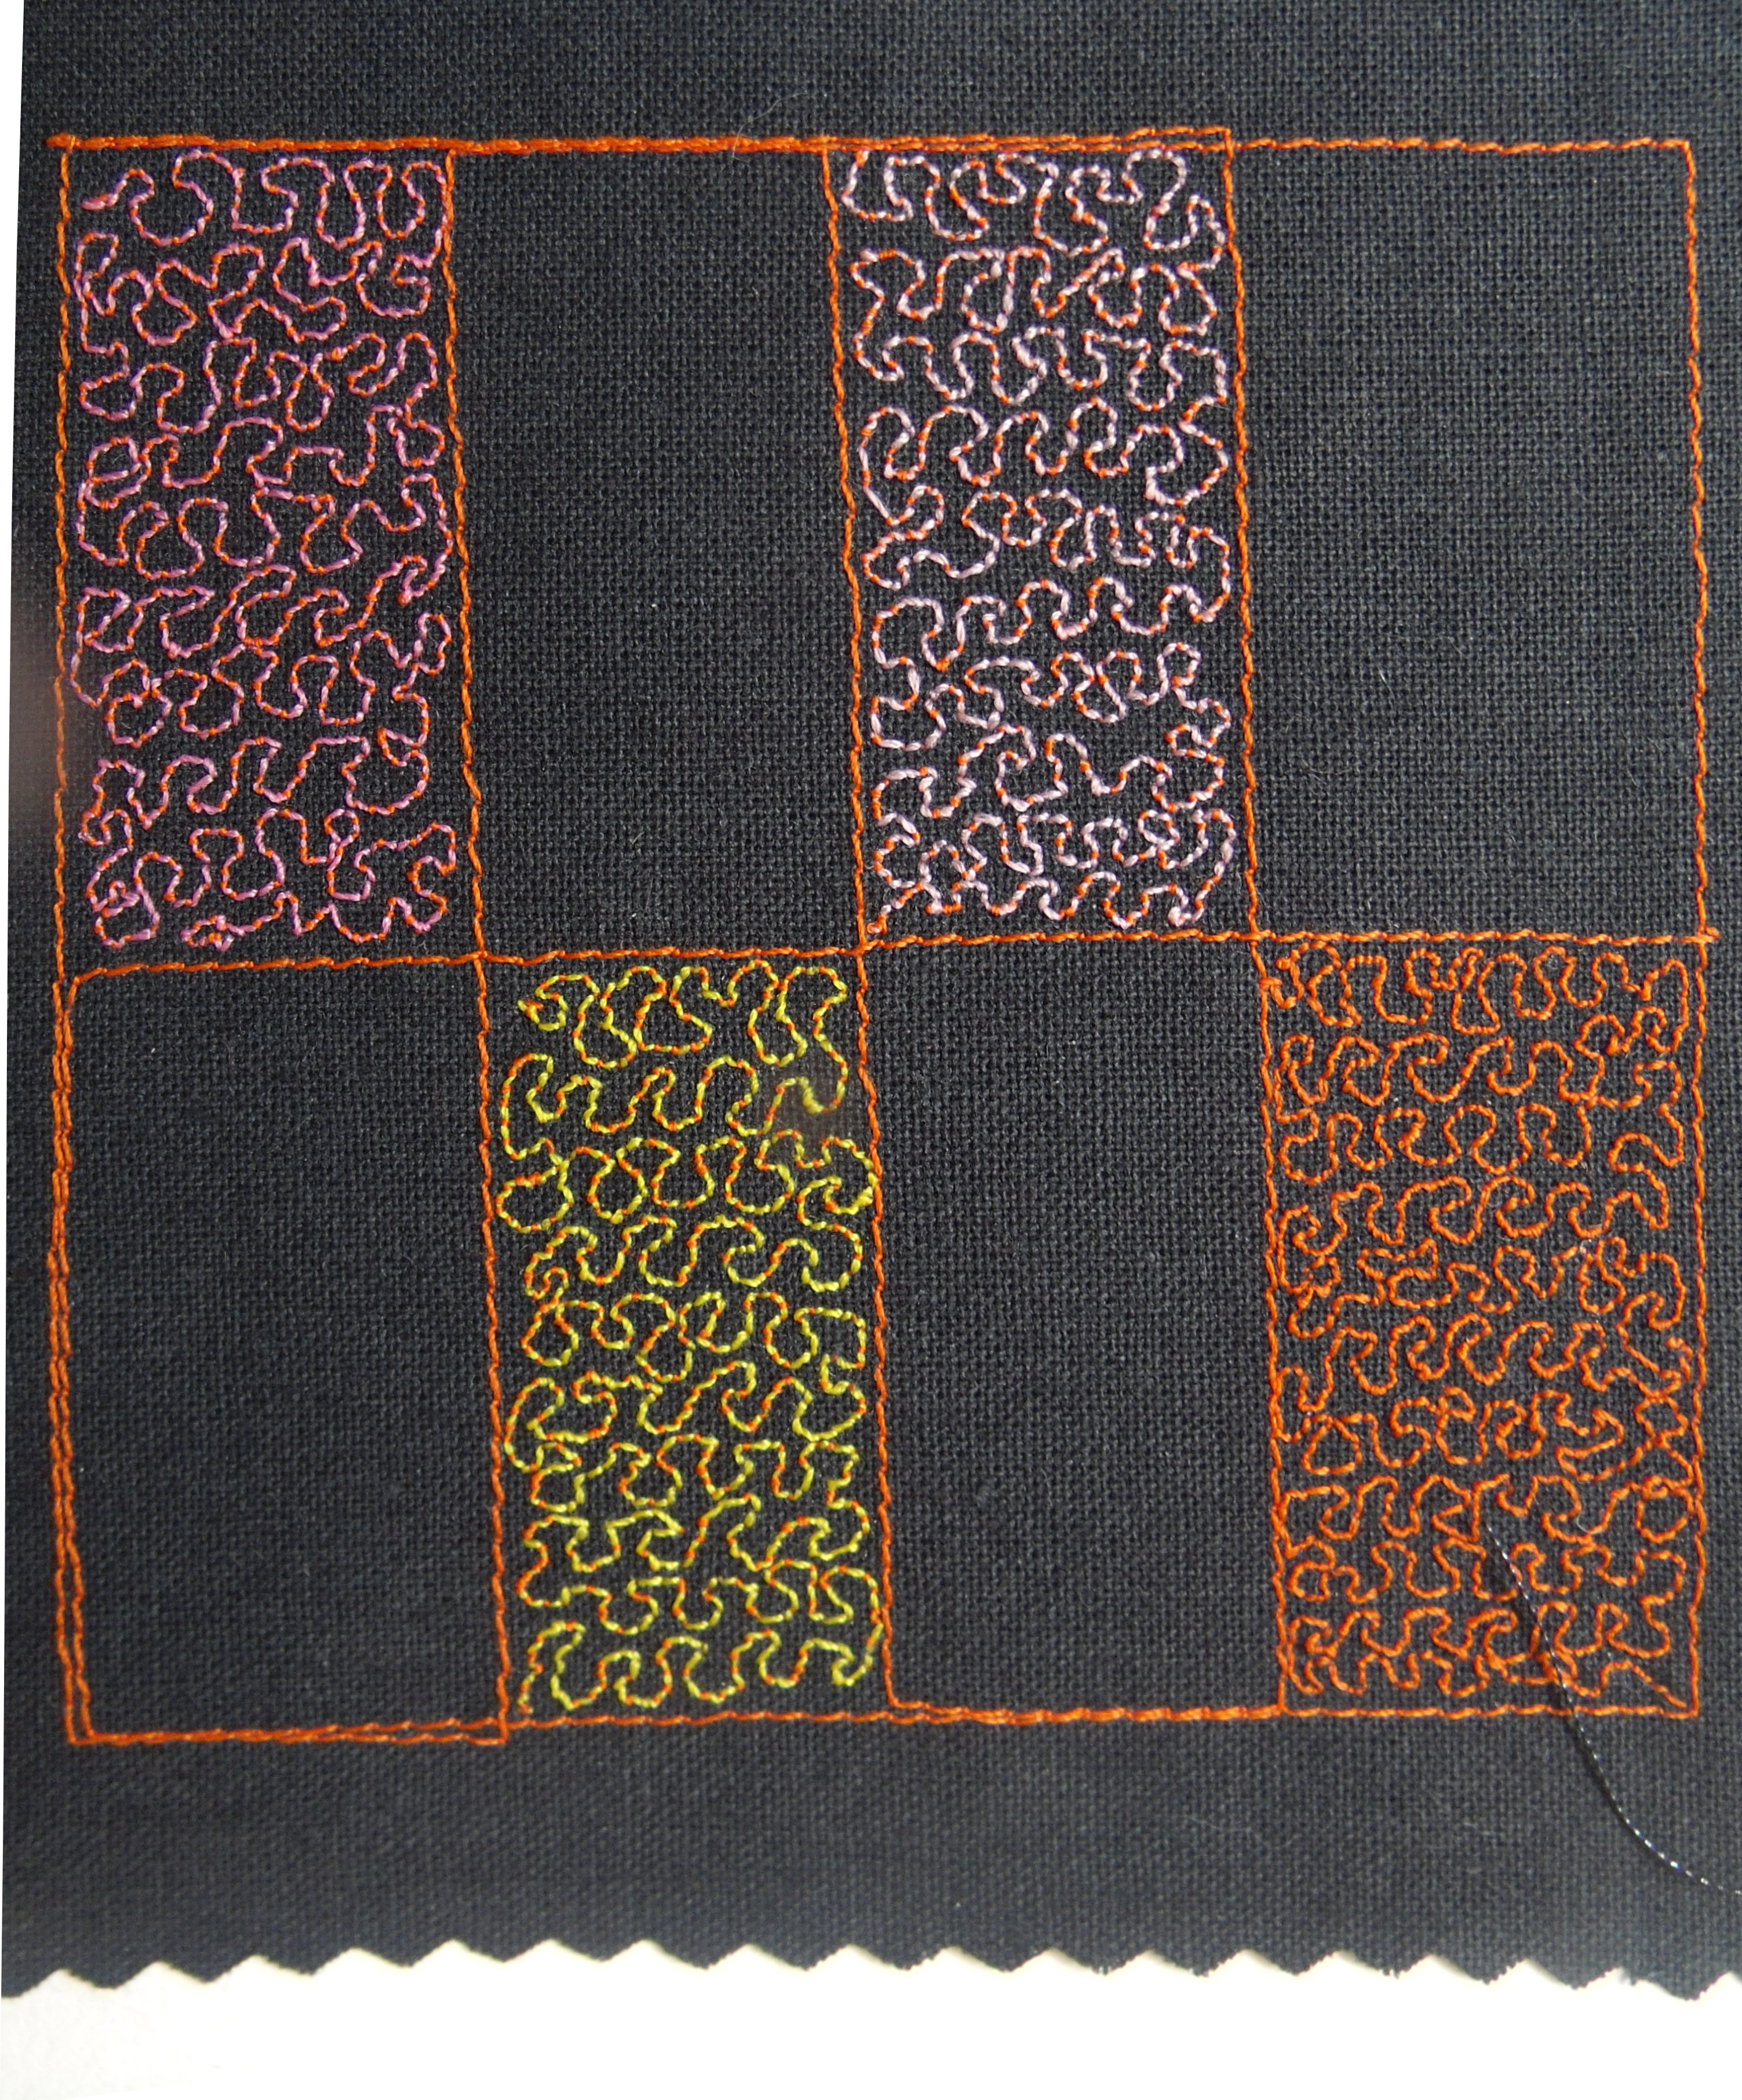
vermicelli linear stitching sample – Susi Bancroft
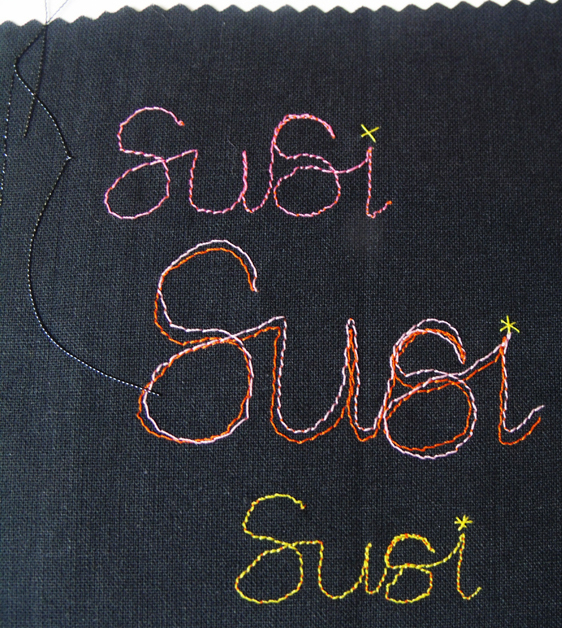
sample machined writing – Susi Bancroft
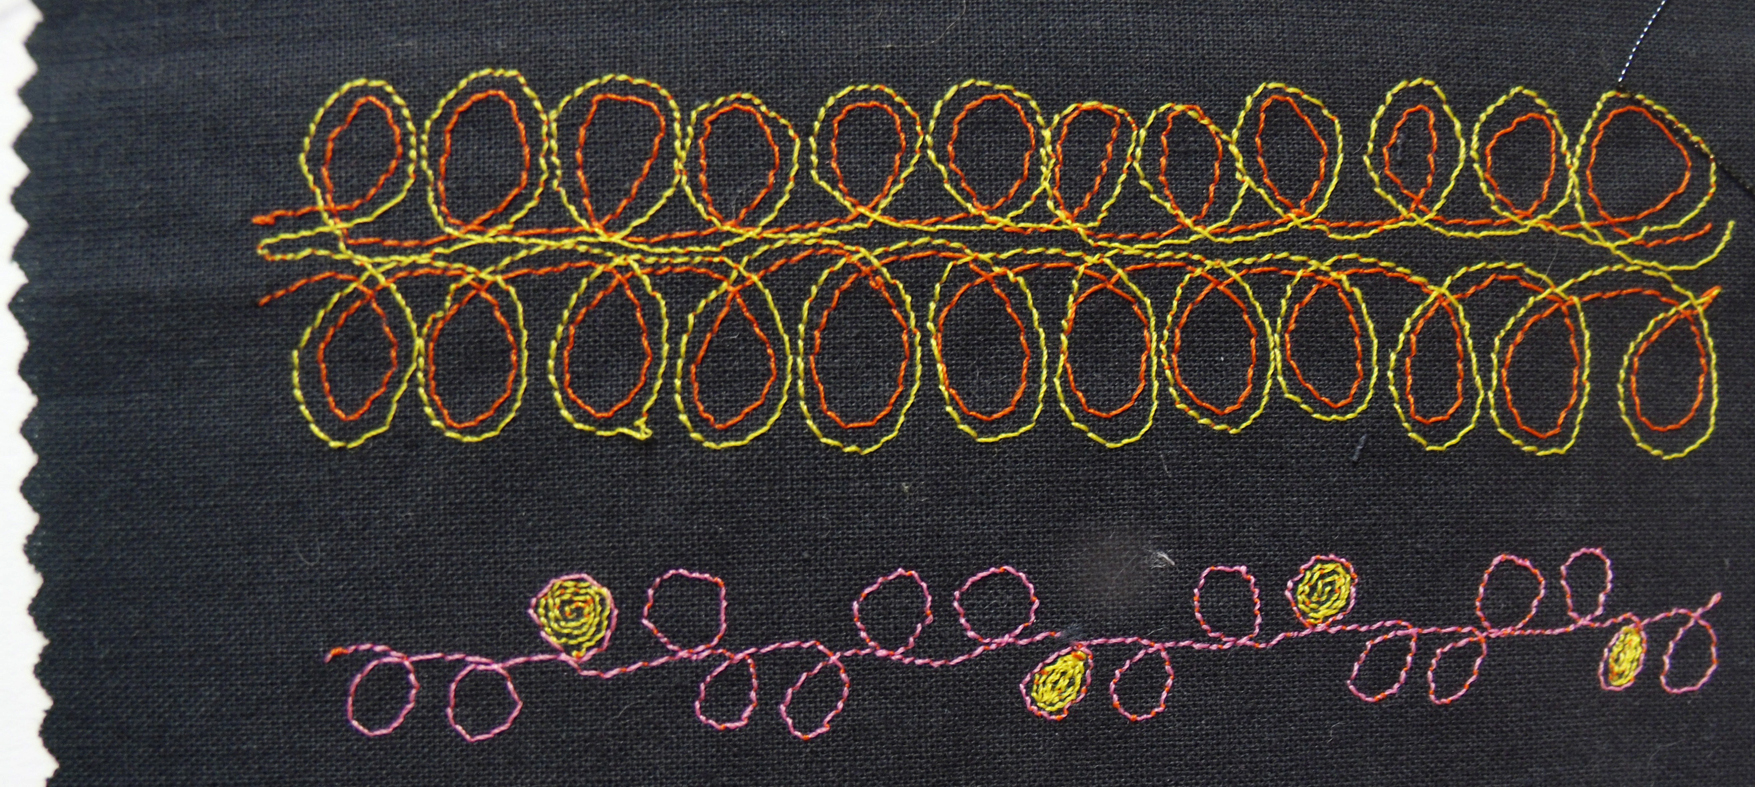
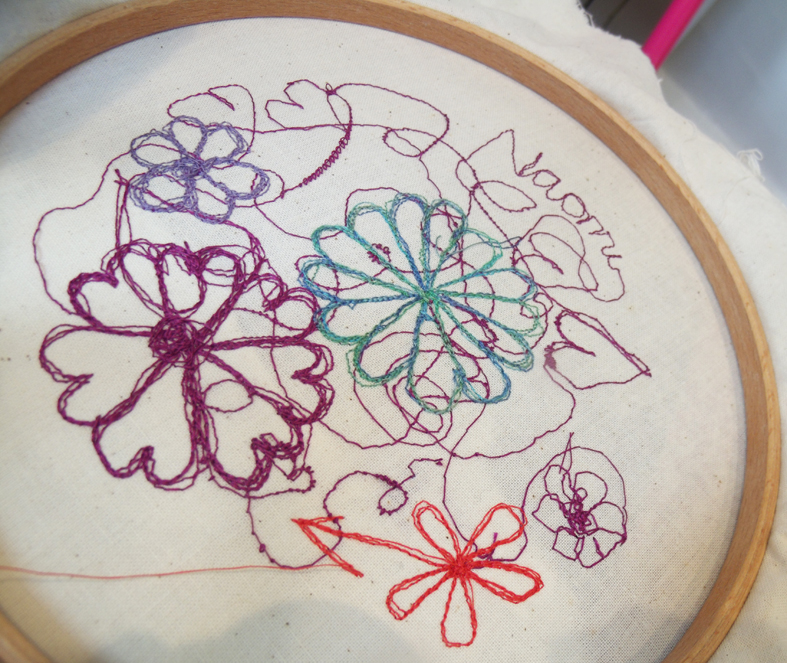
Now the colour started to be sampled, this is where all textile people get excited – endless possibilities just by changing the thread ….
playing with coloured free machine with extra outlines
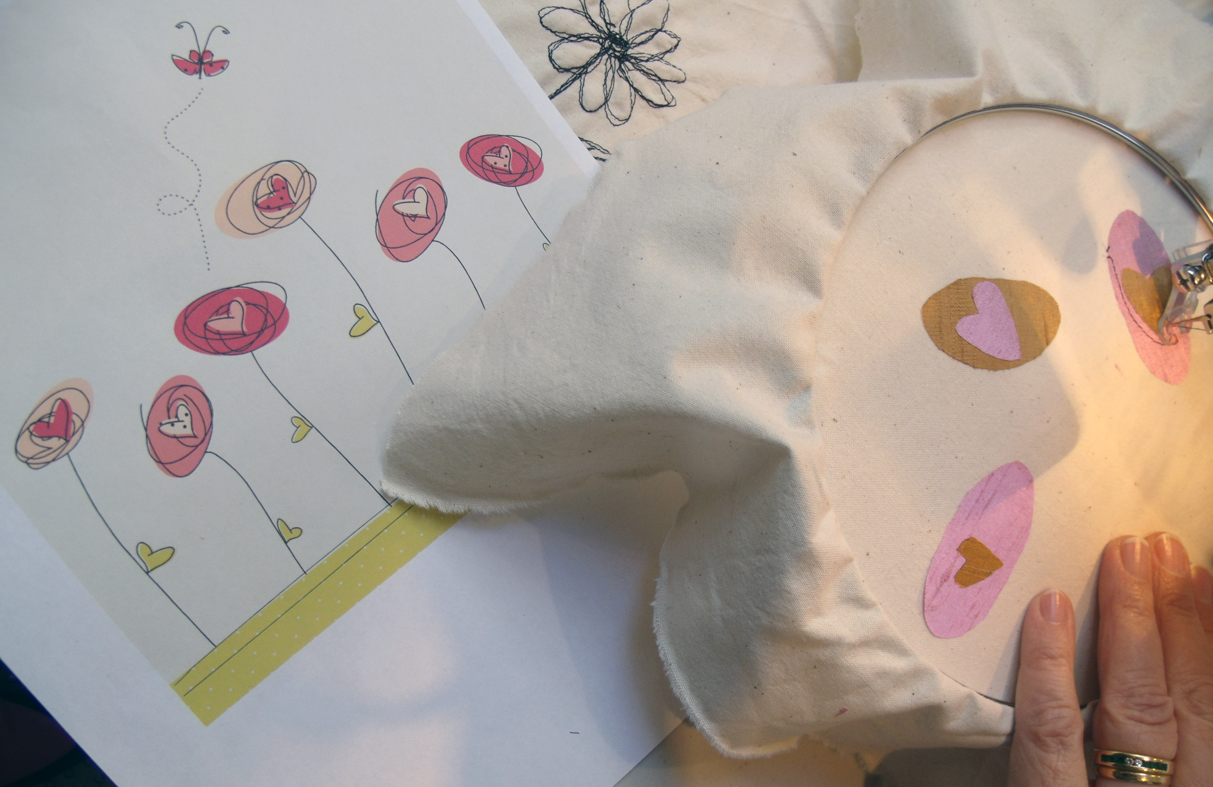
and appliqued fabrics started to appear – each person had brought some form of inspirational work, either an illustrated card or photographs and drawings
working small appliqued motifs from a commercial card design
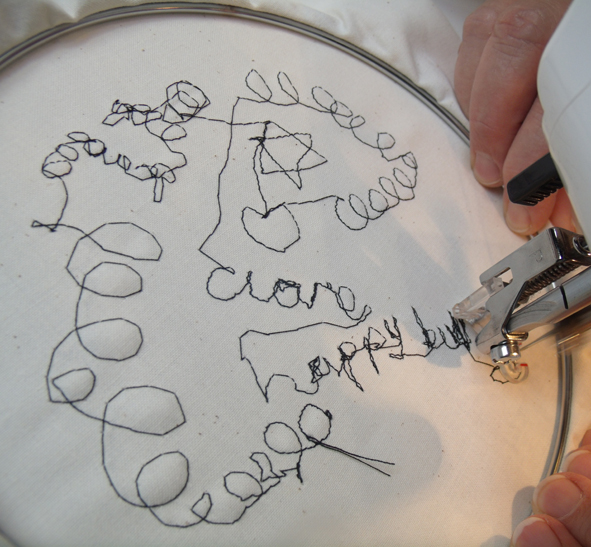
Now I know that working with the sprung embroidery or darning needle means that the hoops aren’t necessary, but Susi feels that for the first attempts everyone should adopt a belt and braces attitude, the fabric needs to be as taut at possible to get the best results. When everyone feels confident of drawing then they can remove the hoop – however most people took advantage of this restriction – this work below is already framed – it actually reads ” I am Very Happy”
circular embroidery made by keeping to frame restrictions.
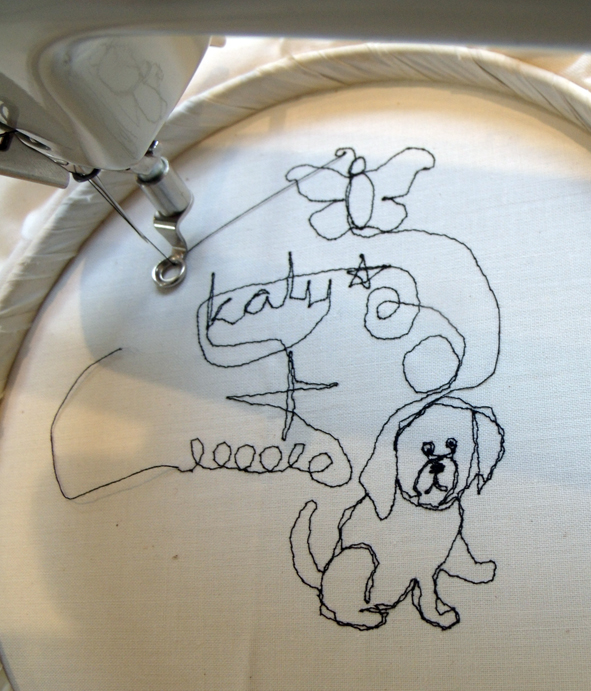
and here the nuisance of not being able to manouvre the stitching past the hoops intrusive clamps has made a new design from the original card – go with the flow…..
design due to the constricting clamps – this is what sampling is all about – work with what you have got.
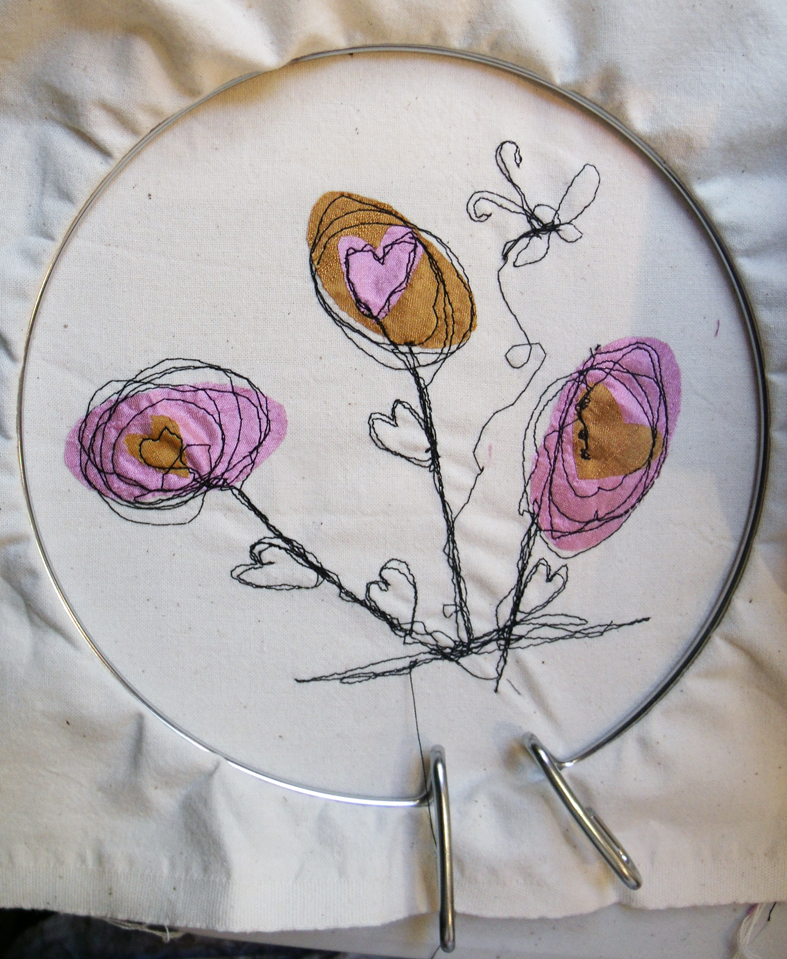
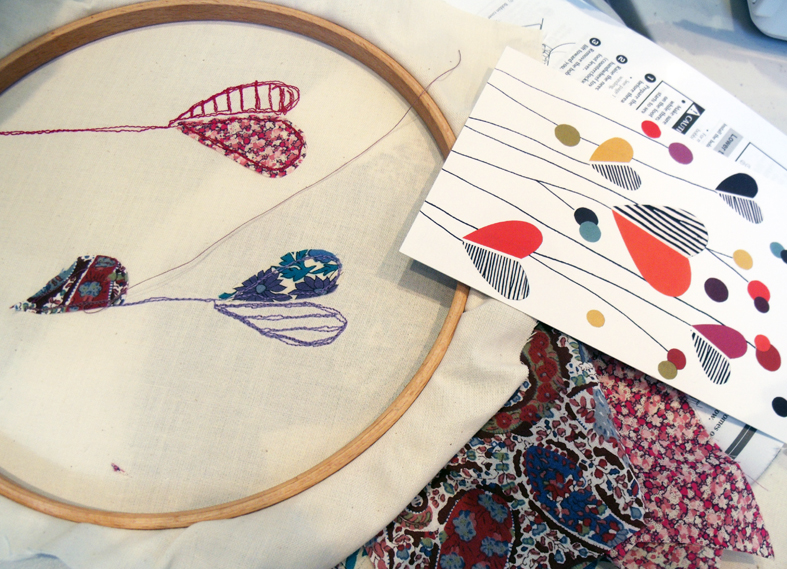
Some more renditions of photographs and cards start to take on a life of their own – this is why I think that copying something inspirational is a good way to start off any new technique, the worry of design is taken away and suddenly invention takes over..
copying the design in fabrics brings so much more pattern and texture
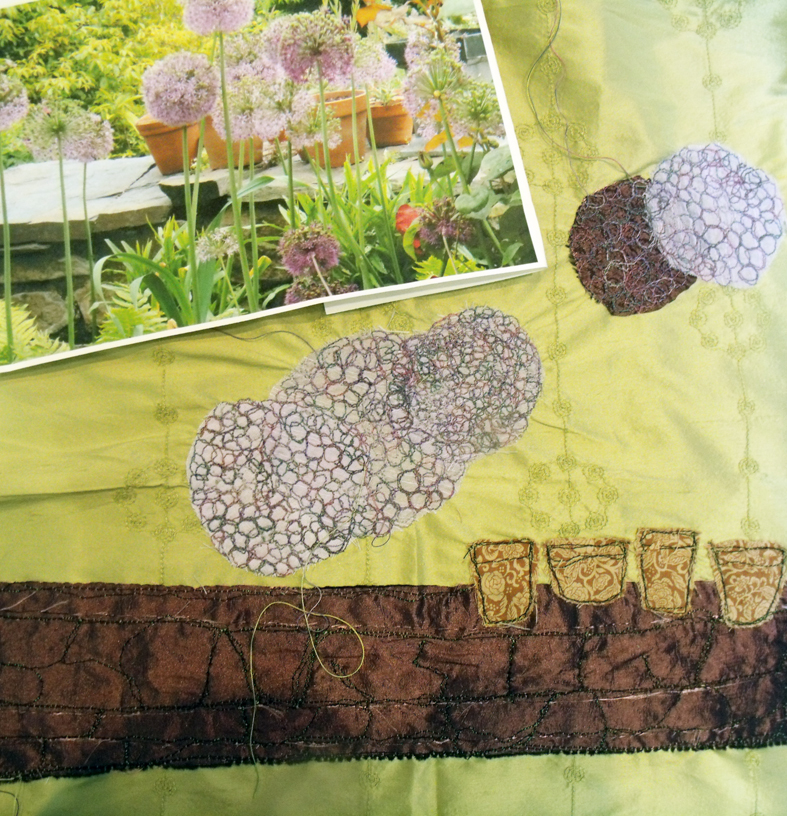
and working from lovely photographs is often a good way to get started – the fabric soon asserts itself.
photographic inspiration works for a colour gamut to get things going.
In celebration of Valentin’s day the staff and tutors at Heart Space Studios got together to develop mixed media work based upon Paper Cutting. Debby Bird led the session – a chance for everyone to get to know one another better and swap information, materials and ideas. The project was to make selling exhibition of heart pictures or cards for our gift shop.
bird motif for practicing on
lace bonded onto papers
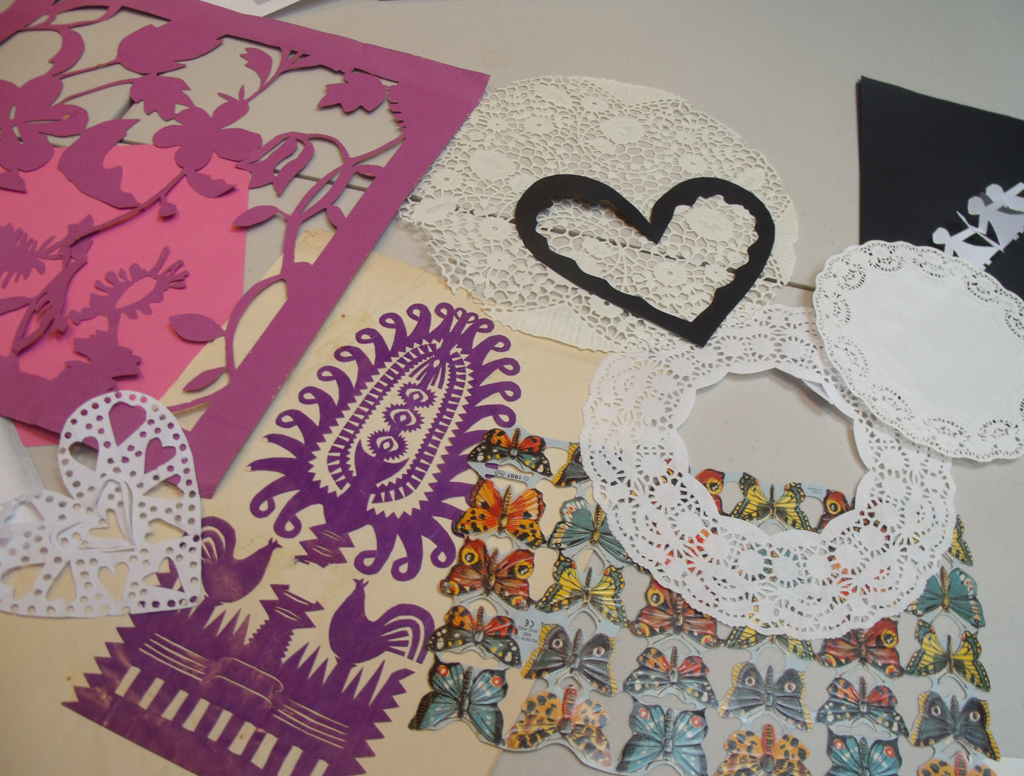
The tutors had been asked to bring in materials and equipment from their own practice, and so when these came out everyone stared to play with different things..
pre-cut papers, from scalpel to laser techniques
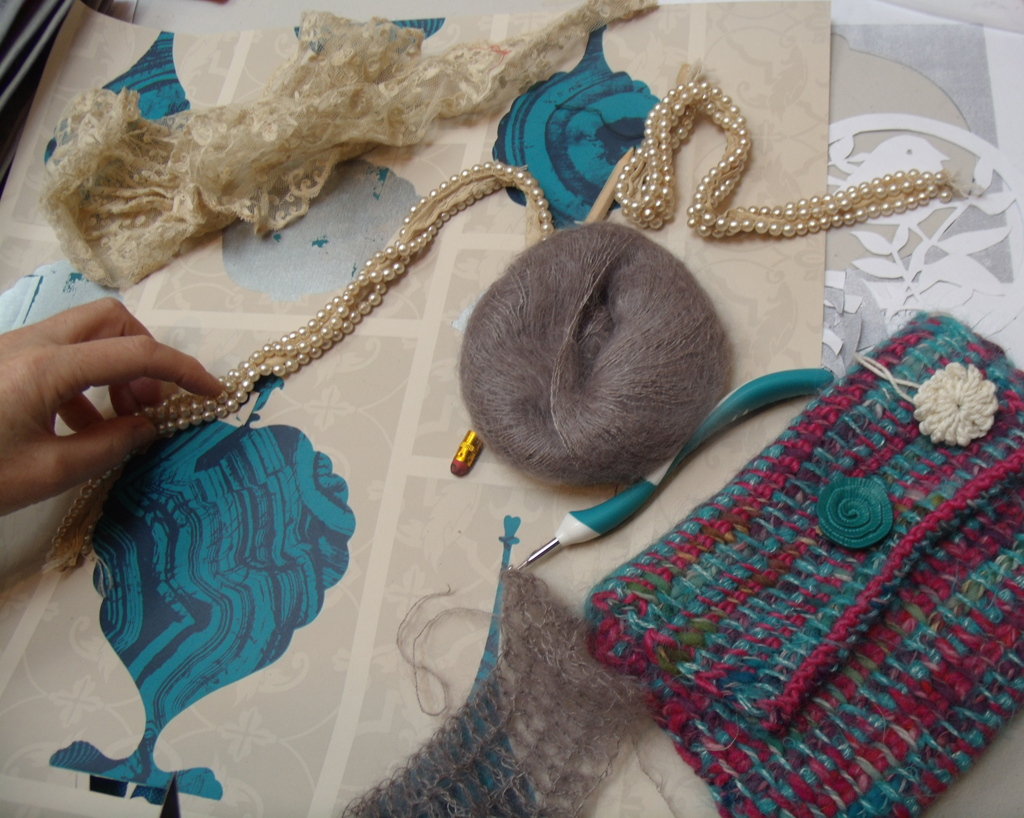
everyone had very different pieces of inspirational materials…
Steph Wooster’s stash of old blankets,woolen yarns, ticking and tracing papers.
the characters of the makers was apparent by the things they chose to bring….
Kirsten Hill-Nixon’s felt tweeds and maps
Each person has developed stashes of very personal things and now they had a good excuse to use them…..
Amanda Jone’s knit and crocheted bead collection
in fact even the boxes and bags the materials had been brought in were inspirational.
Decoupage cardboard box.
Sophie Bristol’s sewing box of exotic ribbons
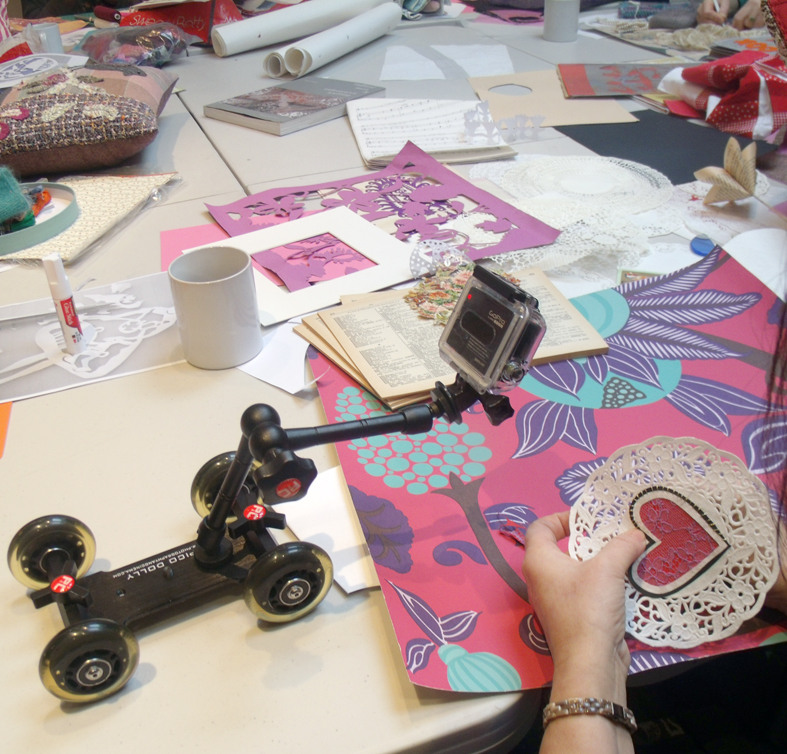
Just as we were getting started we were visited by a camera team to record the workshop for the regional daily news programme on ITV.
Regional news cameraman filming the workshop
Sophie and I were interviewed separately about various aspects of the how Heart Space works, she was fluent and received a round of applause from the group, but I was told by the interviewer that they had lots of ‘sound bites’ from me – I think this is a polite way of saying I didn’t exactly answer the questions.
roving close-up camera checking Debby’s work
But we were all intrigued by the roving miniature camera used to get close-ups of the techniques were using. Back to work after the excitement and after we had given 5 top tips for beginners – more of which later…..
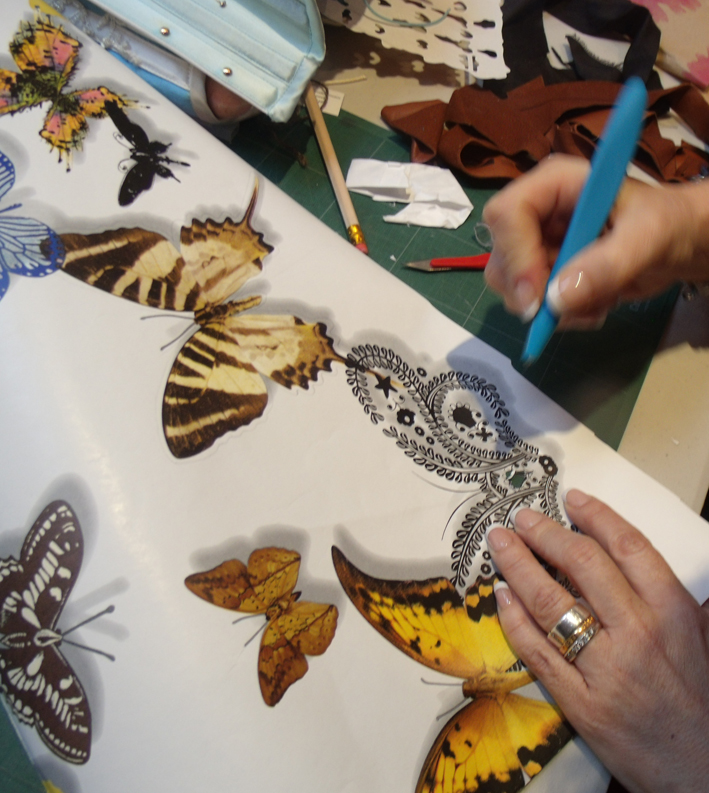
Lisa Keating starts to cut into a butterfly motif out of a modern photographic wallpaper.
Once the filming was over everyone suddenly seemed to be energised by what they could achieve in the day, they each had to make 1 sample heart picture that would ideally lead to a few other versions when they went home, when framed all this work will make up the Valentine’s exhibition for Heart Space Studios
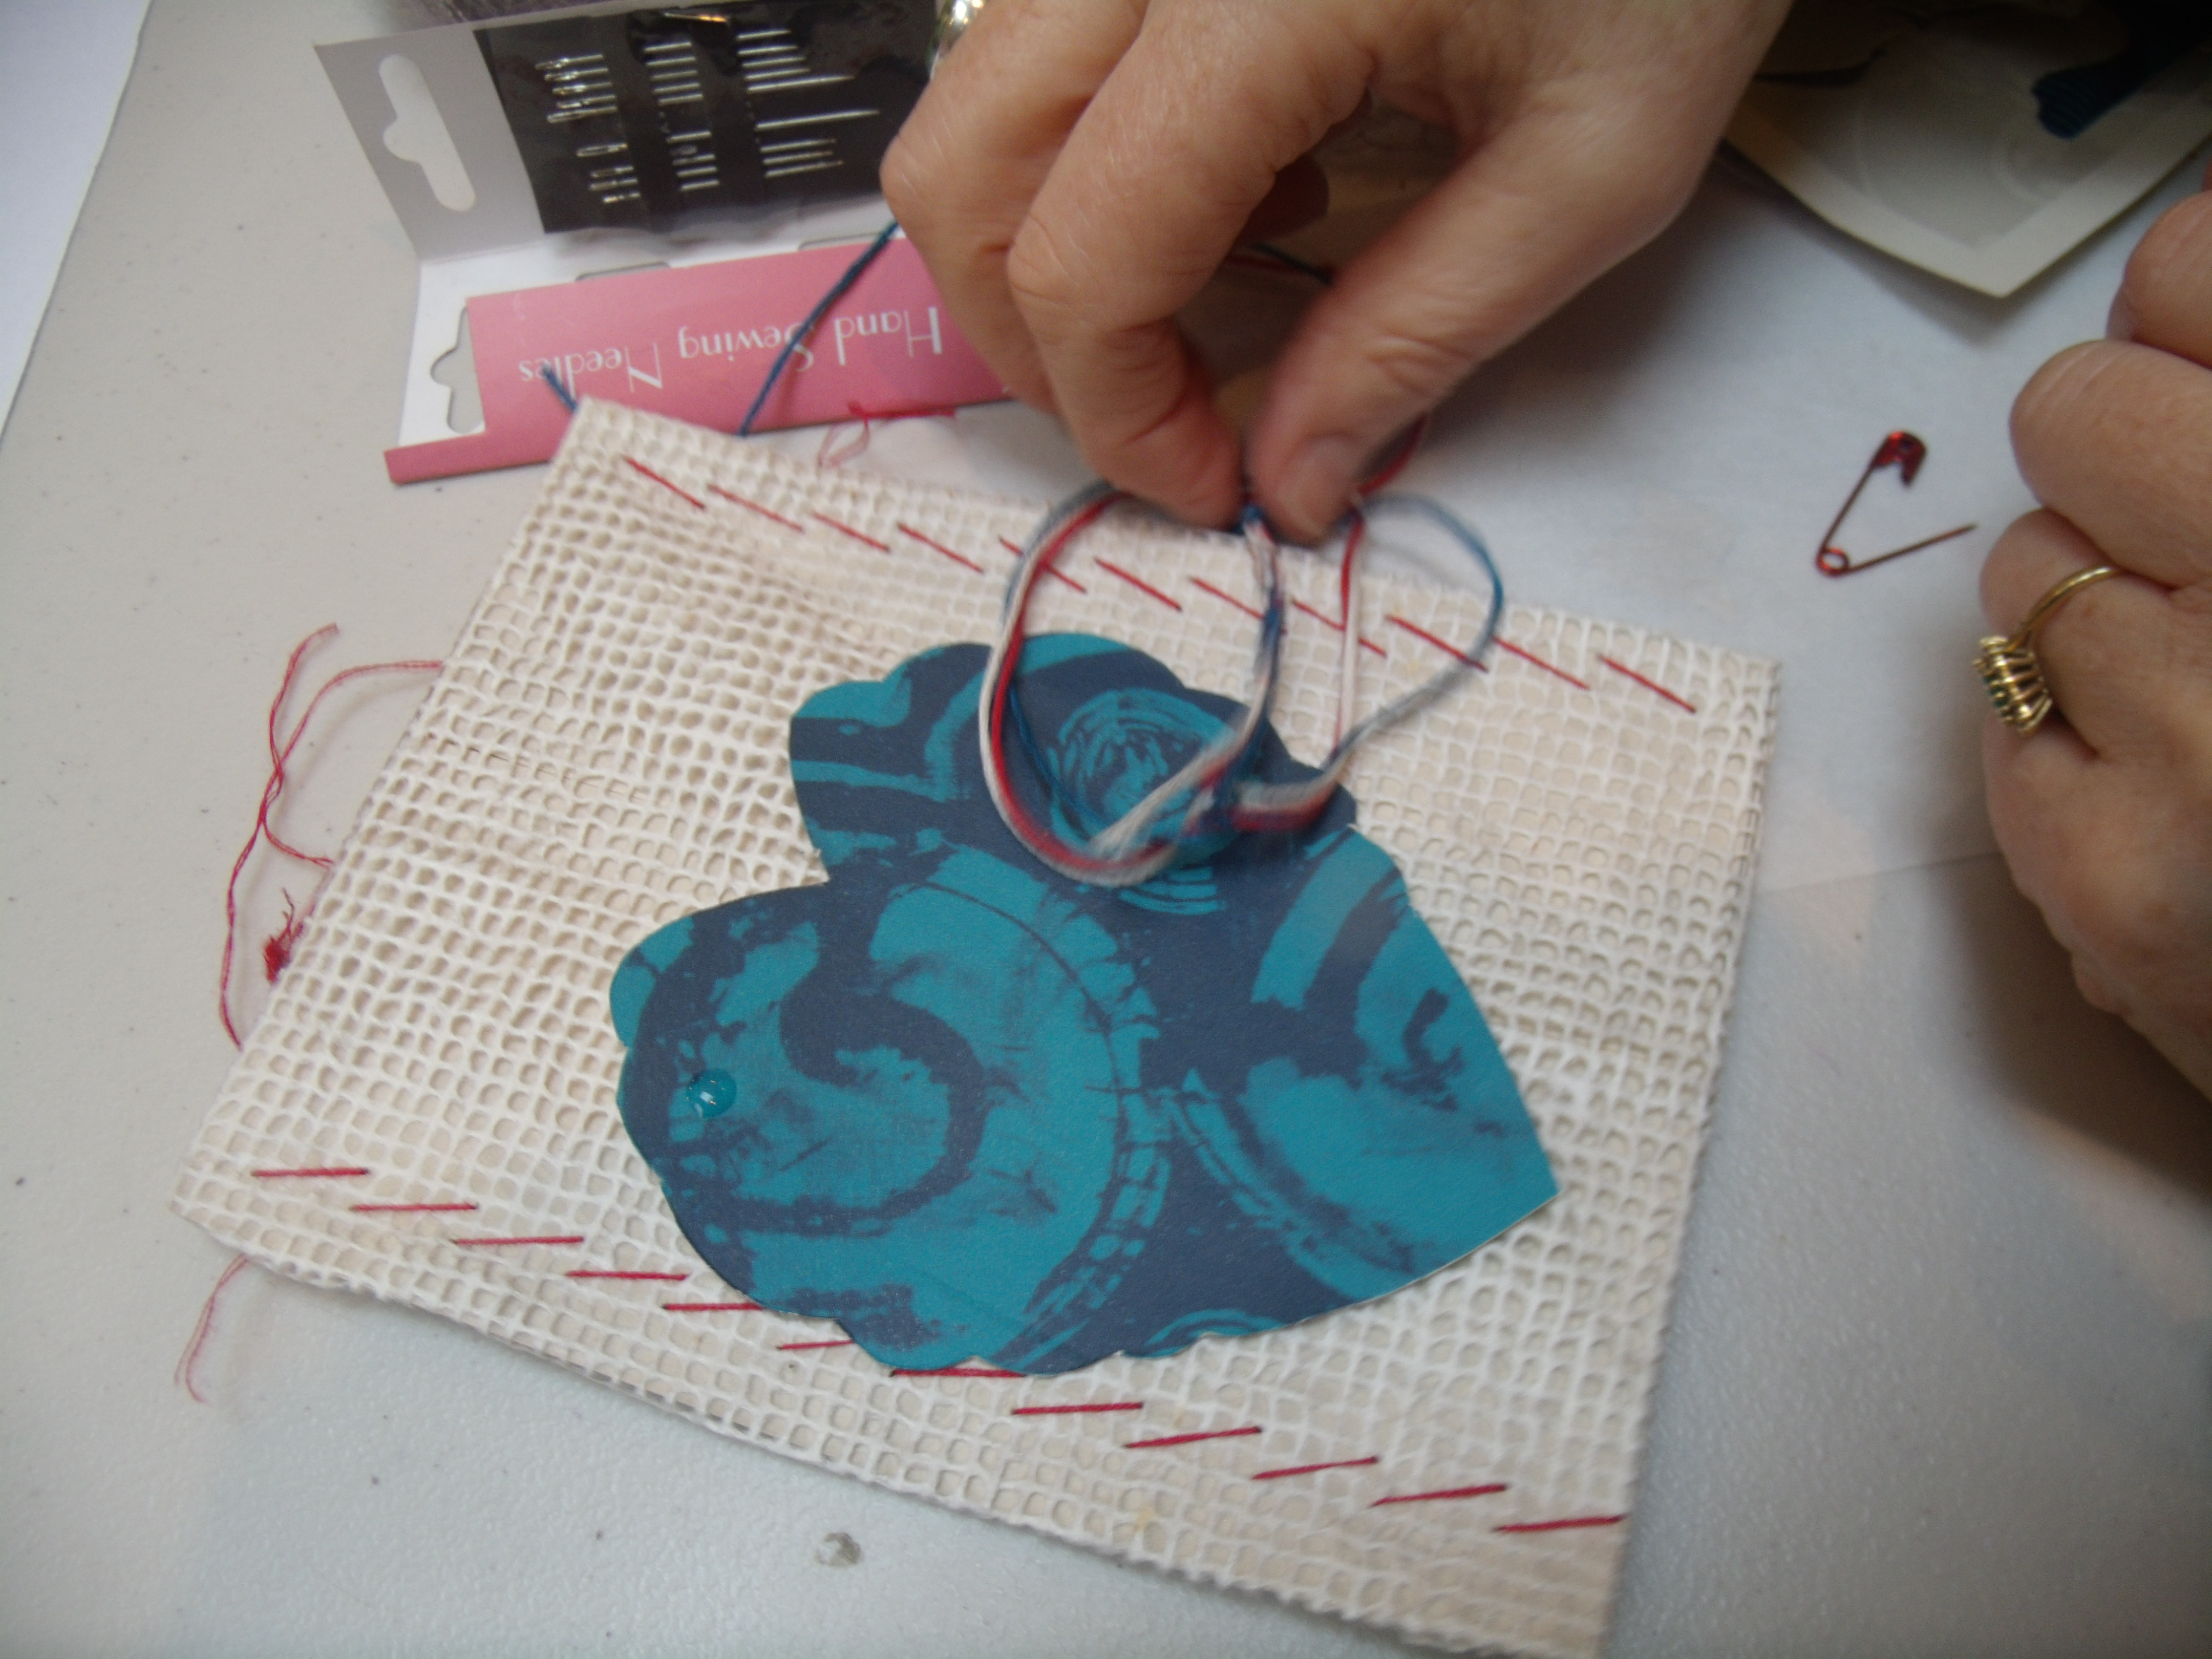
I was really pleased to see that Libby, who volunteers helping to generate our publicity, used the techniques I had taught at the first session of the Crazy Beading course that run on alternate Saturday mornings – really good to see how simple ideas can be adapted to new materials.
Avril Best’s wallpaper and woollen materials
Avril’s cut paper turquoise heart stitched onto Japanese washi paper
Suddenly hearts started to appear on all the work sites.
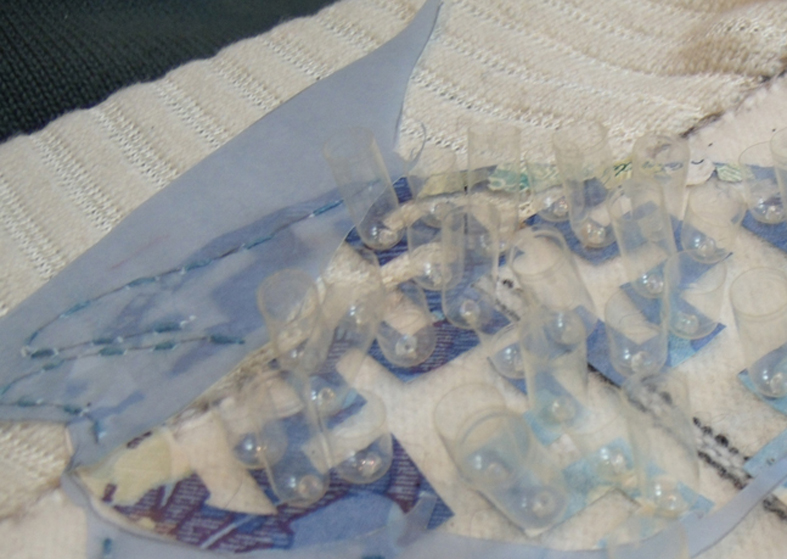
Steph Wooster’s seagull legs and heart applique
a close – up reveals a really strange use of mixed media – now who would have thought that medicine capsules could look so glamorous?
medicine capsules or new type of sequin?
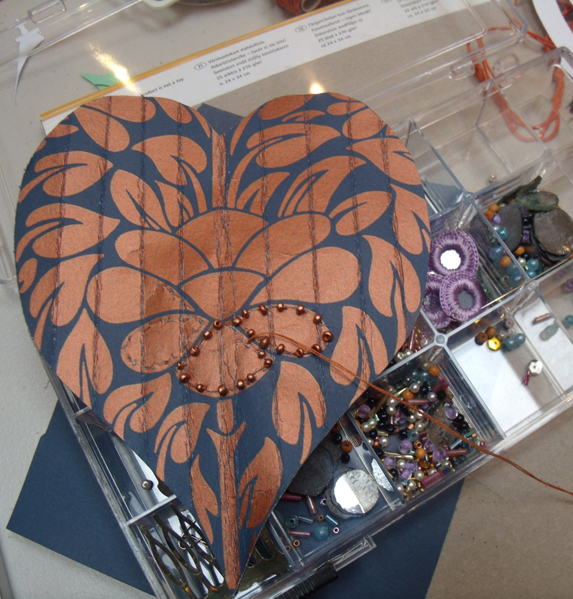
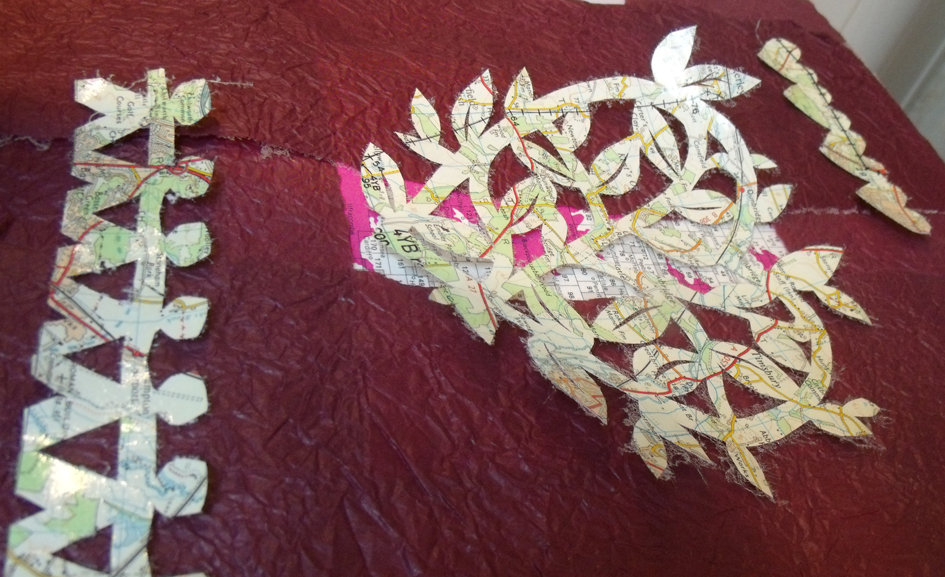
a really interesting idea emerged from Kirsten, she placed hearts and figures either side of a large decorative heart all of which she had cut from maps, I liked the idea that she could make links between the hearts and the figures using the map as a route……..
maps to link hearts and people? Kirsten Hill Nixon
the simplest hearts are often very successful – these stitched, printed, miniature bunting strips are just so desirable.
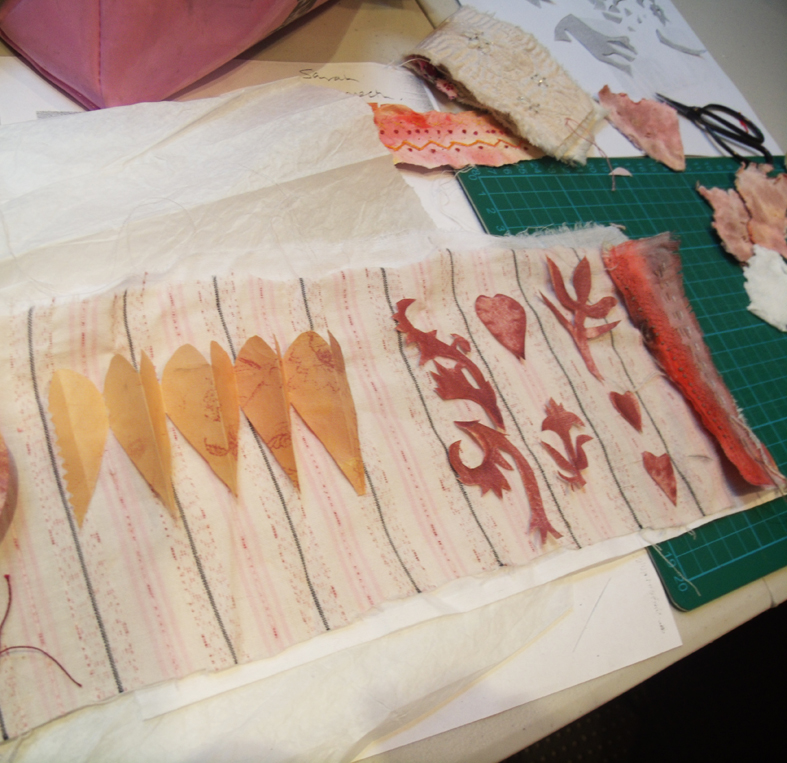
choices to make for developing finished work
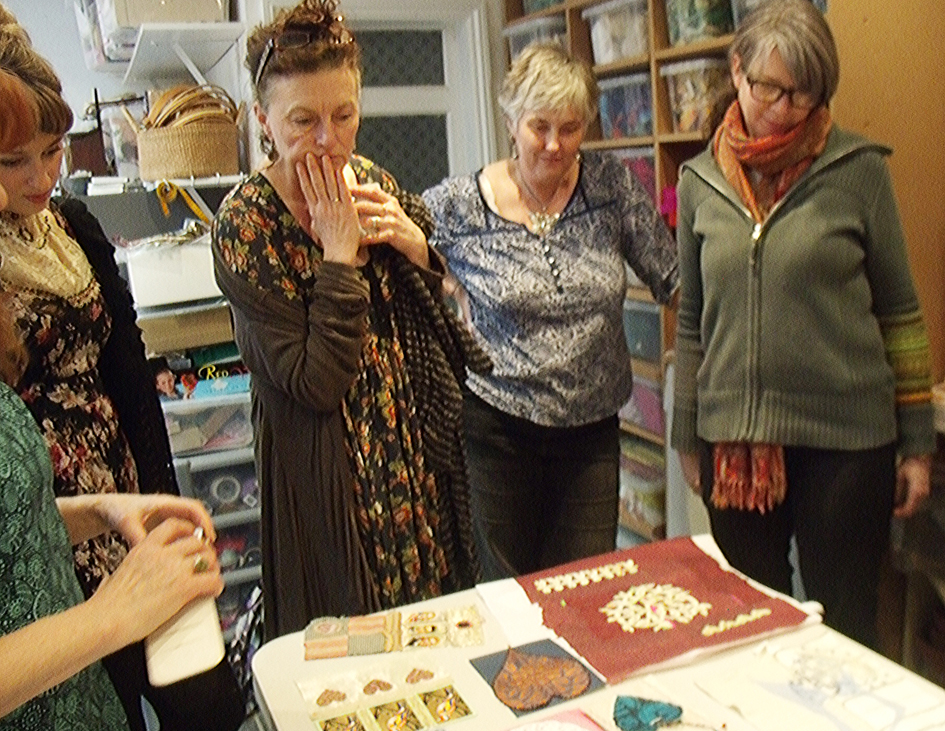
When the sampling session was finished everyone set their work out for viewing by everyone – several people were determined to get more work for next week – which apart from St Valentine’s day celebration is the 3rd anniversary of the opening Heart Space Studios.
some of the group assessing the finished samples – where to go next – doesn’t look too hopeful does it?
Well they all promised to send or bring work for exhibition by the end of the week – so the next post will show the results….Oh and the 5 top tips for staring to make with textiles,
1 when threading a needle 1) cut the needle end of the thread at a 45% angle
2 when threading a needle 2) lick both the end of the thread and the eye of the needle
3 use circular needles to knit garments – you only ever have to make the basic knit stitch ( not alternate with rows of purl) and there are fewer seams to stitch up.
4 use the best possible materials you can afford – always.
5 press as you go when making any garments (this is also my own favourite rule)
my totally moth eaten cashmere cardigan – but with darning still intact!
This is a sad story with a happy ending. My favourite cardigan that was included in my first ever post, Make Do and Mend, where I proudly showed the careful darning that I wore with pride, sadly, got lost. When I eventually found it pushed to the bottom of my laundry basket (don’t ask) it was totally ruined even beyond my restorative darning powers.
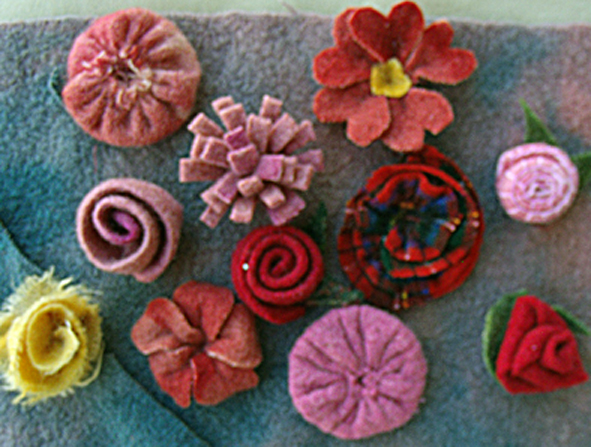
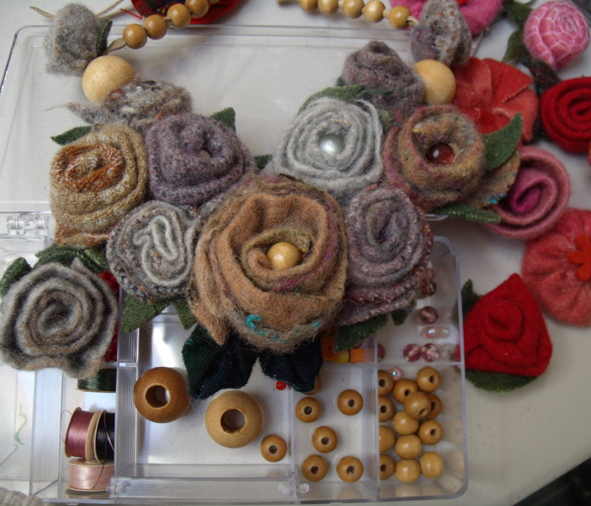
I decided to felt it by boiling it twice. The colours are so vibrant that I just had to try to find a use for it and I found the perfect solution when designing with some lovely felted woolen blanket flowers that Kirsten Hill-Nixon had brought along as a new idea for a class at Heart Space Studios.
the reds and pink selection- I really like the tartan rose.
the neutral colour selection
Kirsten will make the flowers in the morning class and I will develop the design and make session with them in the afternoon…but first I had to design something with what she had brought me, and she had brought me a whole selection of disparate flower heads – just as I has asked her to.
I made 2 colour sets of flowers. the neutrals were really soft and wooly, very tactile and I thought first to just make a heart out of them – well I would wouldn’t I? and in fact this is a really nice idea I may go back to…..
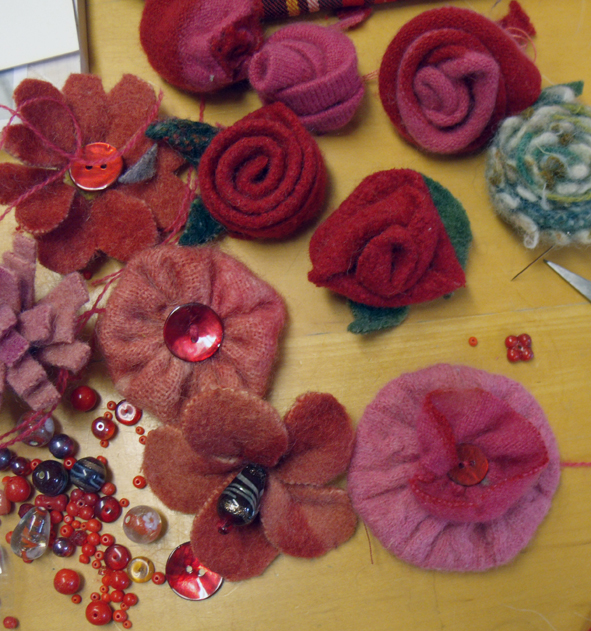
sewing on some beaded and buttoned centres
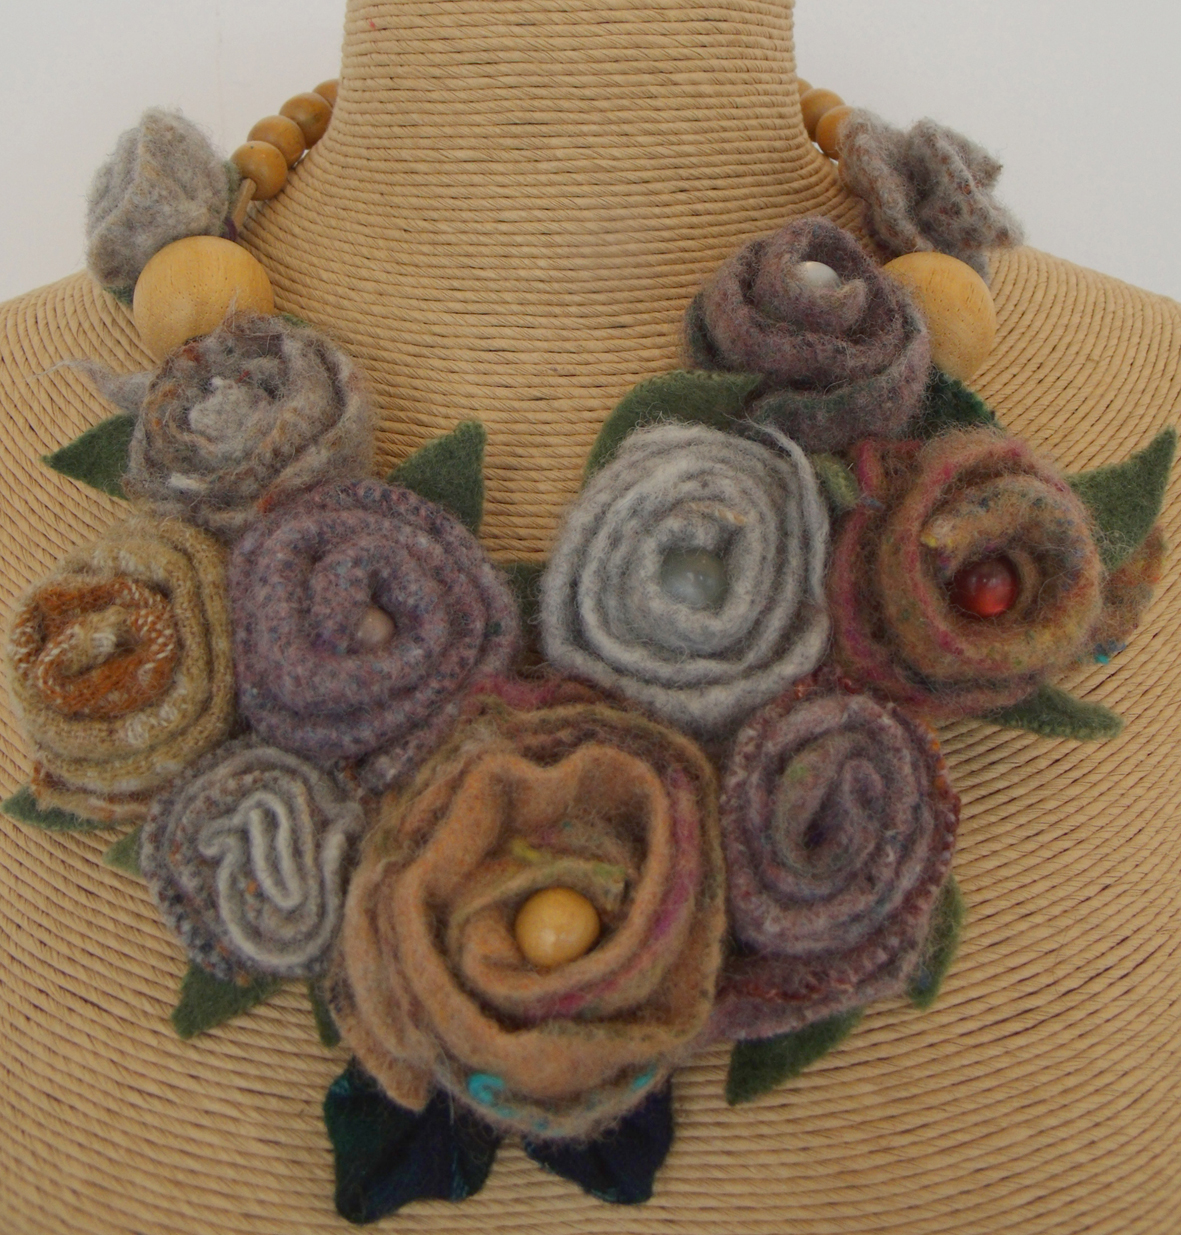
But then I imagined them as adorning a woolly winter jumper or cardigan, they aren’t heavy but they are bulky and a brooch seemed better than stitching them to a piece of clothing. But I had been given so many flowers that I soon decided on a necklace….
Kirsten’s red flowers arranged as necklace
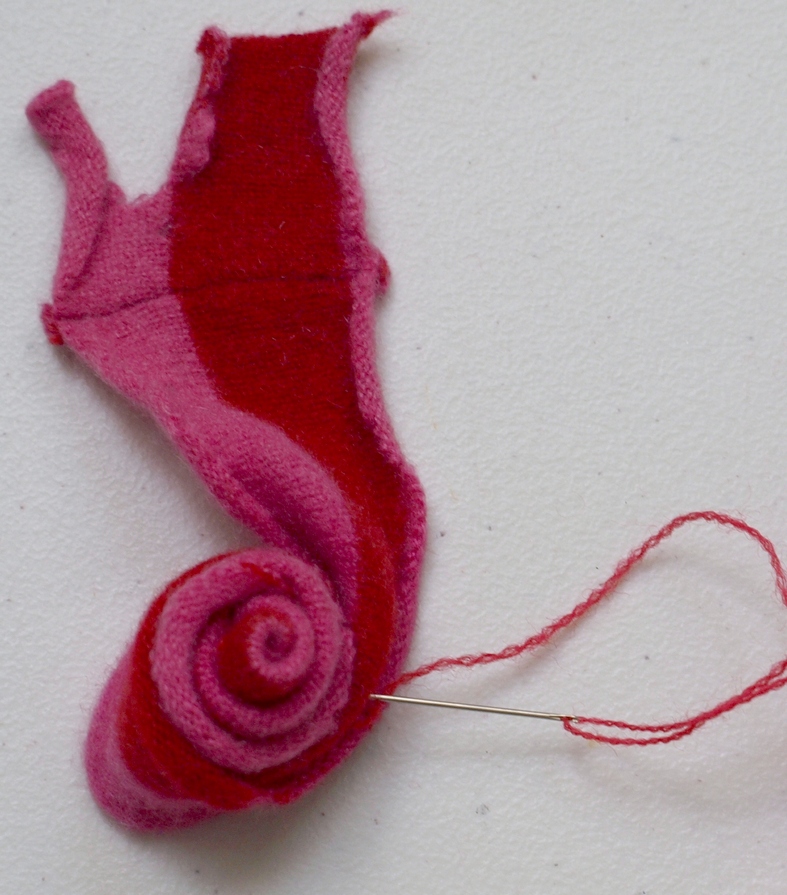
I set to work but when stitching them together without a backing fabric, soon realized that I needed just a few more roses….then I remembered my old ruined cardigan. I cut the sleeves into ribbons of different coloured stripes and stared to stitch the rose buds by simply rolling and folding the strips to suggest overlapping rose petals.
cut strips of sleeve being curled to start roses
stitching the rolled rose securely with matching fine wool thread
I had used this system many times as it is so easy – you just need to stitch as you go and control the folded edge, I found the way to do it in a vintage dressmaking manual from the 1930’s; the natural affinity to roll for cut knitting really helps the rose petal effect. I was starting to see a new life for all my old felted woolens.
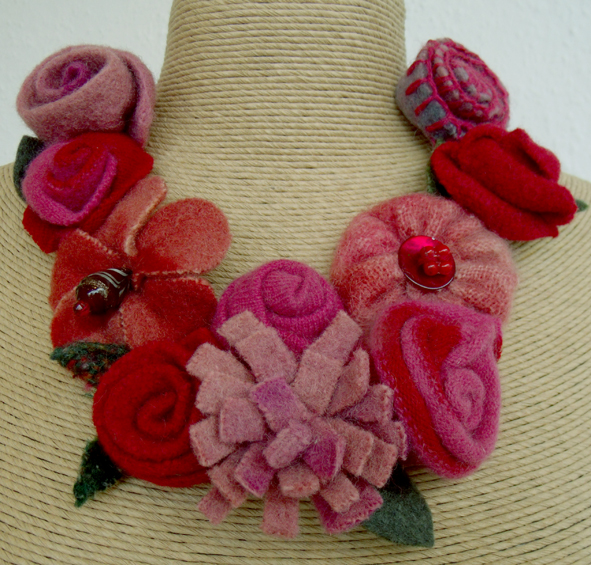
the finished necklace –
I inserted my knitted roses between Kirsten’s more substantial felt blanket ones, ( I really like her use of the blanket stitched edge for a fat rolled rose). She had provided leaves as well so they helped make the reds even stronger. Then I simply stitched 2 suede strips for ties onto the last roses and there it is – now for the neutral necklace.
the neutral necklace made of different blankets and added wooden beads.
this time I added wooden beads by threading them onto the leather strips to make a more decorative finish. Kirsten had filled some of the centres of the flowers with soft glowing beads so I added some wooden ones as well, the soft tones and texture of the wood feels just right for this sort of fabric.
finished felted blanket necklace
I was really getting into my stride, and now I just want to make more of these simple flowers pieces and I didn’t use the lively red tartan rose – so now I need to pluck up courage to felt my tartans and paisley scraps to use with my old washed out jumpers……