The new season’s exhibitions at Jen Jones’ The Welsh Quilt Centre, Lampeter opened a week ago today where I am exhibiting a small show of personal work – work that I make and keep for myself.
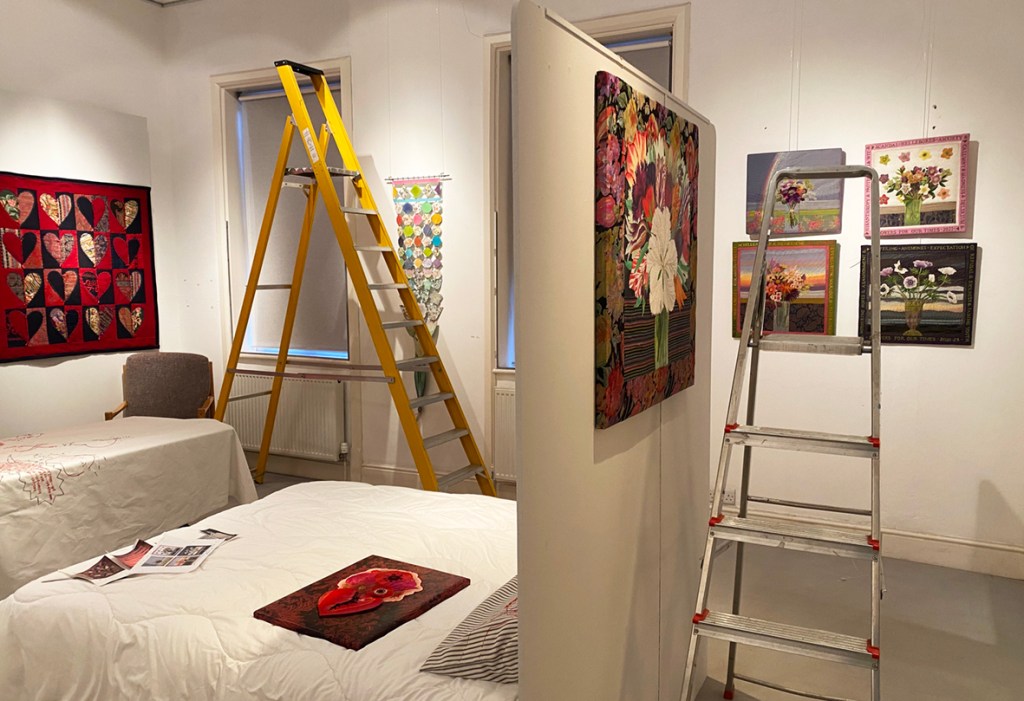
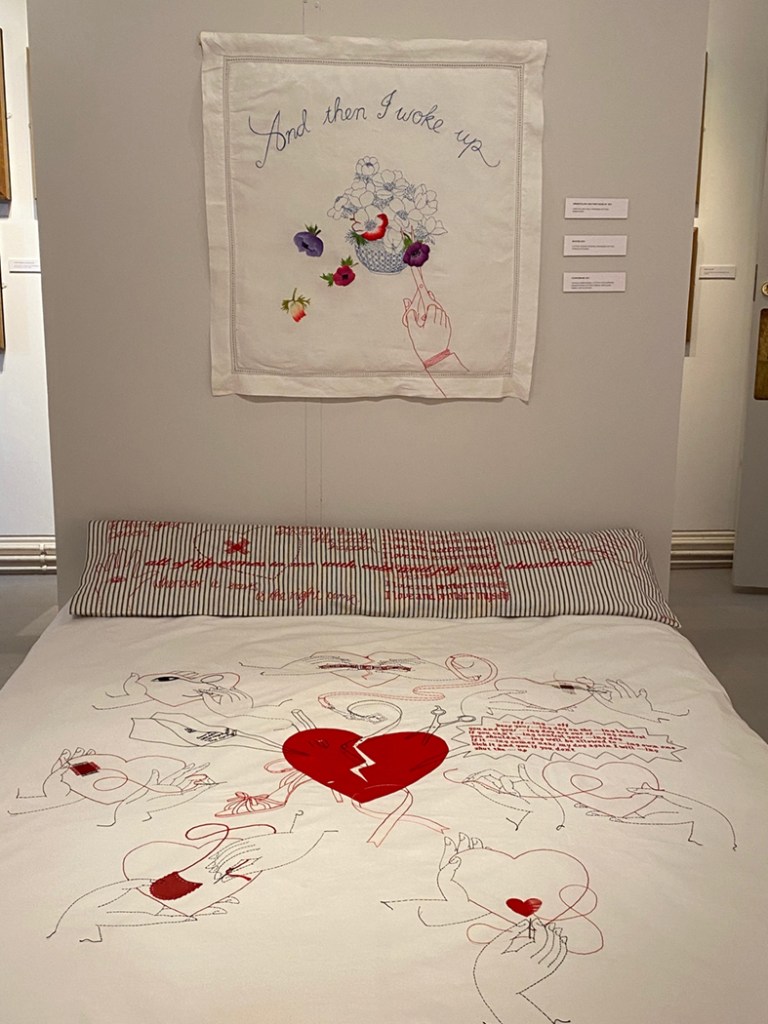
On my first visit early in 2023, when I took actual work to show Jen Jones, she offered me a small gallery for an exhibition and I decided on ‘The Flora’ embroideries. However on my second visit to the, now empty, room I immediately realised it would need far more works than I had imagined. I decided to add a more unusual collection of my textiles combining vitreous enamel and based on Mending. It features broken hearts and how to mend them, so Hearts and Flowers: starting at the begining and going round the room: this is the story of putting up the exhibition
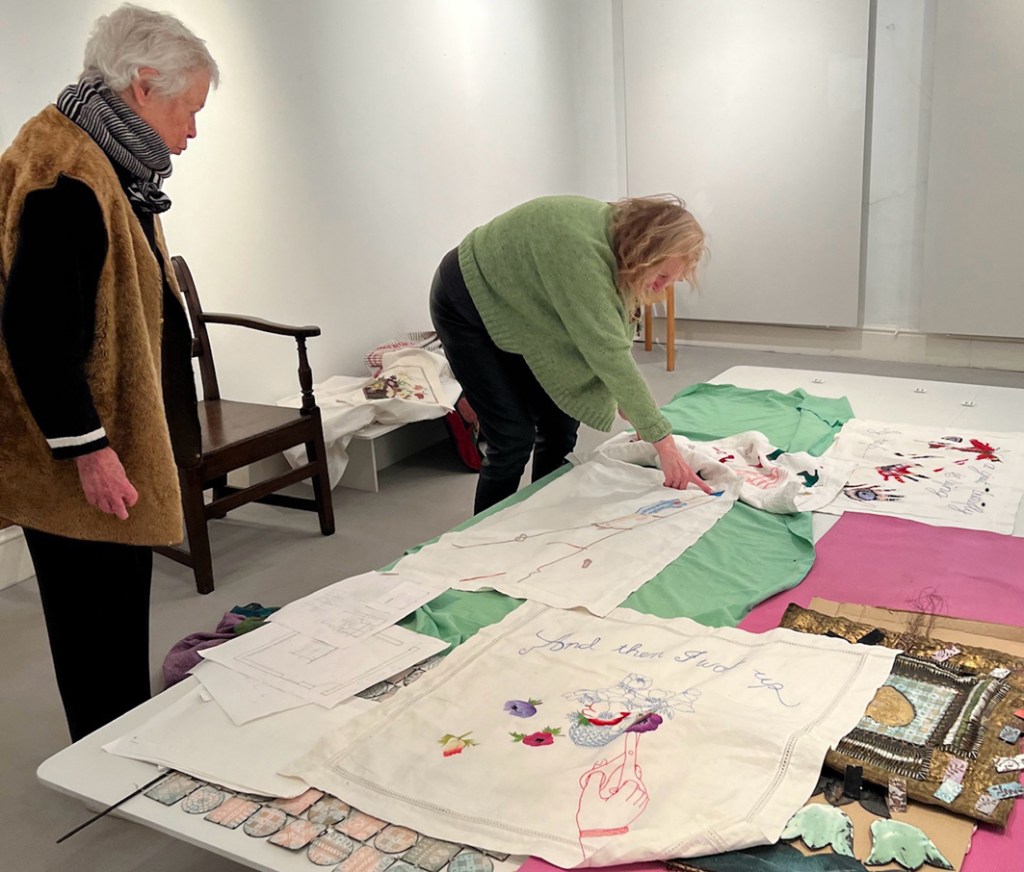
In the first week of March I took all my works and with the help of the whole team at the centre the exhibition was in place in a day(apart from a few extra tweaks before the opening)The first wall of work was The Flora. The exhibition curator/editor, Sarah James, remained focussed when I had lost mine.
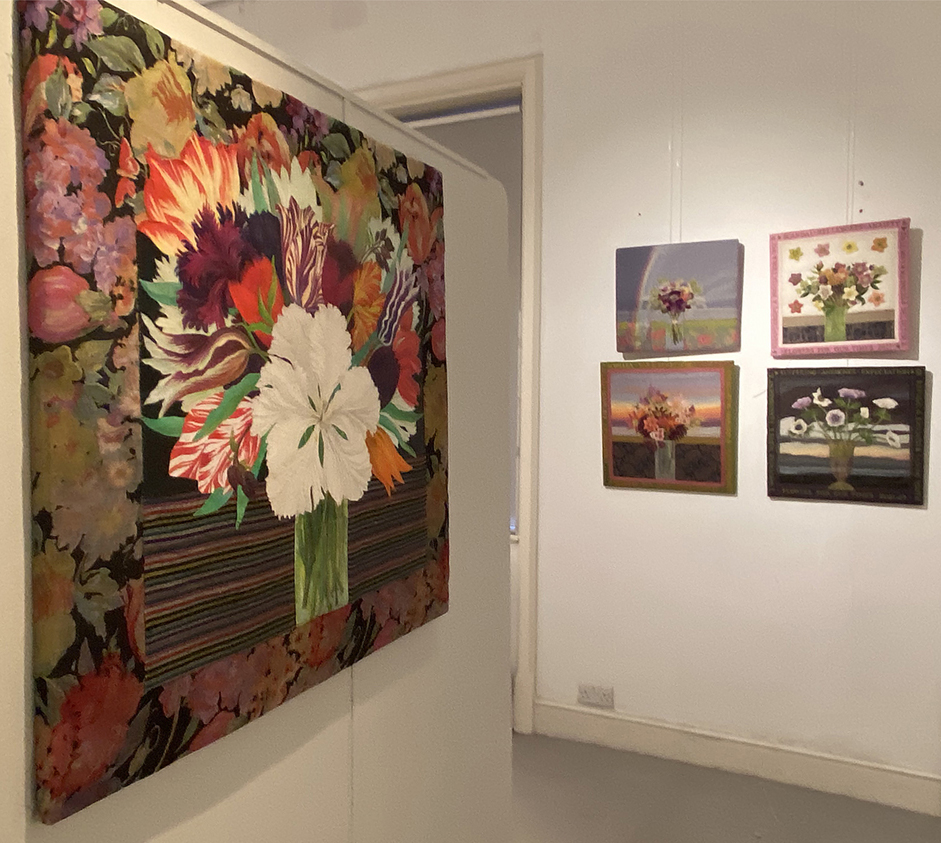
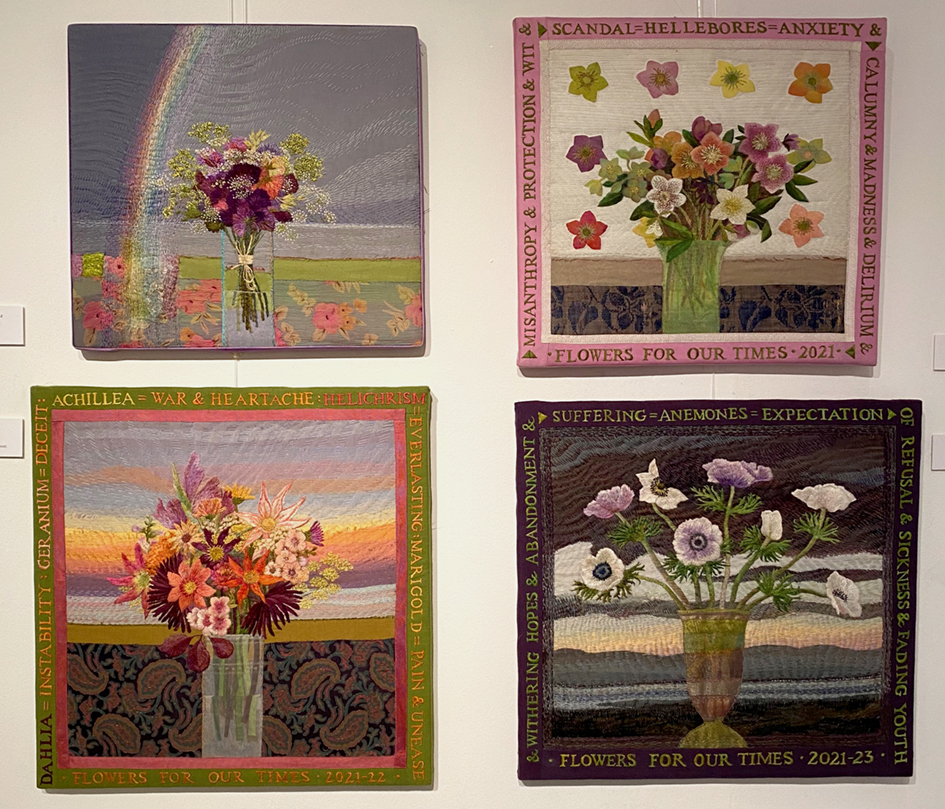
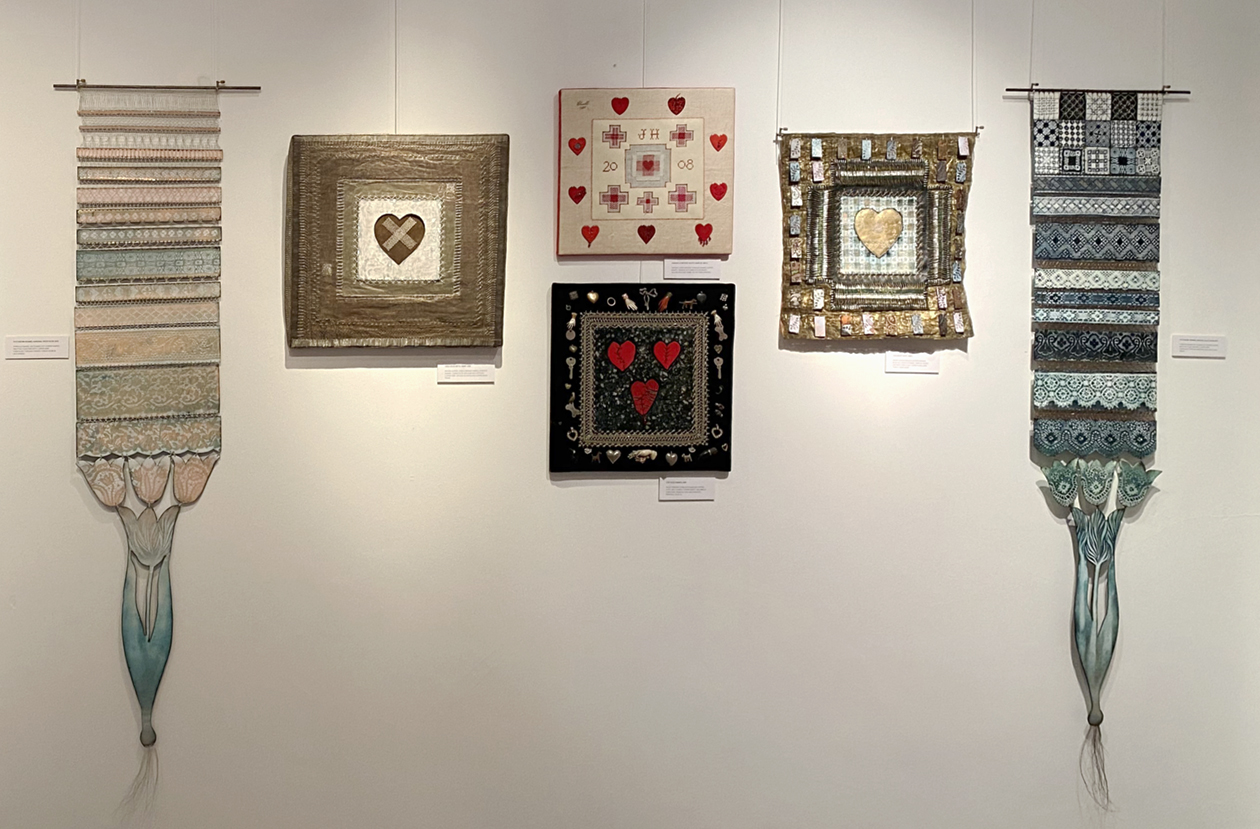
The Flora flowers give way to a group of ‘Flowers For Our Times’ my most recent hand embroideries..but they continue the themes found in Flora. On the left is a stitched appliqued drawing.
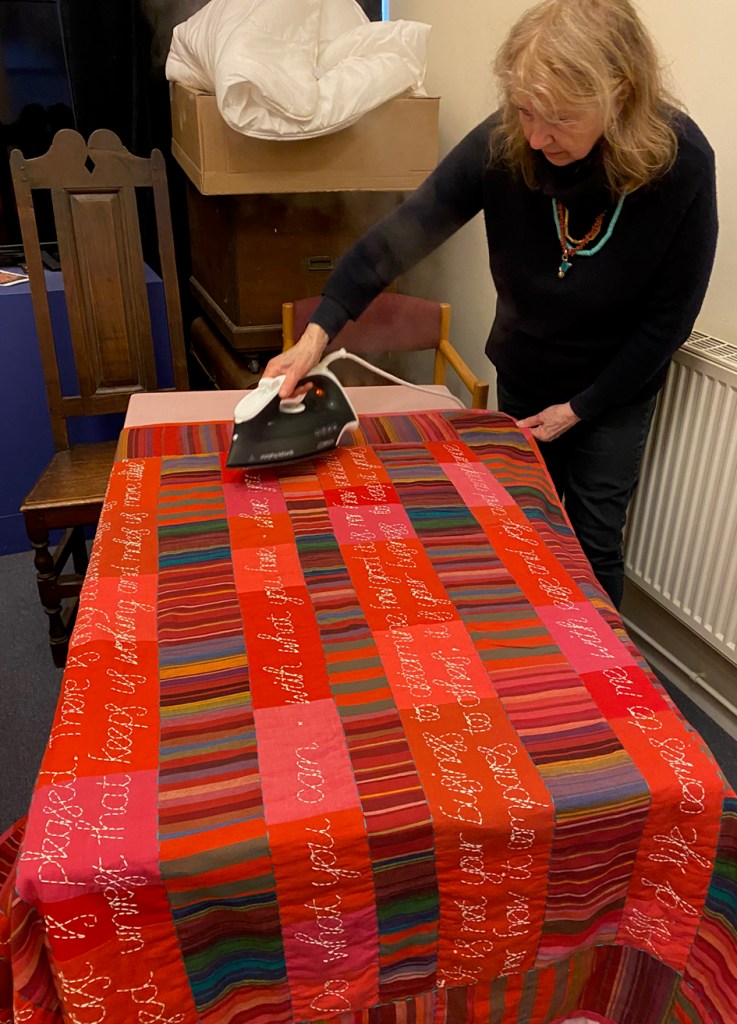
The flower walls give way to hearts (and eyes) so here are my minimally quilted fabric patchworks. This took quite a lot of preparation, pressing on my behalf and for Charles (and Russell) the gallery’s invaluable exhibition men, constantly measuring and sometimes just waiting, but colour co-ordinated!
The large Comfort (Hearts)and Security (Quotes) Blankets and Safety Curtain ( Eyes) had been draped over my bannisters for weeks (above right) but a 3 hour car journey had creased them; I am always relieved to be able press my work before it goes on display.
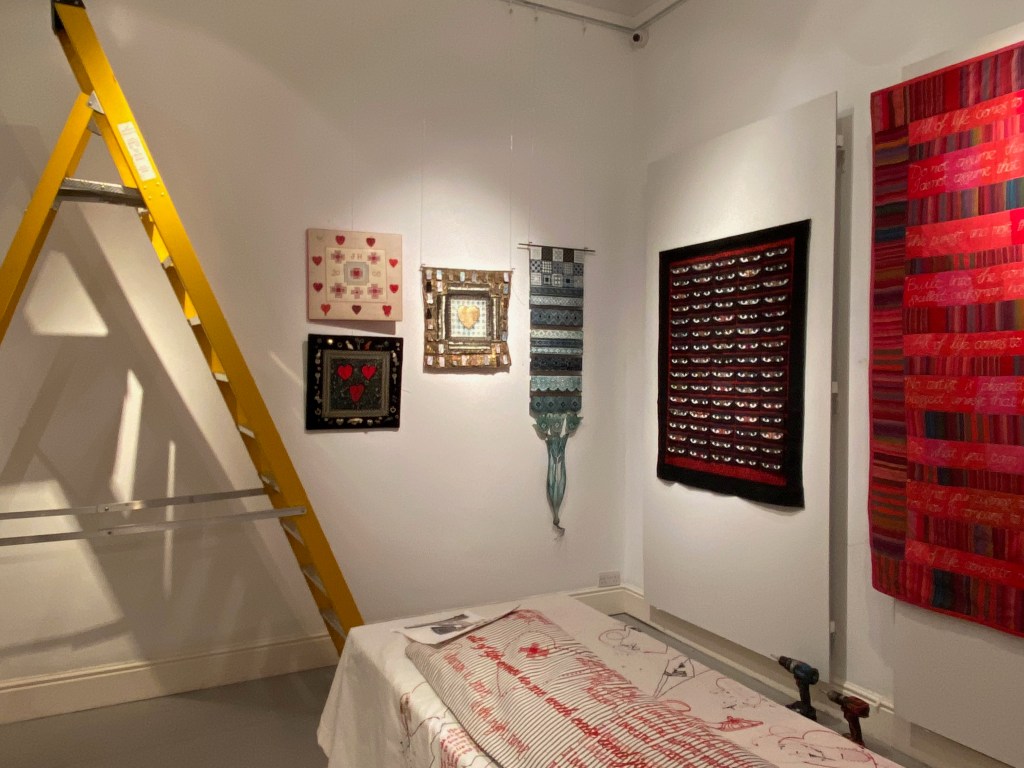
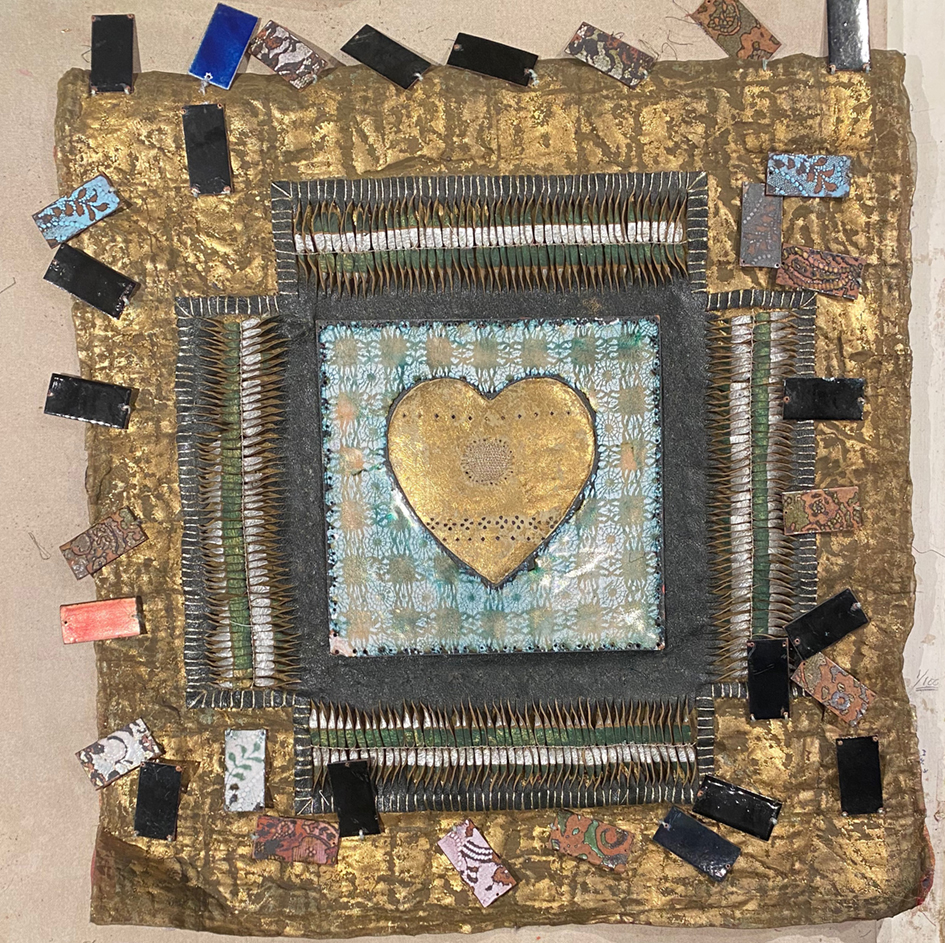
Moving round next are the metal and vitreous enamel hearts – all broken, discarded, damaged but saved in some way.
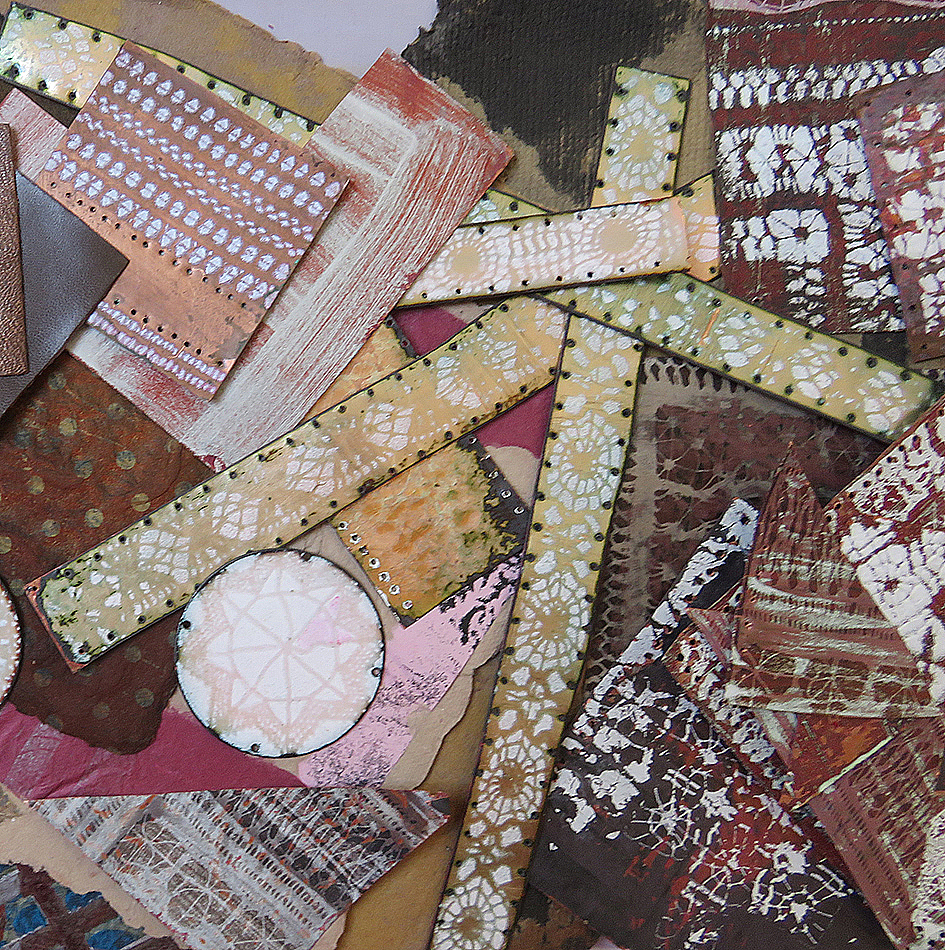
The works above are made of metal and glass enamel, they are stitched and embroidered with drawn thread work in copper wires on metal fabrics and copper plate. Patterned by sifting white enamels through Lace and Broderie Anglaise stencils, except for the red sampler that is darned in silk on vellum
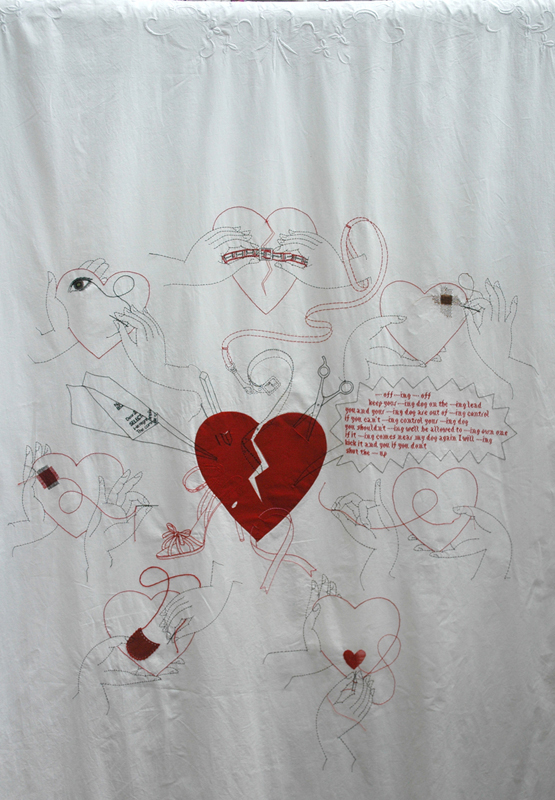
The bed in the centre of the gallery is Sarah James’ idea, she thought it would perfectly show off the bedding of Make it Through the Night and she was right! People are really curious and stop to ‘read’ the symbols and it makes sense when teamed with the Bolster.
Eventually we get back to entrance with patchworked and embroidered and flowers but outside in a vestibule there is still something else to see, Russell putting up my framed giclee prints, unframed for sale in the shop with many more flower pieces. And the large ‘Lytes Cary Manor’ woollen wall hanging taken from my studio wall where it has lived since 2001.
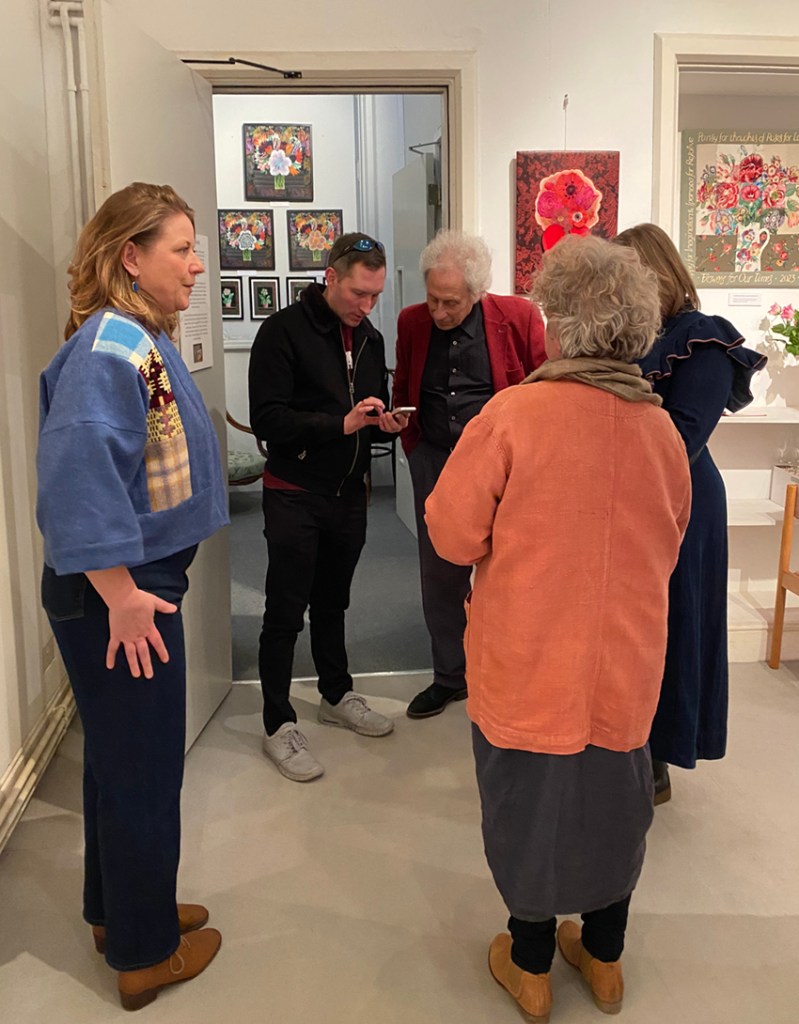
The very last picture I took was at the end of the Private View. A group of staff and on the left Jenni of Jenni Smith Sews talking to Hazel (who appears to organise just about everything around the Centre) waiting to hear how to get through the wild Welsh countryside to the restaurant for us to celebrate all the exhibitions and videos on display throughout this amazing place.
PS. my work is not for sale but my new giclee prints of embroidered flowers are available to buy in the fascinating vintage textile and bricabrac shop attached to the centre.
It is not without irony that I am posting the mending my old ‘mended hearts’ metal embroideries.
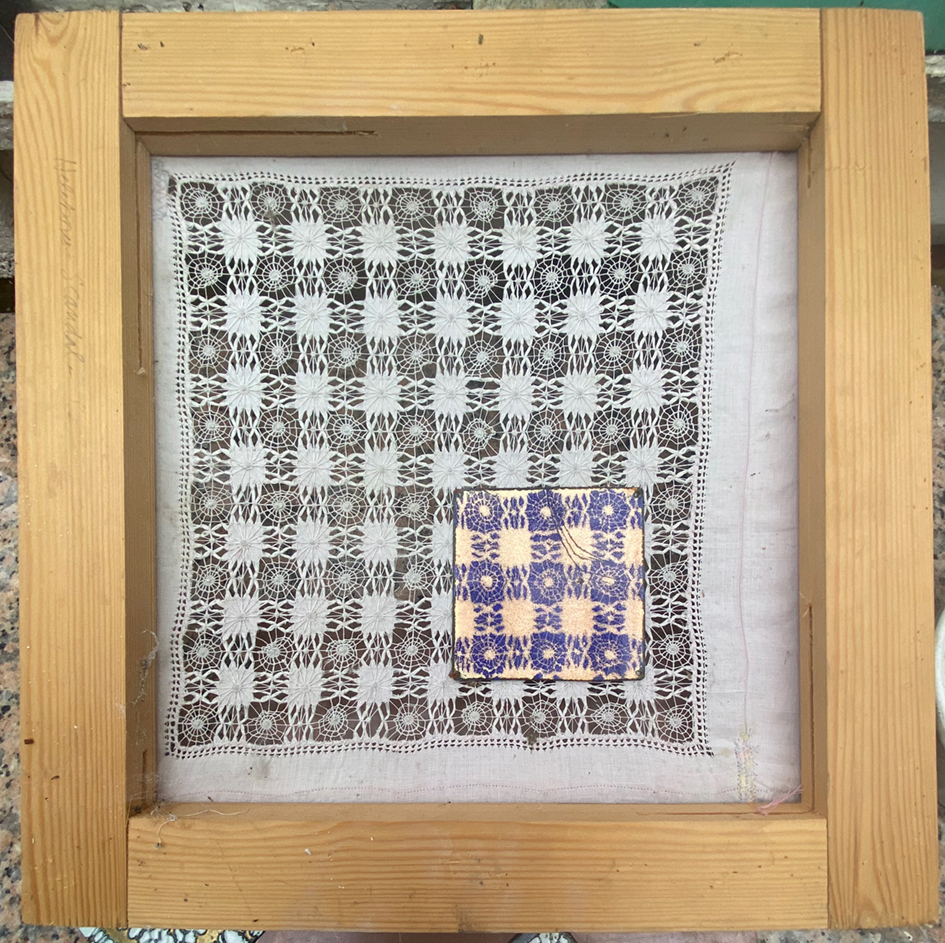
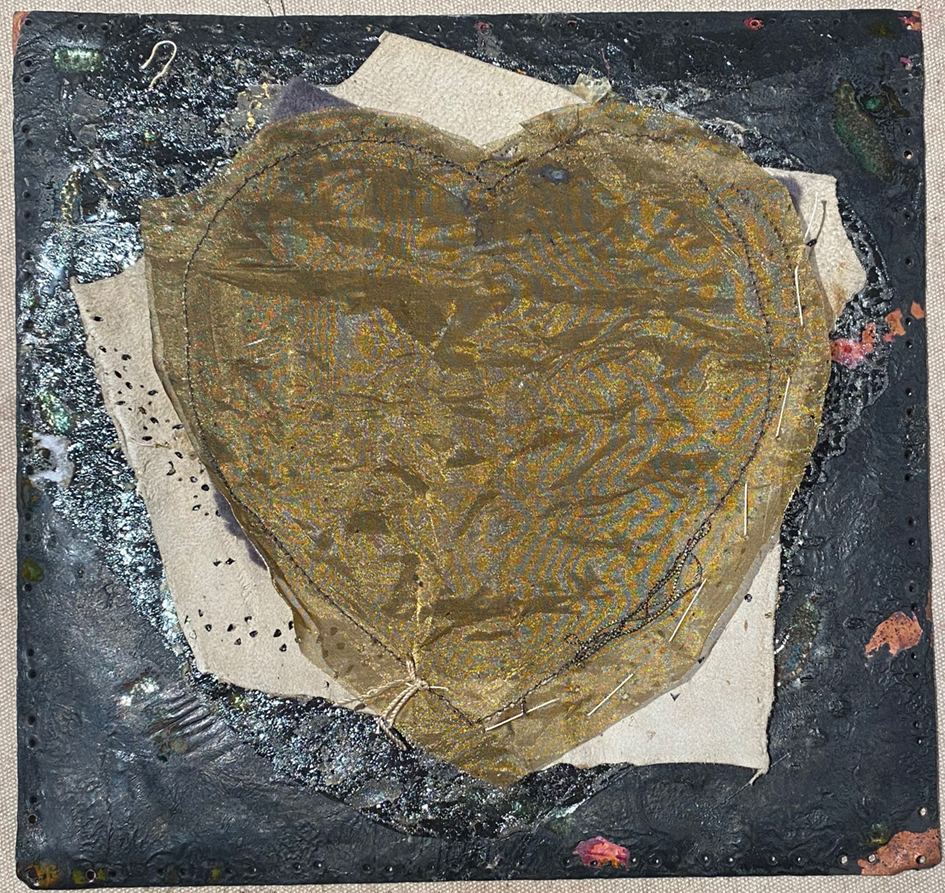
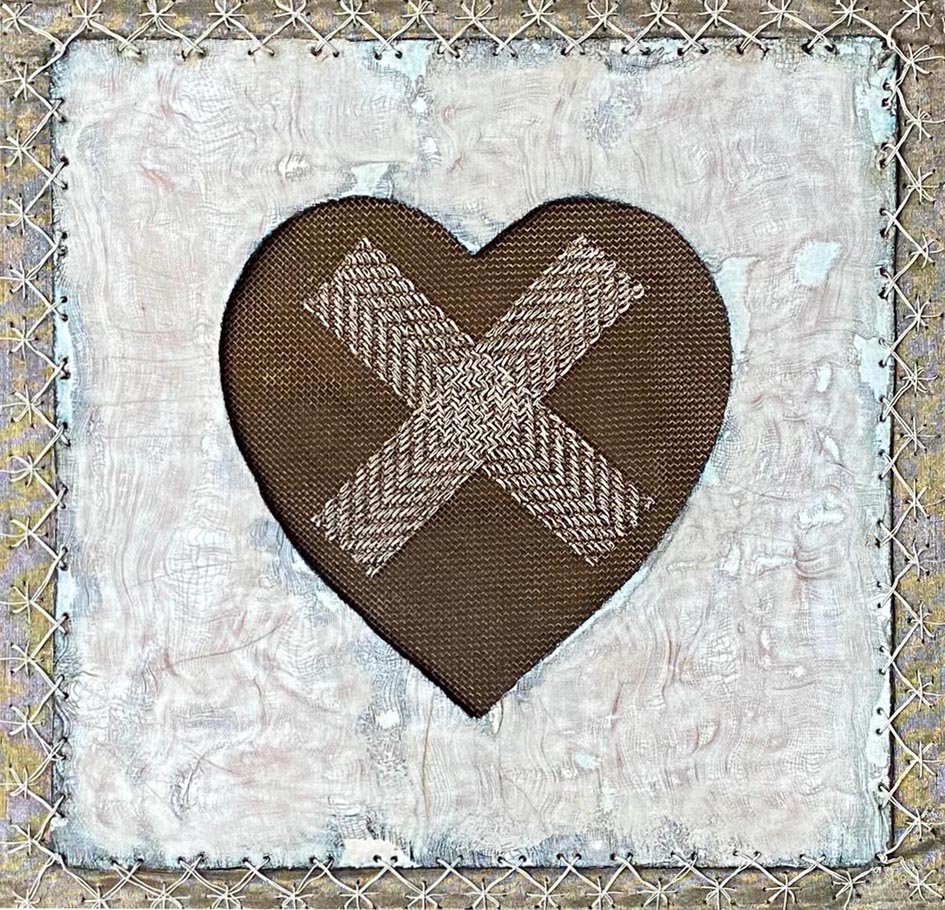
Above are the original images of 2 pieces of old work (circa 2010), left is Discarded Heart, and right Crossed Heart. They are just 2 of the outcomes of much experiment with some challenging materials – I was interested that these metal fabrics would last for a long time – far longer than the natural fabrics that I usually use…..how wrong I was!
Searching in my studio I found a drawer full of old ‘fabric enamel‘ samples, that I had made use of for Discarded Heart. I had often used drawn thread-work as stencils and amazingly found the original stencil fabric , stretched and ready for use.
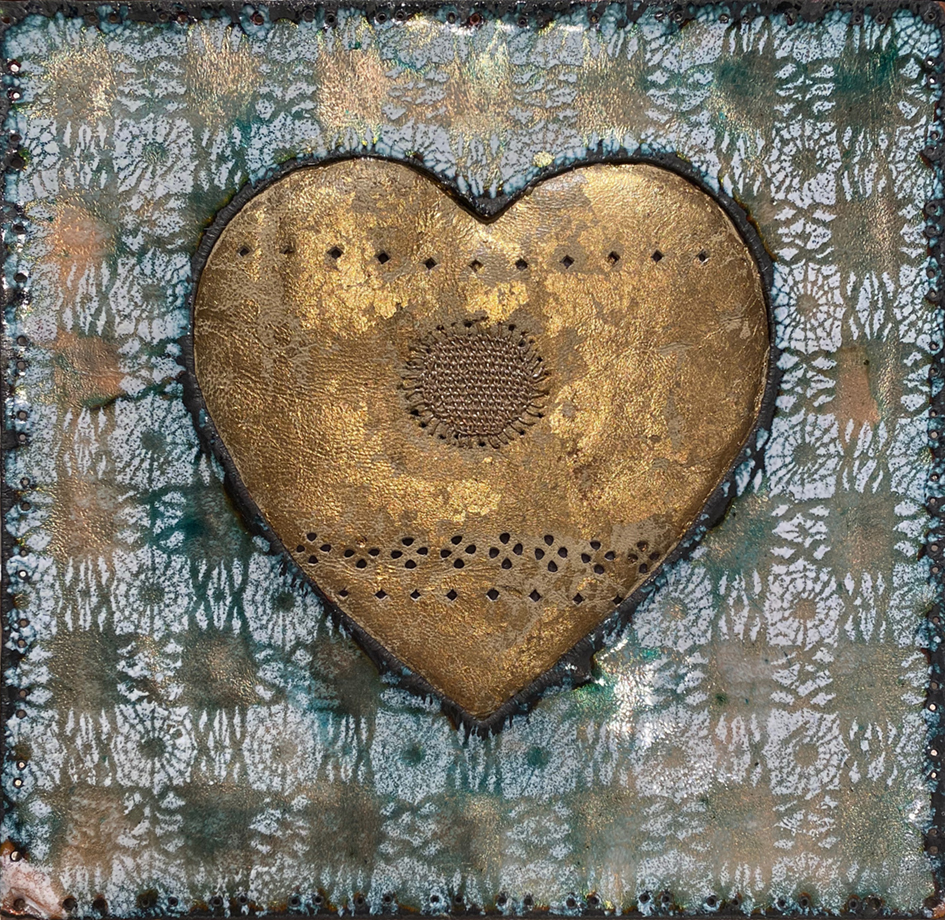
The most difficult thing I had to do was to repair the cracked enamel square. I wasn’t sure I could do this as it needed to be re-enamelled in exactly the same place as the original – fat chance! I carefully removed the gilded and stitched leather heart and re-gilded it. SO taking courage in both hands I re-stencilled it using a strong white enamel, then fired it at a very high heat and this made both the pattern very feint, and the cracks filled up – result!
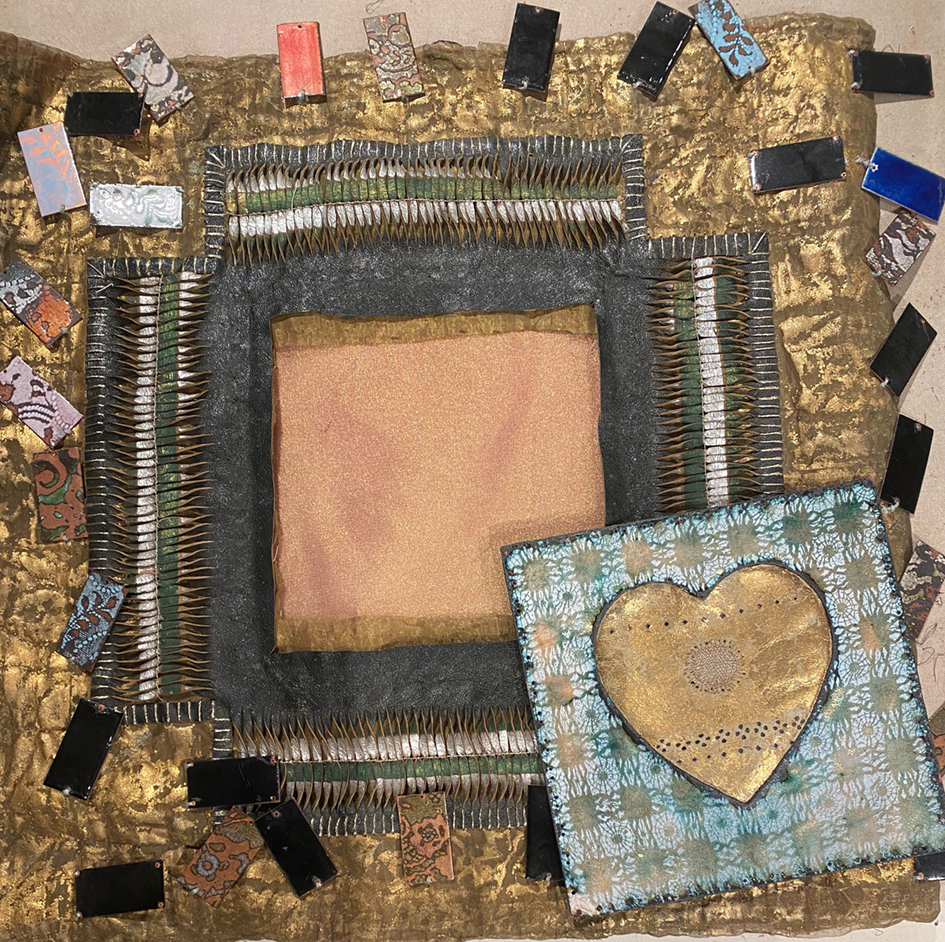
Back of centre panel with leather and bronze fabric cut to free heart for repairs
Front of re-placed re-enammelled heart
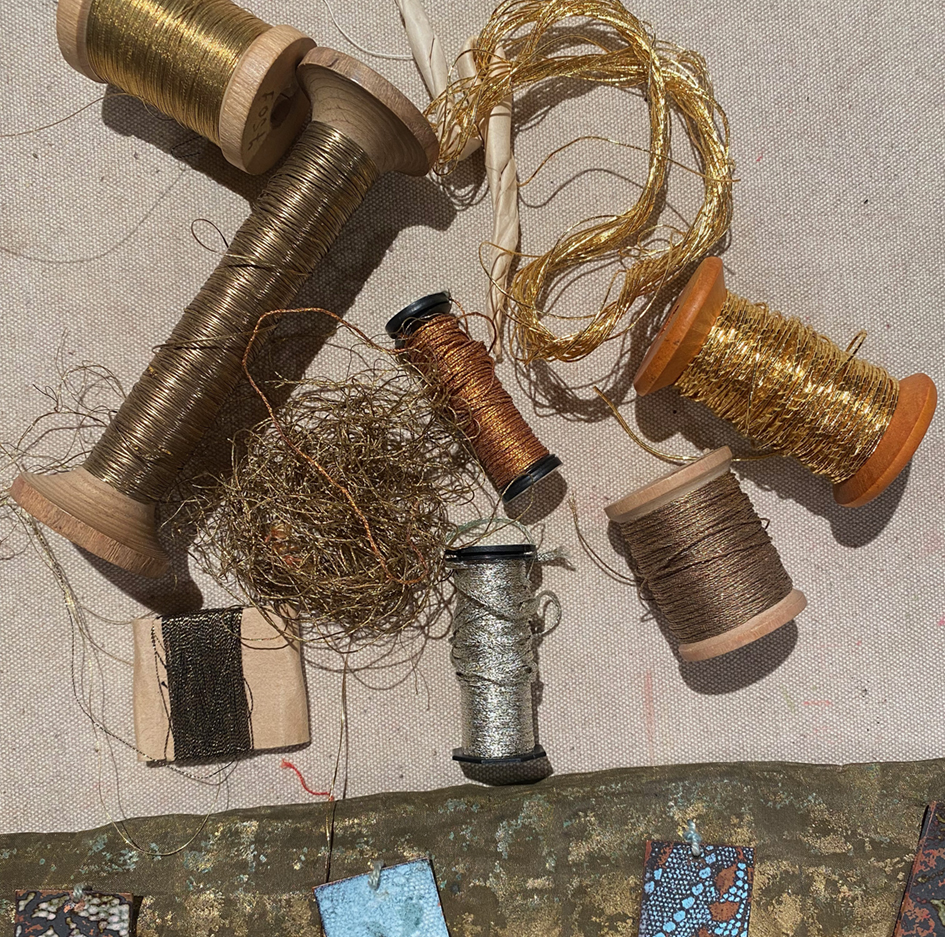
To get it back into postition I had to re-excavate and re-drill the stitching holes, so that I could painstakingly stitch the whole square by hand using real metal threads, ( trying hard to stick to my intention of NOT buying new materials but recycle anything I already own). I had several real Japanese gold and some copper wrapped threads to choose from, but this thread had to be strong and resilient for stitching through metal and leather.
After several half days of really awkward stitching, I managed to herringbone a wrapped copper thread all around the square.
Relief, as I had already offered the Discarded Heart (as it was it was originally made from lots of my. unsuccessful samples ) to the Welsh Quilt Centre as part of my 6 months exhibition called Hearts and Flowers in 2024.
So far so good, but the next piece, “Crossed Heart” was really badly damaged – mostly by fading but seemingly anything it had been in contact with over the last 10 years….including my hands while working it! Everything seems to mark these refined woven metal fabrics (and I suspect Boysie, an ex fox terrier stud dog). And I thought that these fabrics would be as hard wearing as they are tough to stitch! I didn’t offer this piece for exhibition as I was not at all sure if I could make it look worthy of being exhibited again.
The only area not stained, faded or split was the centre panel of a decorative cross darn in white wire into a heavy copper mesh I had copied from a Darning Sampler in the Bristol City Museum and Art Gallery which has one of the most famous Sampler collections in the world. I kept this, but now had decide just what to keep as signs of legitimate wear and what I just couldn’t aesthetically live with!
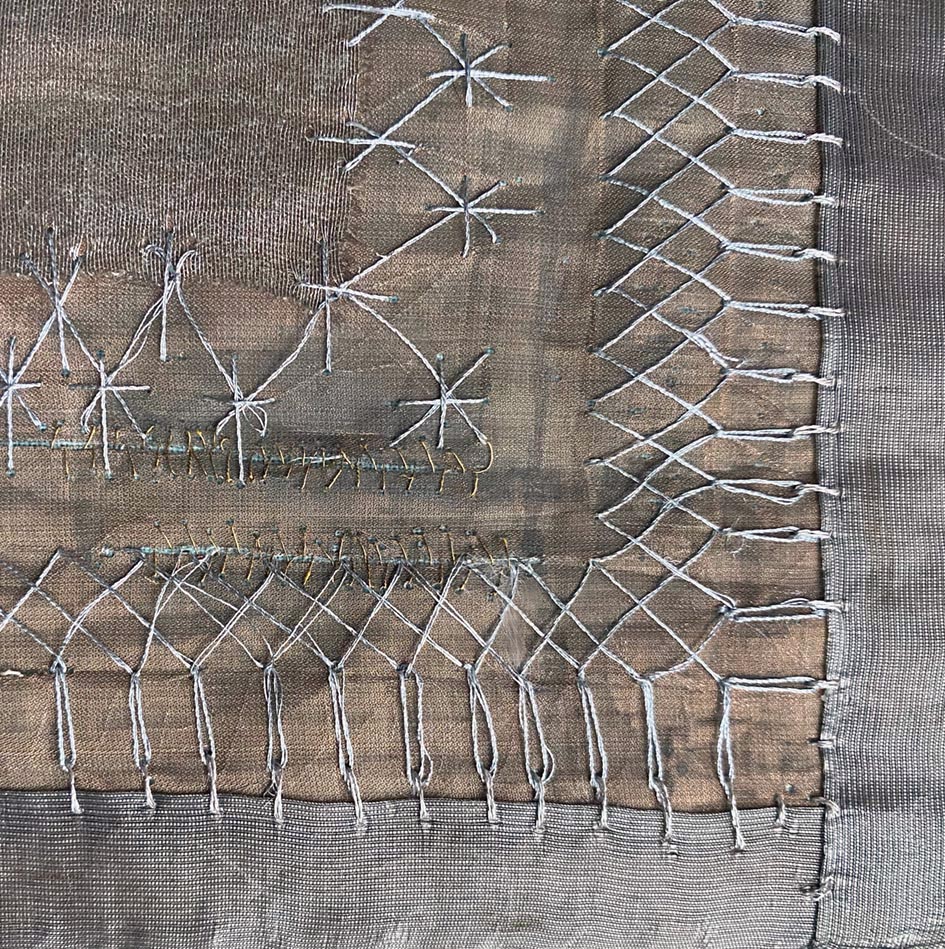
The whole sorry embroidery put onto my worktable and pinned into place – the metal fabrics have a tendency to roll up on themselves when left alone; a metal memory even after 10+ years of being stretched on a fame. The staining is plain to see with the general fading and tarnishing, but what you can’t see are the splits on the background fabrics underneath the rows of herringbone stitches.
The first area I felt confident to work was a rip and I cut away the fraying fabric – a mistake – but hey ho, nothing ventured…and started to darn the gap in the metal and nylon woven fabric with 1 thread from a stranded silver hank of 6 strand….very tricky – I may yet go back and rework this!
I was not very confident to continue, but I had started and I am of the sign of the crab…..very tenacious. Here are various ruined areas of the work, with different mends : a proper running stitch strengthener over a pulled thread area, sewing an extra border in a nylon and probably lurex woven fabric (once a very glamorous skirt worn to a 1 very glamorous occasion)to hide the worst of the staining on the outermost edge of the piece ( Boysie?) and then surrepticious stitches to draw the edges of the split fabric together. The herringbone stitches had started to unravel – and by this time so had I.
but eventually they are finished enough for safely re-stretching and possibly have their place in the lay-out for the gallery as part of a group of stitched metal mended hearts…
I have been invited to exhibit my work at The Welsh Quilt Centre, when they re- open for next year. So I have been carefully choosing pieces to make a cohesive exhibition of the recent Flowers For Our Time, the related Flora embroideries with the collection of bedding, Make it Through the Night.
I realised that the work chosen fell into 2 distinct groups – there are always cross currents and references in any body of work sustained over long periods of time and some of these embroideries are 20 years old! I wanted to make links between them, and decided on a new piece that encompassed the mending broken hearts themes of the bedding with the perennial flower themes.
My sacrificed jacket fabrics reconstructed as a heart – the opening page in my sample/sketch book for “My Badly Stitched Blanket”.
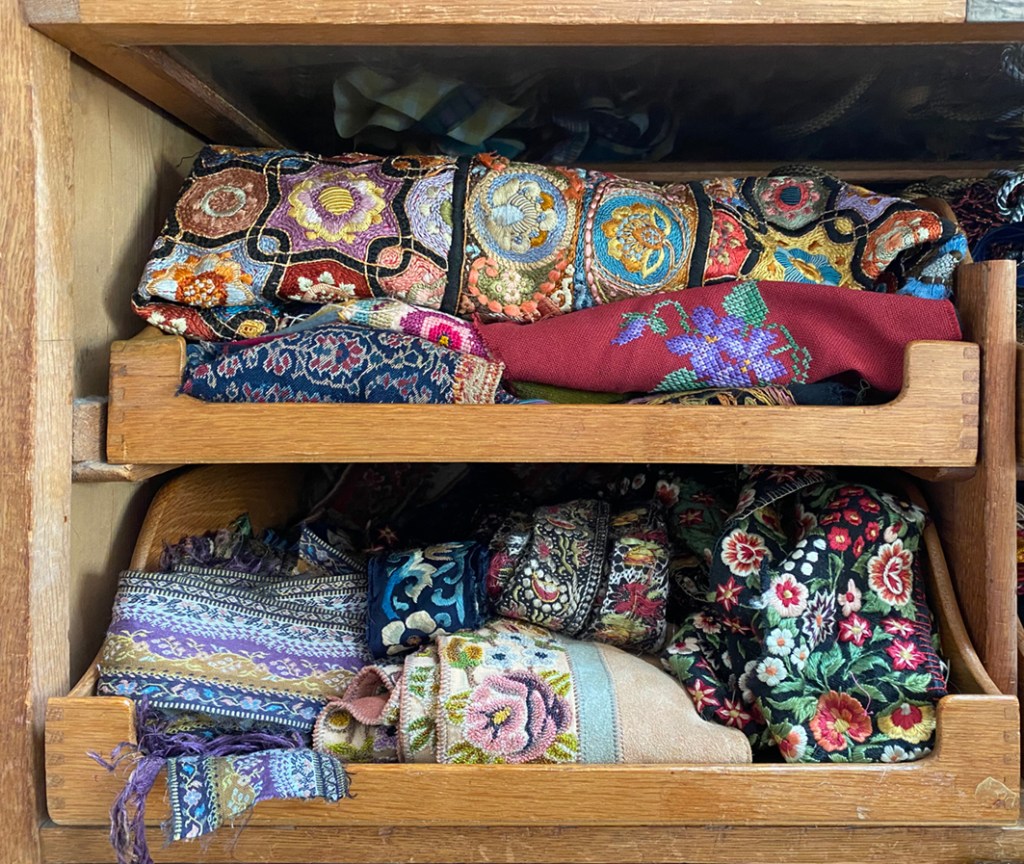
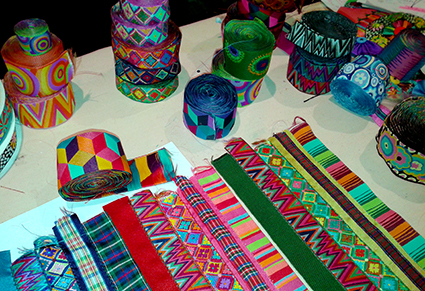
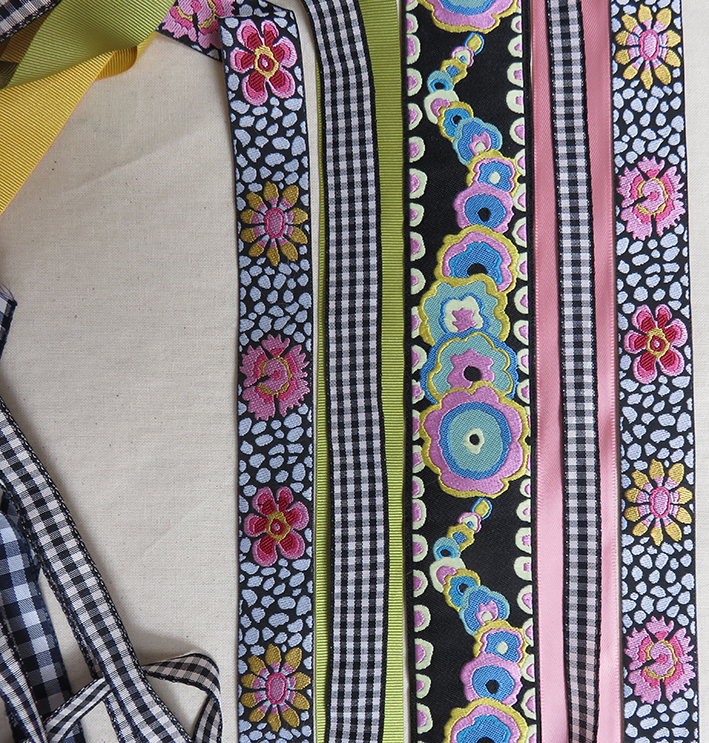
I looked at my studio wall and saw a small group of pinned samples for designs for Ehrman Tapestry company – the rows of split hearts and some fabric scraps that I had wanted to work into new designs. I also thought that it was time to use some of my most beautiful vintage embroidery scraps that I had hoarded for years… I had an idea to make a blanket – a comfort blanket.
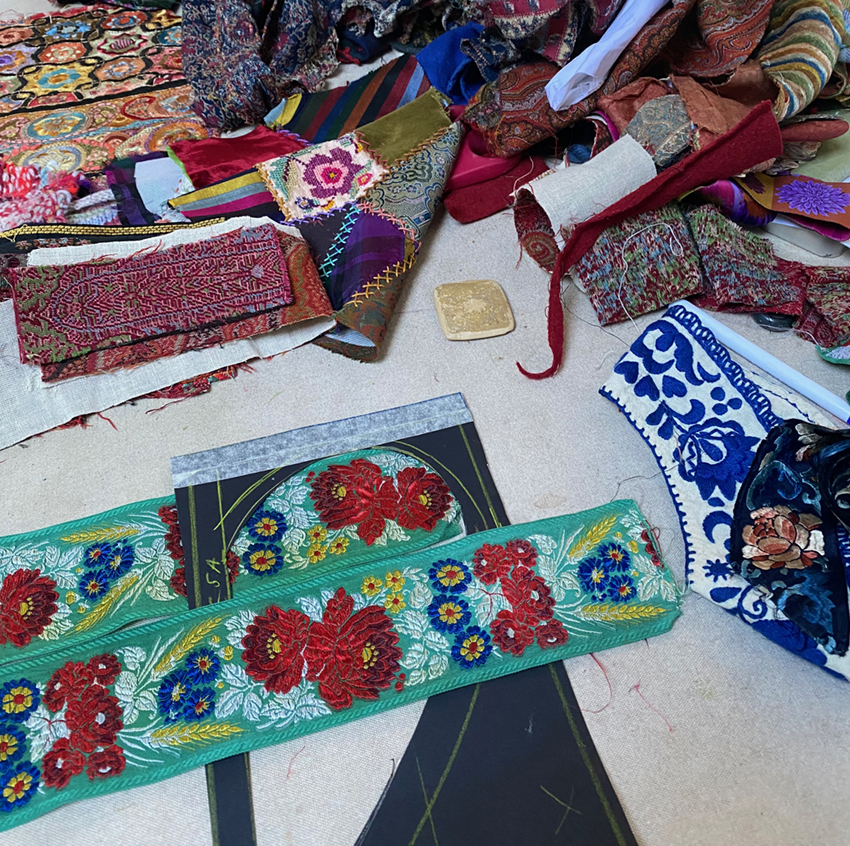
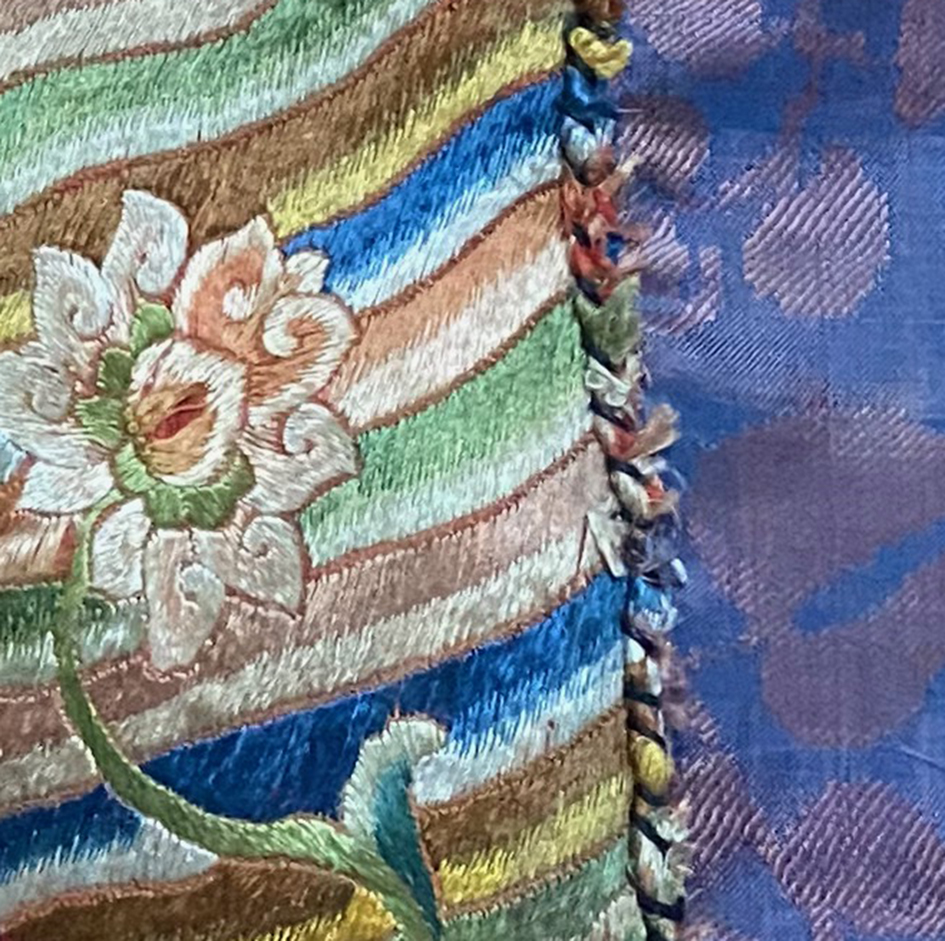
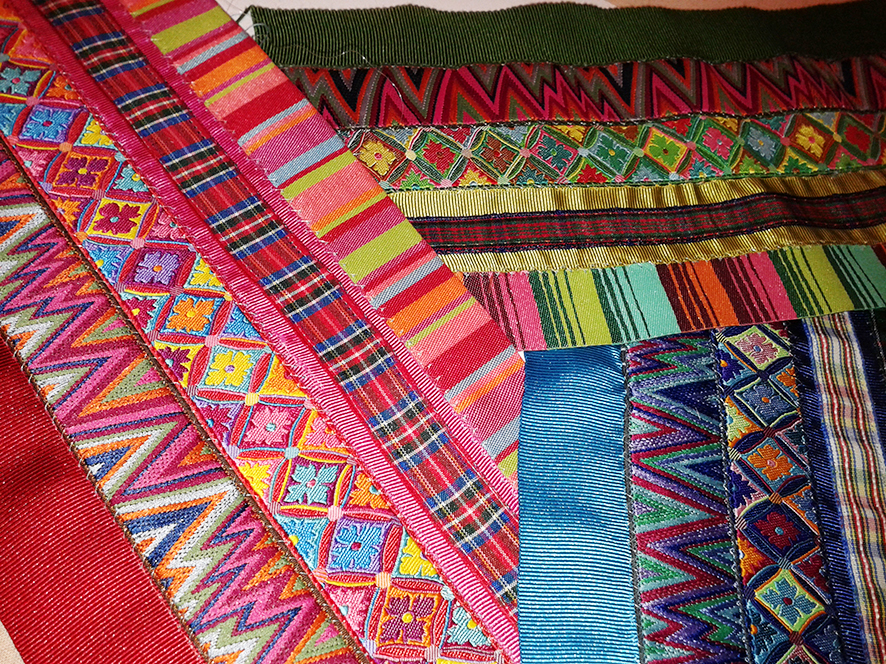
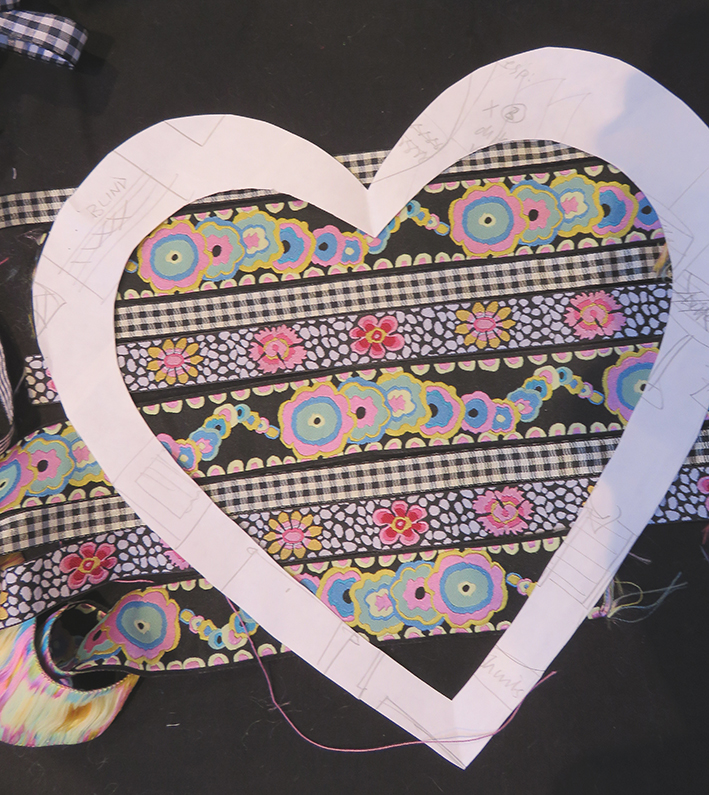
I cut a card template and started to place it over the treasured collected fragments of fine hand woven woollen shawls, silk Chinese robes and European woven ribbons and embroideries. I found my own old un-sold fabric design samples (from when I was a free-lance designer for an international fashion fabrics company). I thought I could use all of them all together – more is more!
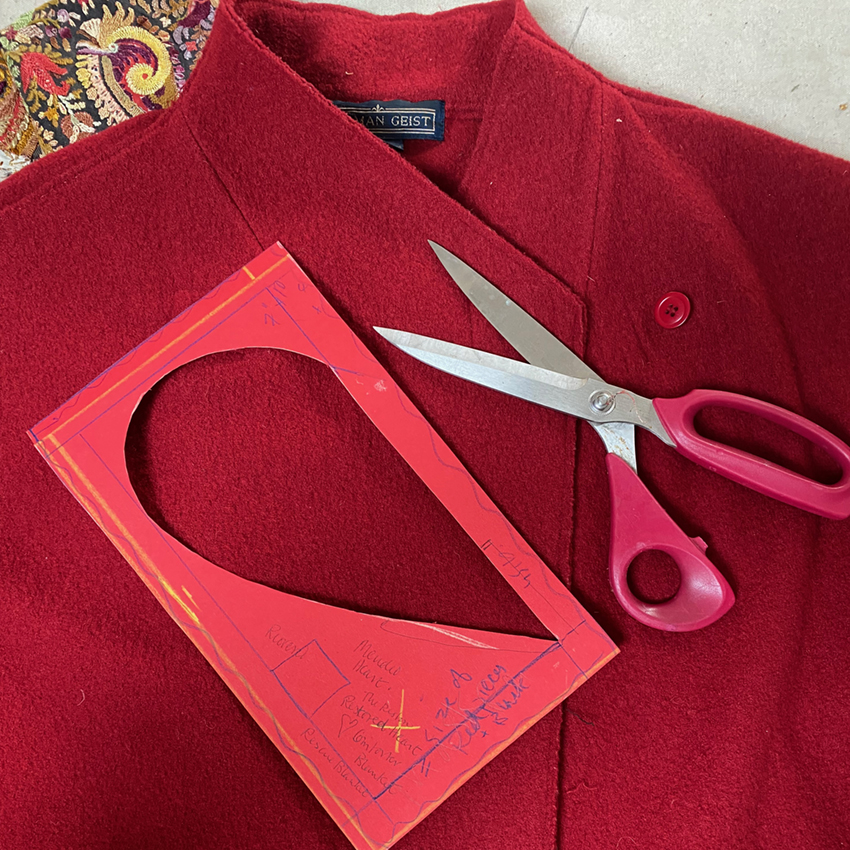
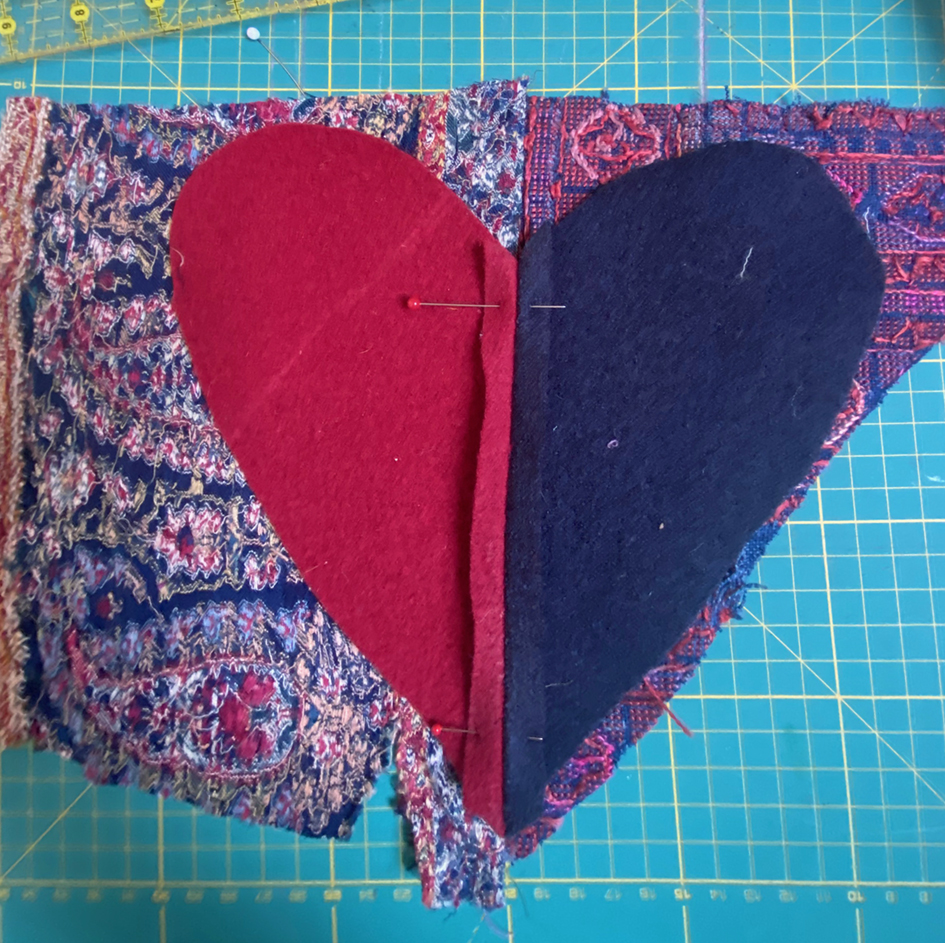
Choosing from my truly delicious and damaged fabrics, I cut out an oversized heart shape, and quickly realised that my original idea would look like patterned porridge. I needed to add some strong plain contrasts. And this is where the difficult part of this design process really started. I had very 3 old and well loved boiled wool jackets that I didn’t wear anymore I have to admit that I am very attached to my clothes and keep them for years. But the colours were perfect…….
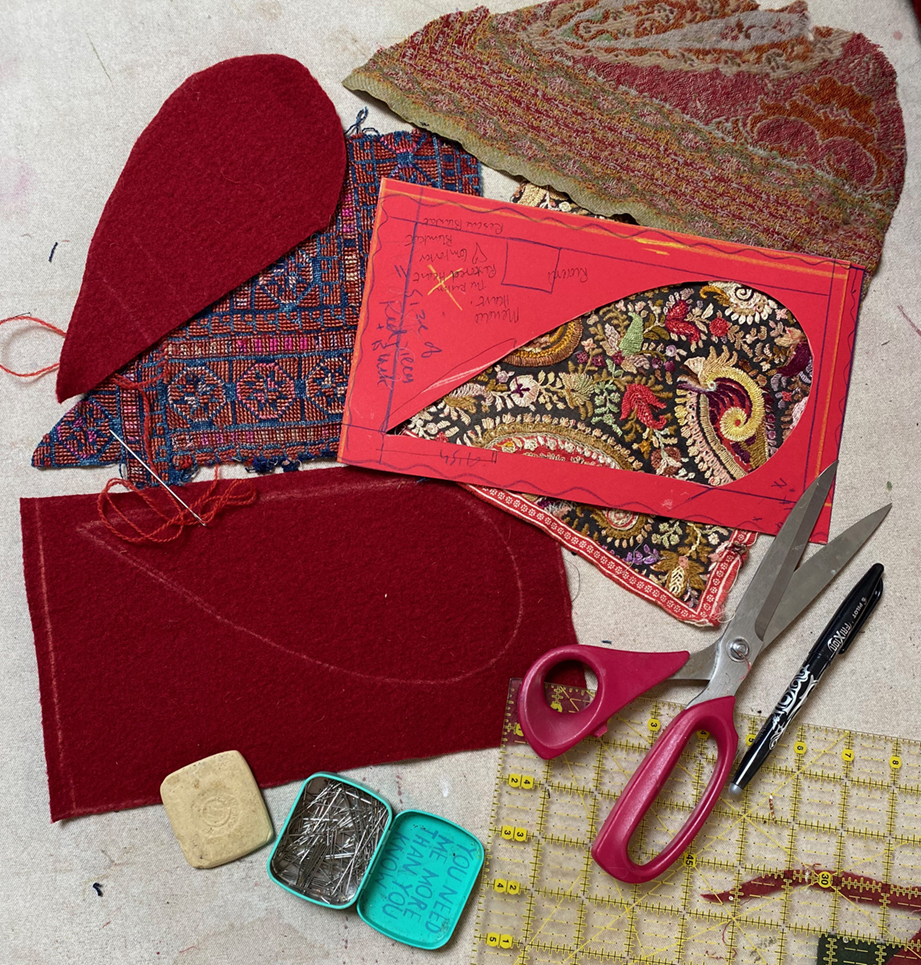
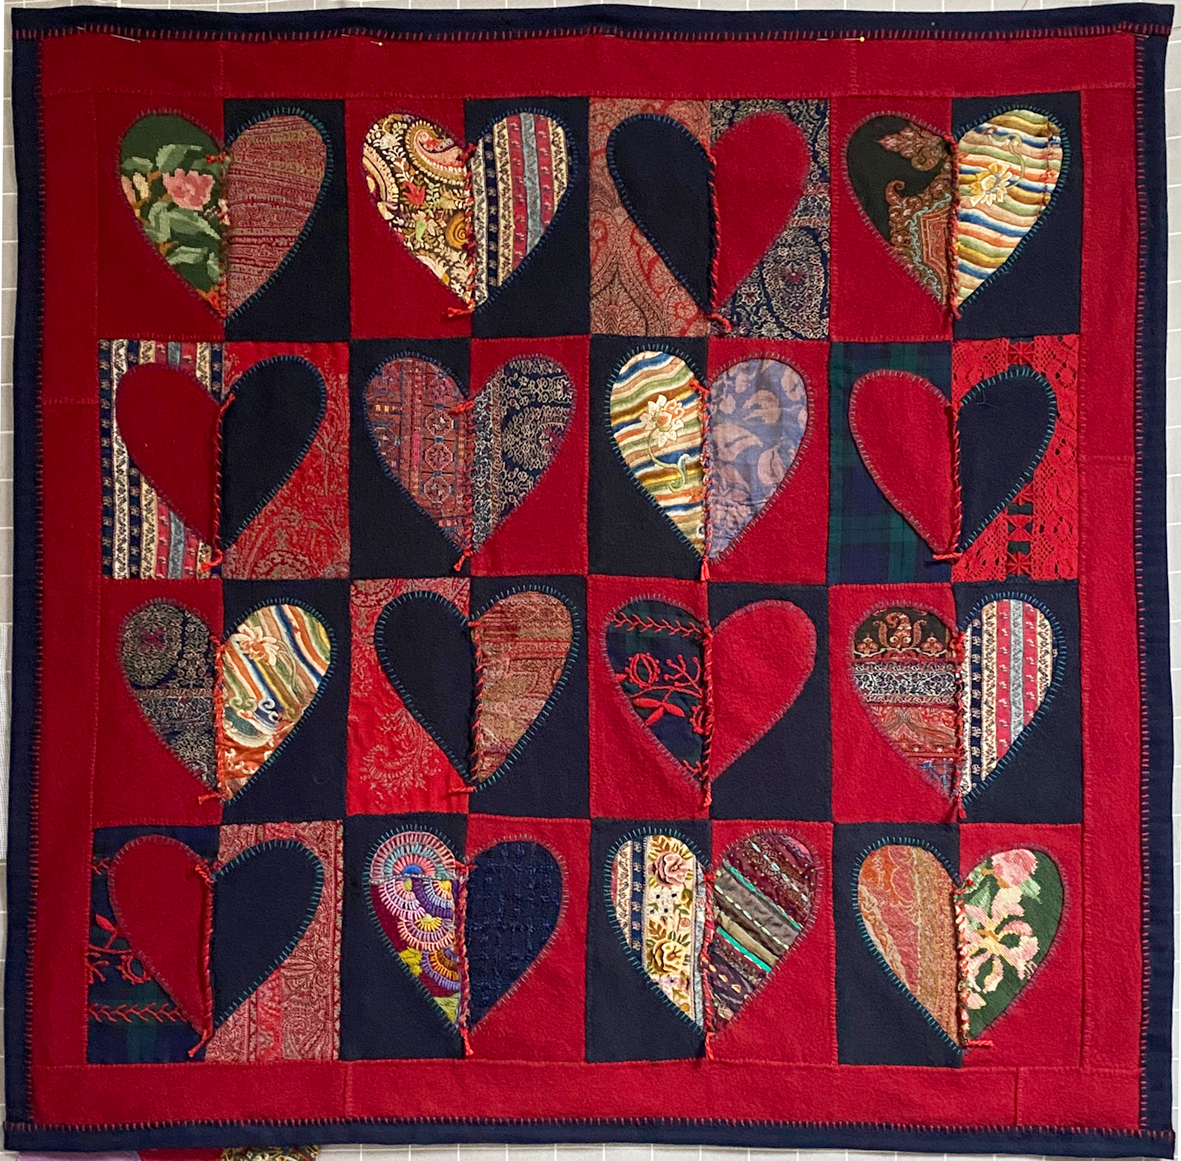
Cutting up the red one was not so bad, it only got used lately for occasional dog walks, and it had suffered from moth. Somehow the idea of setting my treasured vintage and antique fabrics, in new cloth just didn’t seem right. With a heavy heart, and after a few days consideration, I reluctantly unpicked it and started to cut it up for the blocks. This was to be a hand-made quilt and this decision made me consider the work beyond its original purpose by provoking me to consider what it meant for me. It became deep down and personal.
I now wanted to show that this work was a part of my broken and mended hearts theme, which is predominantly red and black embroidery on white bedding, but this was supposed to be a celebration of colour and pattern. Now I was mending, recovering, recycling and rescuing my treasured fabrics and clothes as I had admitted to myself that I was never going to wear or find a better use for them. I couldn’t bring myself to photograph the cutting up of the navy blue Oscar jacket (I have kept half for a pattern – someday).
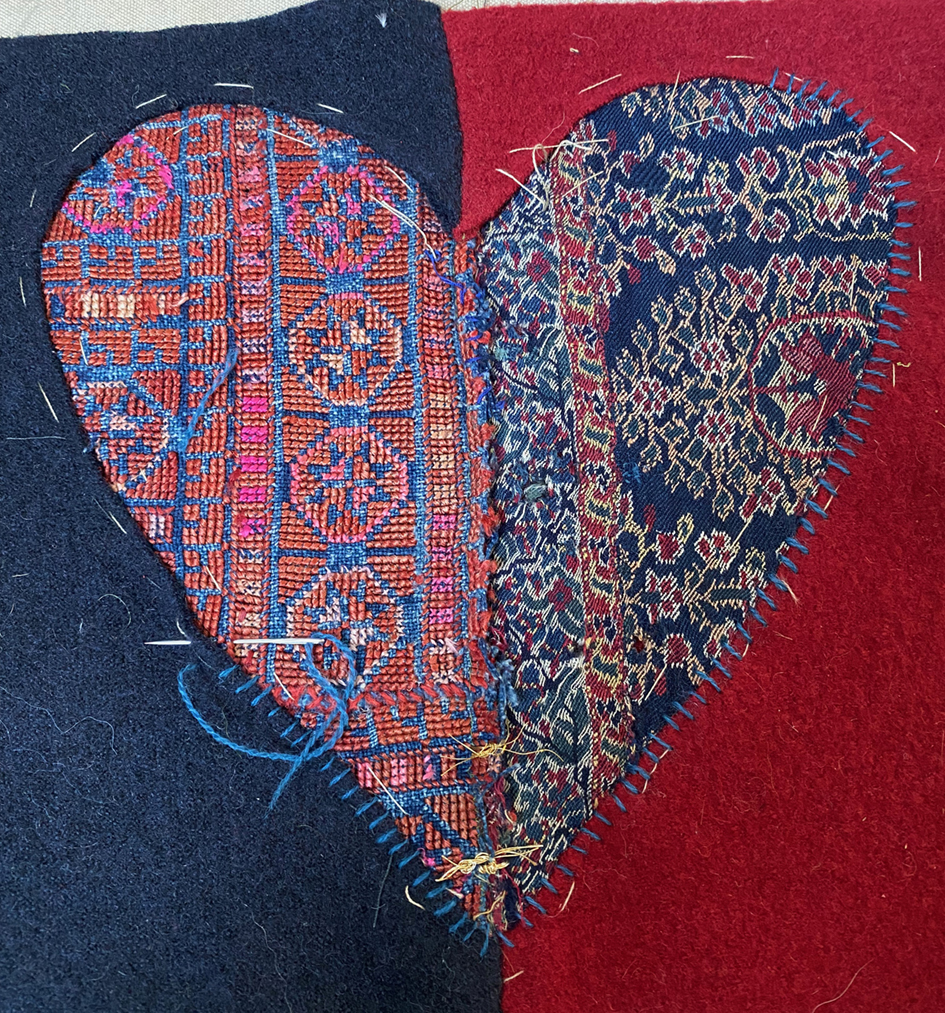
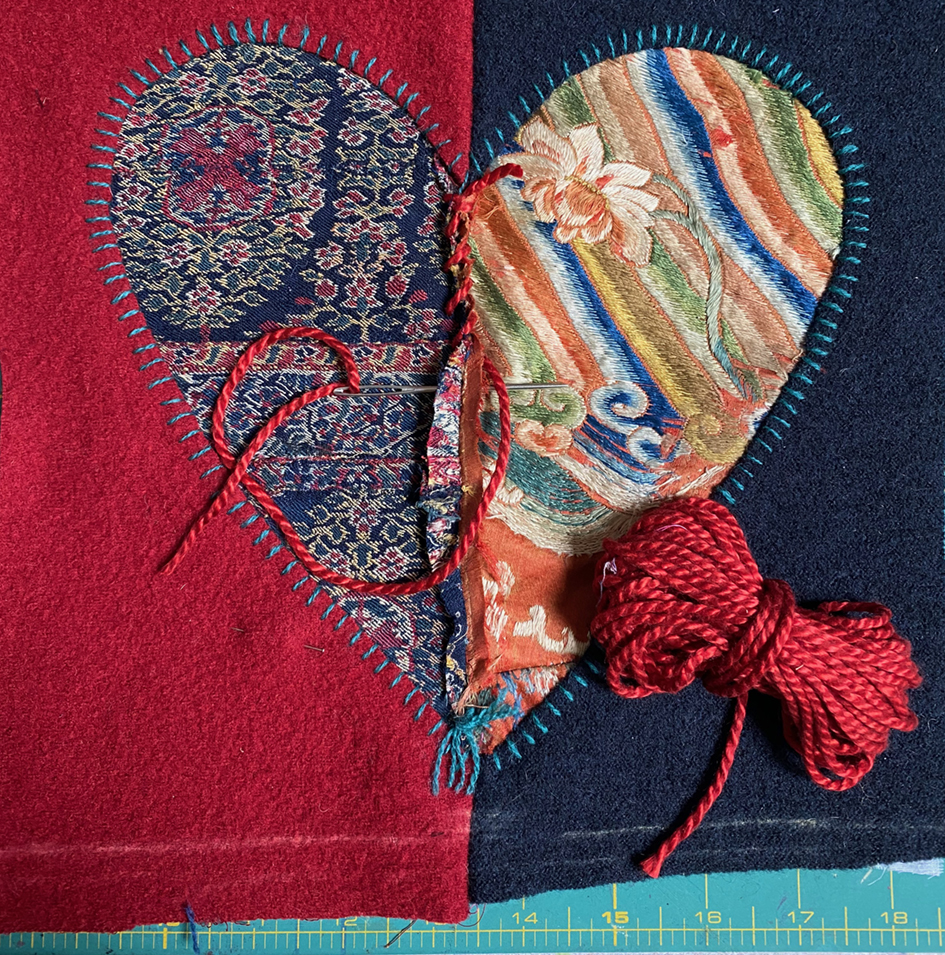
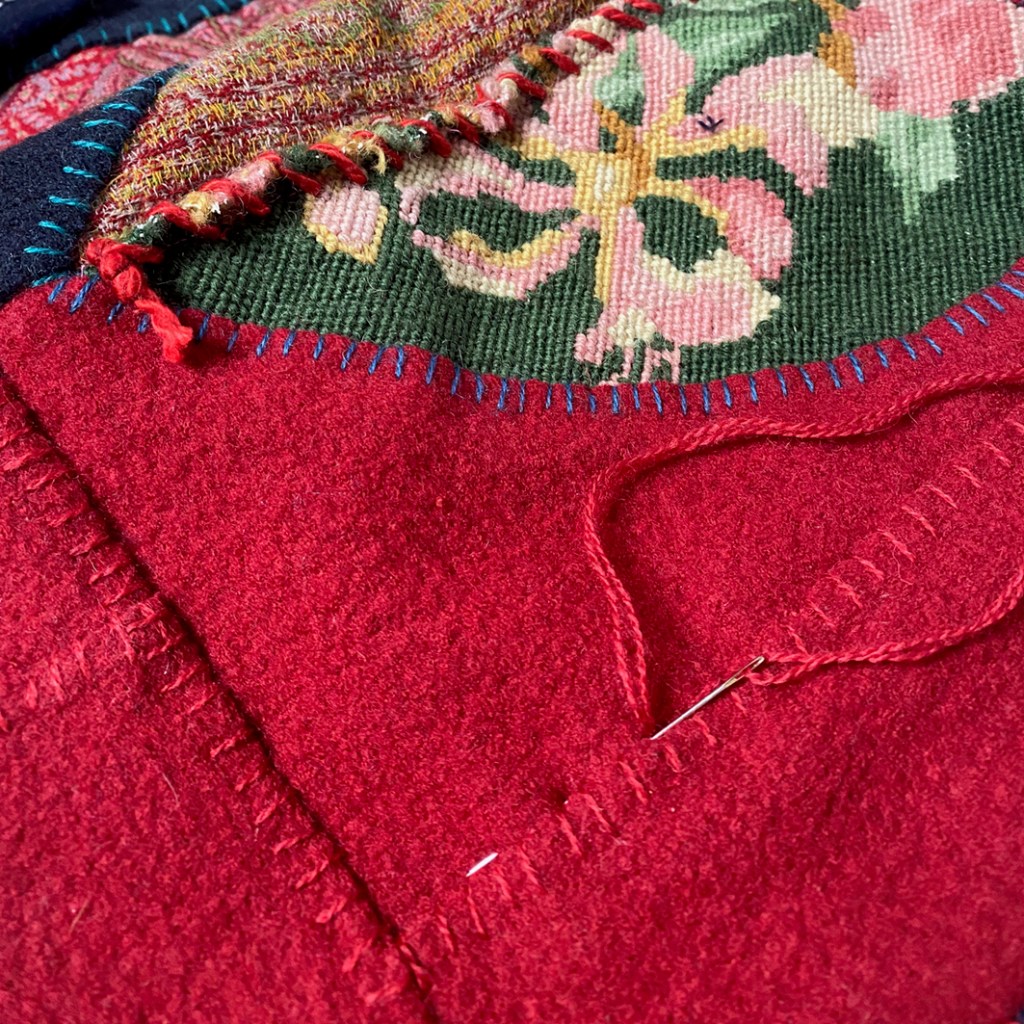
now the central join of the split heart was to be fully in evidence and the more jagged the join the better…completely at odds with my normal practice of (over) controlled stitching. I decided to use the Surgeons’ Knots on the outer seam and leave it un-neatened, like a scar. I tried various threads; above left an oversewn waxed thread and I thought about gold as still I have real gold threads bought in Japan years ago – totally perfect until I saw a hair conditioner advert featuring gold filling on a dreary vase – suddenly all forms of value has been taken away from this ancient mending symbol for me for now. Then I found the too-heavy-to-sew red silk.
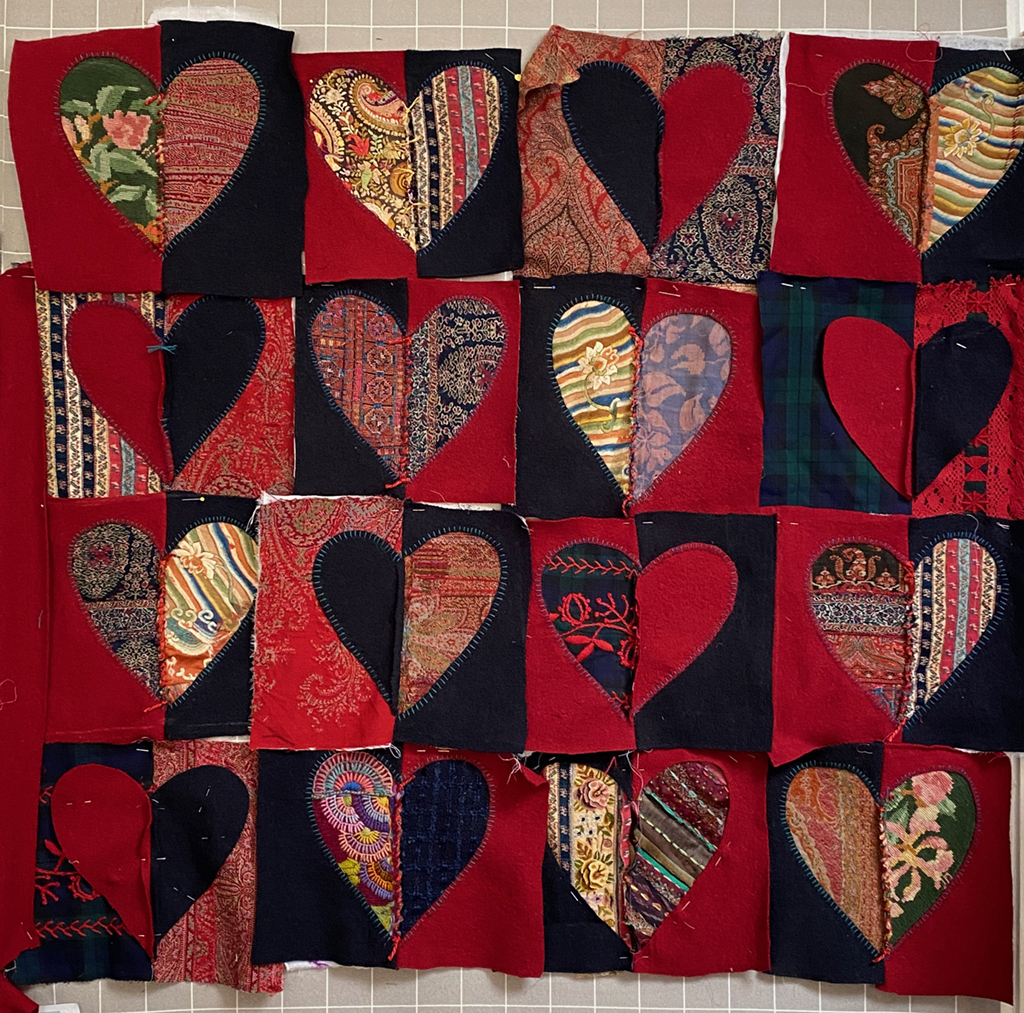
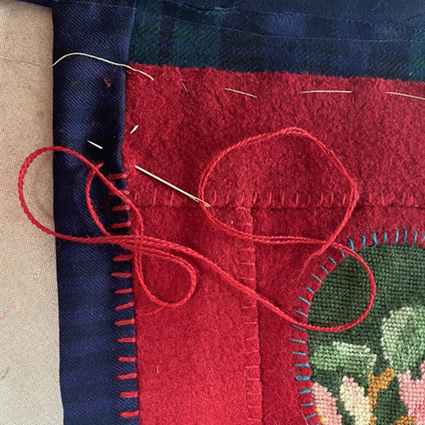
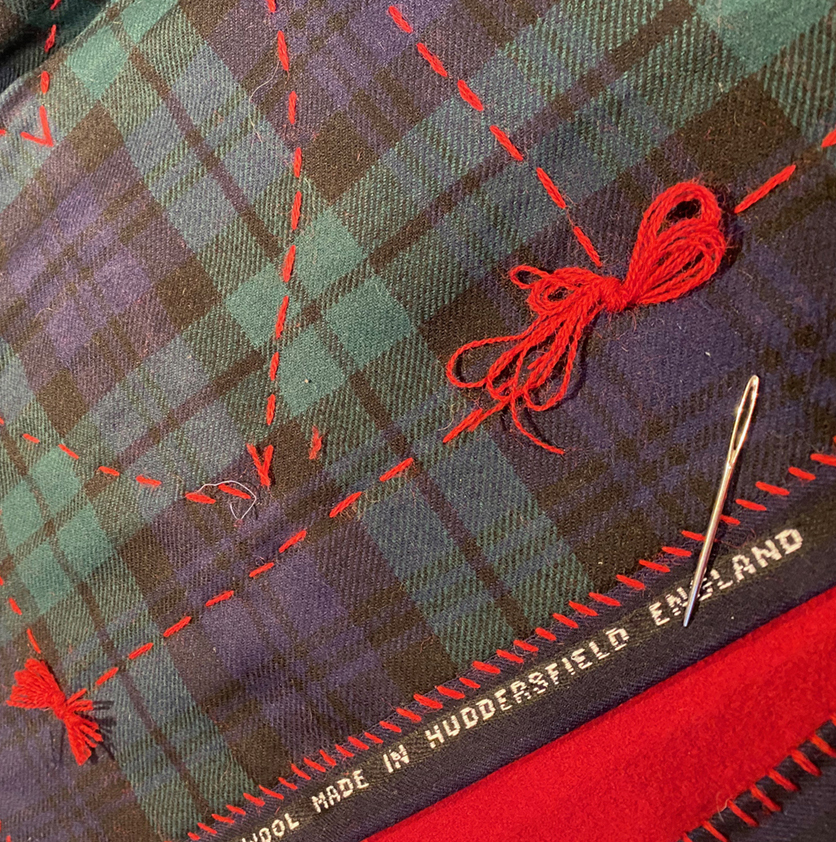
And this is where the title of the quilt arose – there is no way that I could control stitching this yarn and coupled with the slightly wonky sewing in the hearts I think it is a perfect title. Eventually I rescued enough fabrics to make 16 blocks to arrange on the quilt wall ready for sewing together by hand onto a large sample of tartan wool as a backing!
This was plain sailing after all the the decision making – but as I had oversewn the hearts into the blocks in fine wool yarn, I now felt I had to continue with the borders in the same way but the lack of having to rule a stitching line and unpick when necessary made this 2 weeks of work rather than 2days!
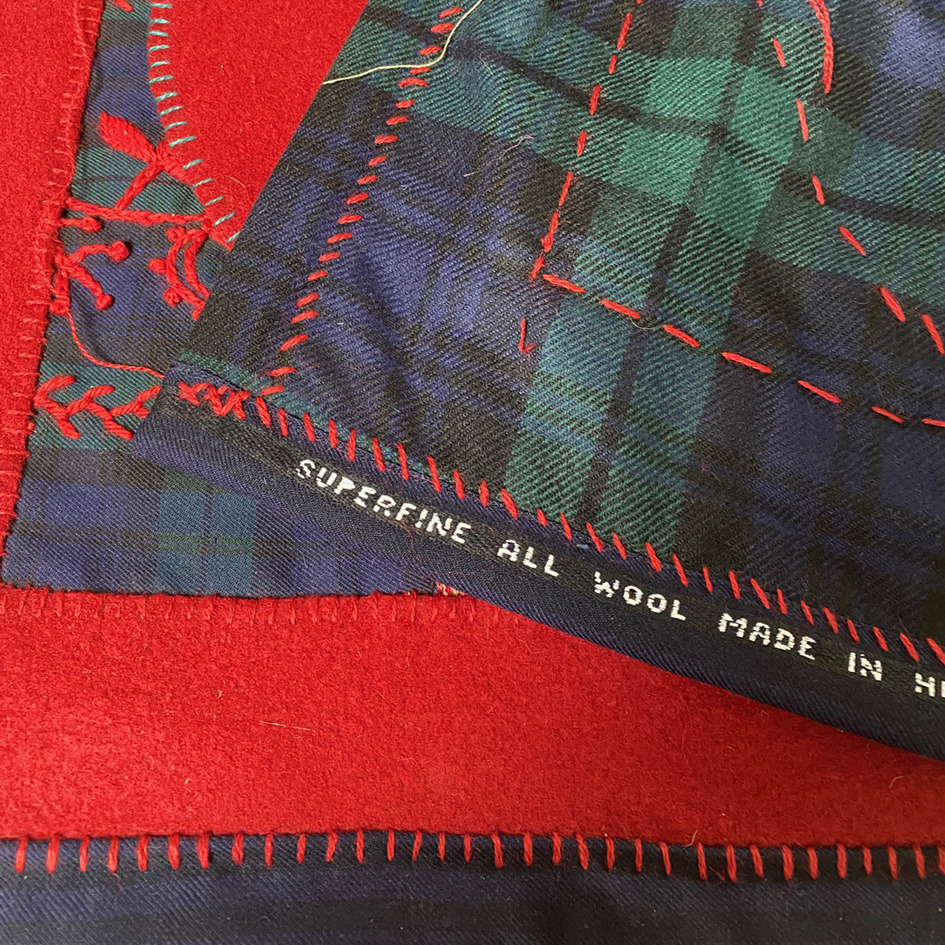
I kept the beautifully woven selvedge of the last border fabric as a testament to the quality of “Superfine” British wool and weaving traditions. And here it all is pinned to the wall this morning.
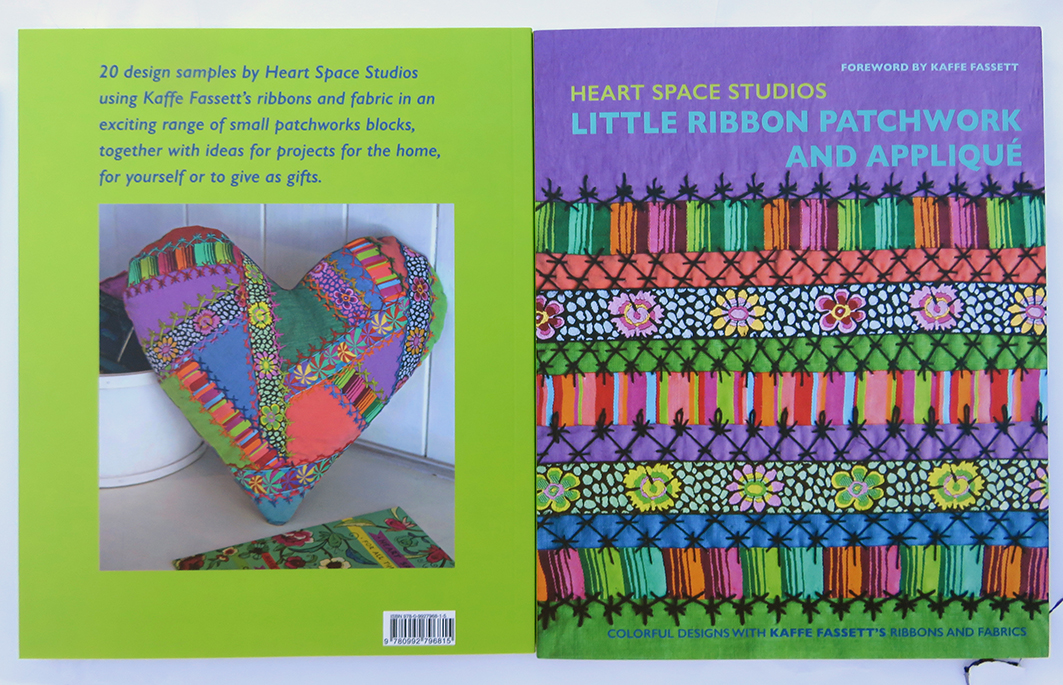
opening the package of the advance copied of Heart Space Studios’ first book
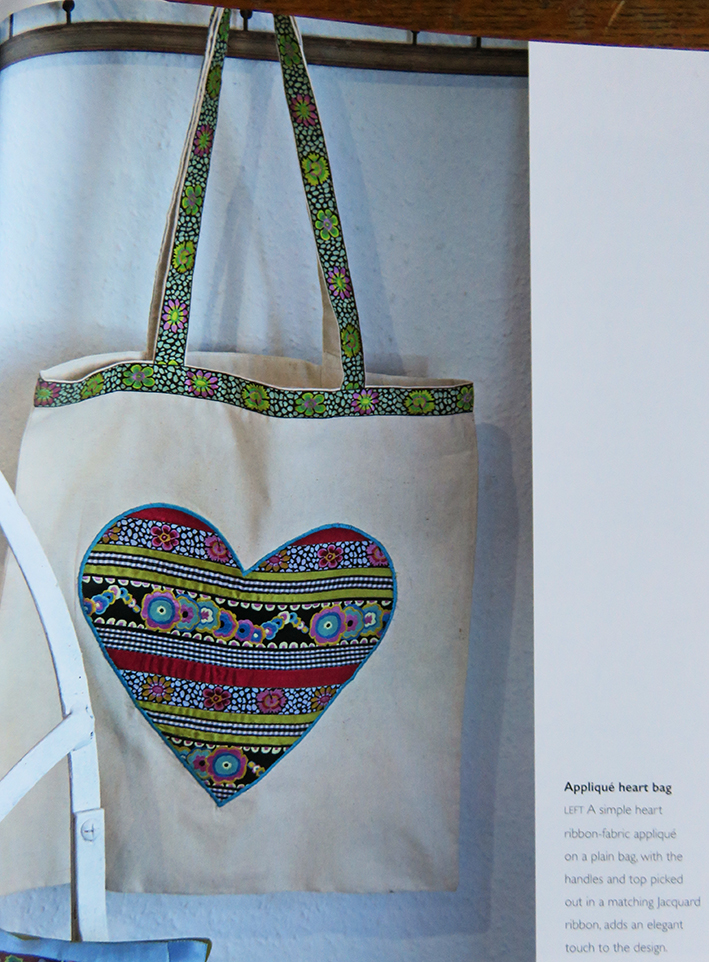
Here it is, my very first look at the proper printed books – Heart Space Studios’ Little Ribbon Patchwork and Applique, inspired by and featuring Kaffe Fassett’s wonderful ribbons. And this is the English edition, and it is published by Heart Space Studios…But oh the hopes and fears were in equal measure when I saw that neat white package of the first 10 advanced copies of the book…
all the angst and problems of getting the UK cover perfectly coloured have paid off
Originally the book was commissioned by the American publishers, Taunton Press ( and uses American terms and measurement – bliss – I was educated using inches and yards) and then I was offered the opportunity of producing a small UK edition and this is it. And as a consequence I have spent a large proportion of the last 9 months working on this and other publications involving Kaffe Fassett’s ribbons and fabrics……
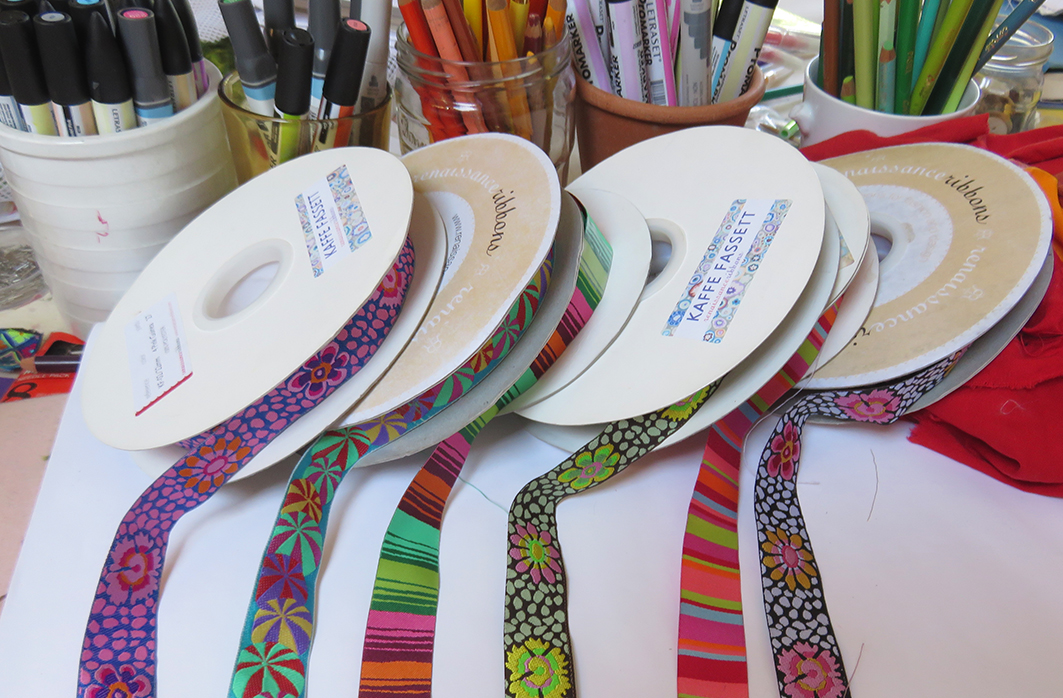
the 5 original reels of ribbon I designed with
I was first asked, by Susan Berry, a book producer concentrating on textile crafts (whom I have worked with for many years) if I had any design ideas for using the beautiful Jacquard ribbons designed by of Kaffe Fassett and produced by Renaissance Ribbons. Susan advised me to see them at his exhibition at the American Museum in Britain, that took place in 2014. Then I was sent a few reels of ribbons to ‘play’ with and this is what I came up with in the first few days….
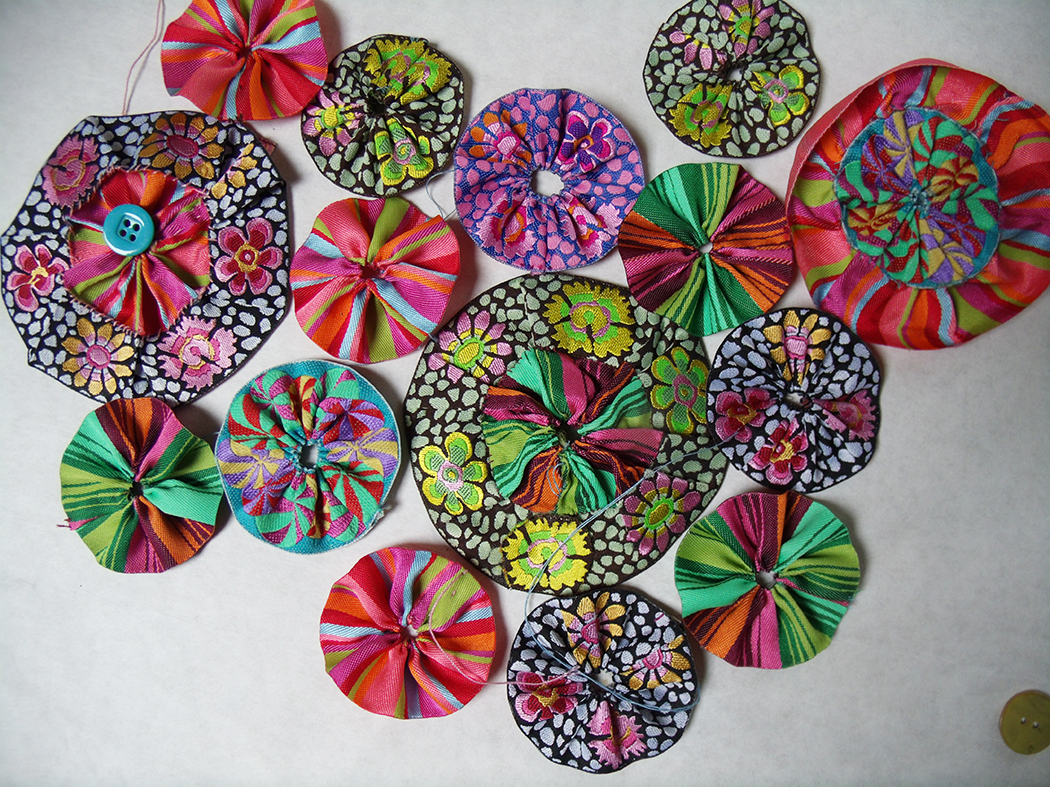
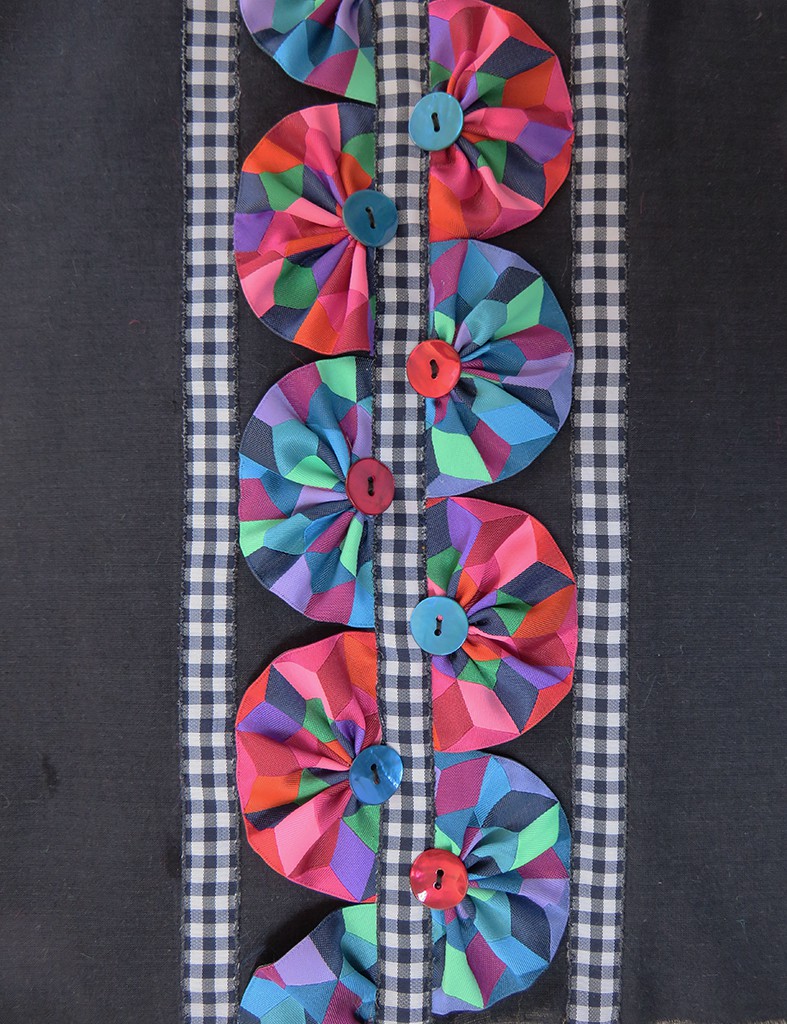
single and double ribbon yo-yos
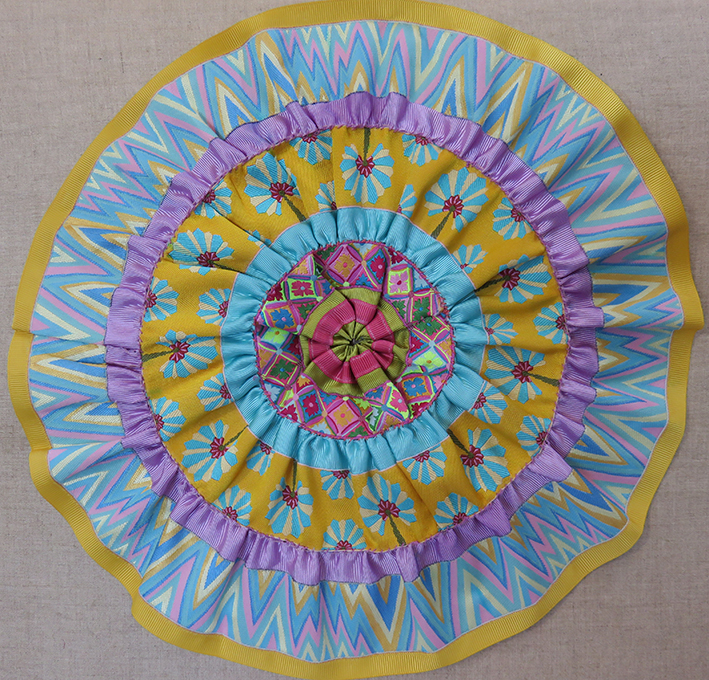
I have a vintage – quilt hanging on my studio door and I immediately thought that this system may translate to the ribbons; so I just cut some random lengths and using running stitch gathered them up to form these pretty circles…some worked and some didn’t – see above; but it is a designers task to make them all work beautifully – so lots of samples later I made this, below, which I intended to grow into a huge throw or curtain.
yo-yo hanging – sadly this failed to make it into the book – it proved too complicated to show how to stitch together simply….
Then of course I thought of crazy patchwork, and this eventually became the heart-shaped cushion on the back of the UK edition cover
crazy patchwork with ribbons hand embroidered into position between the patches of shot cottons
of ribbon with the loose yo yo’s, easy -peasy as these ribbons have been designed to work together – a rich mix but what else would you expect from Kaffe Fassett?
ribbon and yo-yo strips – first ideas
I just took lots of photographs as I researched, and sent them off with rough ideas for a book of small patchworks made of ribbon and plain fabrics – but the journey from playing with ideas to a finished book has been long and let’s say problematical – ideas are always easy for me to come up with, making them work for inclusion into a “how to do it” book is not easy at all.
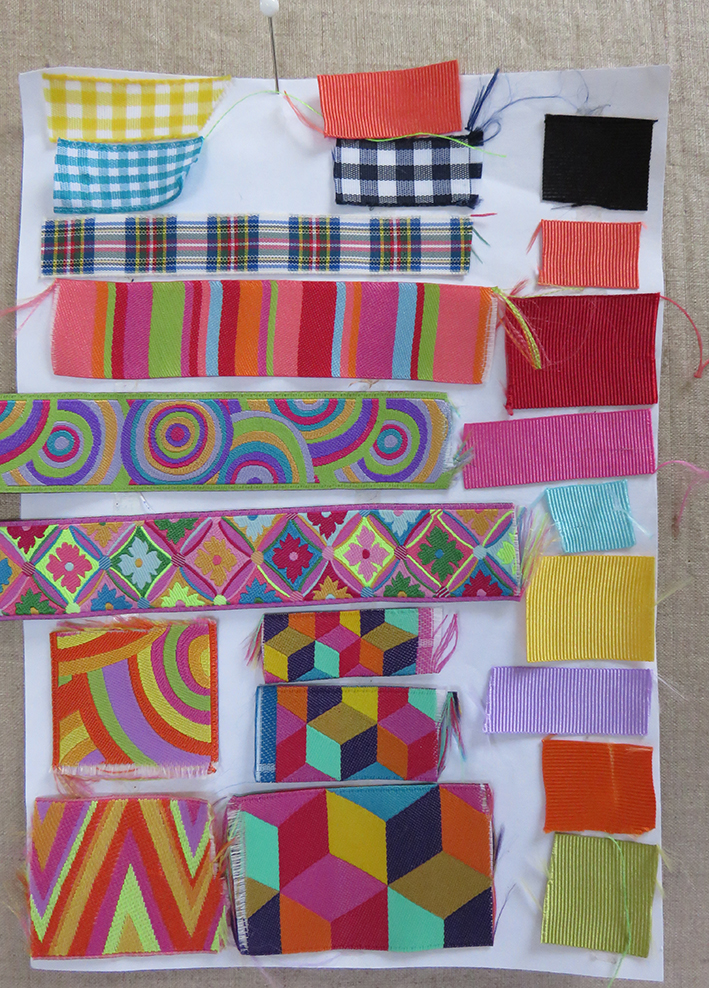
new ribbon combinations
getting the new ribbons into colour combinations – here are the brights
The first thing I realised was that I needed to put some other ribbons and fabrics with these intensely patterned Jaquard ribbons. So I included the Grosgrains, or Petershams, fine ribbed ribbons that come in many sizes and colours, Renaissance Ribbons have many different versions – and they duly sent me some and more of the new ribbons from their Kaffe Fassett range; and then I needed a ribbon that could be used to tone with the 2 brights – I chose my old favourites – tartans. Tartan ribbons are universally available now on-line, and they conform to the clan colours so I felt sure that most buyers of the book could get hold of them easily. But then which fabrics to use for the patchworks particularly the crazies?
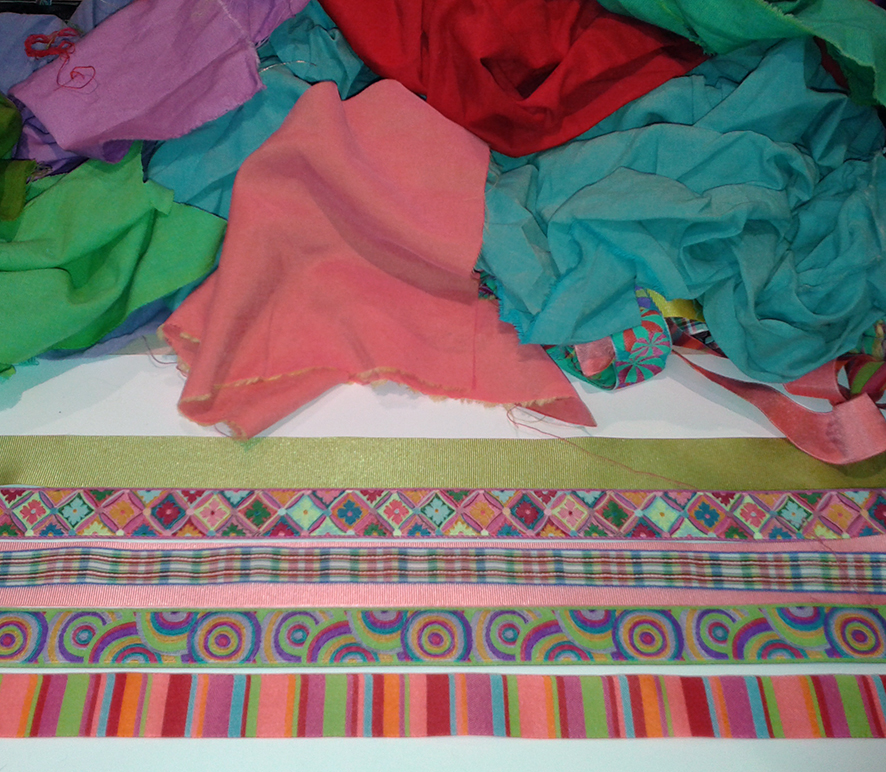
my stash of shot cottons selected to tone with the ribbons toning ribbons
I am a fabric hoarder, like most textile designers, and I found some small pieces of ‘shot’ cottons – the warp and the weft of the fabrics are different shades or even different colours from one another so the woven fabrics are subtle colours and so more easily used with other materials; and by chance who were these shot cottons designed by? Kaffe Fassett. So that was an easy decision as well and I sent off to The Cotton Patch, (who have the best user – friendly, on-line ordering fabrics service) for more samples of these lovely fabrics. I started designing approximately 20 different samples of ribbon patchworks and appliques.
But I fist made myself some new fabrics – out of the ribbons themselves….
designing ribbon combinations for ribbon fabric
trying out different ribbon fabrics for crazy patchworks
what I needed to realise is that when you are making your own ideas for a book, it is important to be able to demonstrate by using photographs, drawings, diagrams and words how someone else, who has not got your knowledge and may even be a complete beginner, can easily follow the instructions …a lot of lovely ideas and more complicated designs got thrown out in this process.
But here are some examples of 20 samples that made it, from first ideas, through to illustrations of the steps involved and finally the 20 projects that I made with the samples. There are 4 types of patchwork and applique techniques in the boon, strips – see below, crazy, squares and yo-yo’s.
putting several ribbons together onto my work top, trying to make up a new ribbon fabric
designing another variation of ribbon stripes for a heart shape applique
from the work table to the finished book in one bound!
illustration to make the ribbon fabrics
page from the book to show the heart shaped applique
and eventually this design turns up on the contents page as well….
content page of finished book completed with the same Ribbon Fabric
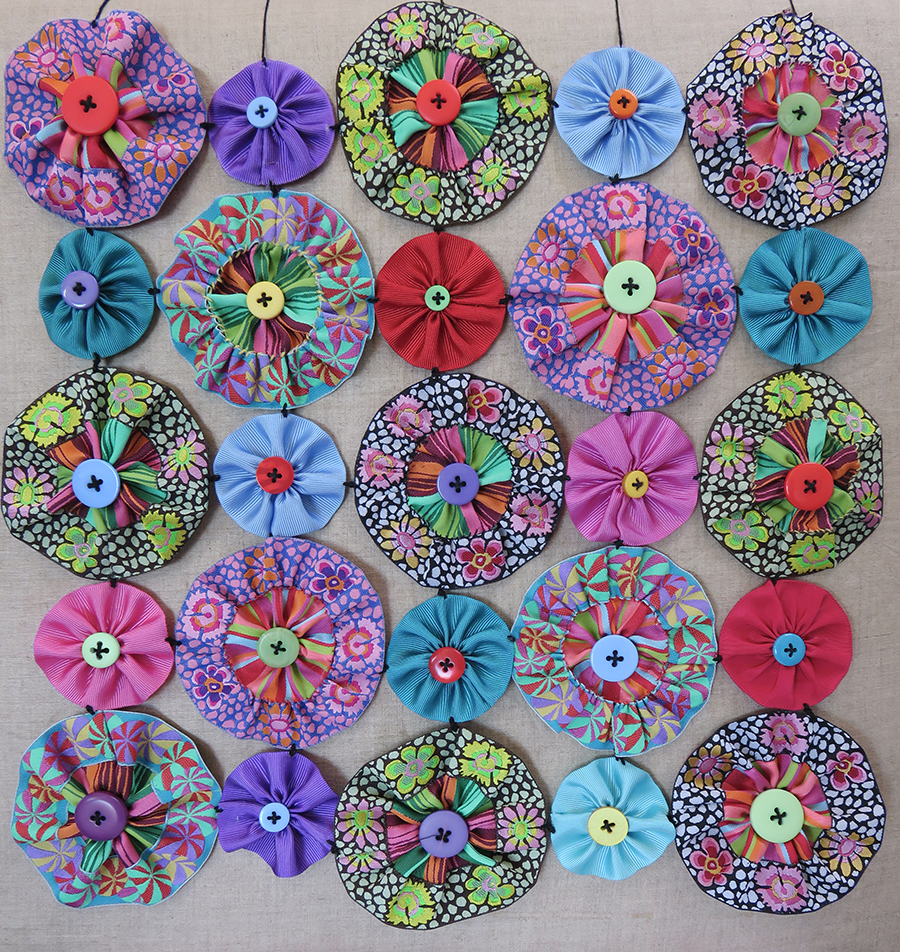
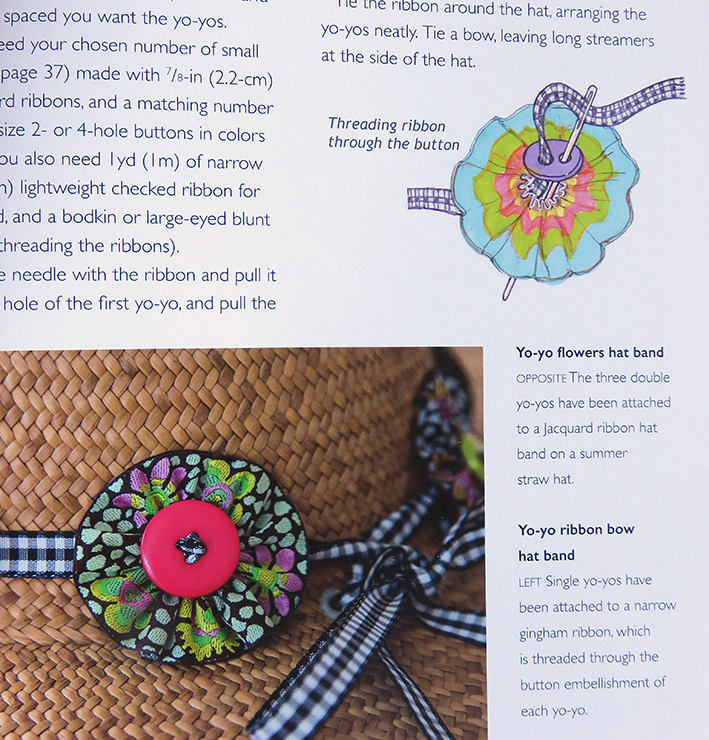
the yo yo designs quick and fun to make and design with, within the book they come single, embroidered….
hat band yo yo with button stitching ribbons
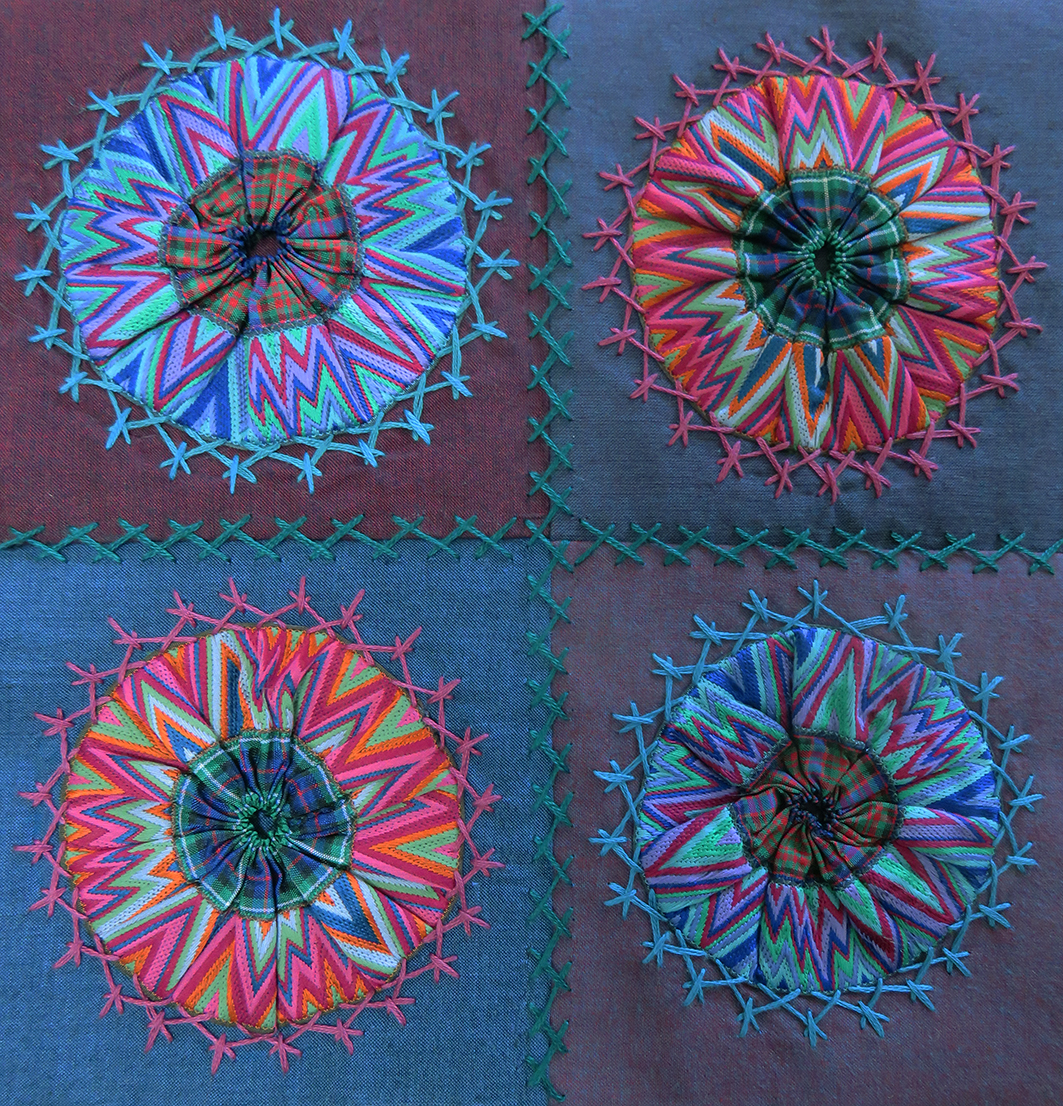
embroidered double yo yo square patchwork
halved and giant.
half yo yo bands
and one very very big yo yo.
in fact I could have written another book about making and decorating with yo-yos
project section of the book – with lots of different things to make
I could write for days about the book and all that it contains – but then why would anyone buy it? As I write I am waiting for the large consignment of books to arrive from the printers….it is a small edition but I have plans to advertise it, it is being launched on September 15th at the American Museum in Britain, well it is full of the American Kaffe Fassett’s ribbon designs… and for this I am giving a special bead – making workshop. ( more of which in a later post )Then the book is being sold with special packs of ribbons and fabrics on the Cotton Patch stand at the Knitting and Stitching Show in October; but meanwhile we have a lovely display in the shop window of Heart Space Studios, devised by our style guru, Jane- Marie Mahy, please see below and I have devised a whole set of classes to complement the book – go to http://www.heartspacestudios.co.uk/workshops/ribbon-patchwork-hearts-half-day-class/. for more information. And eventually we will be selling the new book on our website – watch this space
Heart Space Studio window display by Jane-Marie Mahy
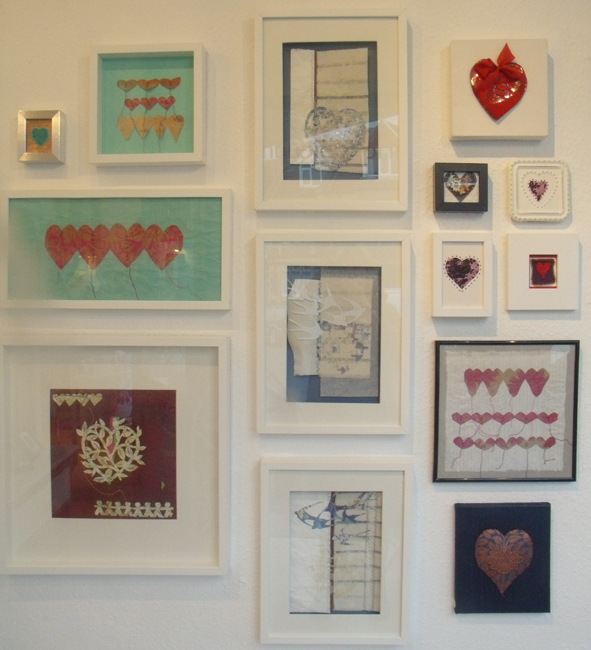
The small but delightful exhibition that the Heart Space Studios staff made in the mixed media session are all framed and ready to go on the wall ….
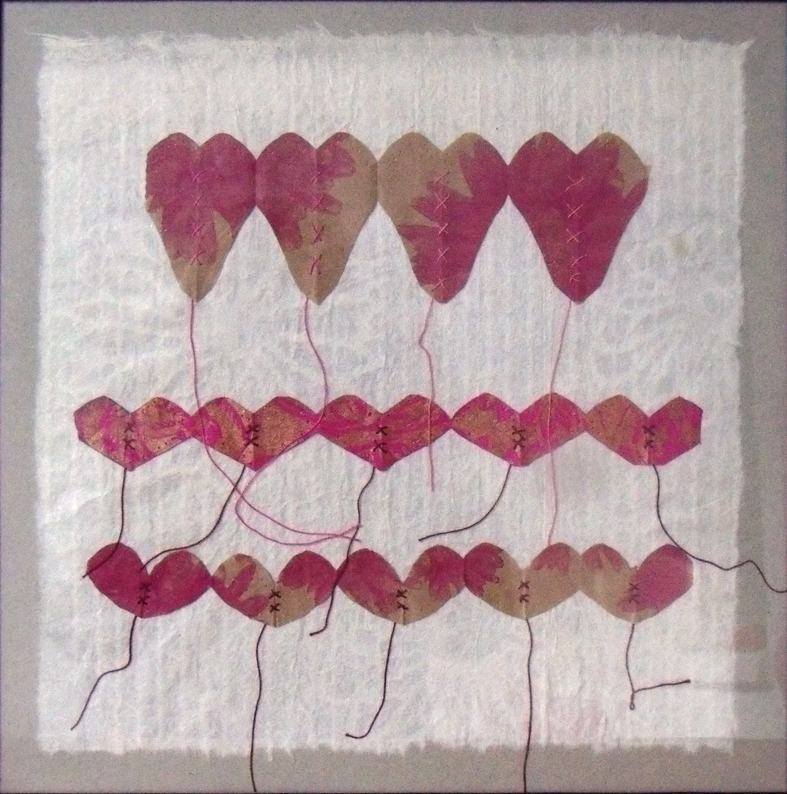
more stitched paper hearts by Susie Bancroft
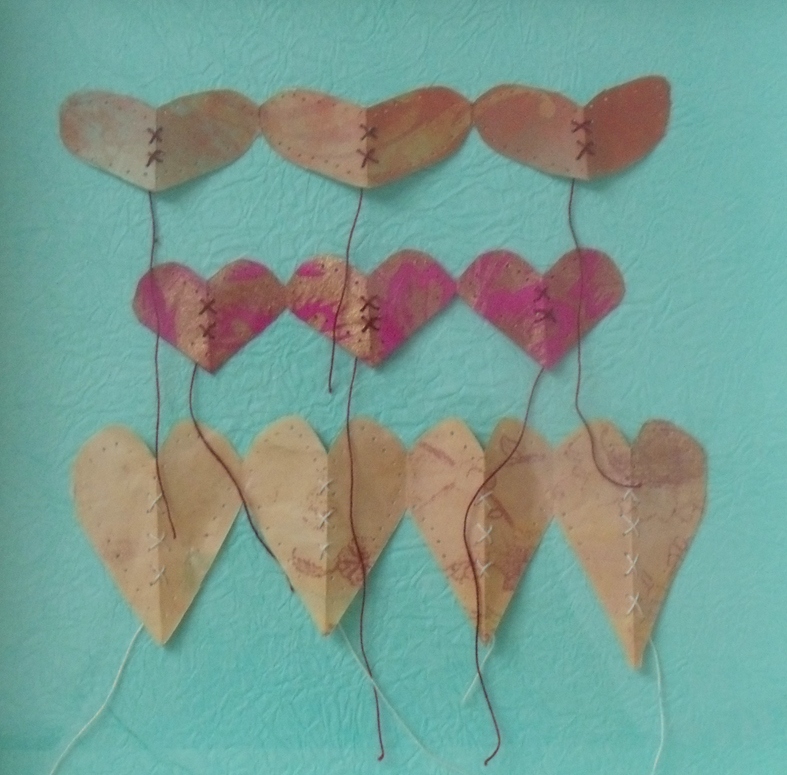
the first to arrive through the post was a box of stitched printed paper hearts from Susie Bancroft – so I set about mounting rows of them on Japanese hand-made paper or crumpled tissue papers ready for framing
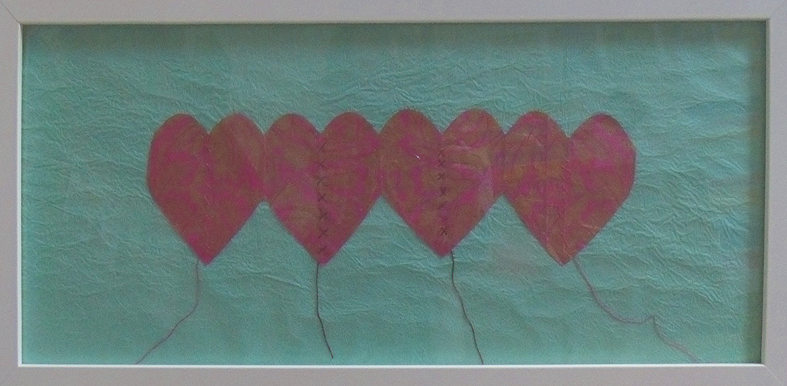
row of large printed paper hearts – Susie Bancroft
the cotton threads just going every which way – I think they look like tiny heart shaped kites…….-
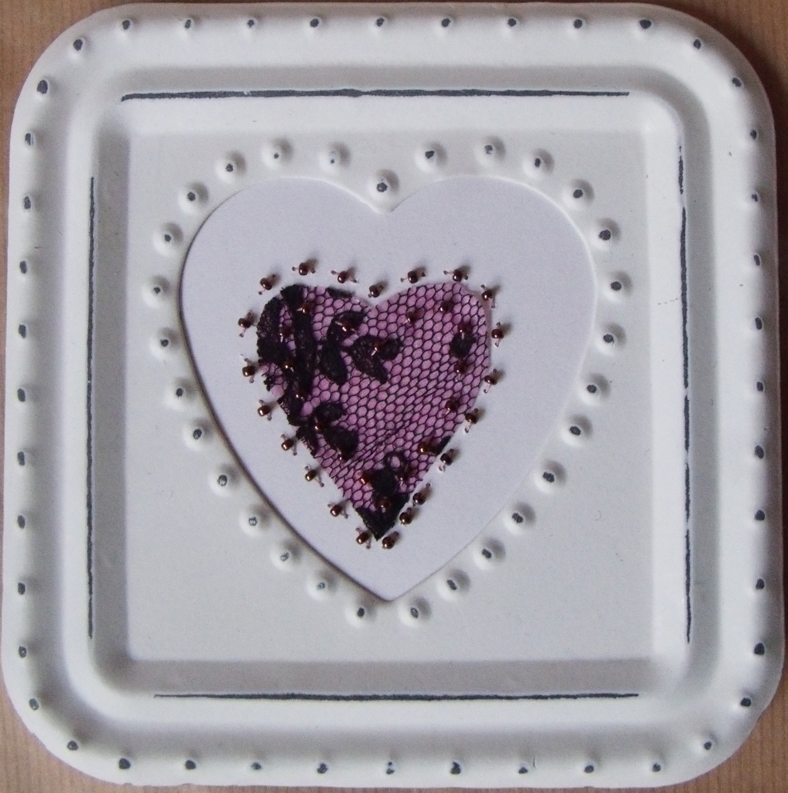
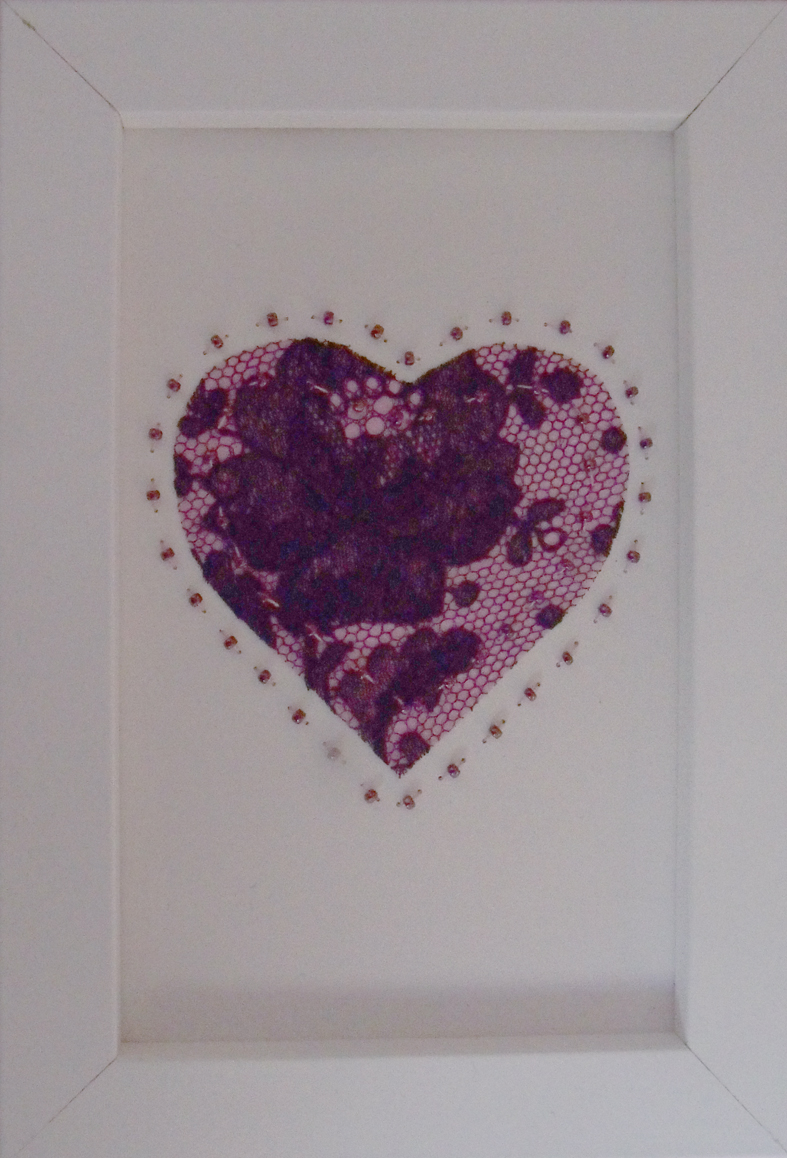
minute beaded black lace heart in tin frame- Jane-Marie Mahy
the tiny hearts are somehow the most appealing, they came in all manner of materials and techniques….
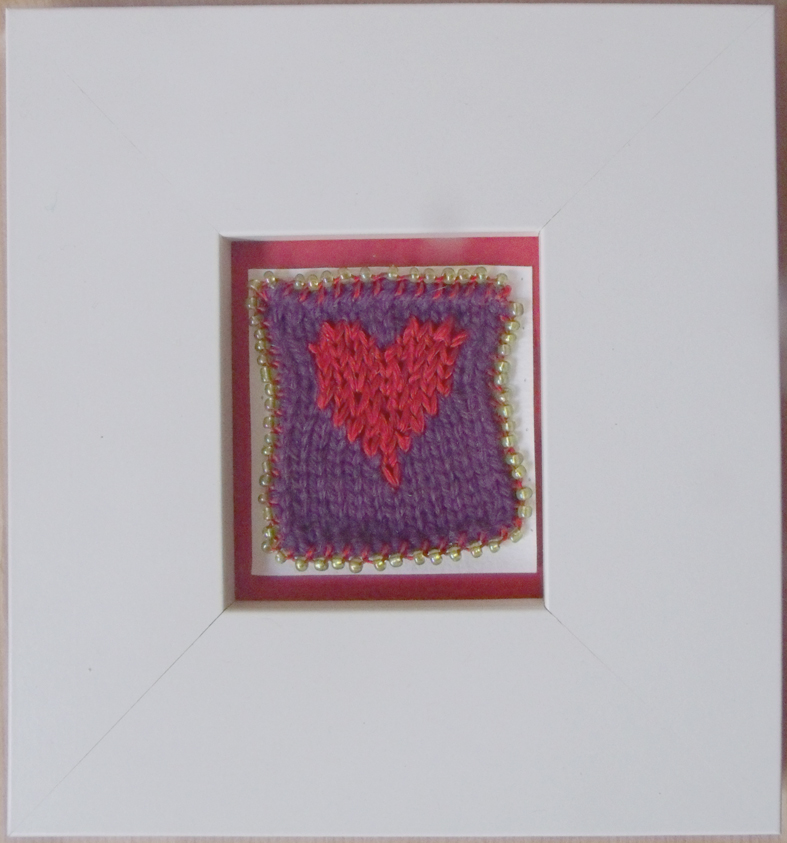
hand knitted and beaded heart by Amanda Jones
I must admit that I did take a few liberties with the mounts before framing… the more impact we can give them the better chance to sell them – and this is a selling exhibition
Larger black beaded lace heart by Jane-Marie Mahy
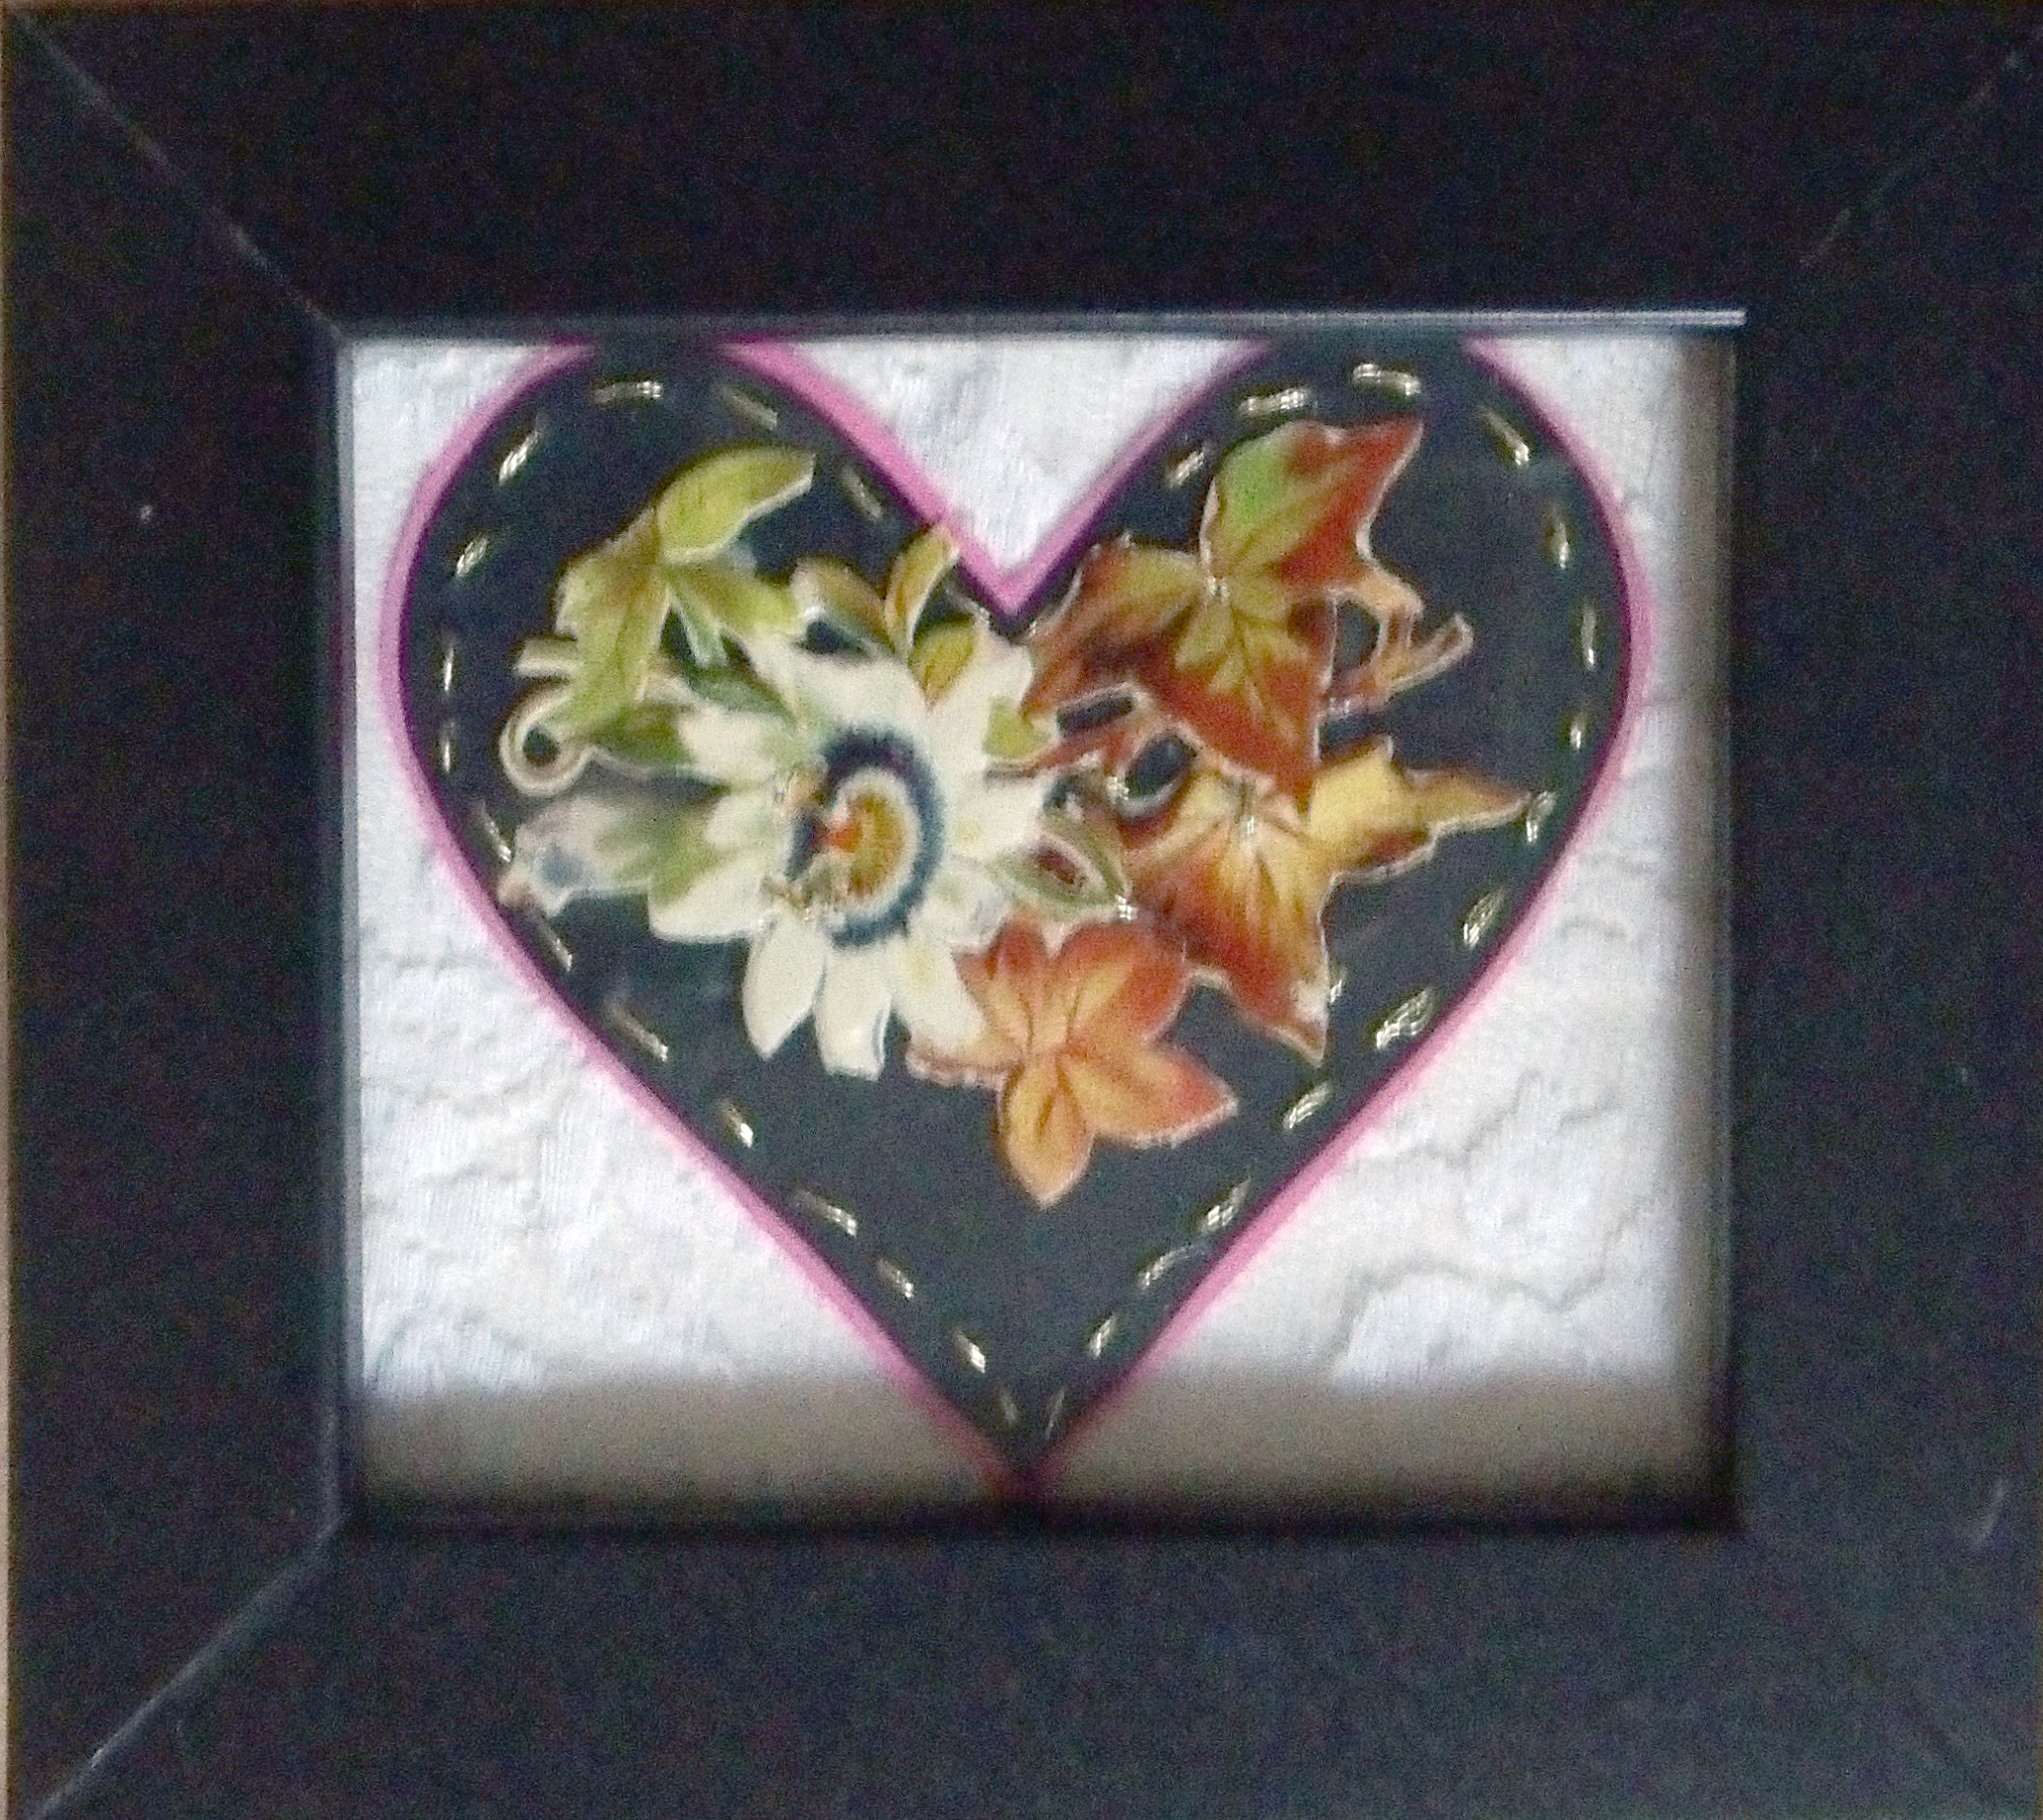
Jane- Marie Mahy Heart Space’s display guru brought hers in already perfectly framed, as did Debbie Bird – her teeny tiny paper printed scraps look very vintage when heavily framed in black
printed scrap paper applique by Debby Bird
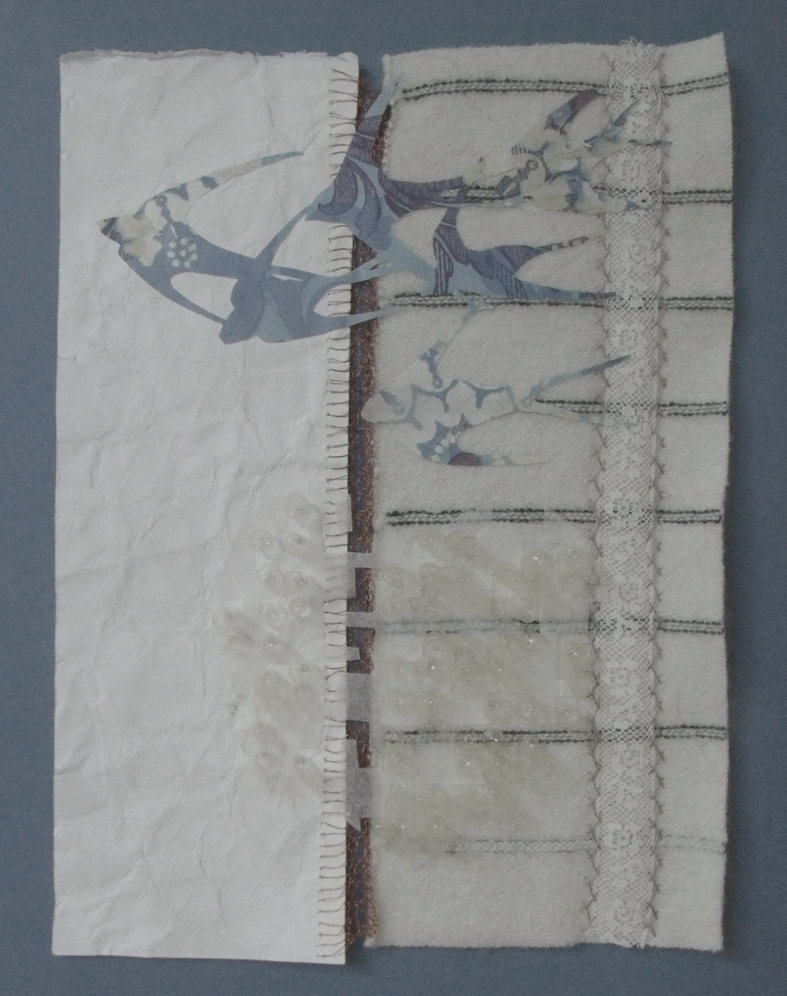
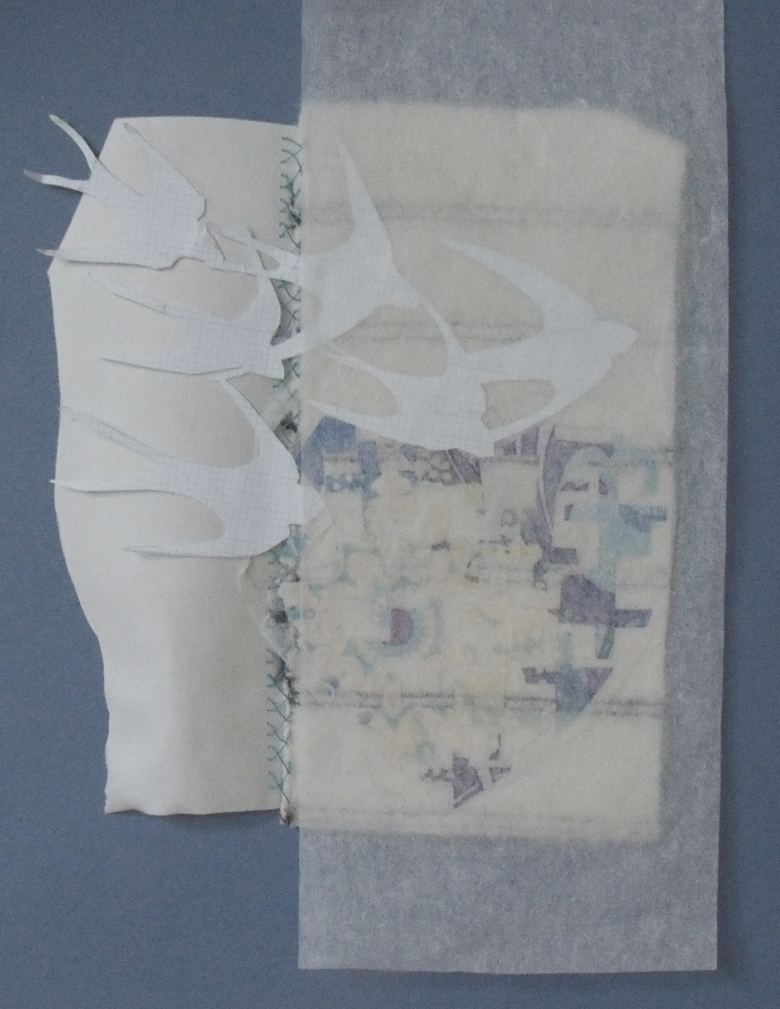
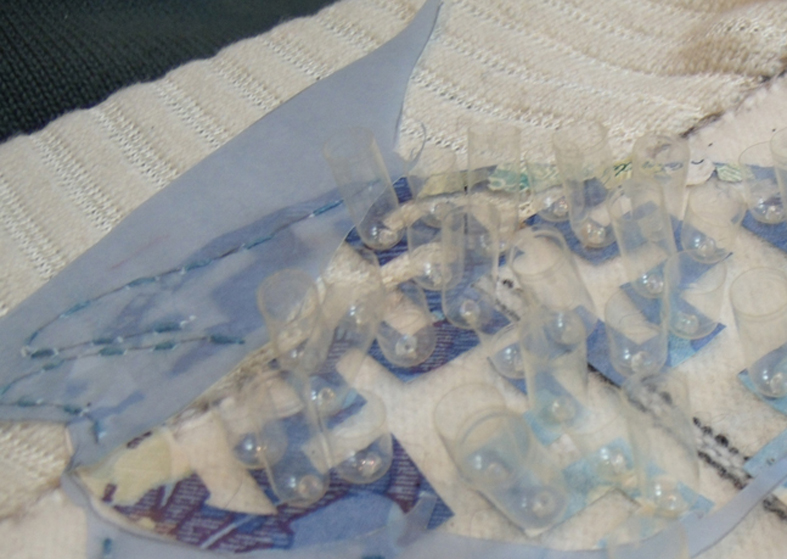
but for something completely different we have knitted copper wires to join paper and fabrics…with a flights of swallows scattered above a nebulous clear pill-case heart
flights of swallows by Steph Wooster
true to her discipline as a designer, Steph sent in 3 variations on her birds and hearts theme,
Steph’s second bird and heart picture
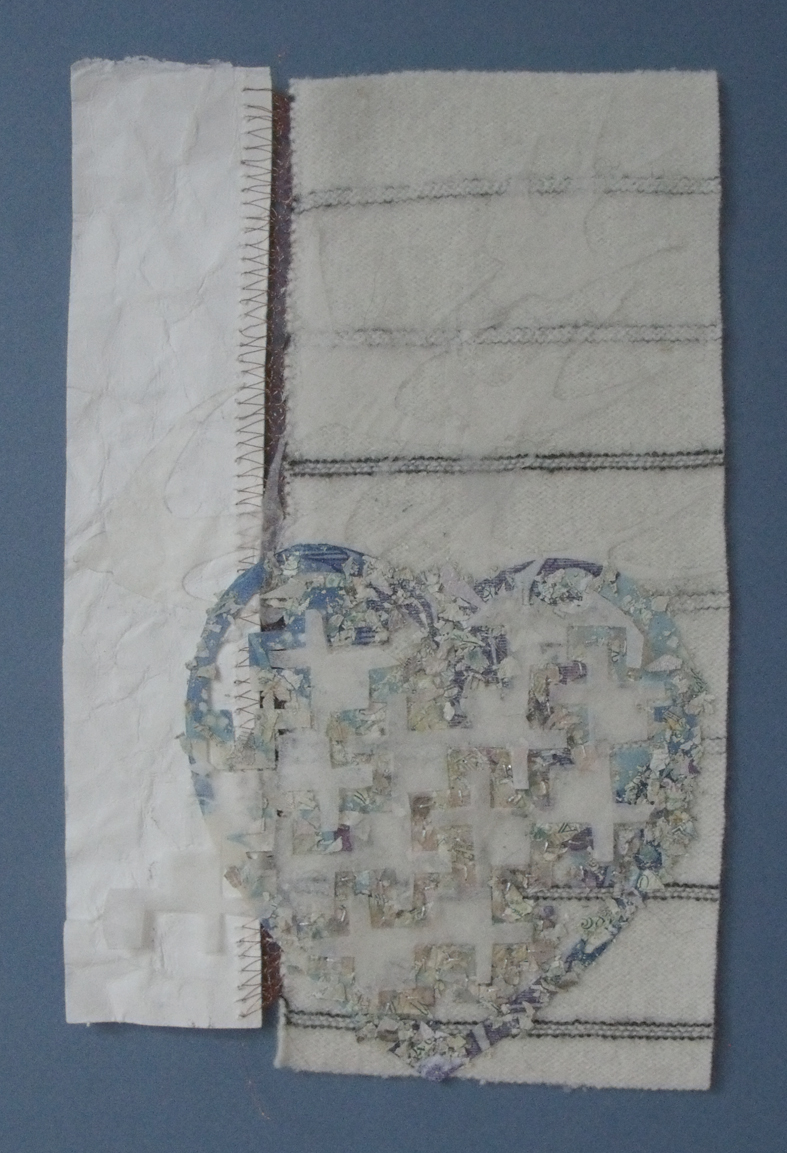
the third piece is an intricately cut applique of shredded bank notes, paper and woolen blanket stitched and knitted with copper wire…now that’s what I call mixed media.
Steph’s totally mixed media heart
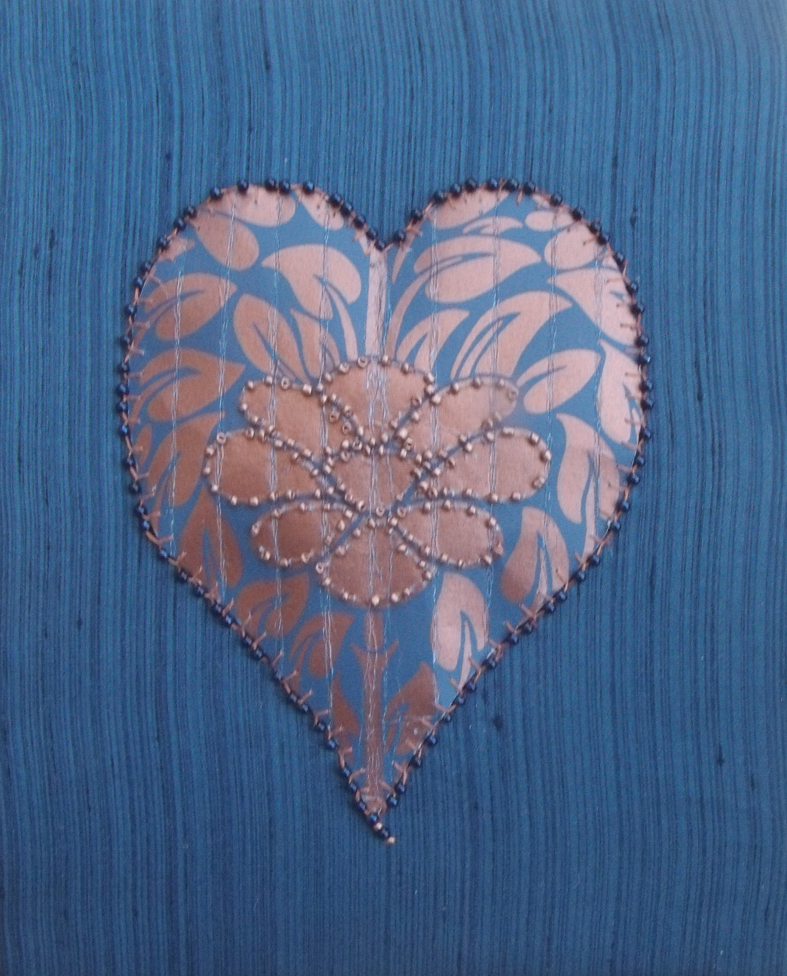
the beaded paper heart by Libby Butler is at last padded and applied to a dark blue fabric ground.
padded beaded paper heart by Libby Butler
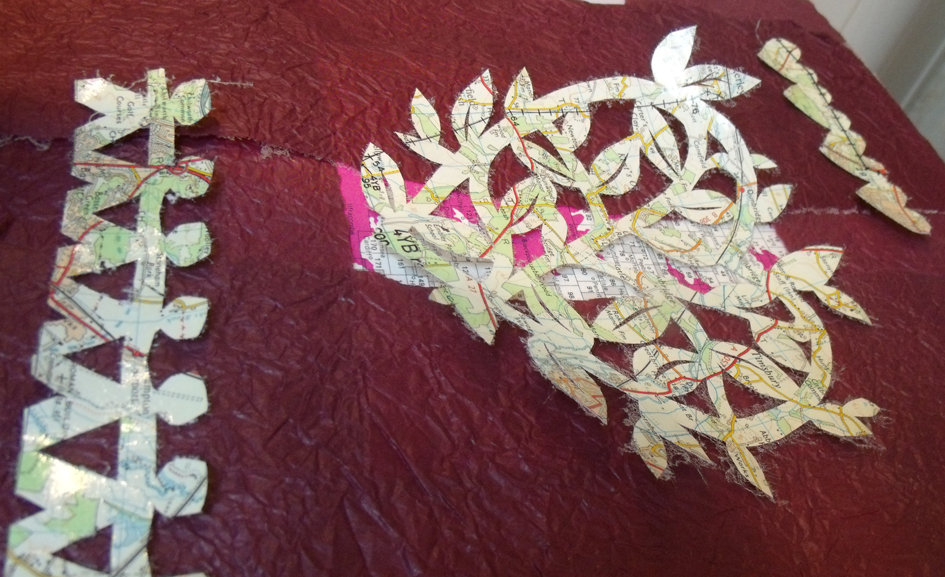
and right at the last minute this evening a lovely folksy map heart came form Kirsten Hill-Nixon…really worth the wait.
crushed paper and cut maps hand stitched applique by Kirsten Hill-Nixon
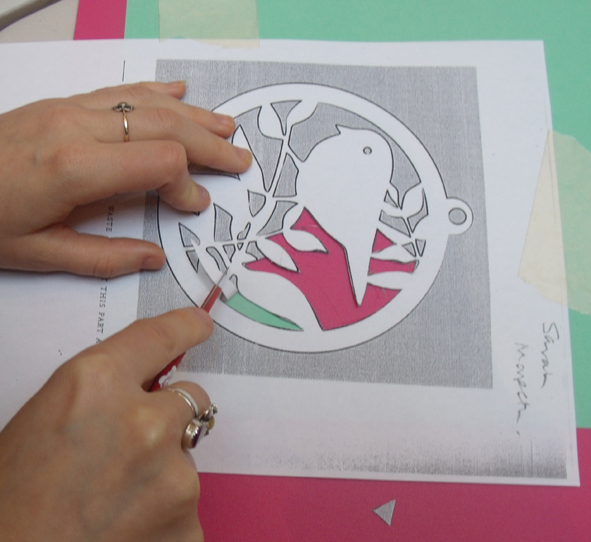
In celebration of Valentin’s day the staff and tutors at Heart Space Studios got together to develop mixed media work based upon Paper Cutting. Debby Bird led the session – a chance for everyone to get to know one another better and swap information, materials and ideas. The project was to make selling exhibition of heart pictures or cards for our gift shop.
bird motif for practicing on
lace bonded onto papers
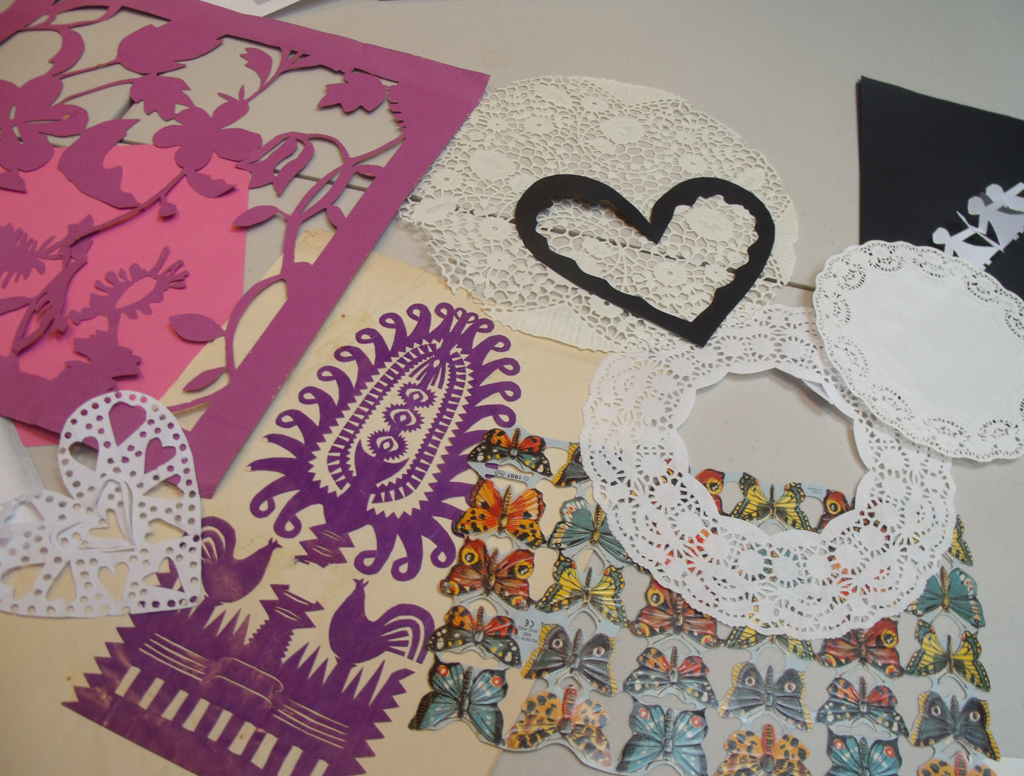
The tutors had been asked to bring in materials and equipment from their own practice, and so when these came out everyone stared to play with different things..
pre-cut papers, from scalpel to laser techniques
everyone had very different pieces of inspirational materials…
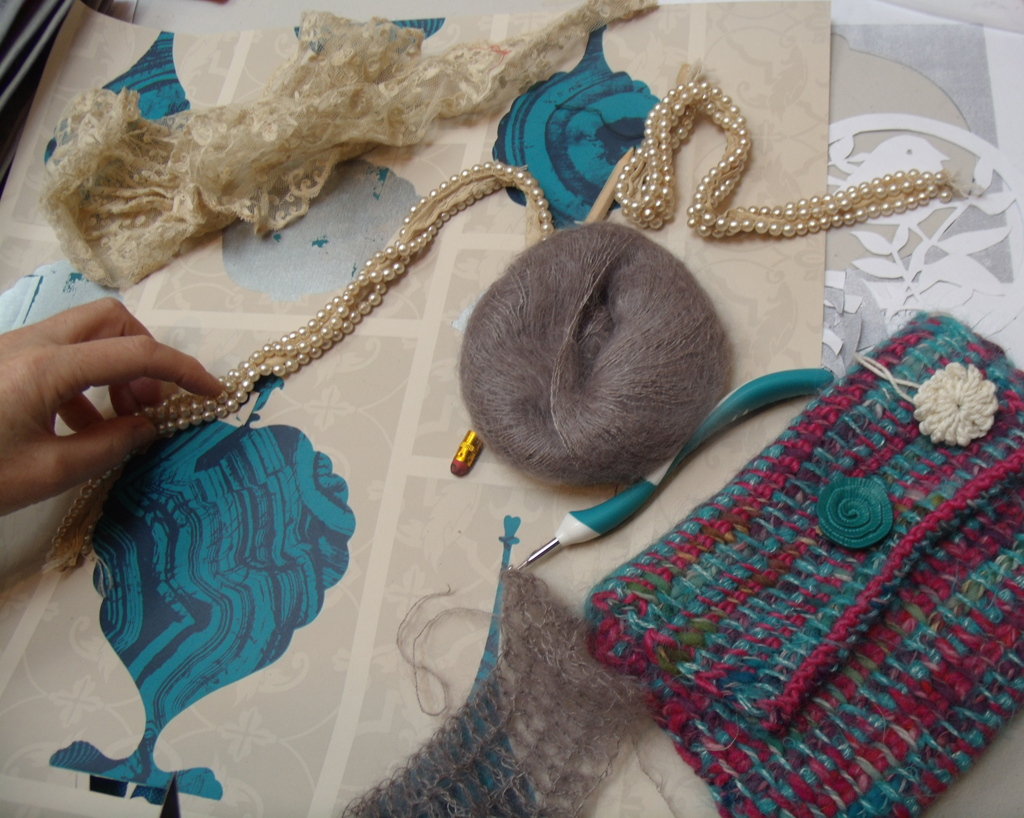
Steph Wooster’s stash of old blankets,woolen yarns, ticking and tracing papers.
the characters of the makers was apparent by the things they chose to bring….
Kirsten Hill-Nixon’s felt tweeds and maps
Each person has developed stashes of very personal things and now they had a good excuse to use them…..
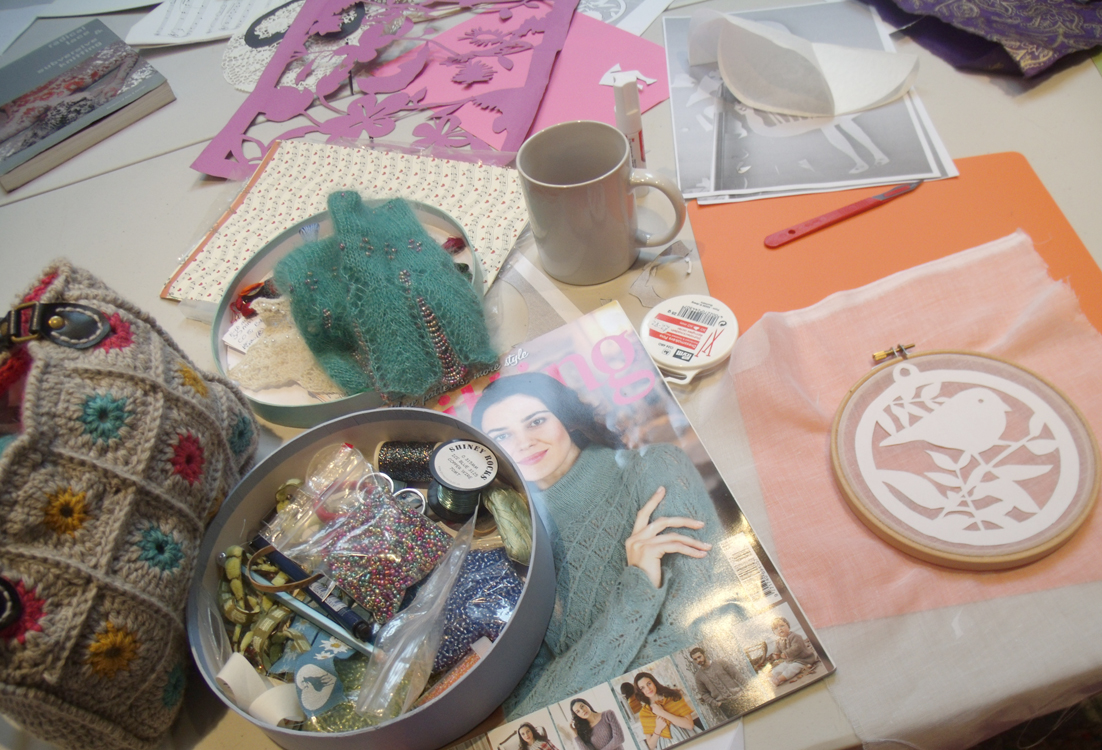
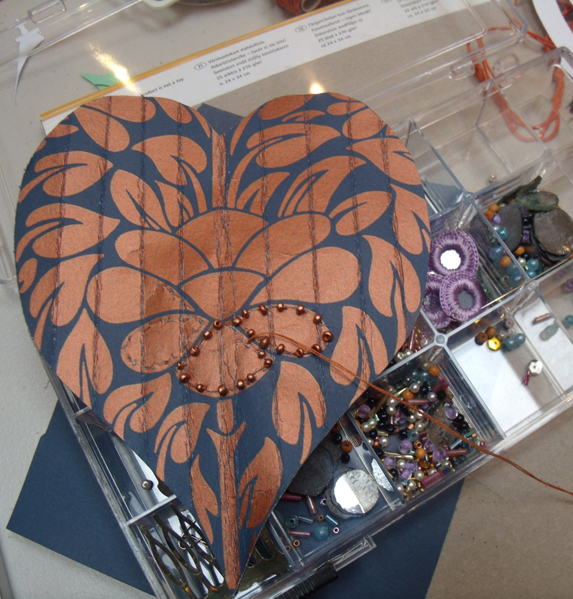
Amanda Jone’s knit and crocheted bead collection
in fact even the boxes and bags the materials had been brought in were inspirational.
Decoupage cardboard box.
Sophie Bristol’s sewing box of exotic ribbons
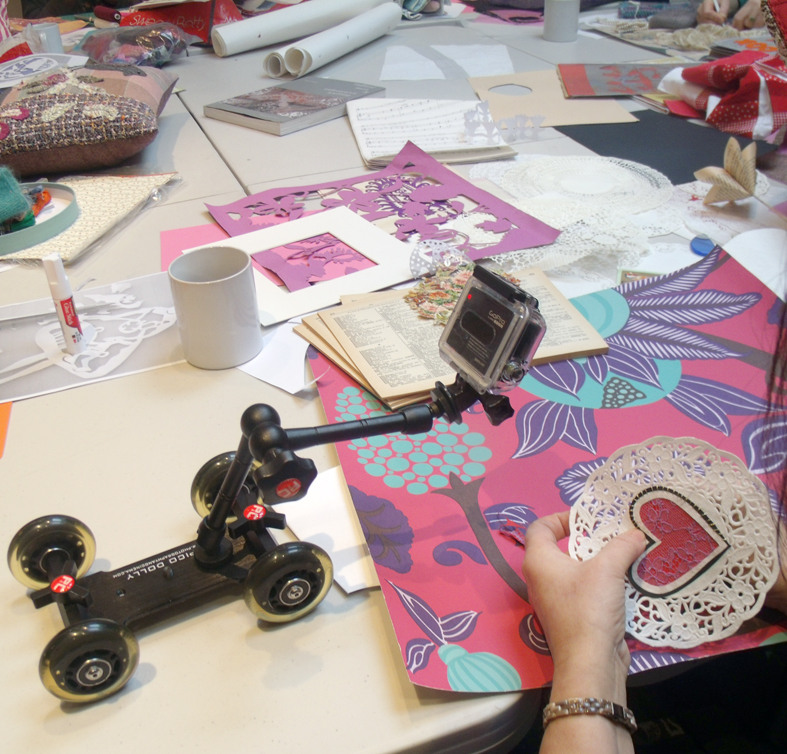
Just as we were getting started we were visited by a camera team to record the workshop for the regional daily news programme on ITV.
Regional news cameraman filming the workshop
Sophie and I were interviewed separately about various aspects of the how Heart Space works, she was fluent and received a round of applause from the group, but I was told by the interviewer that they had lots of ‘sound bites’ from me – I think this is a polite way of saying I didn’t exactly answer the questions.
roving close-up camera checking Debby’s work
But we were all intrigued by the roving miniature camera used to get close-ups of the techniques were using. Back to work after the excitement and after we had given 5 top tips for beginners – more of which later…..
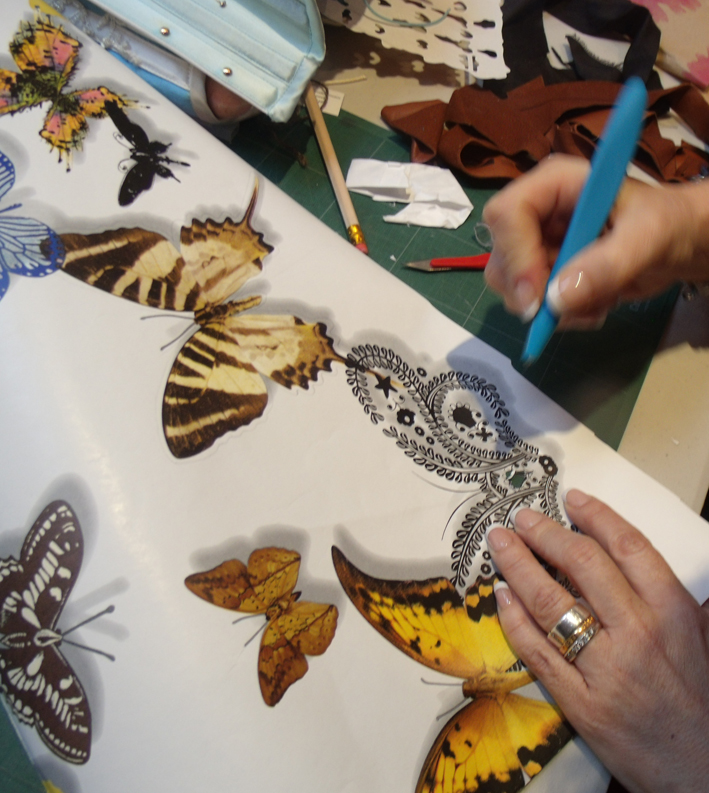
Lisa Keating starts to cut into a butterfly motif out of a modern photographic wallpaper.
Once the filming was over everyone suddenly seemed to be energised by what they could achieve in the day, they each had to make 1 sample heart picture that would ideally lead to a few other versions when they went home, when framed all this work will make up the Valentine’s exhibition for Heart Space Studios
I was really pleased to see that Libby, who volunteers helping to generate our publicity, used the techniques I had taught at the first session of the Crazy Beading course that run on alternate Saturday mornings – really good to see how simple ideas can be adapted to new materials.
Avril Best’s wallpaper and woollen materials
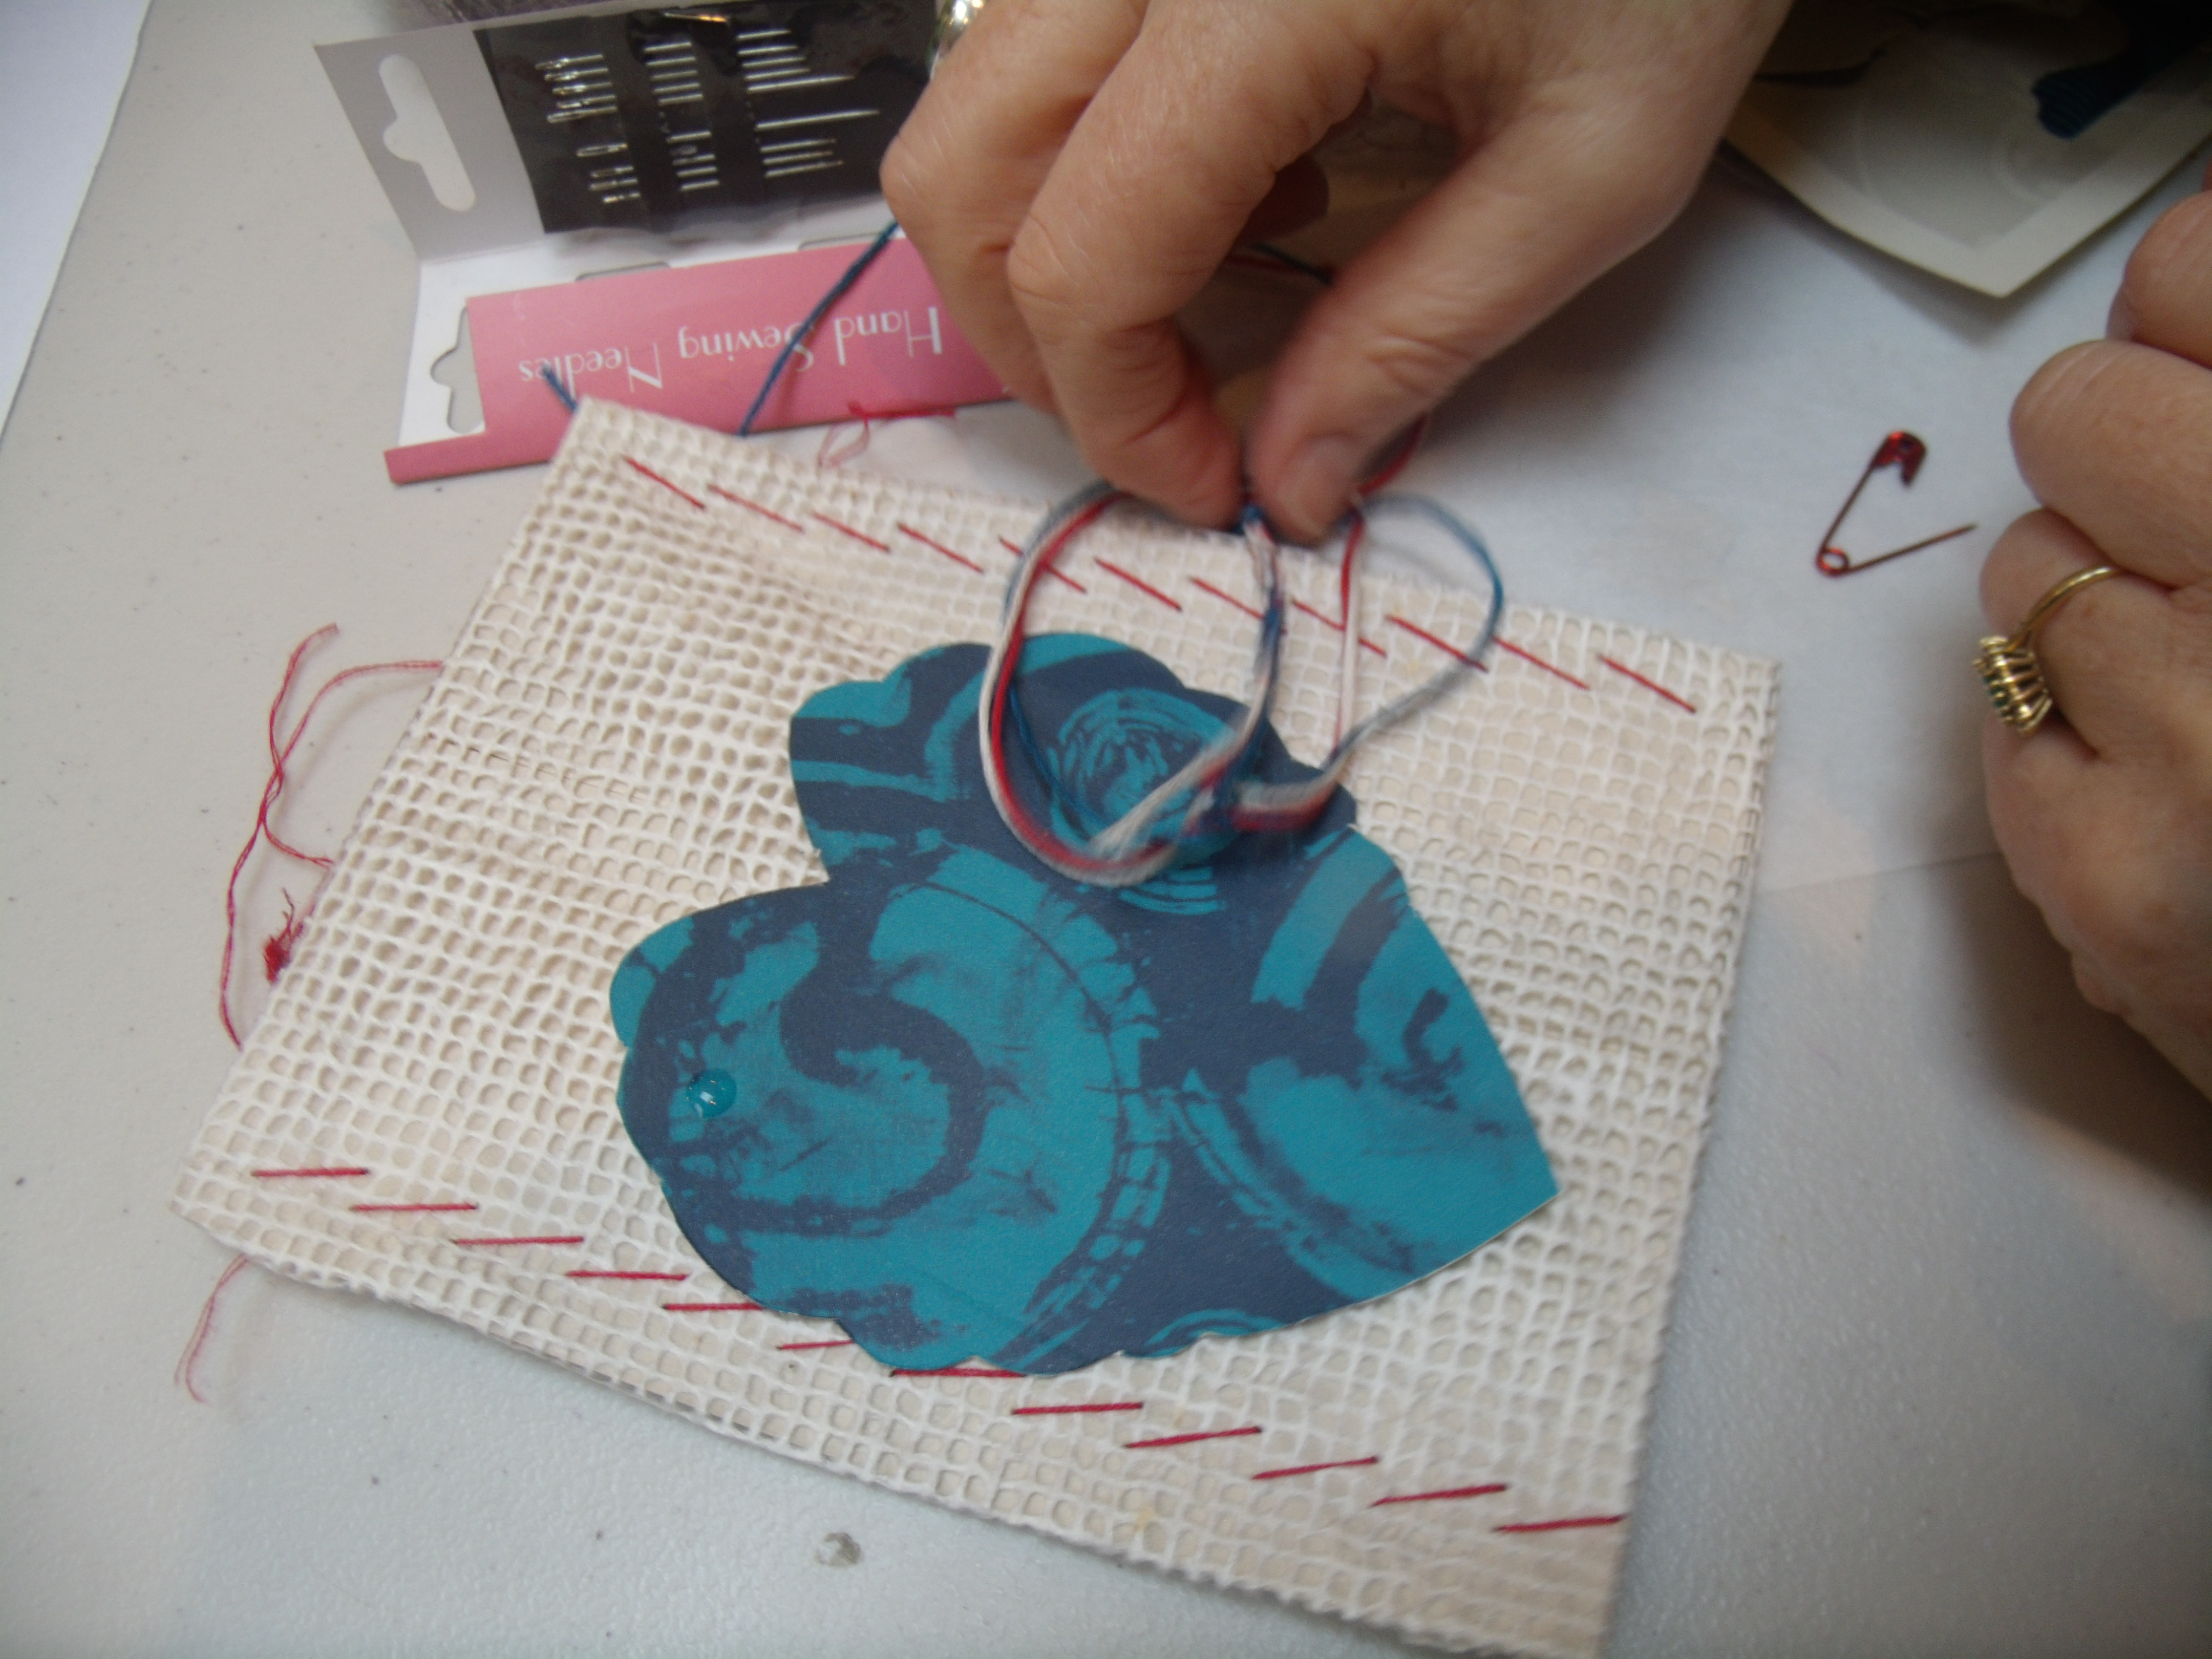
Avril’s cut paper turquoise heart stitched onto Japanese washi paper
Suddenly hearts started to appear on all the work sites.
Steph Wooster’s seagull legs and heart applique
a close – up reveals a really strange use of mixed media – now who would have thought that medicine capsules could look so glamorous?
medicine capsules or new type of sequin?
a really interesting idea emerged from Kirsten, she placed hearts and figures either side of a large decorative heart all of which she had cut from maps, I liked the idea that she could make links between the hearts and the figures using the map as a route……..
maps to link hearts and people? Kirsten Hill Nixon
the simplest hearts are often very successful – these stitched, printed, miniature bunting strips are just so desirable.
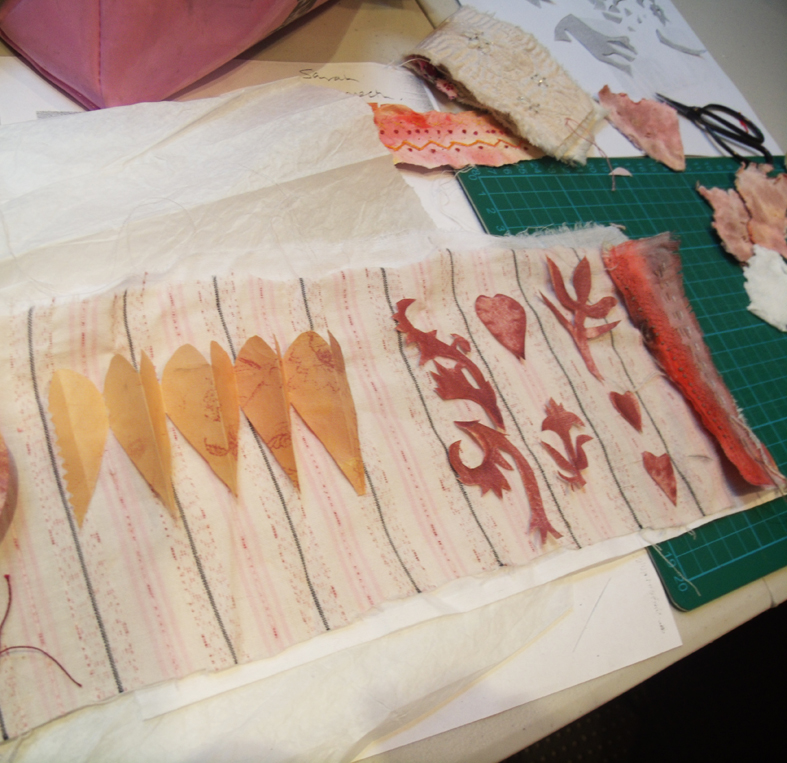
choices to make for developing finished work
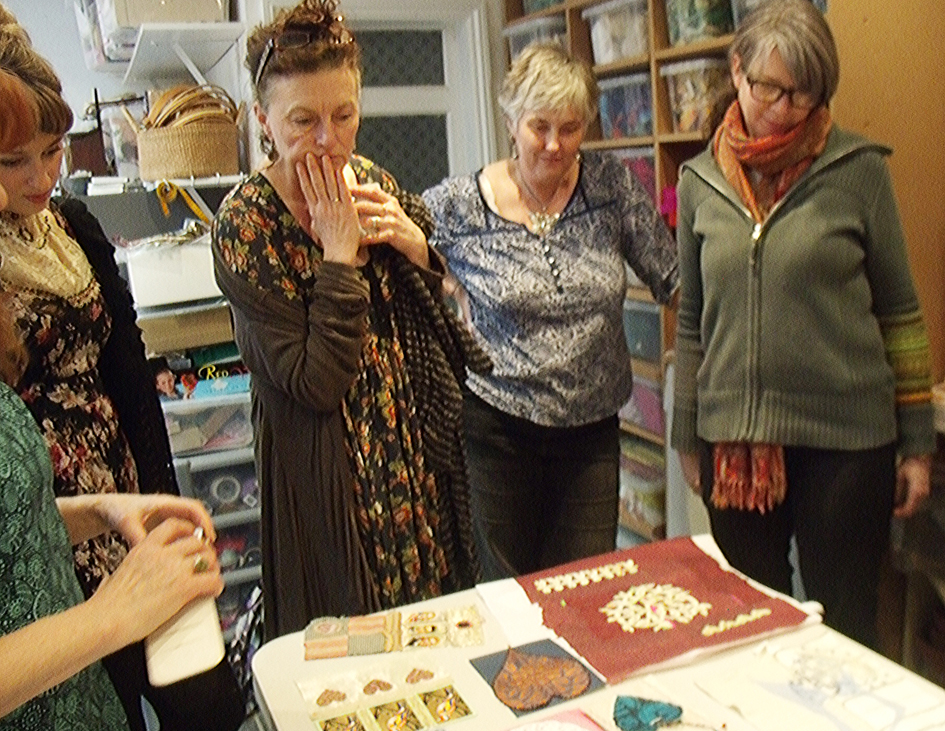
When the sampling session was finished everyone set their work out for viewing by everyone – several people were determined to get more work for next week – which apart from St Valentine’s day celebration is the 3rd anniversary of the opening Heart Space Studios.
some of the group assessing the finished samples – where to go next – doesn’t look too hopeful does it?
Well they all promised to send or bring work for exhibition by the end of the week – so the next post will show the results….Oh and the 5 top tips for staring to make with textiles,
1 when threading a needle 1) cut the needle end of the thread at a 45% angle
2 when threading a needle 2) lick both the end of the thread and the eye of the needle
3 use circular needles to knit garments – you only ever have to make the basic knit stitch ( not alternate with rows of purl) and there are fewer seams to stitch up.
4 use the best possible materials you can afford – always.
5 press as you go when making any garments (this is also my own favourite rule)
I am not a big fan of Christmas, I prefer New Year with its promise of a fresh start and better times ahead…but here at Heart Space Studios everyone expects us to do a Christmas window at least. But with a refurbished shop to launch, the powers behind my shaky throne decided to put out all the flags – well bunting to be precise – and go for it….hot mulled wine, mince pies and a late night opening party. Added to this was an idea for an exhibition of bunting.
animal mask by Jenni Joule
But, first things first – find the inspirational object – I always do this when starting something new, search for an image or a piece of fabric – anything that gives me lots of ideas or gives a very strong atmosphere…Sophie found it on Facebook in the guise of a head – an animal’s head, 3 animals in fact, by artist Jenni Joule, who brought wonderful things in to a meeting about a month ago – we were away, a spooky-wooky frozen forest
Debbie Bird being very precise and technical
rejected heart bunting
Meanwhile all the tutors set about producing bunting…Debbie Bird held a class on making it and so Heart Space admin, ( Sophie Bristol and I) turned up to find out how to do it.I made several attempts at heart shaped bunting in very tasteful fabrics…they were soon abandoned. What I needed was a contrast to the white spooky windows..I realised I was trying to reconcile 2 different atmospheres in one space – so the only way to go is complete contrast, the more extreme the better. We would have one red window and one white. So I found an old and very crude Russian shawl in my stash, I hand painted the mustard coloured roses with some pink and purple dyes and then cut it up; next I went for glitz – why stop now? then I added tartan, I do love tartan and paisley – I couldn’t bring myself to cut up any of my old woven paisley samples – far too precious, but I had at last found a use for this old neglected shawl.
tartan and Russian Shawl bunting
I didn’t bag-out the pieces but just cut them and left them, as they are cut diagonally to the straight grain they shouldn’t fray too much, and hey it’s only bunting…..I set about making 5 lines to sell.
But then we had to start stocking the shop. The first thing was to get one area working properly to set the tone for the whole place. An old and true saying is ” you can’t sell from an empty shop”; so we piled it all in, colour co-ordinated of course.
Teresa Searle’s felted and embroidered bags, mittens and cases look wonderfully colourful, setting the standard for the rest of the shop, my hand embroidered felt letters look strong and clash nicely with the work beneath.
the first stand of textiles sets the tone
And the pile of scarves hand knitted by Sarah Thorpe go happily with Janet Clarke’s beautiful soft coloured felts. For real winter warmth, the knitted and felted Hot Water Bottle Covers and neck warmers made by Steph Wooster all mingle together.
felted hot water bottle covers and knitted scarves
The shop starts to look like it is in business.
the shop takes shape
But what about those windows? The winter white one came together very quickly, it is now stocked with cream and white woollen goods for sale, with the 3 headed animal standing sentinel.
spooky white window
But the other window was more of a problem, the costumes that had been brought didn’t fit our stands and there weren’t enough animal masks to make an impression, beautiful though the horned mask is, by Jenni Joule.
jacket and mask by Jenni Houle hung with my silver heart
I needed more red stuff to link with the bunting on the wall behind…so I asked Lisa Keating who was running a corset making workshop for us, if she had anything suitable to contrast with the white and silver and she lent us this wonderful glitzy black and gold number – now that’s what I call a contrast.
Lisa Keating's black and gold lacedcorset
Then I took every red or silvered glass heart from home and hung them in the window – my house now looks bare – but the Christmas windows are paramount.
red and silver window with my glass hearts from home - note the corset bunting by Lisa
Eventually everything was finished and looked totally intentional; always the way when a design works out well, you can’t imagine that you ever had any other ideas than the finished piece.
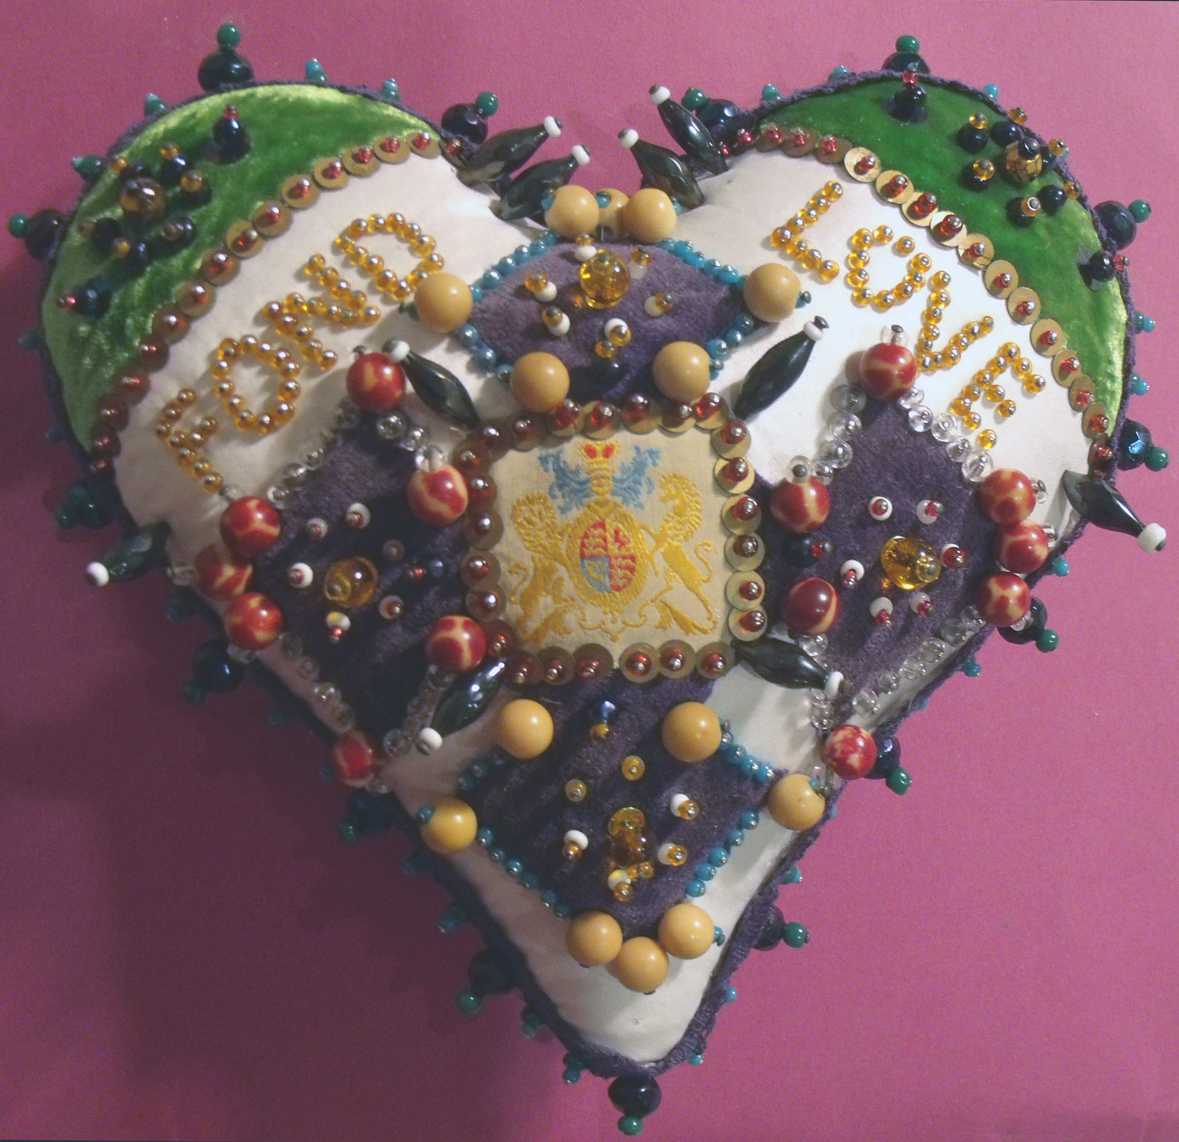
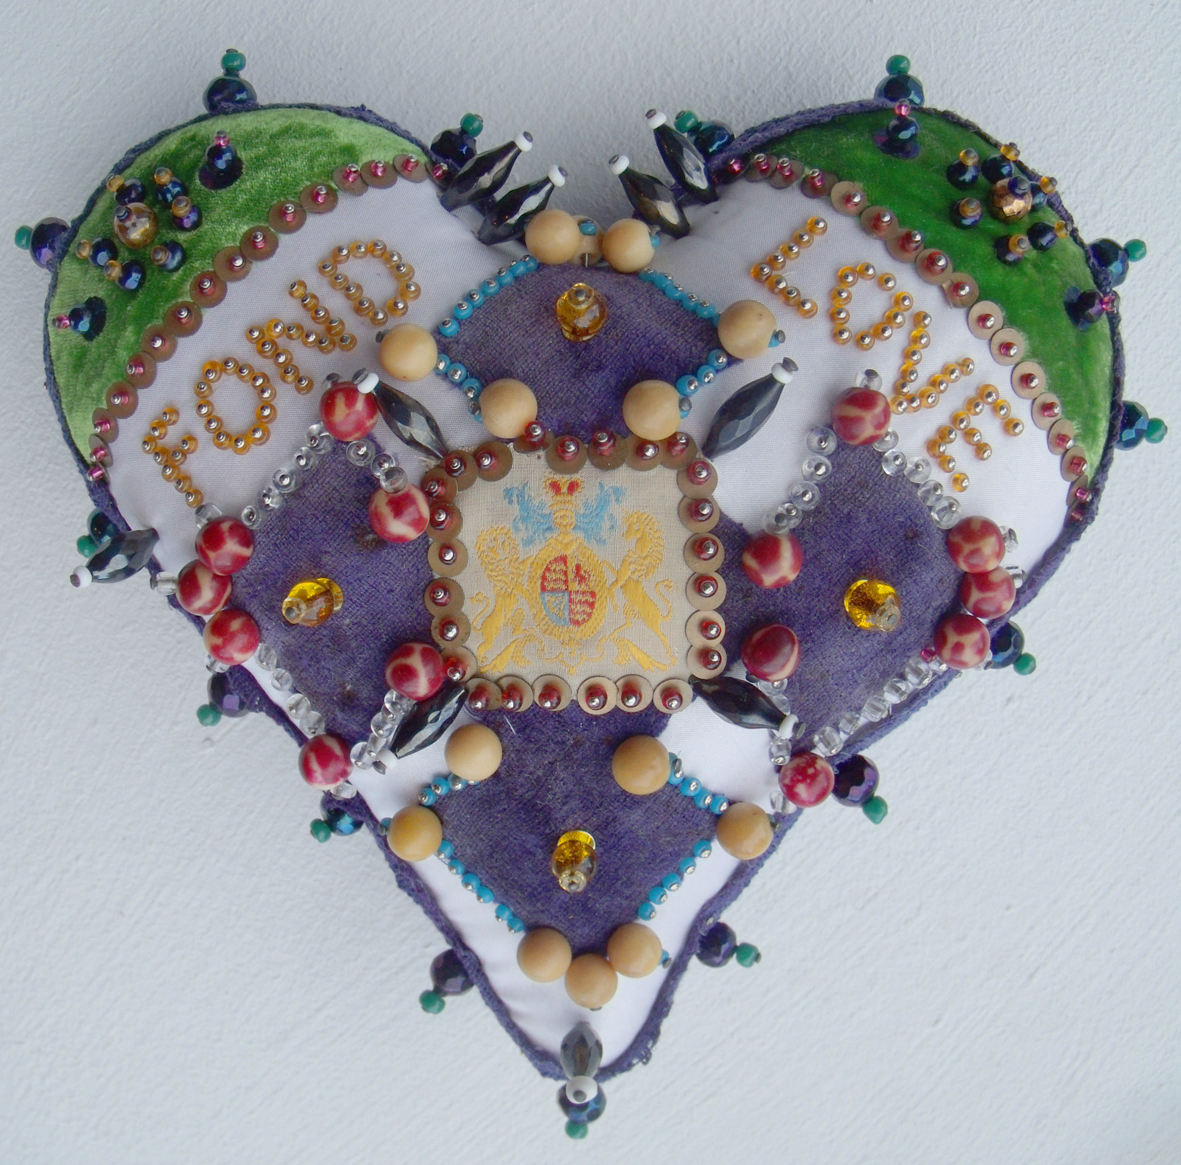
This wonderful pinned heart, so bright and fresh but curiously authentic was made yesterday during a workshop at Heart Space Studios. The maker, Libby, had received the original some 25 years ago from her grandmother, to whom it had been given as a token of love by her husband, a soldier during the first world war.
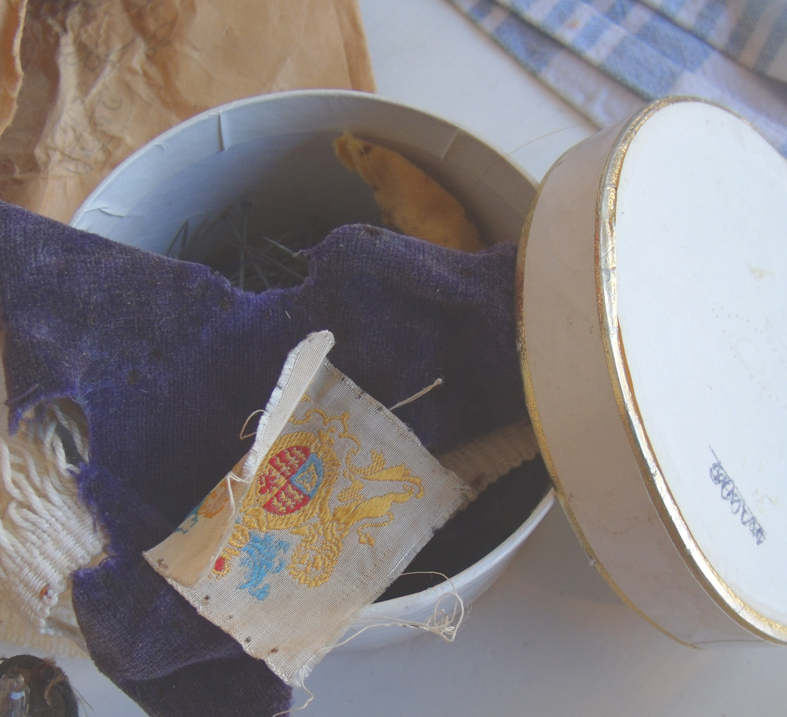
box of rusted and stained remnants with scribbled design for reconstructing the heart.
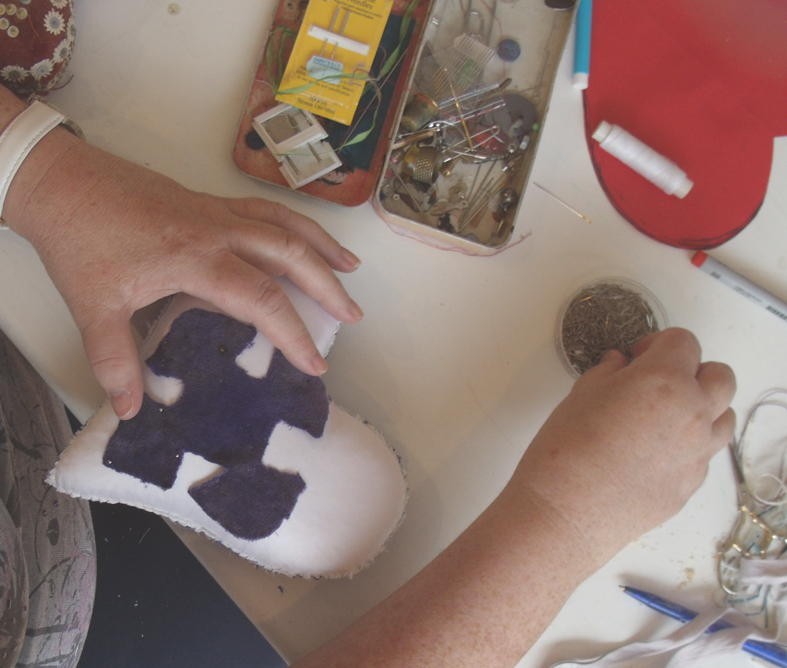
When she first received the heart, Libby tried to restore it…..with disastrous consequences; the whole thing disintegrated because the silk that the heart had been made in had rotted. She thoughtfully put all the pieces in a small box, with a scribbled note of the design – and yesterday it arrived to be mended. The first thing to do was to see what we had got and to clean it as best we could….
all the beads were separated and washed as was the fine cotton velvet centre cross and the remaining shoulder applique.
The pins were steel with several rusted, but we decided we wanted to use as much as possible of the original materials and also bright stainless steel pins would have detracted from the overall quality of the reconstruction.
rusted pins with some beads still attached
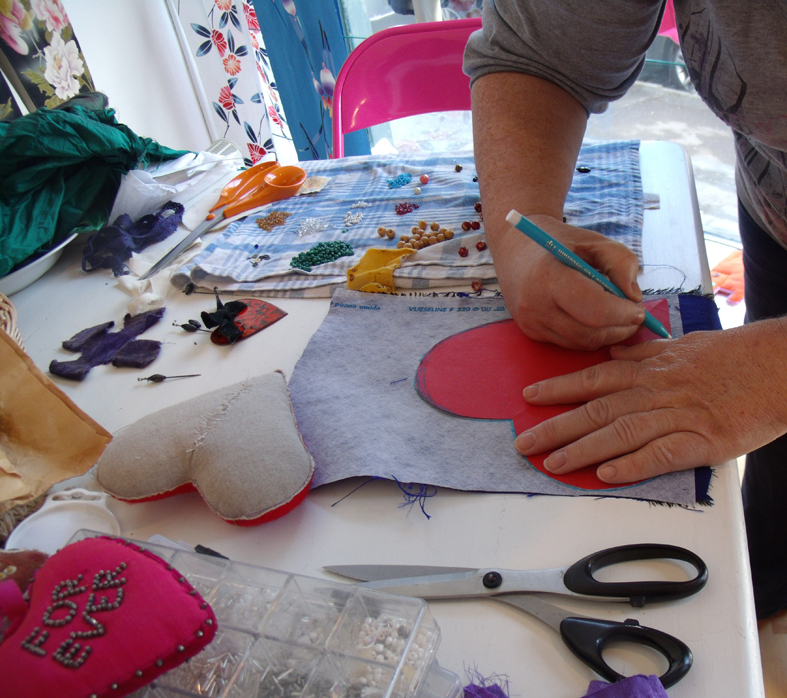
I then had to draft a pattern to fit the purple velvet cross, luckily one of my old pinned hearts was the perfect size so I used this.
original heart used for pattern.
Libby decided that she wanted to use strong colours that complemented the original velvets, but disliking yellow she chose some of my own hand dyed green silk velvet to replace the shoulder appliques.
drawing round the new paper pattern for the back of the heart
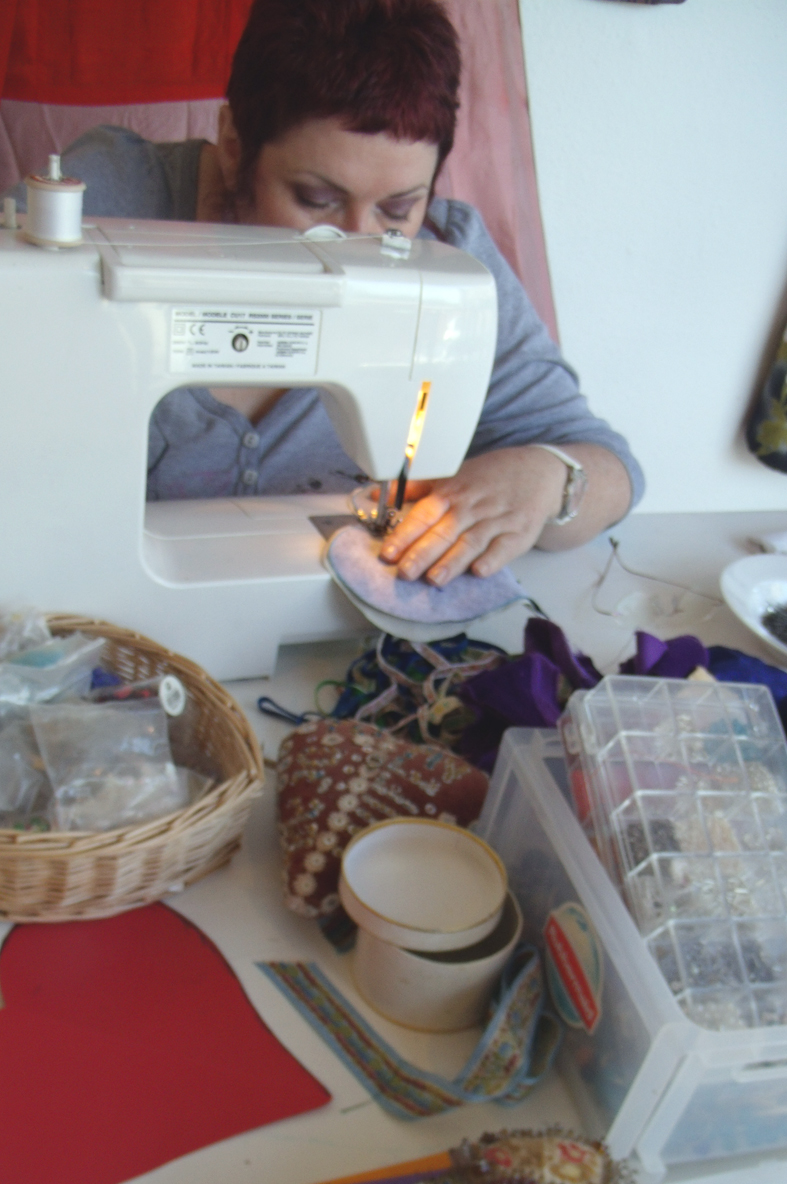
Next came the heart reconstruction, this time stitching by machine, it is stronger and quicker…..
machine stitching the heart shape for filling with sawdust
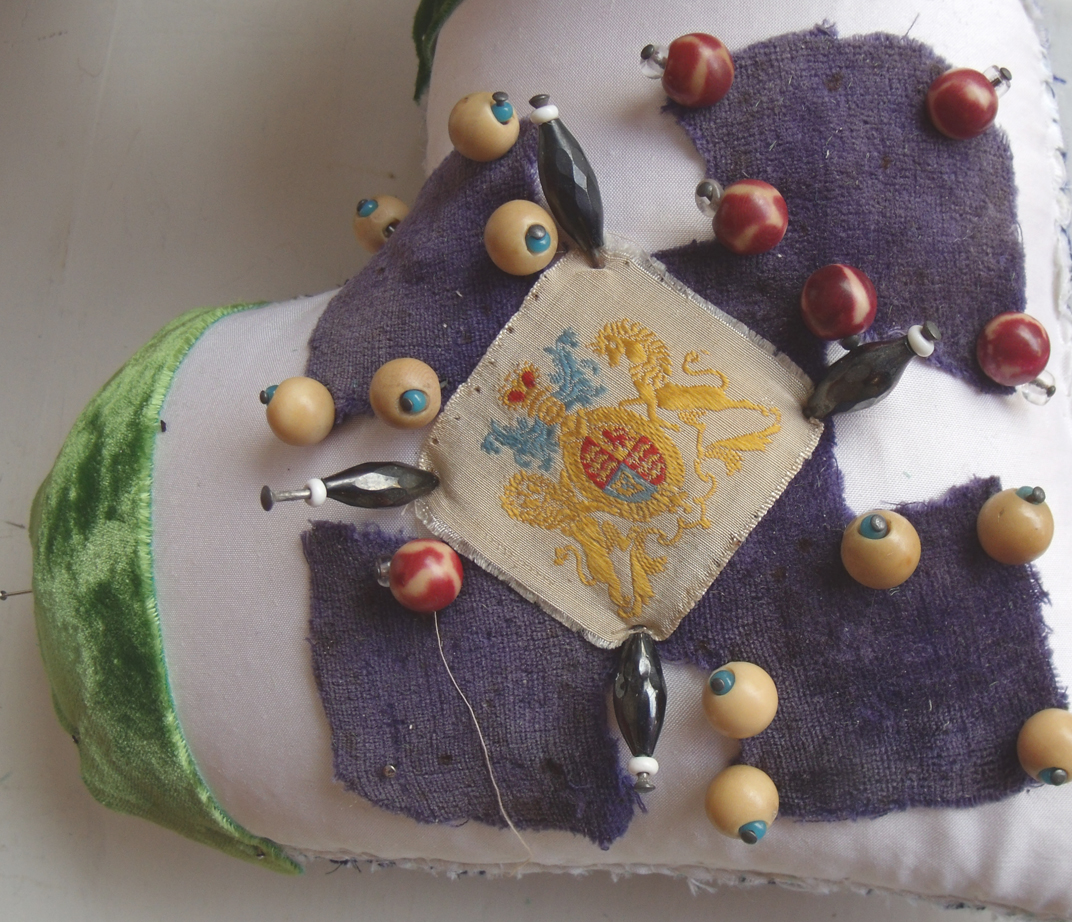
leaving lots more time for time for the really fascinating business of pinning the beaded design back into its original position.
the first central cross is held in position
The washed velvet was still a bit dull and faded but little is seen when all the rest of the beads and the ribbon are in place.
pinning the regimental ribbon in place
I was pleased to see that the original woven silk regimental ribbon was still very bright after I had carefully washed it in several rinses of warm water. These ribbons with badges and coats of arms feature in many of the hearts I have collected, but none are as bright as this.
the simple beaded lettering being formed
Libby re-wrote the message “FOND LOVE” onto paper and the pricked through it with a pin straight onto the silk. We had found some evidence of sequins in the remnants and they are useful to hide the raw edges of the applied fabrics; in my stash of beads I found some dull gold metal ones salvaged from a 1920’s dress, the same period as the original heart.
the almost finished heart
By the end of the day the heart was almost complete, except that there were a lot of the original beads left over…Libby said that she would keep pinning them into patterns as more is more in this type of thing. So that evening she brought back the finished heart which you can see at the head of this post.
The best thing of all though was how the remaking of this family heirloom originally made by Libby’s hardly remembered grandfather, resulted in her reflecting on her family and its history, the ties to the present formed by using the remnants of a family wedding dress; she was moved by the idea of actually touching the same beads and placing them in the same patterns as her grandfather had – I have seldom worked with such an enthralled and ultimately contented and student.
selection of old and some of my new beaded heart pincushions
Although I have not set out to just make hearts at the classes at Heart Space Studios they are proving very popular in several different textiles workshops. I decided to make my first teaching workshop on how to make the stuffed and beaded hearts that were popular to give as love tokens or birth presents in the late 19th century. Hand made with pinned patterns and messages they were often made by men away in the forces as presents for those left behind. Now they make small gifts for all sorts of occasions and are highly pleasurable to make.
But before the fun of pinning the beads starts you have to make them and this takes quite a bit of manipulation and a lot of sawdust. They need to be so full that a straight pin will stay put when stuck into the surface to hold the beads. I always have to stuff and stitch them several times to get the tension correct.
They also need strong stitching to hold the stuffing in and I always like this “scar” that is made – it looks very surgical and one of the hearts made at this class retains this scar idea on the front of the finished heart to great effect.
stitches holding sawdust in place.
Getting a good shape to the hearts takes some pulling and punching as well as a few retaining stitches, it was interesting how different and individual the hearts looked even at this stage. Maybe we all have a perfect heart shape within us.
pinning messages in place on Crazy patchwork base.
Two of the class decided to make “Crazy” hearts – small pieces of fabric are pinned into place and them the edges covered with ribbons or beads. One of these hearts was made by a mother for her son who is a soldier, and she made it to remind him of home – a nice reversal of the original soldier and sailor makers sending them home.
this Crazy heart was made for the sheer joy of playing with the luscious fabrics, ribbons and beads
Another heart had a message pinned in to it a rueful comment about the maker, first the message needs to be written in place though and this is quite a tricky piece of designing so it is back to the drawing board before she was able to get her message to fit perfectly in the elegant shape.
writing in position ready to pin - Jan Connet,
The finished heart was brought to me to photograph later when she had finished it – I like the difference the livid scar gives to the well-known saying.
mended but rueful heart.
By coincidence Jan Connet and Liz Hewitt, 2 of the makers shown in the post are responsible for organising a conference for TFSW to be held later this month in Taunton Somerset it involves Mapping and Networking and as I chair TFSW I am shamelessly adding the flyer to this post in the hope of attracting even more people to enjoy a textile networking day.
And by an even happier co-incidence the mended ceramic pitcher shown in “mending goddess fights back” will also be exhibited.


![photo 3[1] copy](https://janethaighherwork.com/wp-content/uploads/2025/06/bd41e-photo-31-copy.jpg)