

Out of the blue, last year, came an invitation from Diana Sykes, Director of Fife Contemporary, to apply to exhibit my work for a new exhibition, Nexus:Meetings at the Edge, to be held this year – 2018 at 2 venues, in April at the Kirkcaldy Galleries in Fife, then in September at Ruthin Craft Centre and aimed at makers whose work encompasses a variety of cross -over techniques. “Wonderful, that’s me”! The work submitted had to be made within the last 5 years: “Well Hell – that’s not me”!
As a designer working mainly to commission, it is unusual for me to be invited to submit work to anything, let alone 2 highly respected applied art galleries. Explaining the reasons for no new work ( see Heart Space Studios ) I proposed making something specially for the exhibition, developed from my original patchwork enamels when I had cut and joined enamel pieces to fold and wrap like fabric.
![blackwork patchwork detail jpg[2]](https://janethaigh.wordpress.com/wp-content/uploads/2018/03/blackwork-patchwork-detail-jpg21.jpg)
I promised a full-sized Enamel Patchwork Quilt – big enough for a double bed. They were, I think, intrigued and the curator, Elizabeth Goring, gave me the go – ahead….

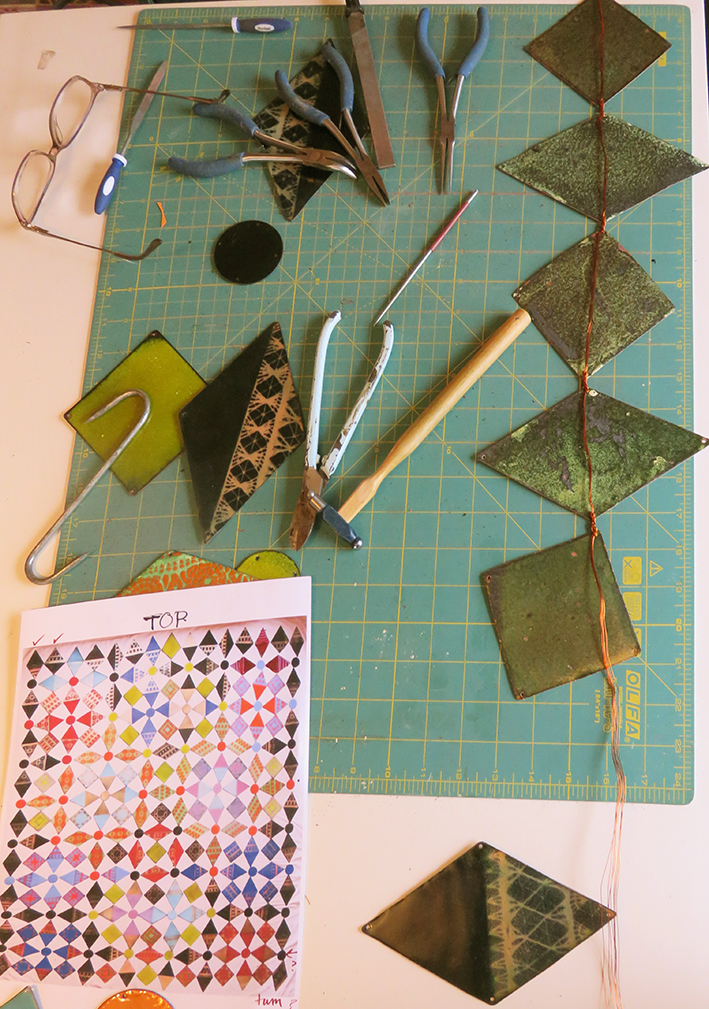
I had been looking for an opportunity to resume my enamel practice and am currently entranced by the above book that is full of quirky, mid 20th century quilts made in the USA. Looking at the book’s illustrations made me alive to ‘movement’ as an integral part of pattern making.

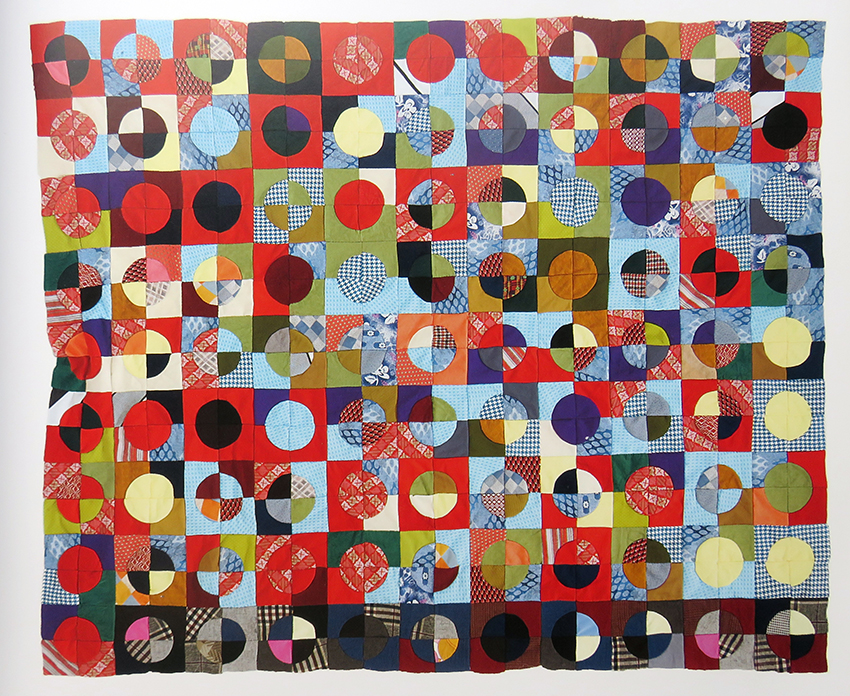

The eye makes the movements but it affects the whole body…….. I started work.

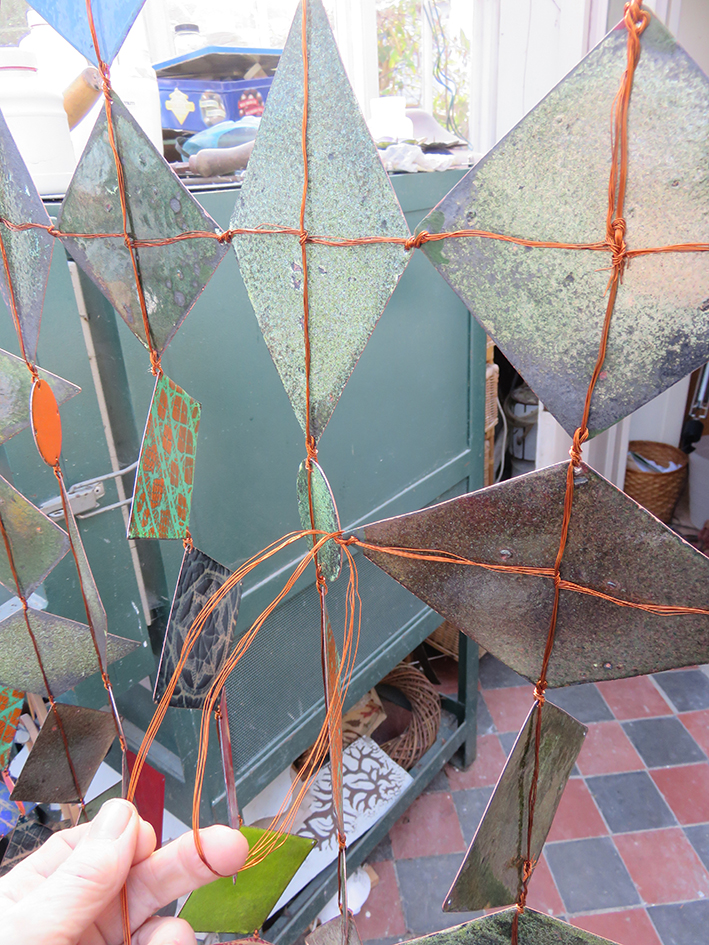
The initial idea was to find a traditional patchwork design that would afford large scale gaps or voids between the patches…the weight of the hanging was of the utmost importance. Copper when coated several times with vitreous enamel to create patterns is very heavy – in effect 2 sheets of glass encasing metal.
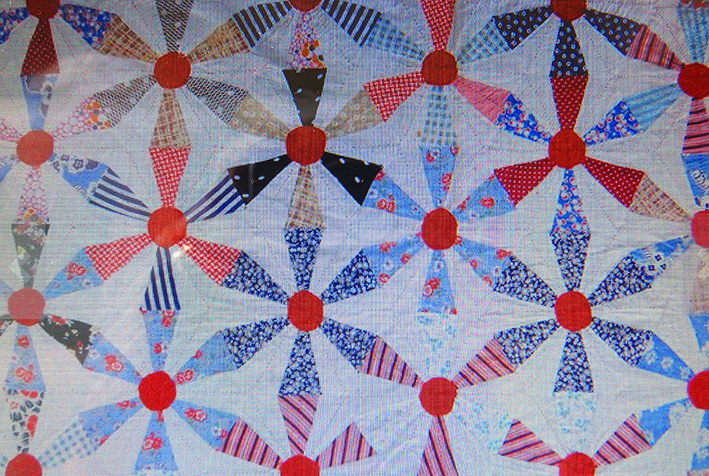
I made a card sample and found that to make the pattern hold together I had to insert tiny triangles,

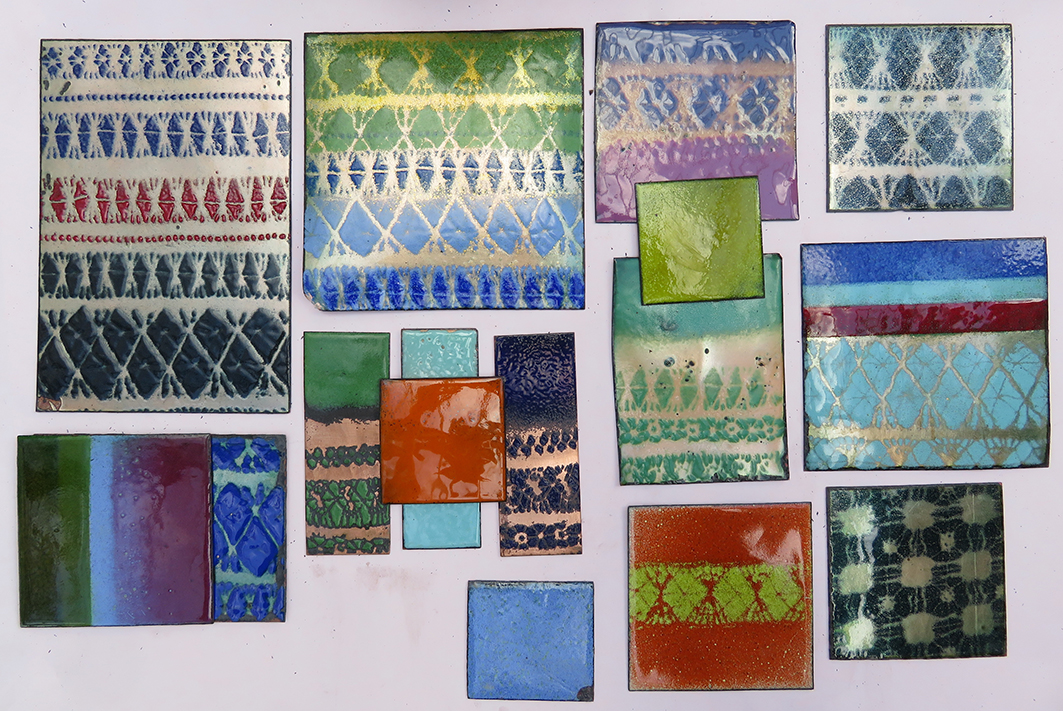
To make a hanging around 1.5 – 2 metres square I would have had to cut hundreds of extra tiny shapes then drill and stitch about zillion holes before I started to enamel each piece so, literally, back to the drawing board. Meanwhile I started to make my enamel pattern and colour samples
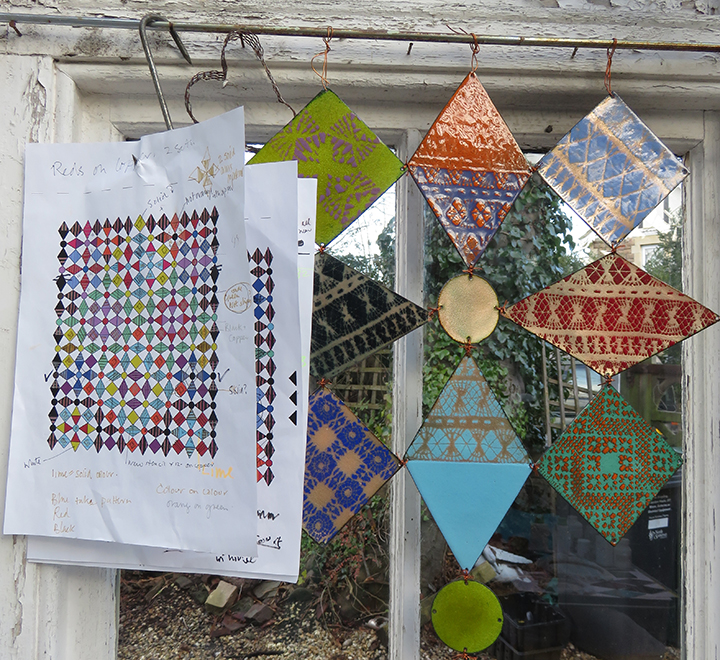
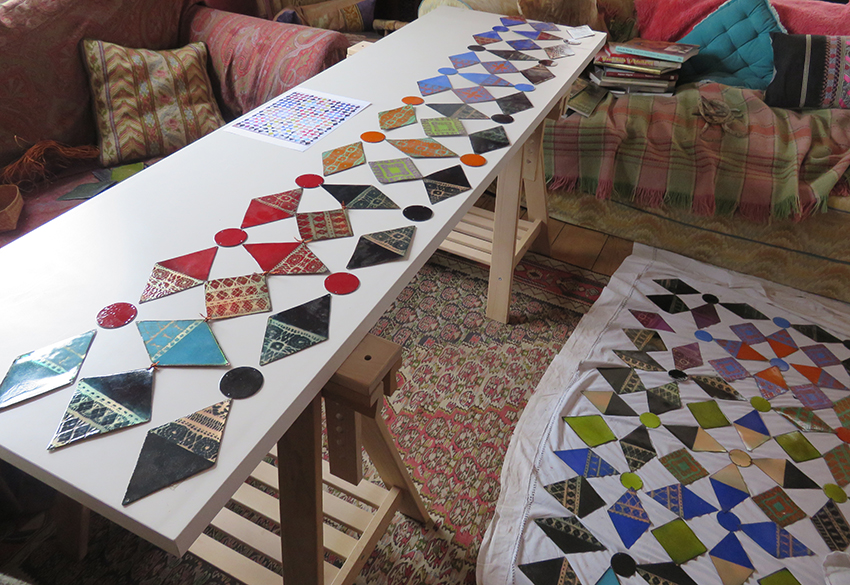
I quickly found a simpler patchwork design that afforded colour groupings to move the eye

Armed with this new simpler idea (not so elegant but allows secondary patterns to emerge with colour co-ordination) I transcribed the shapes to Illustrator – for the first time ever I used this as a design tool. I figured that there were so many variations of colour and pattern to play with, that this system would enable me to achieve the design quicker and more readily. Now I am not sure this was true – give me any choices and I am lost in endless possibilities.

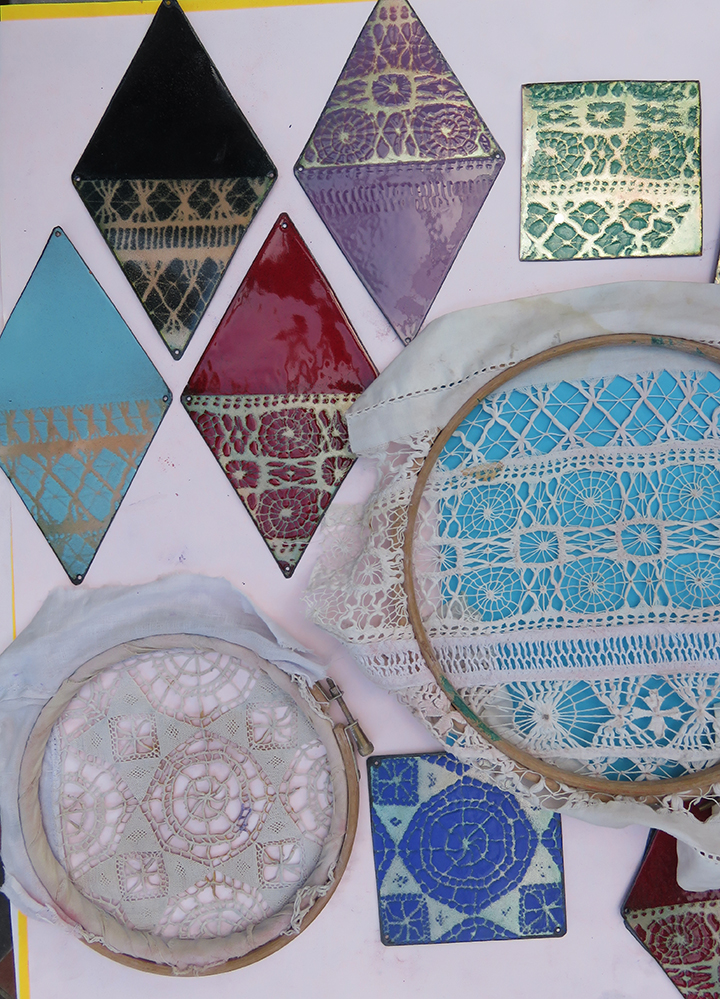
I started the enamel sampling for colours and patterns – working with my favourite technique of stenciling through vintage scraps of drawn thread work. More colours were required, so I ordered samples and eventually visited Milton Bridge for their advice.This family run company in Stoke on Trent is so helpful at all times – they seemed genuinely interested in the colour effects I wanted to achieve. I would not define myself as an enameler – I am a textile designer, fascinated by colour and enamel gives great colour – and they took this on board, I understand just enough about the vagaries of firing to get the results I can work with.
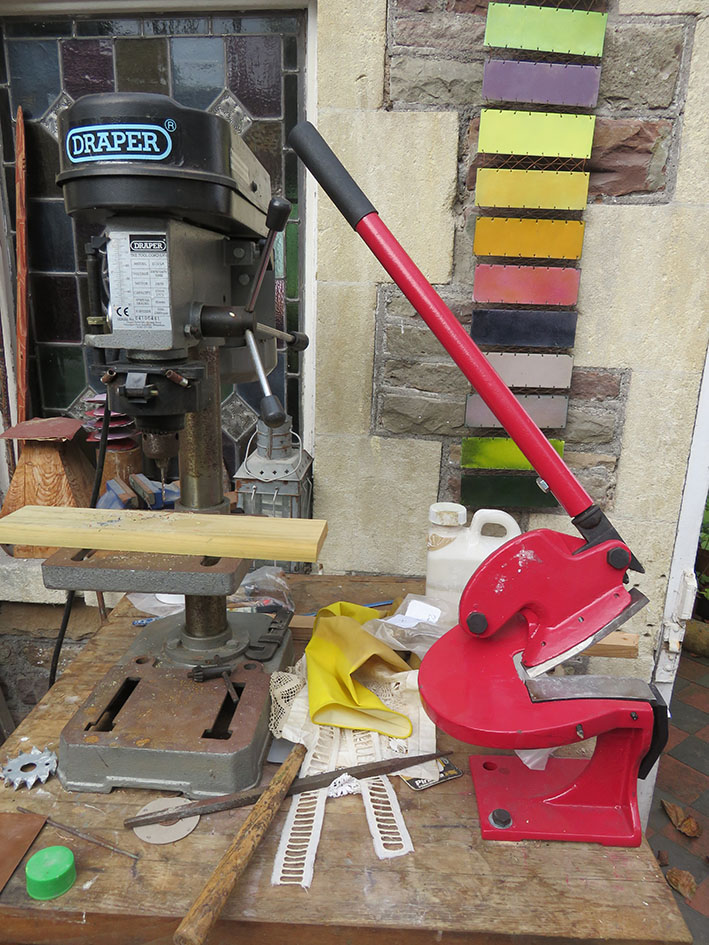
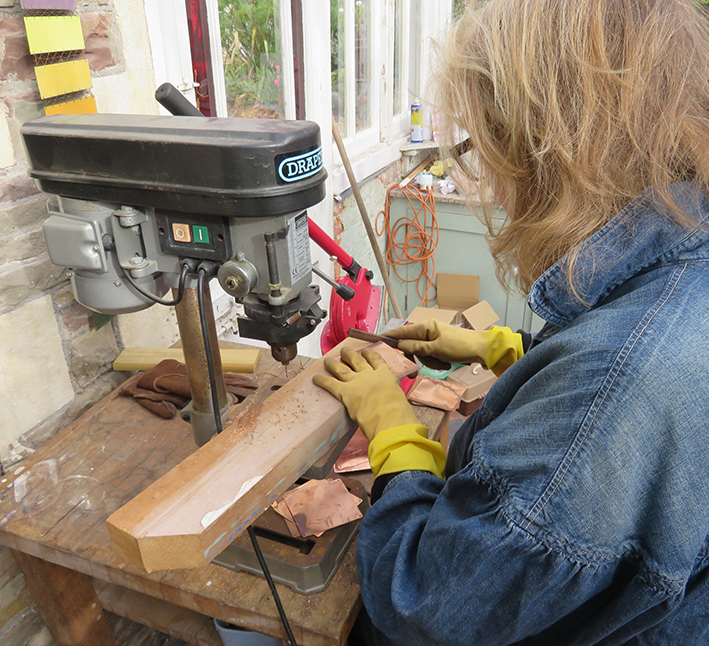
Just one more thing was needed before I started to make the actual hanging, a tool to enable me to easily hand cut sheet copper into hundreds of diamonds and squares; the circles I bought in. This tiny metal cutter allows large sheets of copper to pass through the bade and I managed to cut and drill all the pieces in 1 week – fast work!
Now the new piece of work really got started – I still hadn’t designed the whole quilt but enough to start, my results from firings can be ‘interesting’ and I need to be alive to any variations that will move the design on – completely unlike stitching with pre-coloured threads.
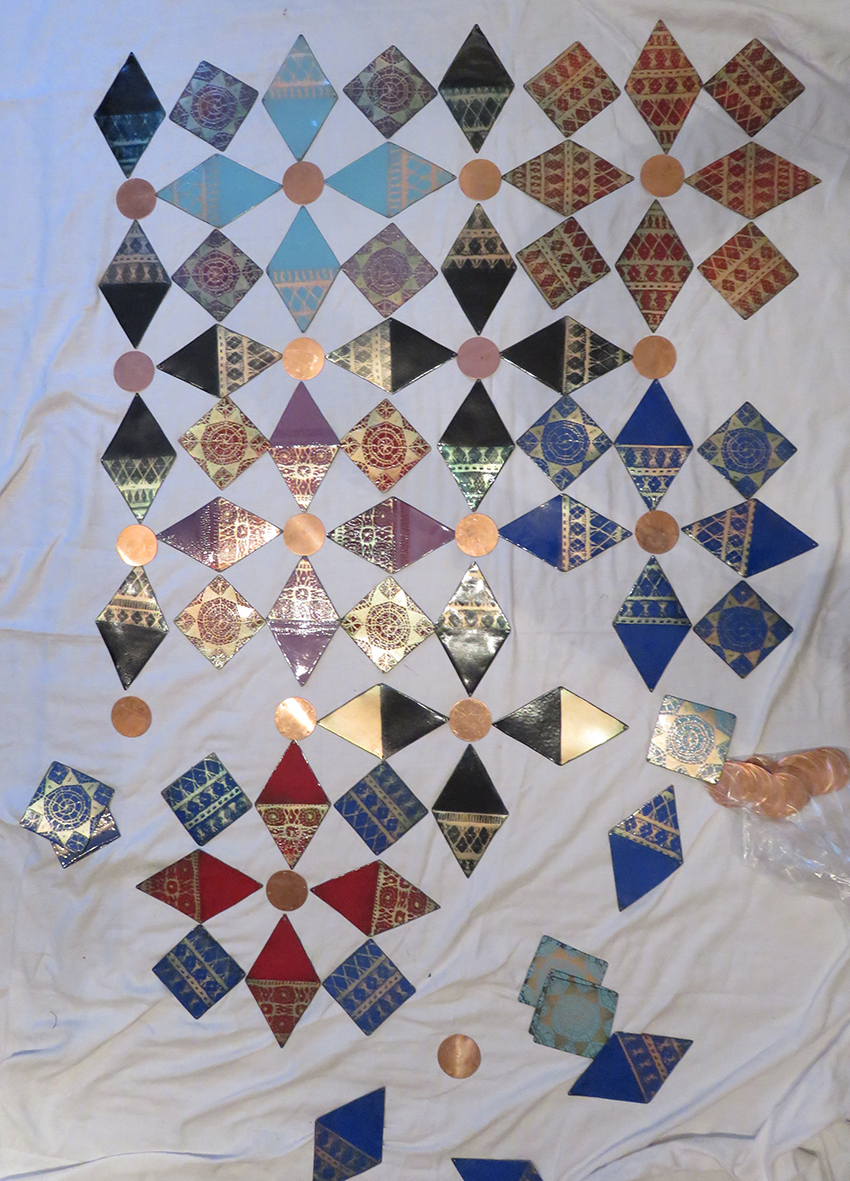
when I laid out the first set of fired shapes I was thrilled with the brilliance of the clear enamels – the copper shone out and attracted the eye – I started to change my colour combinations
In reality the final design took a long time to establish itself, but it was such an enjoyable and totally absorbing experience: if you find working with colour exhilarating enamel is like a roller coaster ride – directly you take the fired piece out of the kiln and watch the colour change as the metal cools is always fascinating, if sometimes a tad frustrating.

Once I had finished all the enameling it was stitching time – well threading and knotting time. I spread all the pieces on the sitting room floor, the only space big, clear and warm enough for the task, then separated them into strings to knot together with multiple lengths of copper wire. I devised a design system of tying or stitching the enamels together so that they can be either folded or rolled to be transported and stored – just like fabric.
once all the lengths were tied in strings they needed to be tied horizontally – time to return to the enameling studio and use my hanging system for photographing work.
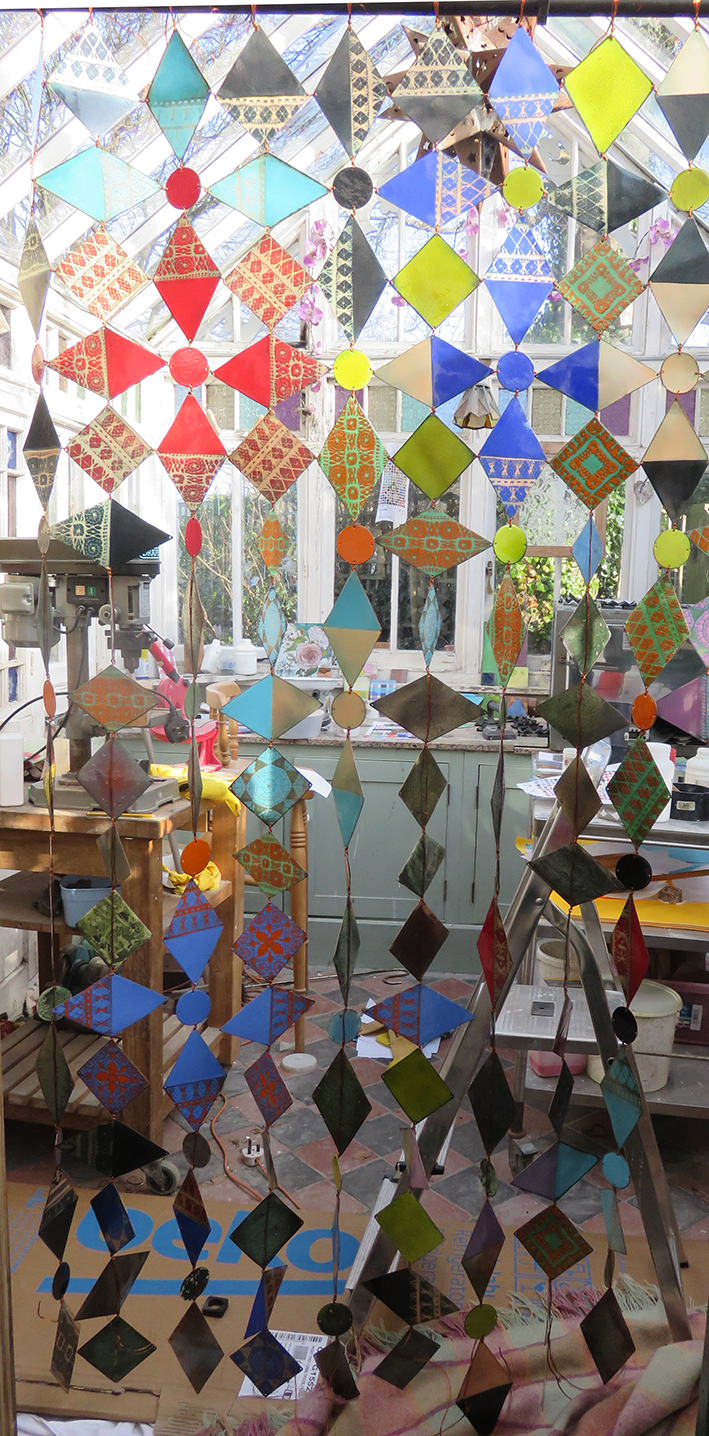
now I am super relieved to find that the copper wires and ties are strong enough to hold the weight of the pieces ( it weighs approx 12.5 kilos) and I can get on with the admittedly tedious task of tying the whole thing together.
eventually I am finished – and here it is
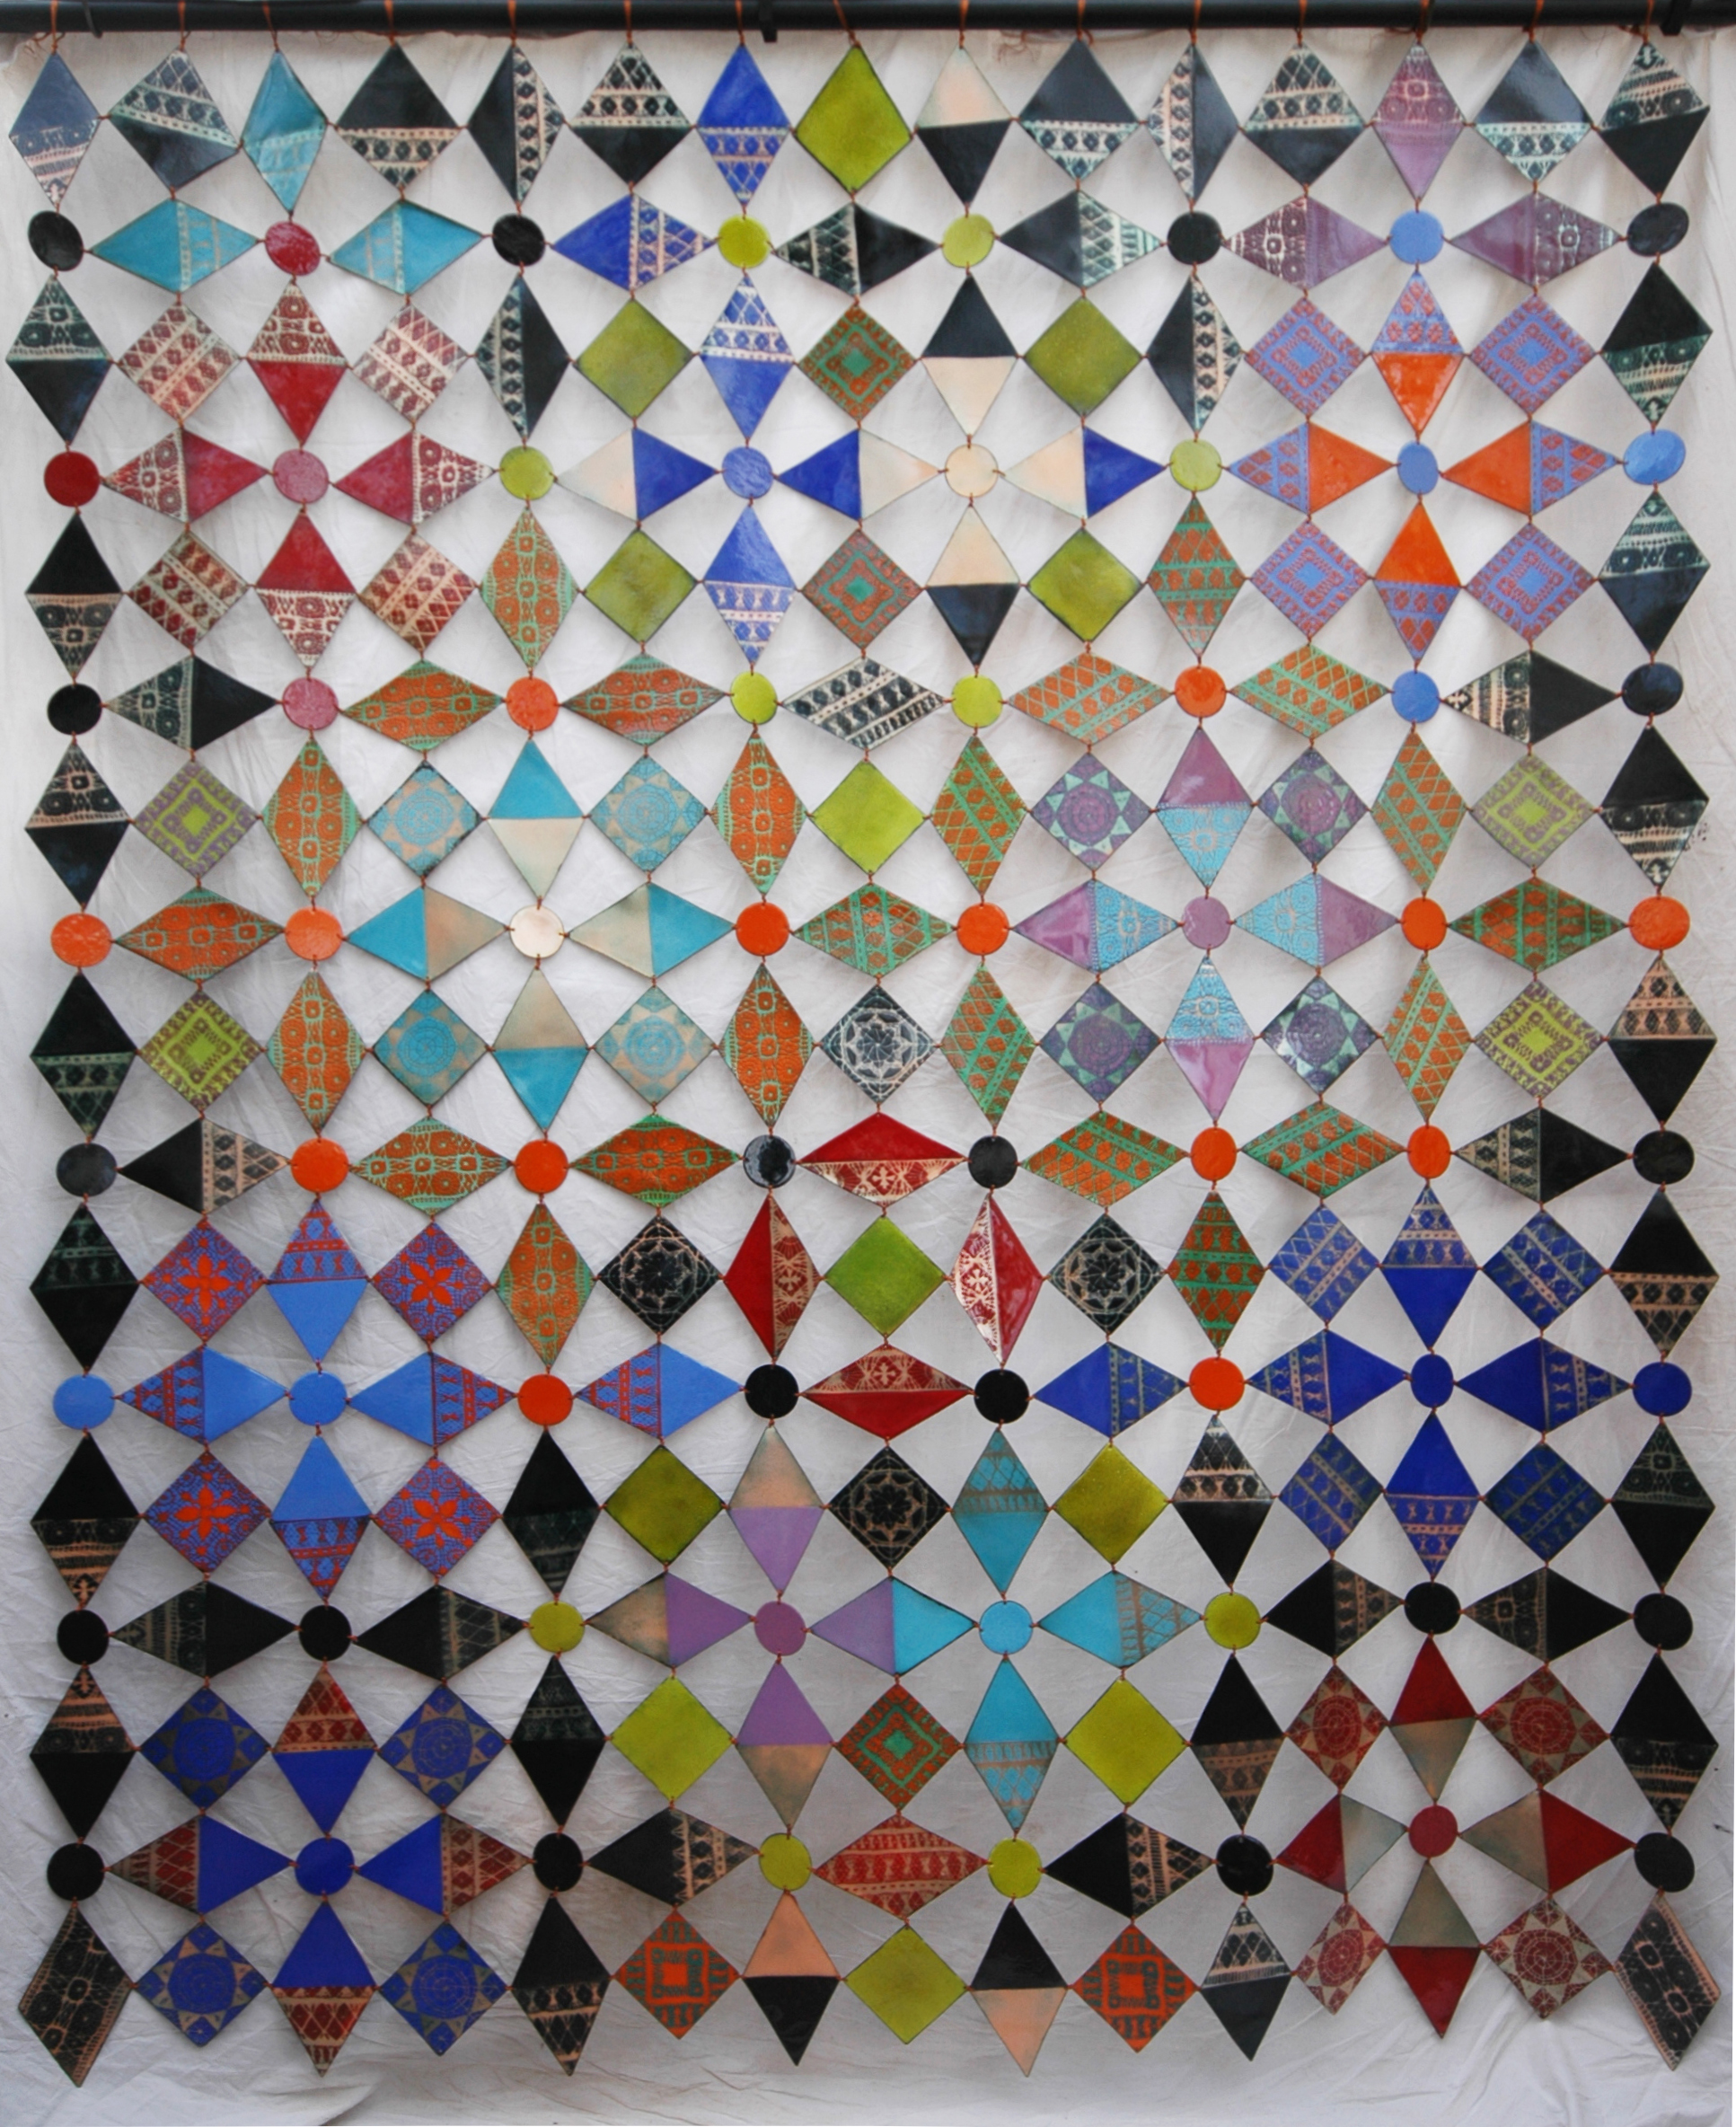
This week, the carefully rolled and protected hanging was delivered to Fife – I will see it next at the Private View- fingers crossed for all sorts of reasons!
Discover more from JANET HAIGH: HER WORK
Subscribe to get the latest posts sent to your email.

Oh my……….!!!!!!!!!!!!!!!!
Janet, it is brilliant! And your process is brilliant too – it is fantastic mix of following the basic idea and staying open for all the possibilities coming along the way. Thanks for sharing this with us.
And don’t worry – fingers are crossed and everything will be… great!
Best,
Bozena
LikeLike
Hi Bozena,
thanks – it was quite a mammoth task both the making and the writing of the blog!!!! but I have several different patchwork stories coming to fruition in the near future – so even though i have not been blogging i have been working away here at home alone!
Janet
LikeLike
Dear Jan,
The completed hanging looks amazing. Every time I stare at it I see a different pattern!
Best wishes for Fife and we are looking forward to seeing the real thing in Ruthin in the autumn.
Julie x
LikeLike
Dear Jane
Just met you at the private view in Kirkcaldy (enamel necklace wearer!) -and I’m so glad you told me about your blog – seeing how the piece was made is fascinating. If I could own one thing from the exhibition it would be that -and you were up against stiff competition as it really is a wonderful exhibition. Lovely to meet you,
Julia
LikeLike
Hi Julia,
thanks for sending this great accolade. i was really fascinated seeing the whole show and all my friends who flew up to meet me at the PV thought like you, that the show was brilliant. i wanted to take home the fabric covered mended jars, just in front to my large piece, by Zoe Hiliard.
good to meet and talk with you as well.
Janet
PS just sorting out my images for the next post.
LikeLike
Such an insight…..fantastic to see you involved with enamelling, I remember it was one of the first things that I was in awe about as you spoke about it when I first met you at Heart Space studio.
I feel privileged to say I saw the ‘Patchwork Enamel’ in process at your Home/studio. It was amazing to see the processes involved at first hand.
From concept to finished work of art ……..Amazing 💜X
LikeLike
Fantastic work 🌸
LikeLike