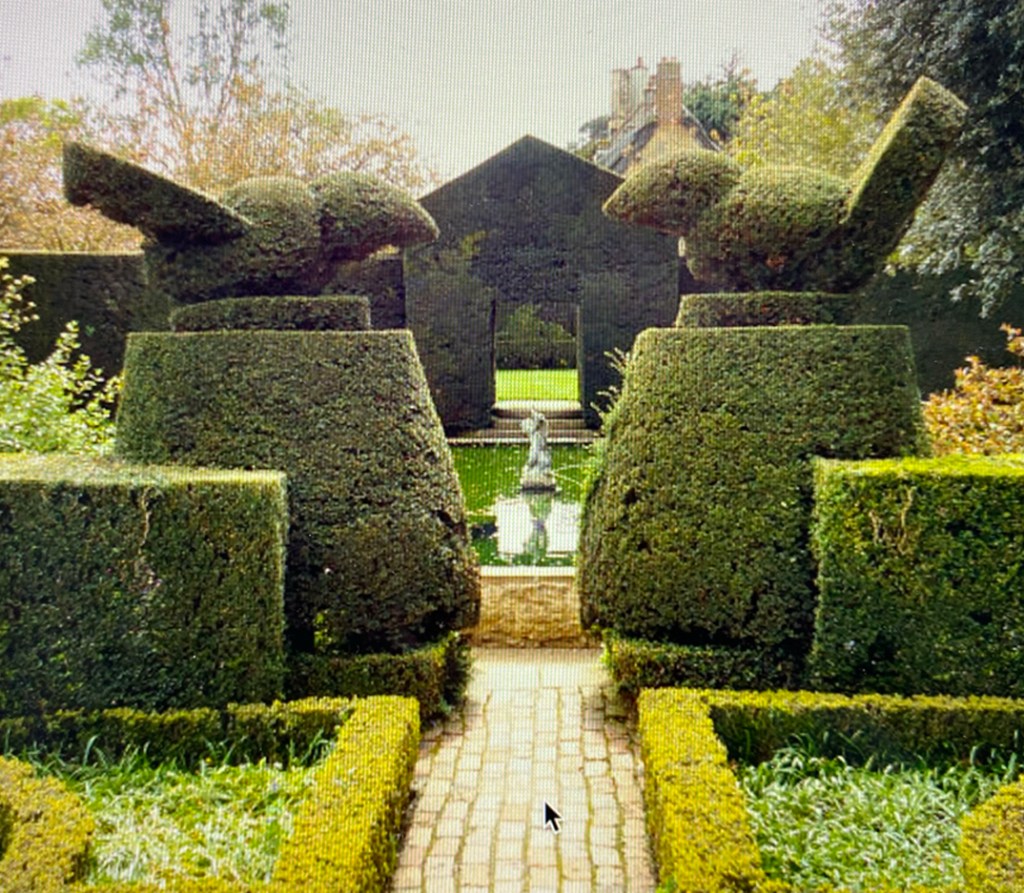
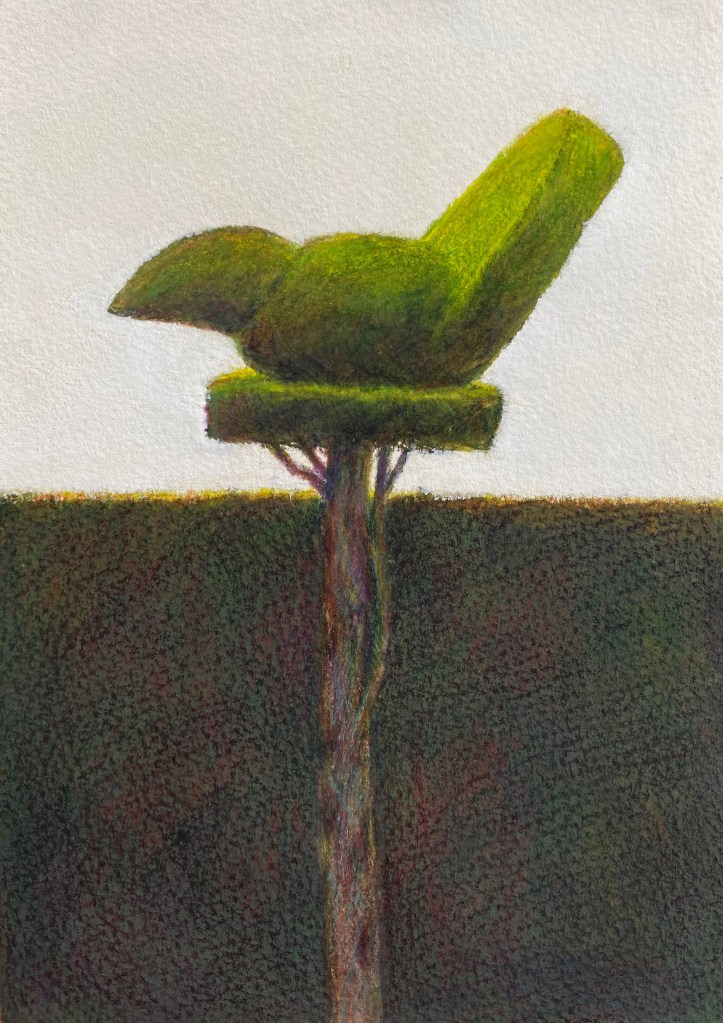
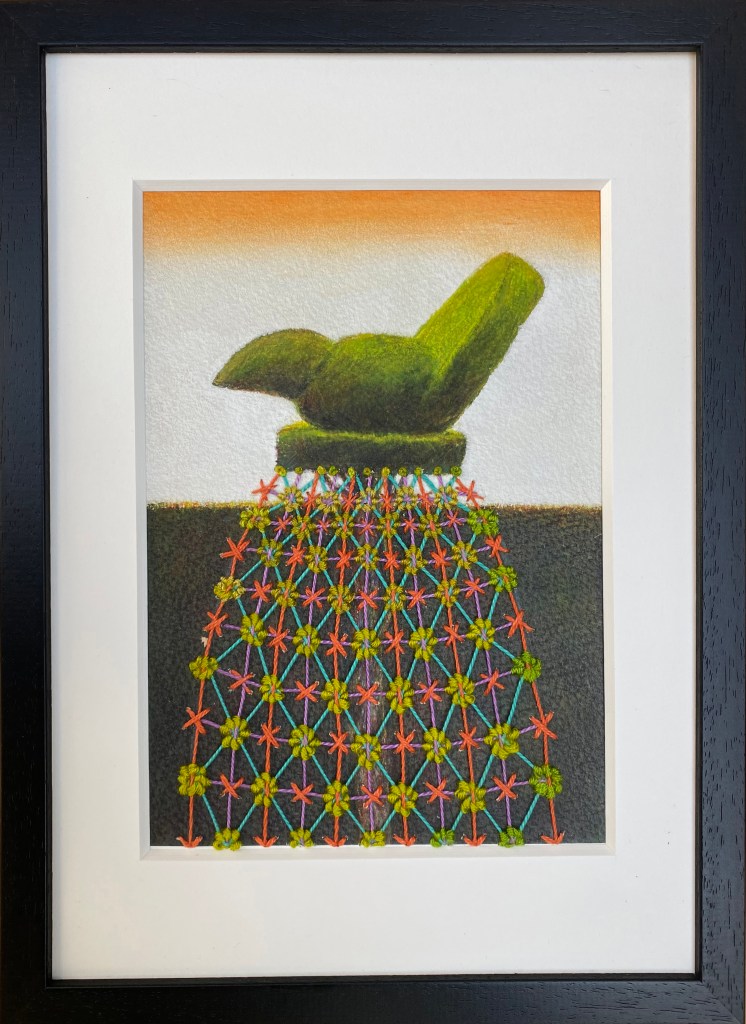
I gasped when I first saw these 2 topiary birds when visiting Hidcote to discuss my exhibition “Inspired to Stitch” for the Manor House gallery in 2025, where were the large bases of yew that they had perched upon for over 100 years?
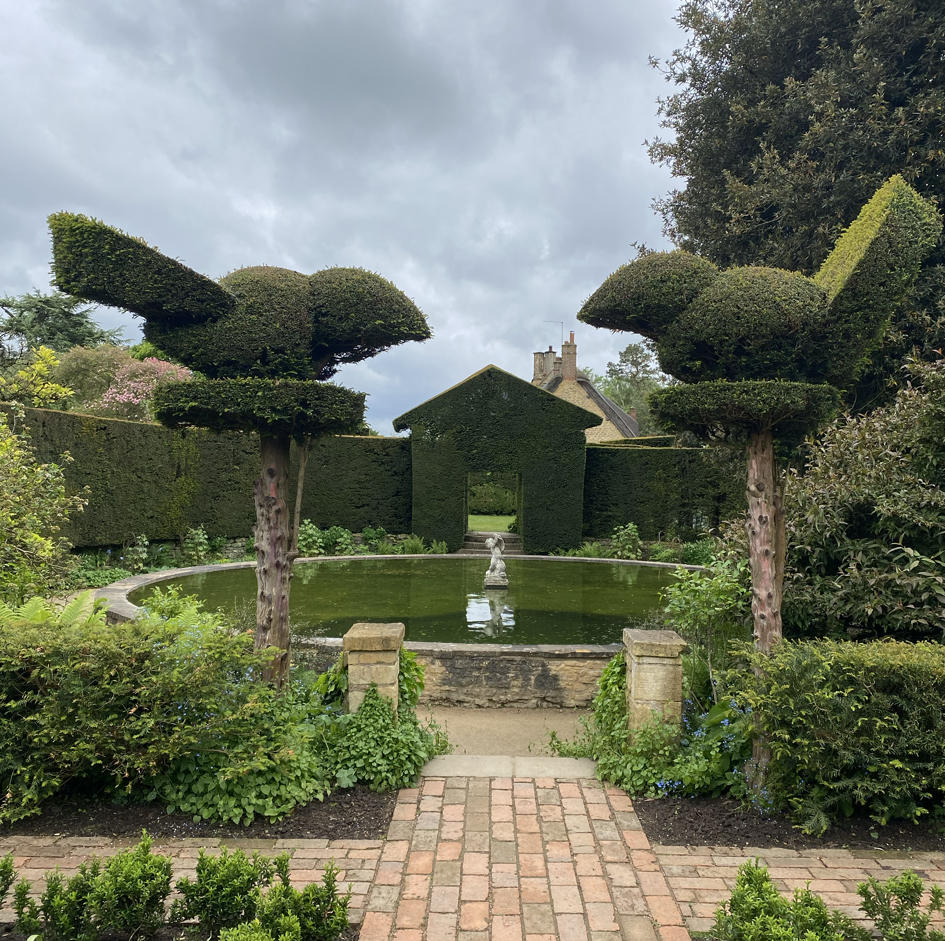
Hidcote then Hidcote Now
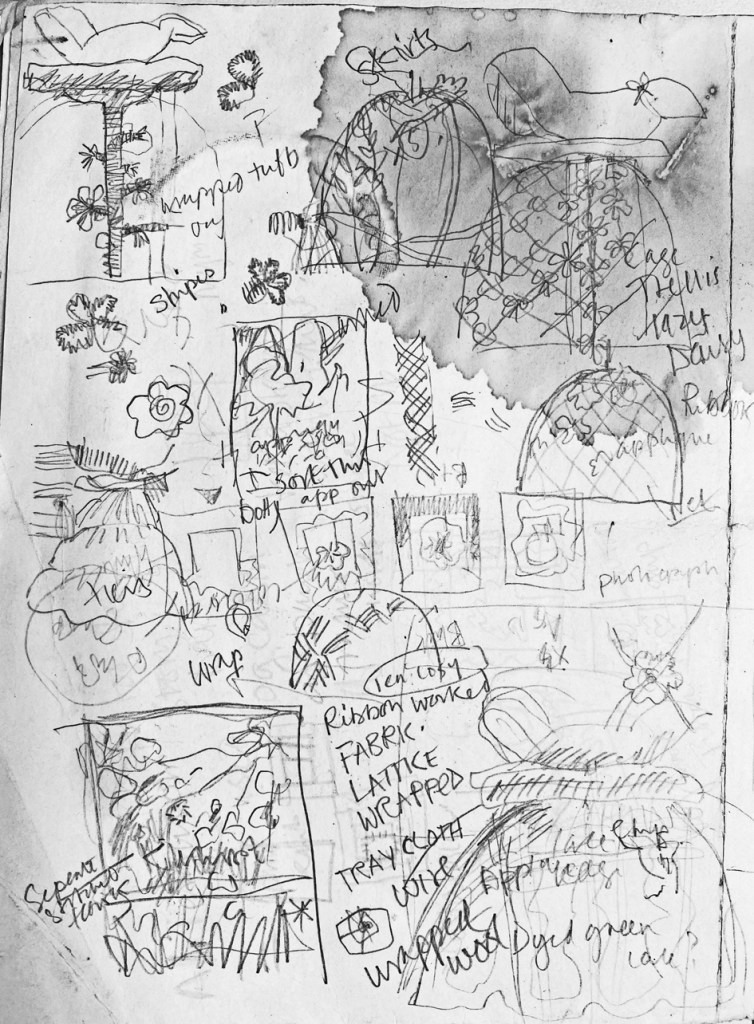
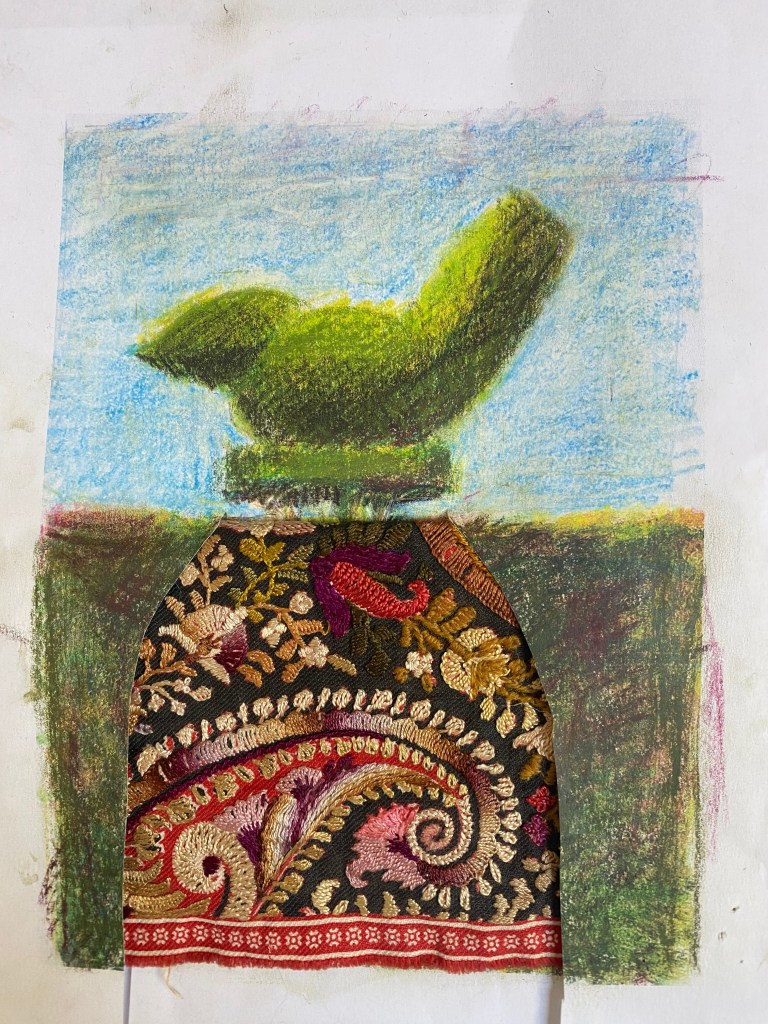
It was explained that the loss is in part due to necessary pruning( after the covid closures) needed to maintain access to the steps to the pool. Now they sit on top of bare but beautifully dappled trunks. I immediately thought “I can mend them”, visually of course! My idea was to create 2 wide ‘skirts’ of different fabrics – but when I started to think about making skirts my mind started to race with ideas. I quickly scribbled some down onto the only scrap of paper I had to hand…..
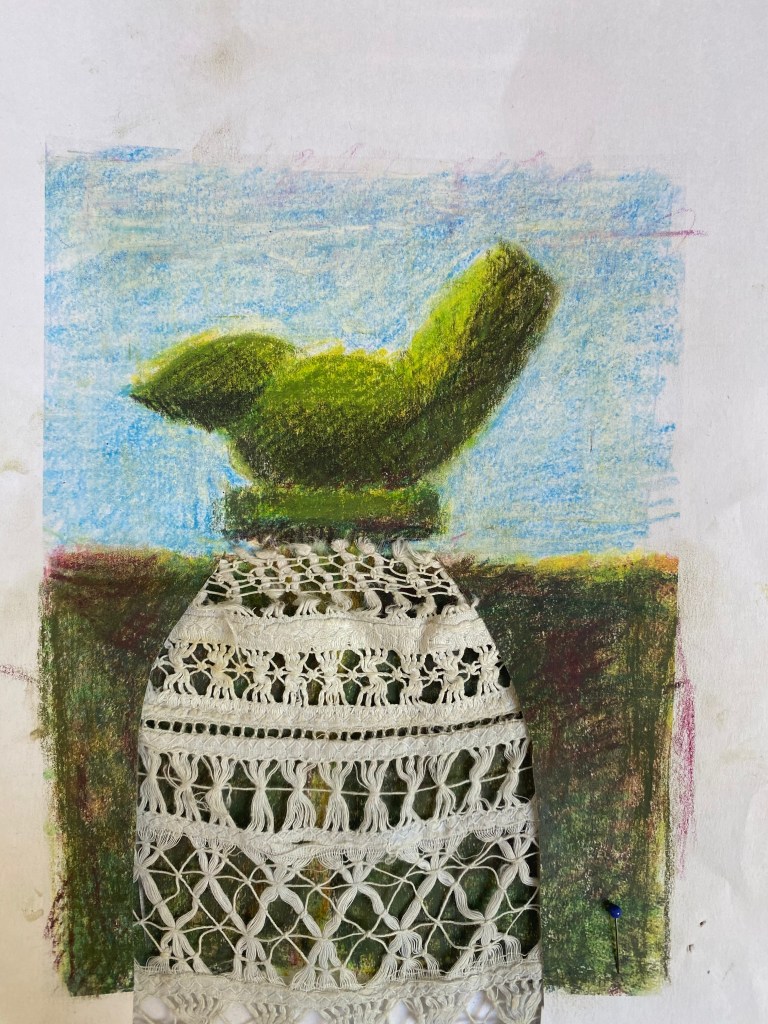
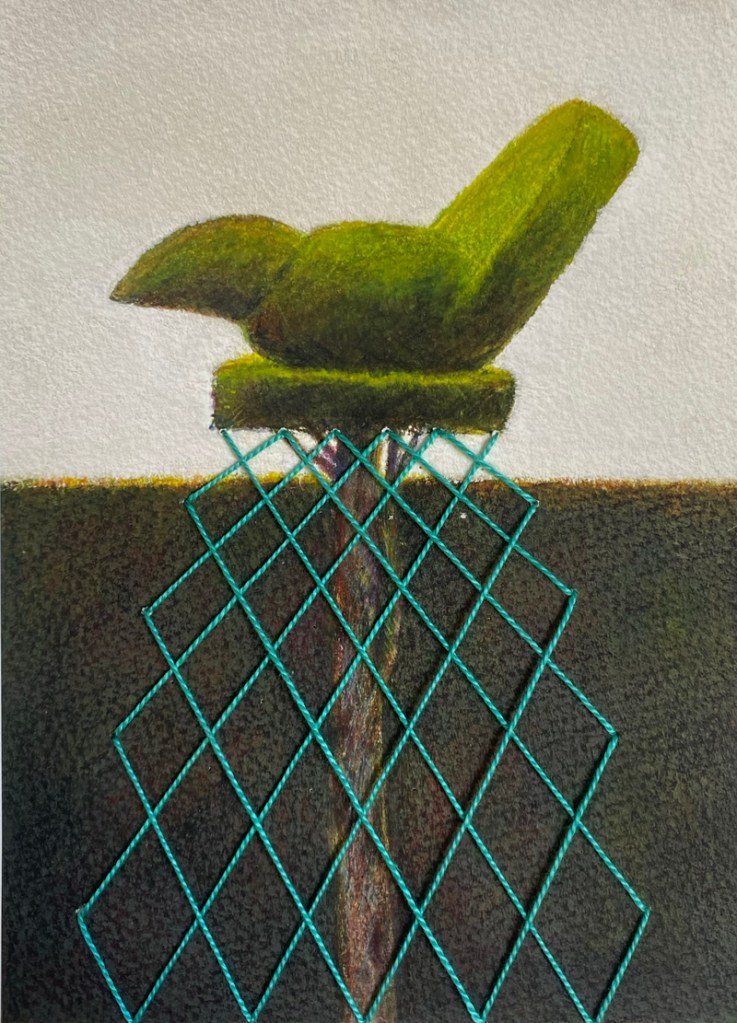
I decided to make small drawings of the 2 birds and then I could dress them both in a fabric skirt. Now how make this look feasible in reality. Using Inktense pigment crayons A4 sketchbook paper I roughed out the basic hedge shapes, but I had so many different ideas when I looked at my vintage fabrics scraps, that I decided to make a 2 sets of giclee prints, in order to illustrate all my ideas.
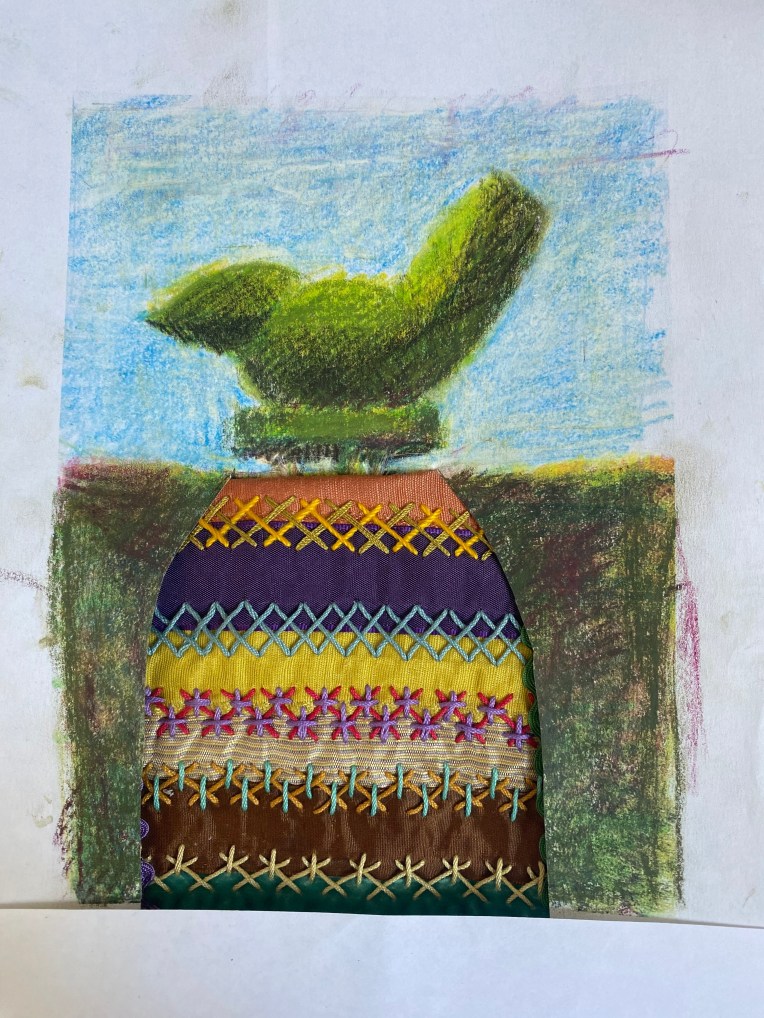
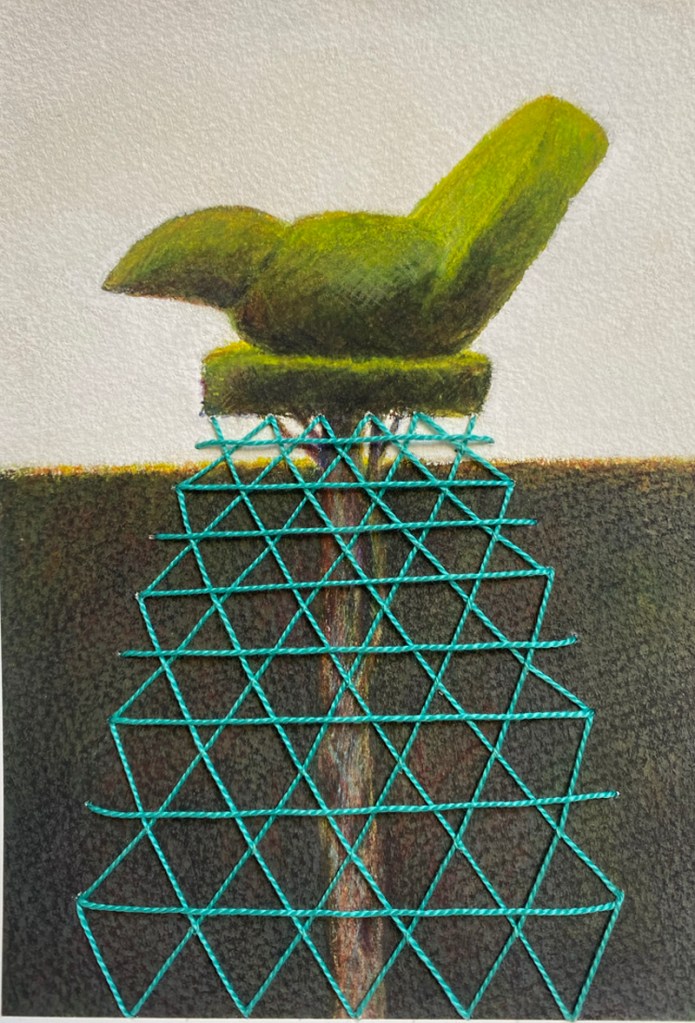
Above, the 2 giclee prints developed from the original drawings from my photographs, the first design was for a lattice or Jacobean Laid Work (see below the samples on the rough drawings).
The first skirt sample was stitched straight into a bird print, using a fine twisted cotton thread. When beginning any new project, I always attempt a challenging piece of ‘inspirational’ work, by which I mean it will make me want to carry on with all my new ideas.
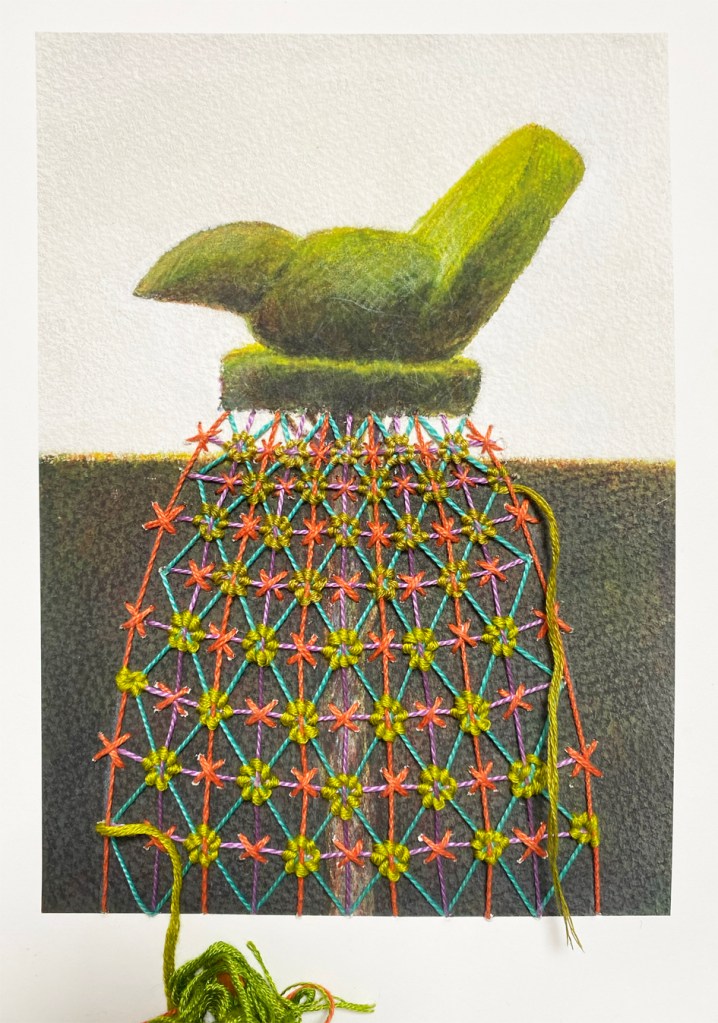
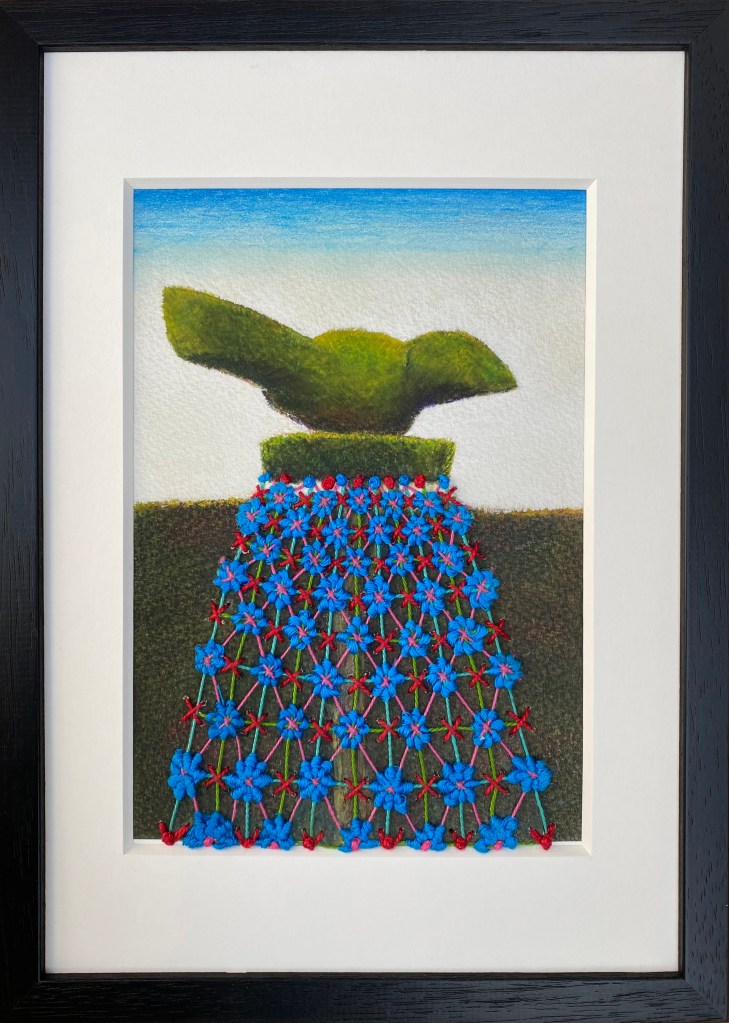
Above is the first design I completed for a whole set of 22 ‘Birds in Skirts” and I made them especially to sell at my ‘Inspired to Stitch’ exhibition This is an unusual step for me as I very seldom sell my stitched works. So now they have all been mounted, framed and glazed ready to be delivered to the buyers after the Exhibition closes.
There will be more posts about these stitched prints, as this is a new and exciting way for me to work. It combines my love of drawing and stitching and opportunities to develop many variations using my collection of vintage fabrics. I am now conducting new classes to cover some of the ideas and new-to-me techniques that I developed for creating the Birds in Skirts edition
It is not without irony that I am posting the mending my old ‘mended hearts’ metal embroideries.
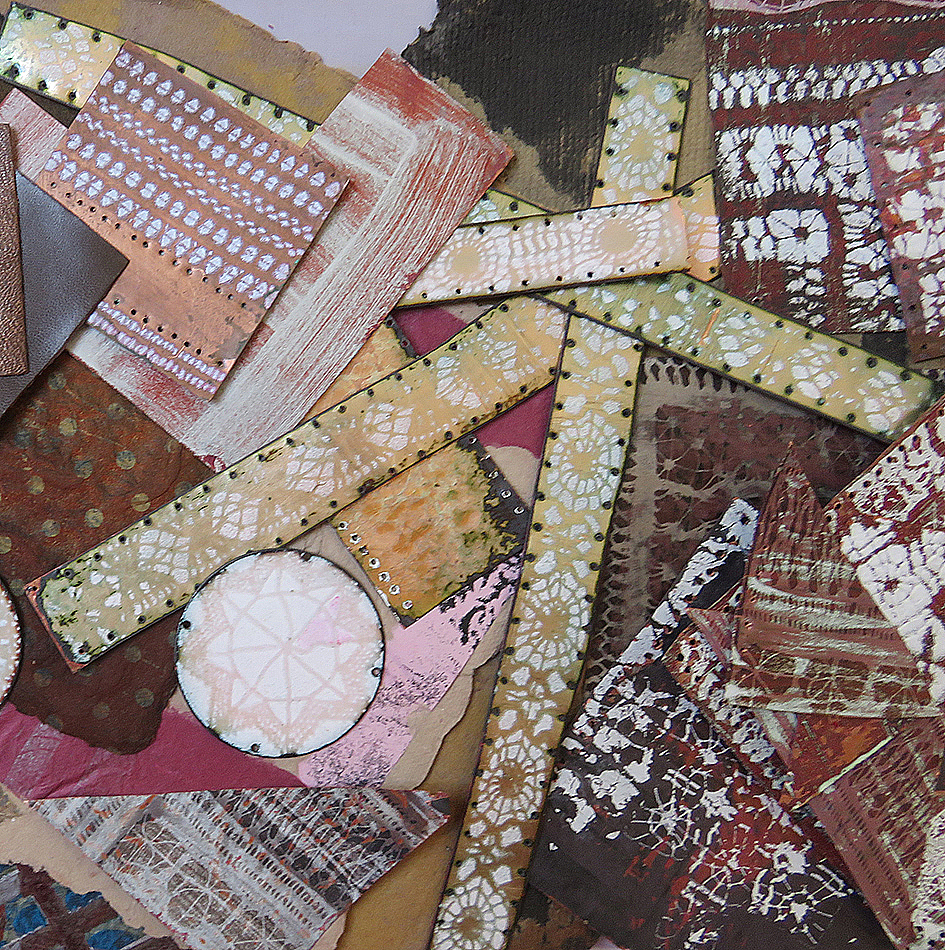
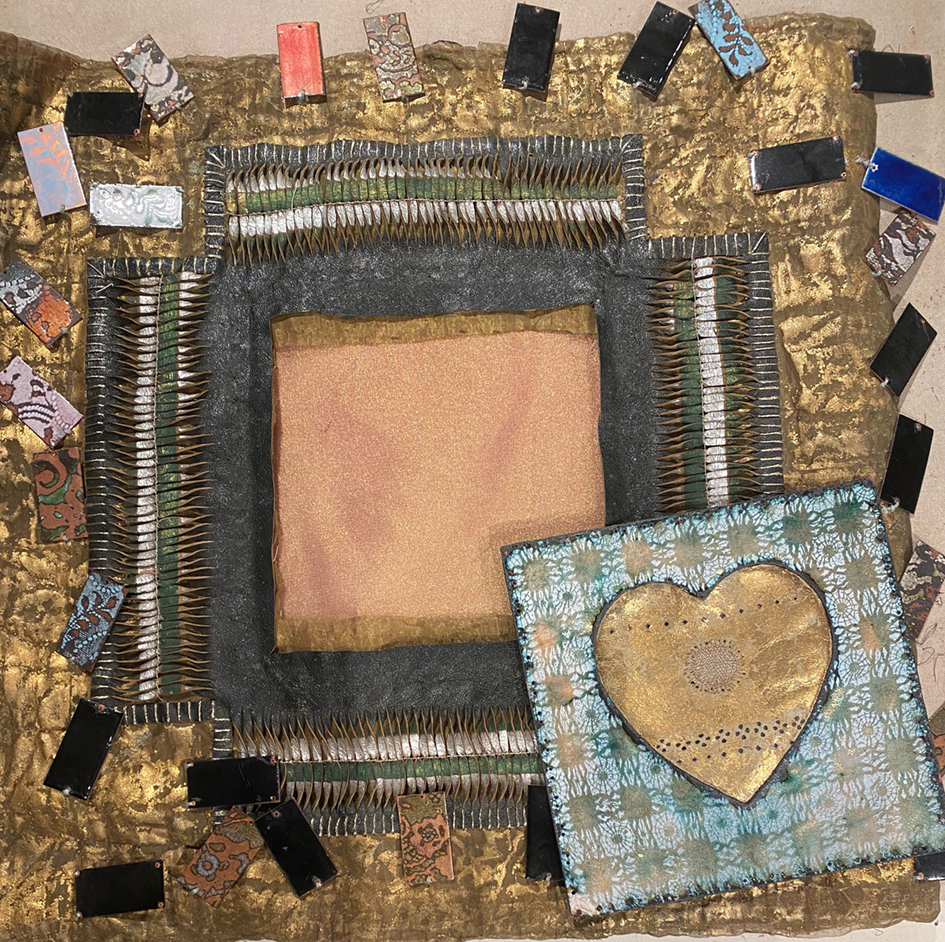
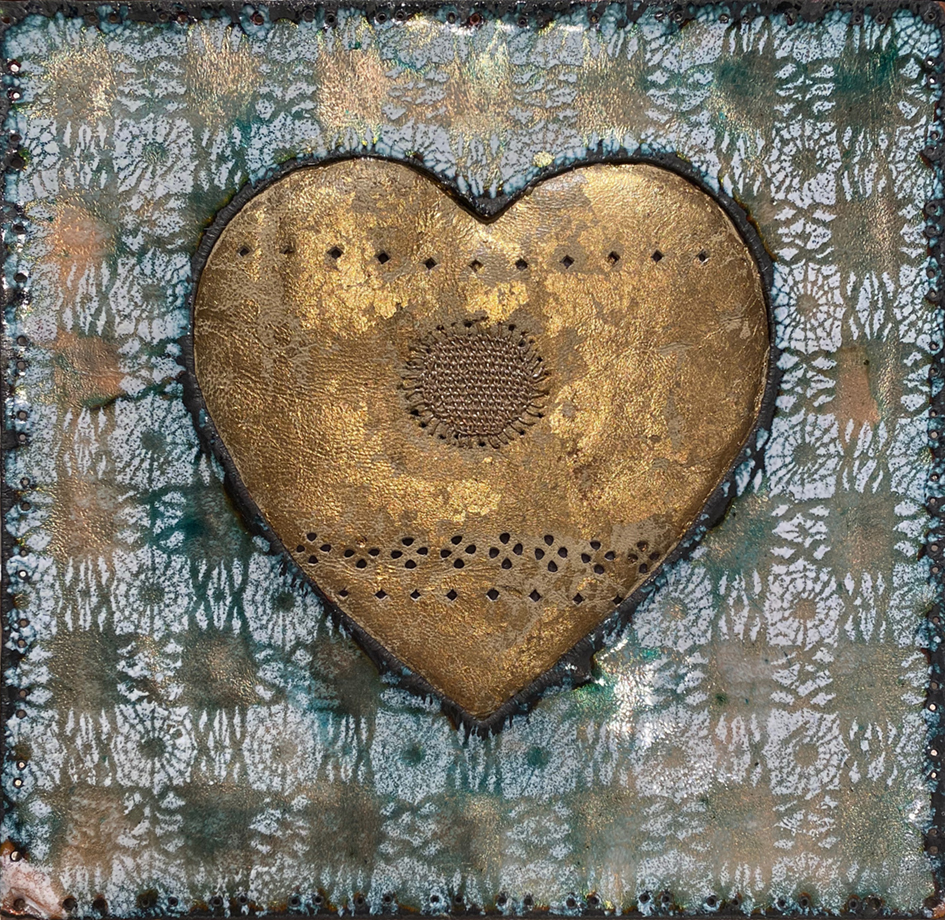
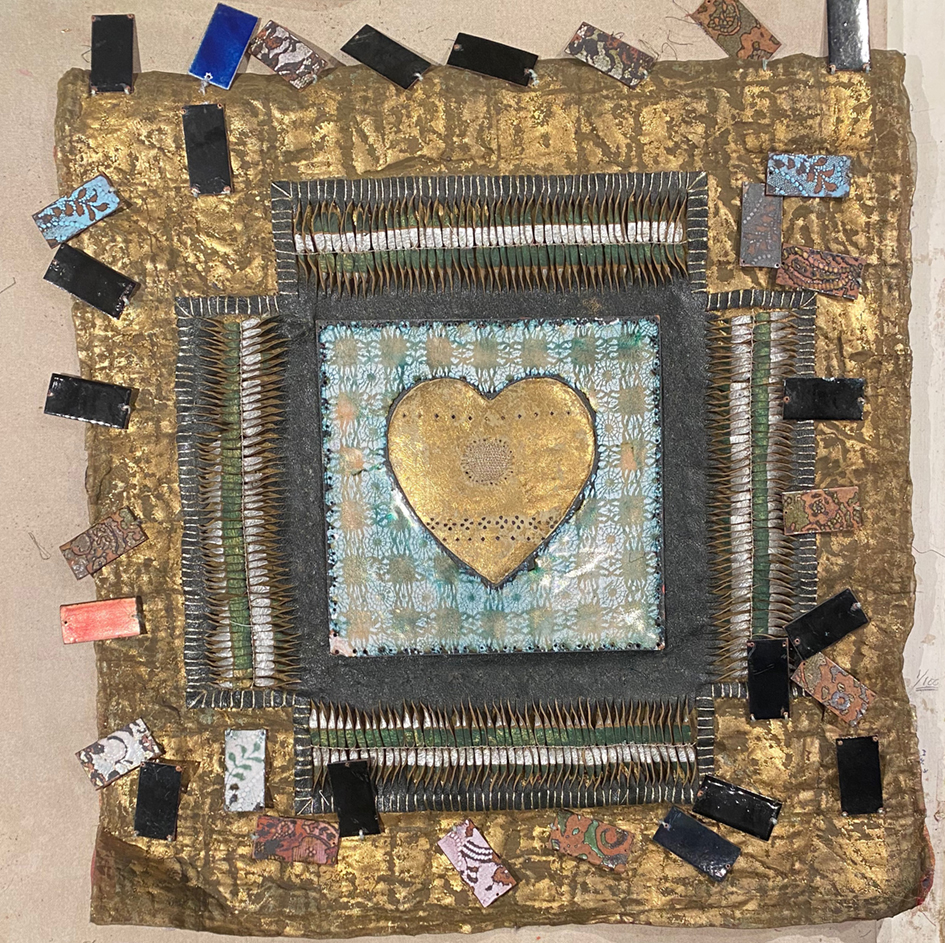
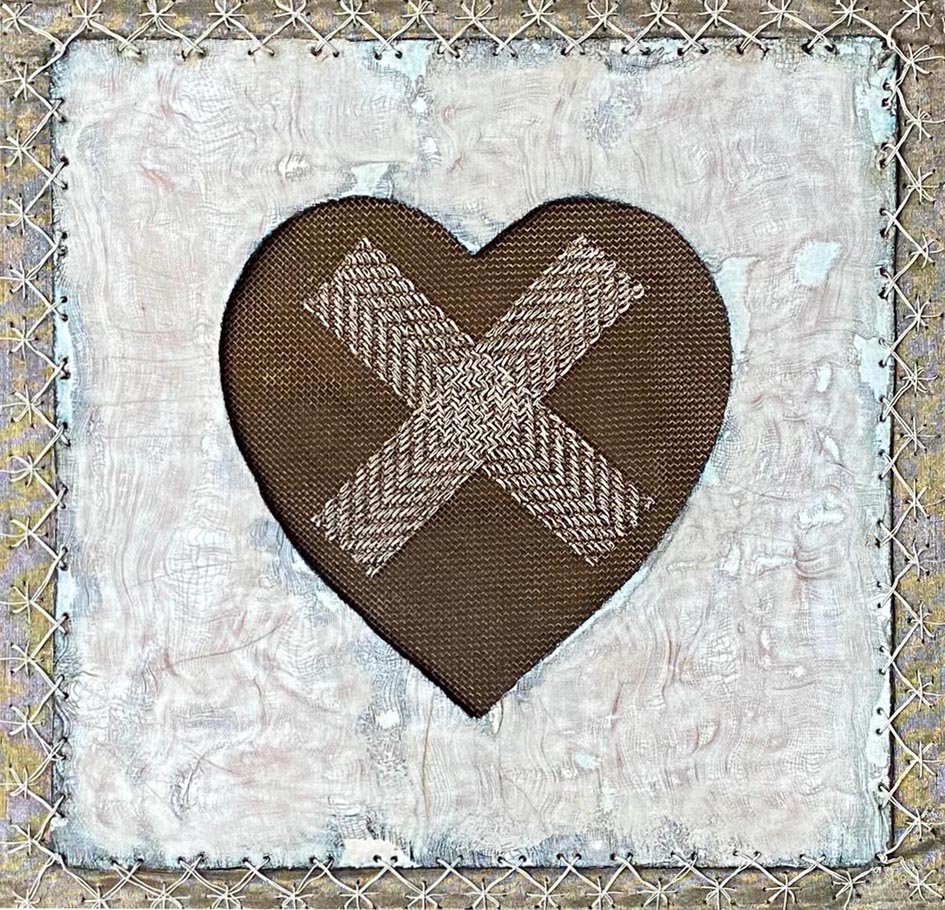
Above are the original images of 2 pieces of old work (circa 2010), left is Discarded Heart, and right Crossed Heart. They are just 2 of the outcomes of much experiment with some challenging materials – I was interested that these metal fabrics would last for a long time – far longer than the natural fabrics that I usually use…..how wrong I was!
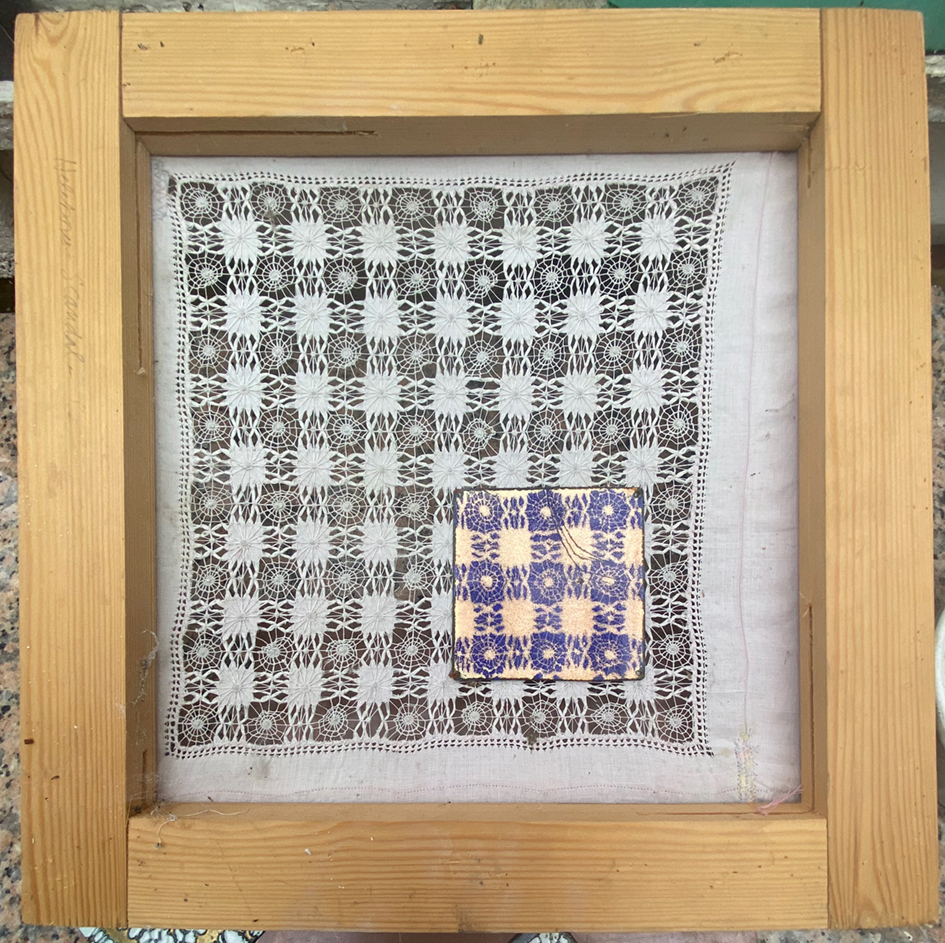
Searching in my studio I found a drawer full of old ‘fabric enamel‘ samples, that I had made use of for Discarded Heart. I had often used drawn thread-work as stencils and amazingly found the original stencil fabric , stretched and ready for use.
The most difficult thing I had to do was to repair the cracked enamel square. I wasn’t sure I could do this as it needed to be re-enamelled in exactly the same place as the original – fat chance! I carefully removed the gilded and stitched leather heart and re-gilded it. SO taking courage in both hands I re-stencilled it using a strong white enamel, then fired it at a very high heat and this made both the pattern very feint, and the cracks filled up – result!
Back of centre panel with leather and bronze fabric cut to free heart for repairs
Front of re-placed re-enammelled heart
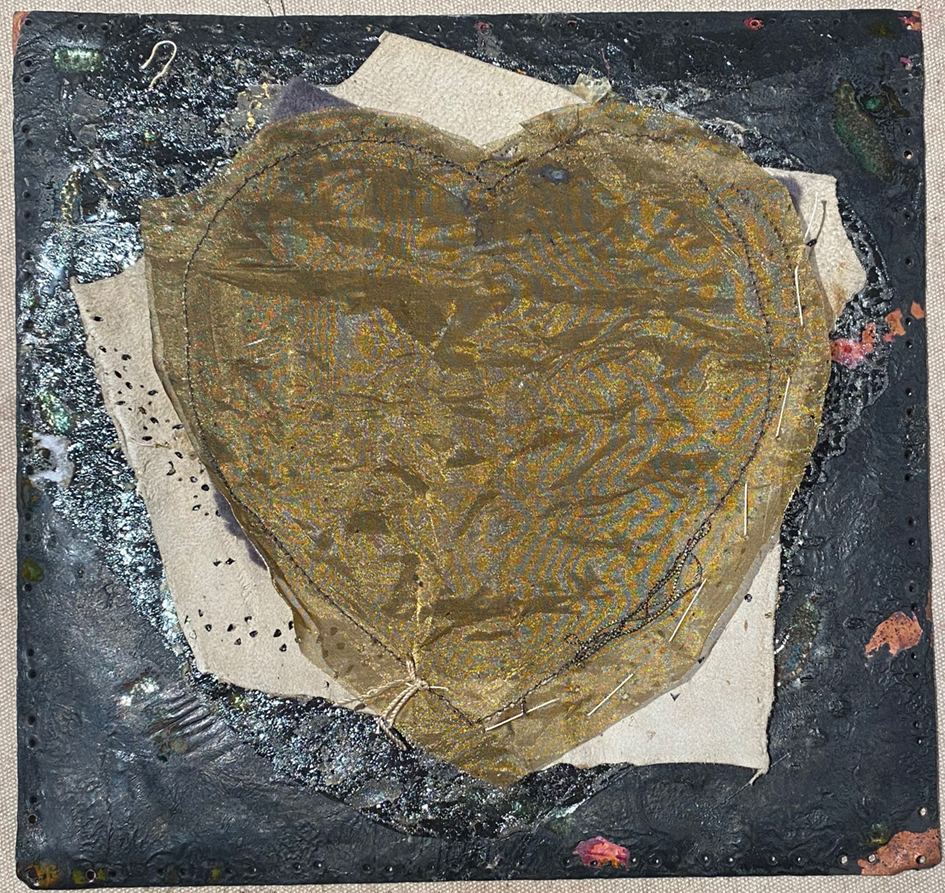
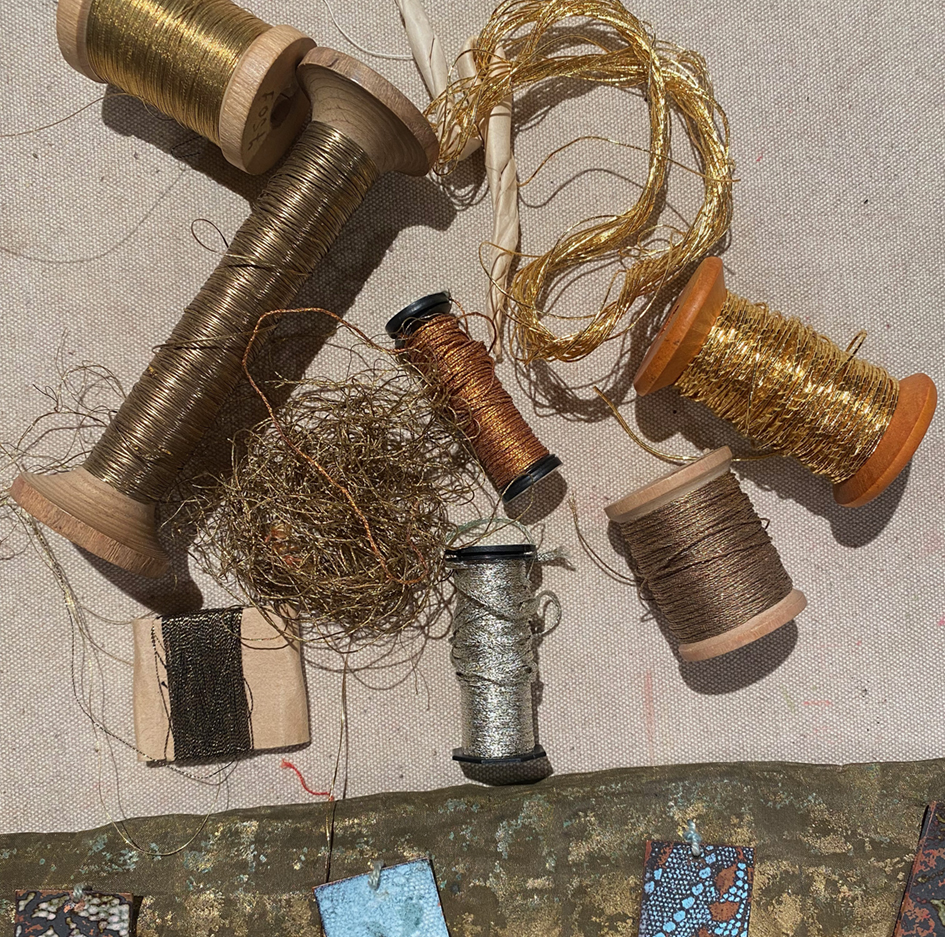
To get it back into postition I had to re-excavate and re-drill the stitching holes, so that I could painstakingly stitch the whole square by hand using real metal threads, ( trying hard to stick to my intention of NOT buying new materials but recycle anything I already own). I had several real Japanese gold and some copper wrapped threads to choose from, but this thread had to be strong and resilient for stitching through metal and leather.
After several half days of really awkward stitching, I managed to herringbone a wrapped copper thread all around the square.
Relief, as I had already offered the Discarded Heart (as it was it was originally made from lots of my. unsuccessful samples ) to the Welsh Quilt Centre as part of my 6 months exhibition called Hearts and Flowers in 2024.
So far so good, but the next piece, “Crossed Heart” was really badly damaged – mostly by fading but seemingly anything it had been in contact with over the last 10 years….including my hands while working it! Everything seems to mark these refined woven metal fabrics (and I suspect Boysie, an ex fox terrier stud dog). And I thought that these fabrics would be as hard wearing as they are tough to stitch! I didn’t offer this piece for exhibition as I was not at all sure if I could make it look worthy of being exhibited again.
The only area not stained, faded or split was the centre panel of a decorative cross darn in white wire into a heavy copper mesh I had copied from a Darning Sampler in the Bristol City Museum and Art Gallery which has one of the most famous Sampler collections in the world. I kept this, but now had decide just what to keep as signs of legitimate wear and what I just couldn’t aesthetically live with!
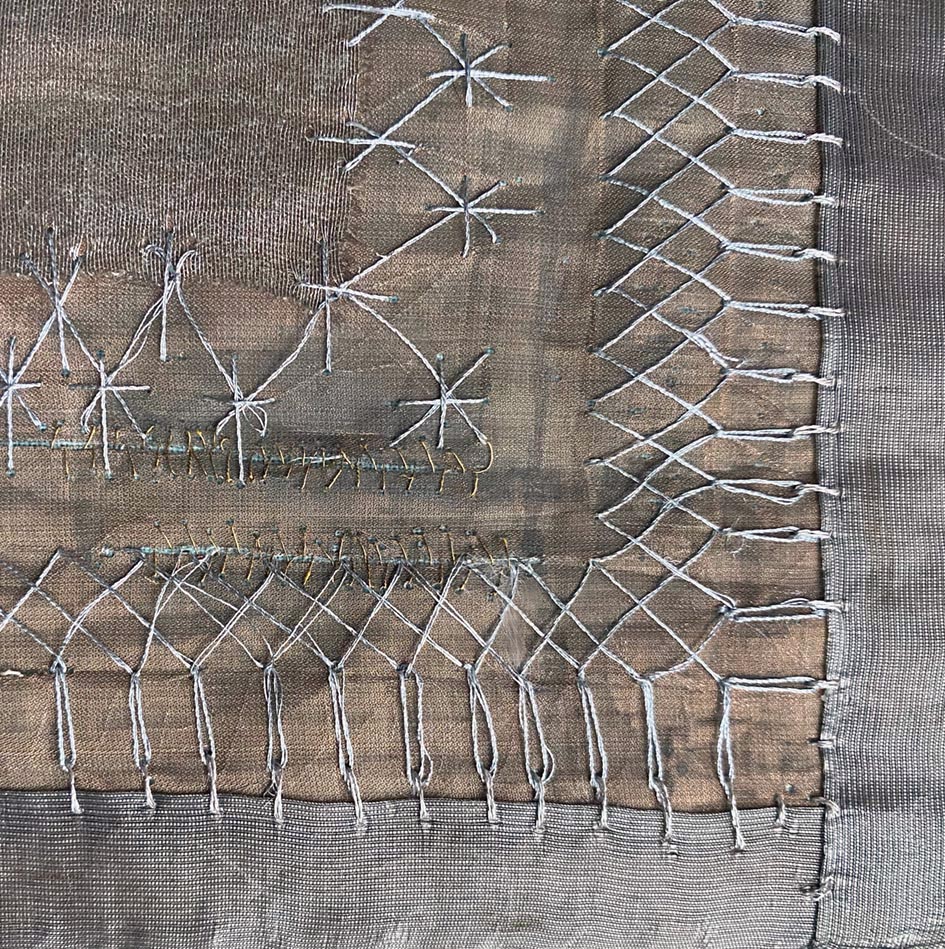
The whole sorry embroidery put onto my worktable and pinned into place – the metal fabrics have a tendency to roll up on themselves when left alone; a metal memory even after 10+ years of being stretched on a fame. The staining is plain to see with the general fading and tarnishing, but what you can’t see are the splits on the background fabrics underneath the rows of herringbone stitches.
The first area I felt confident to work was a rip and I cut away the fraying fabric – a mistake – but hey ho, nothing ventured…and started to darn the gap in the metal and nylon woven fabric with 1 thread from a stranded silver hank of 6 strand….very tricky – I may yet go back and rework this!
I was not very confident to continue, but I had started and I am of the sign of the crab…..very tenacious. Here are various ruined areas of the work, with different mends : a proper running stitch strengthener over a pulled thread area, sewing an extra border in a nylon and probably lurex woven fabric (once a very glamorous skirt worn to a 1 very glamorous occasion)to hide the worst of the staining on the outermost edge of the piece ( Boysie?) and then surrepticious stitches to draw the edges of the split fabric together. The herringbone stitches had started to unravel – and by this time so had I.
but eventually they are finished enough for safely re-stretching and possibly have their place in the lay-out for the gallery as part of a group of stitched metal mended hearts…
Over the past few years I have been intending to start selling giclee printed versions of my personal stitched work. The latest pigment prints available are unbelievably faithful in reproducing my finely stitched work…but where to start? Flowers – where else? I determined to develop some new flower embroideries for this venture.
Following on from revisiting my old research books and past work, I decided incorporate the flower embroideries with the Kantha stitched skies as in After Winifred. I took a beautiful bunch of dahlias and held them against a large scale Kantha Stitched sky in progress on my studio wall. I had been brought the flowers by Helen Reed, who owns Court House Farm and runs a seasonal cutting garden amongst other ventures. And where I hold drawing sessions in the summer months.
I also eventually started to work on an idea taken from a rare photograph of my garden Hellebores in a vase and in front of my scarf design of Hellebore flower heads. What is odd is that while Hellebores are one of my most favourite flowers, am not keen on Dahlias and did find myself reluctantly stitching them onto a small version of the Kantha sky. Below are the first 2 prints in the series Flowers For Our Times, on the left is Dahlias, on right, Hellebores
Reflecting on the Dahlias and Hellebore pieces (made between winter 2021 to early 2022) I felt as if I had made a definite link between my old and new work in order to make the really vivid giclee prints, available soon at Heart Space Editions. But although technically demanding, using the new Inktense dyes from Derwent, I decided that this was not the way forward that I had imagined it would be.
I returned again to my early flower work and re-read the catalogue of my exhibition of Flora’s Legacy, held in Bath in 2000 ( yes – so many years ago!!!!!) and realised exactly what was missing – symbolism – or the half hidden messages often contained within these earlier works.The centre-piece from the exhibition, Flora – the Roman goddess of flowers, had what was missing from my new works…the hidden meanings and humour – here some blackish, bawdy humour.
Turning to the many and various dictionaries of symbols I keep in the studio library I thought I would invent a bunch of flowers instead. The meanings of plants and flowers are universal and every culture has its own beliefs, sometimes conflicting – sometimes they are entirely in agreement: a poisonous plant is a poisonous plant. Out of curiosity I checked what the 2 bunches meant adding, the meanings to my original studies…..
I must admit that I was shocked, relieved, delighted and then excited to find that I had embroidered War, Scandal, Uncertainty, Instability and Sickness within 2 pretty bunches of flowers. But everyone else around me was spooked. So – they asked – where did I get this information from? Well in my books of symbolism, the most curious and confusing is The Language of Flowers – but oh the possibilities that it offers for mixed messages and hidden warnings amuse me enough to keep going with this theme.
Using just my old folders and Victorian books of flower meanings lead me to a brand new fully comprehensive dictionary by S. Theresa Dietz – published by Wellfleet Press, and the here I discovered far more arcane information than I had gleaned from my all my original sources.
So now what to do next – can you guess?
check the gallery sectionto see more outcomes of this ongoing project
Everyone loves children’s art – either drawings or paintings; the pictures always have such energy and capture the spirit of the thing depicted – real or imagined. So when a visitor, Nadia Lanman, came to Heart Space Studios, to view my exhibition of ‘Mending Mottoes’ and asked if I would be interested in a commission to stitch one of her daughter’s drawings, I accepted at once – thinking “this is a challenge”
I asked to see several paintings and drawings so that we could make a decision which to depict, and really to see how difficult a challenge it would be. The price was also considered at this initial point as this was a thank-you and leaving present for the nursery school that 4-year-old Lola was leaving to go onto her primary school. Nadia brought in several, some simple line drawings and some full-on paintings. It became clear that Nadia really liked the rainbow painting (at the top of the post), water-colour paint on sugar paper…so typical of all children’s art – this was going to be a real challenge! It is one thing to stitch drawings but poster paint loaded on with energy ?
When we discussed pricing the piece I advised Nadia to go and buy a frame to keep the costs down; framing is really important but can be extremely costly, so I suggested choosing an A4 size as this was roughly the scale of the drawing papers that she had shown me – and an A size frame is easy to access; I promised her I would customise the frame if necessary.
Meanwhile I set about sampling the way to achieve the full-on colour.
first colour samples on shot pink silk
The first thing to research was the background colour, I found a yellow and pink shot silk fabric, that was about the same colour but slightly brighter than the sugar paper, this would save me having to dye the fabric – but how to get some background colour onto it first before I stitched it? i tried fabric paints but when dry it was like stitching hard leather. I needed the rainbow coloured in so I would not have to completely cover the ground with hand stitches – too time consuming, too expensive.
iron-on fabric dyes in pastel form
selecting thread colours to match paint
The next thing was to choose the threads. I had decided to stitch the whole piece in running stitches, this is the first stitch everyone ever learns to sew and it always looks both simple and innocent, so is a fitting choice for embroidering children’s art. Also I have used it a lot in my recent work, particularly when embroidering writing. I did think at this stage that machine embroidery would have been quicker to achieve the impression of saturated colour, but I am not a happy machine stitcher and felt that the mechanical aspect wasn’t in keeping with the subject; simple hand stitching was really the perfect technique to choose
I tried several yarns, silk and cotton and cottons and eventually chose a mixture of both, whatever would suit the paint colours.
directional stitching sample for rainbow and writing
I had photocopied the drawing and reduced the scale, to fit the frame, and to keep my fee as low as possible. I then drew onto this the direction of the paint brush, actually showing how Lola had swept the paint onto the paper, the lines would become running stitches, but first I had to sort out the message that Nadia wanted to send to the teachers on Lola’s behalf. “thankyou for my wings love Lola xx”
cut out photocopy and writing placement for the working drawing.
I had asked Nadia to get Lola to write it on a separate sheet of paper and then I traced it into position onto the photocopy – previously I had cut out the photocopy to gauge where to put the writing – a copy of this became my working drawing…..I have my own arcane ways of getting there!
I found this stitching really interesting, it had to be kept simple but needed to show the rhythm of the painted bands. Sadly the pastel once that it had been ironed to fix it was a bit too dull – but hey ho – it helped things go smoothly and quickly. What also helped was to draw the directional lines straight onto the dyed areas with a water-soluble pen to keep a track of the flow, they can be seen on the yellow band above. The last thing to do was to stitch the message again in running stitches, then wash and stretch the work and mount it in the frame.
finished and stretched embroidery
I so enjoyed this relatively simple stitched commission ( in comparison to the recent Thangka) that I thought it would be a good idea to run a class and now that I have sorted out how to express the rhythms and colours of paintings I think that I can show other people how to embroider their own children’s drawings – they would make great presents for anyone in the family. And when I told Nadia how her commission had inspired me to develop a new class, she immediately signed up for it!
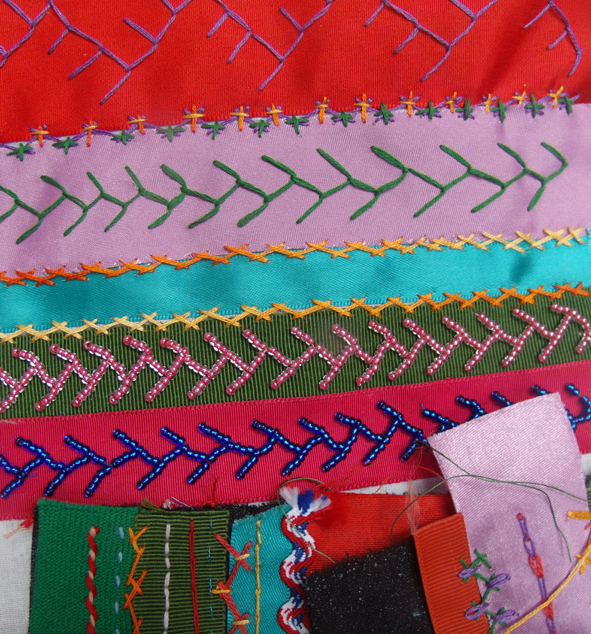
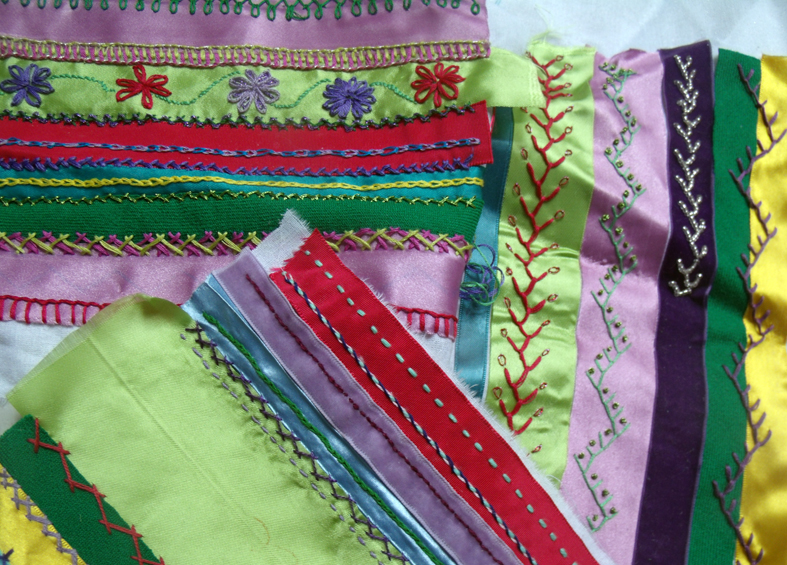
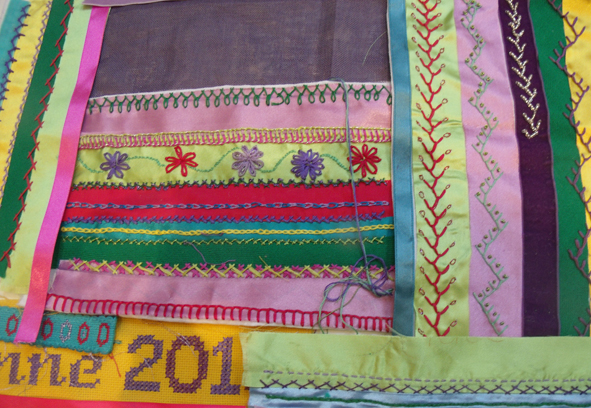
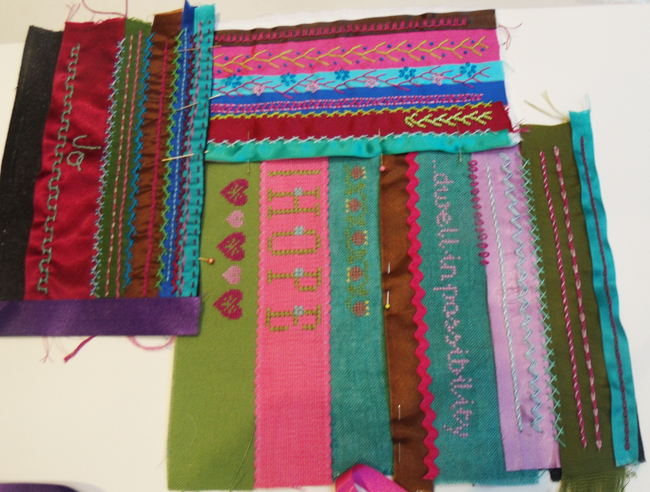
Crazy stitching on a Crazy Patchwork by Naomi Clarke from a recent workshop at Heart Space Studios
Crazy Patchwork classes have always been popular at Heart Space Studios and several people asked me to teach them more hand embroidery stitches, so I started a course called Crazy Patchwork Sampler. The course is built around the sampler that I made for my book, Crazy Patchwork, published in 1998 by Collins and Brown – it seems what goes around comes around……
my book of Crazy Patchwork ideas and designs.
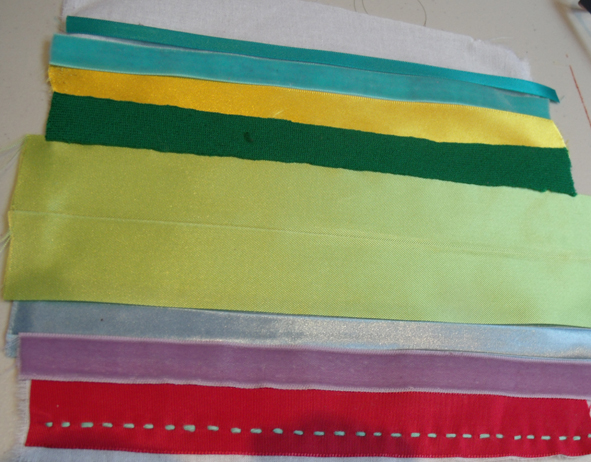
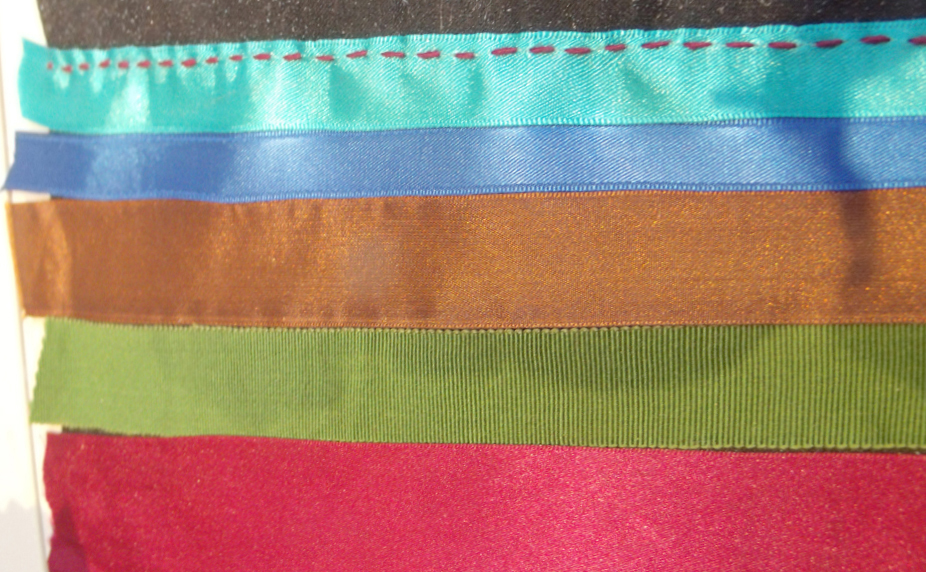
For the FIRST WORKSHOP I started off with the absolute basics, first we chose the colour scheme – I supplied various ribbons and fabrics for people to choose a small group of their favourite colours: this takes longer than anyone imagines it can and causes a lot of negative ideas to flow as people are usually very nervous about using colour, but I have learnt that this choosing is really important as eventually by using the same set of colours in various patterns and proportions the finished piece can be made harmonious.
strips of ribbon ironed on to backing fabric
first chosen coloured ribbons
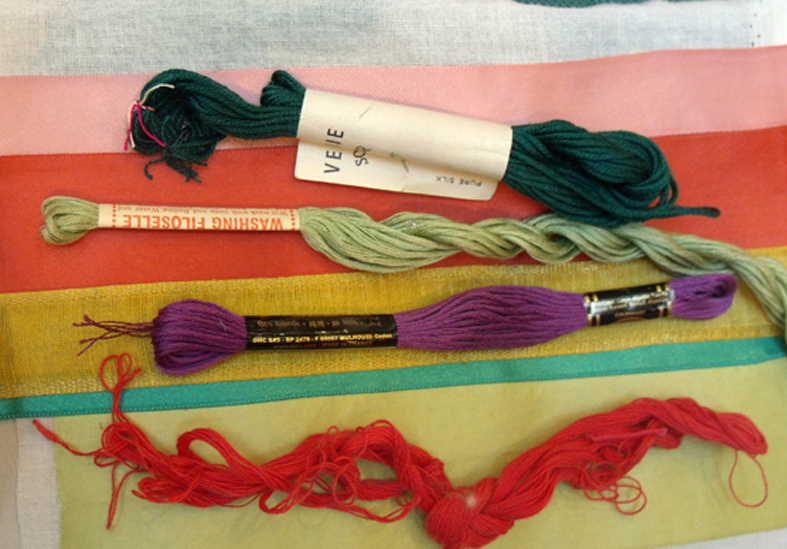
Most people, to their own surprise, choose colours similar to what they are wearing. The next choice to be made is the threads – I ask them to choose similar colours to the fabrics but to stitch in complementary coloured threads – so that the stitching will show up.
choosing complementary coloured threads
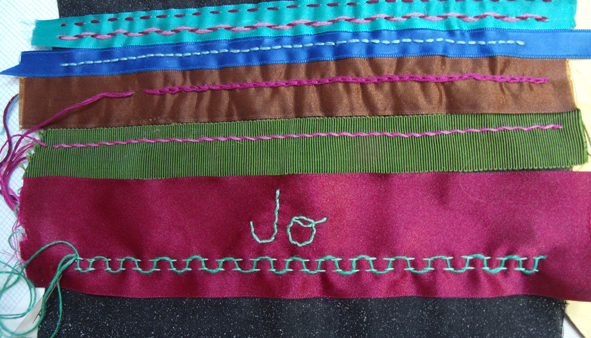
The first sampled stitches are the straight ones – running, back and all the variations, easy does it….but it also includes writing a name…very simple but very effective for the first workshop. There are various methods of writing onto fabric so that it can be embroidered and we start with the simplest by using a water-soluble pen or the old-fashioned transfer paper still used by dressmakers.
the maker’s name worked in back-stitch over water-soluble pen.
The SECOND WORKSHOPsession was cross stitch, counted and herringbone – which is the main stitch I use for joining the patches together. The group was still concerned about colours, but I assured everyone that we had a long way to go and plenty of opportunity to make the whole sampler work in harmony – I was delighted that they had all done ‘homework’ and had finished the first workshop’s ‘patch’ and found more variations to add to the straight stitches.
finished patch from first week being decorated with herringbone stitch
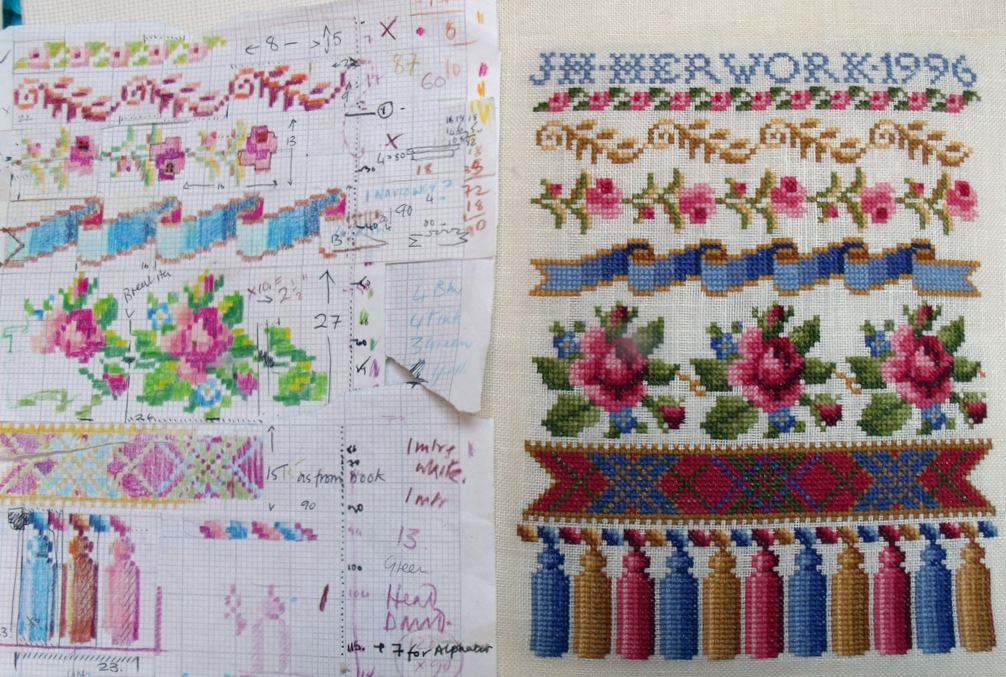
Counted cross stitch is another way of embroidering letters and numerals……
my working chart of cross stitch motifs for the accompanying sampler
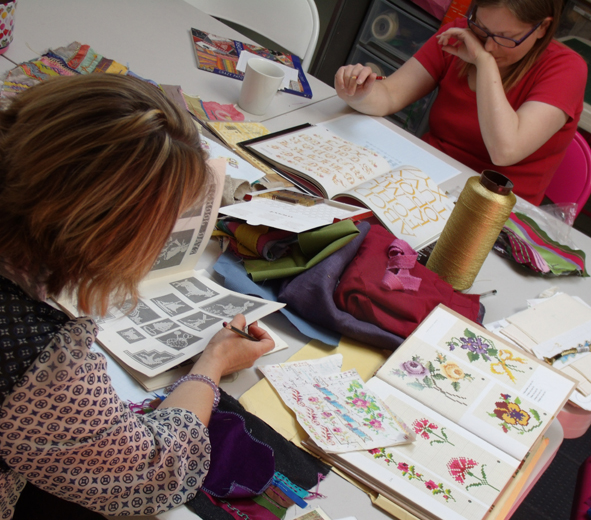
There is a whole world of cross stitch motifs and I like using the traditional ones – to illustrate the technique of charting for cross stitch I showed them some old work of mine that was designed from vintage needlework manuals. I still work as a freelance designer for a canvas embroidery company, Ehrman Tapestry, where I sometimes use similar charting for some of my designs, even though the stitch for tapestry is tent or half crass stitch. So I have lots of reference material and the group spent an hour of the 3 hour session looking at all my books and notes before they began charting their own designs.
Jo and Helen choosing cross stitch motifs and alphabets from my reference book
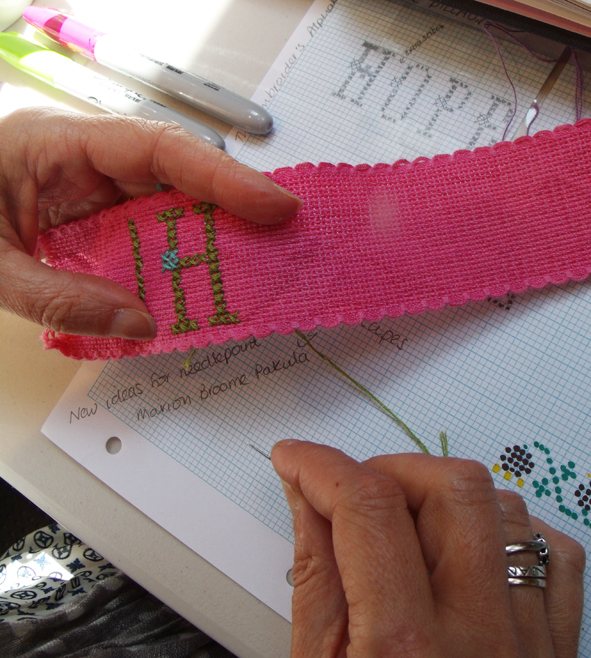
The task for this second session was to chart a name and date as well as a small multi-coloured motif and to stitch it onto the counted thread fabrics.
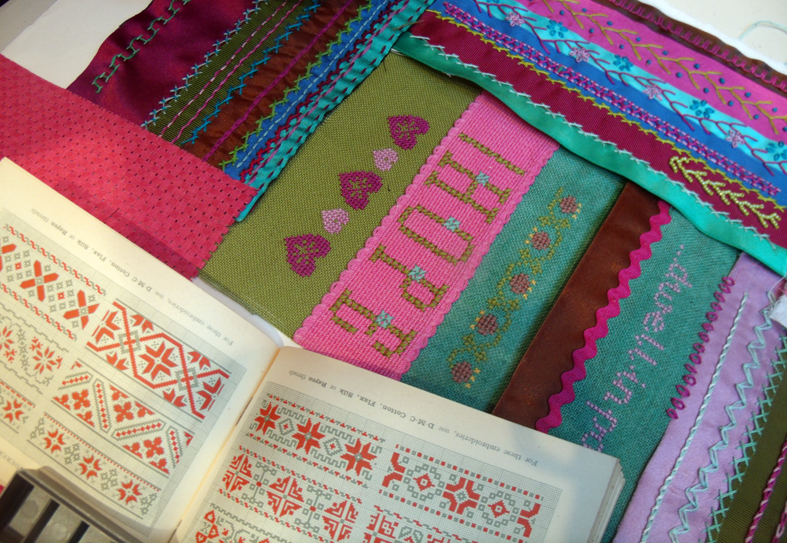
Jo decides to chart and stitch HOPE – she s going for an aspirational crazy sampler.
choosing the colours from a limited range of counted thread fabrics involves creative use of colour
Helen uses a shaded red thread creatively to harmonise her cross stitch samples with her first straight stitch patch
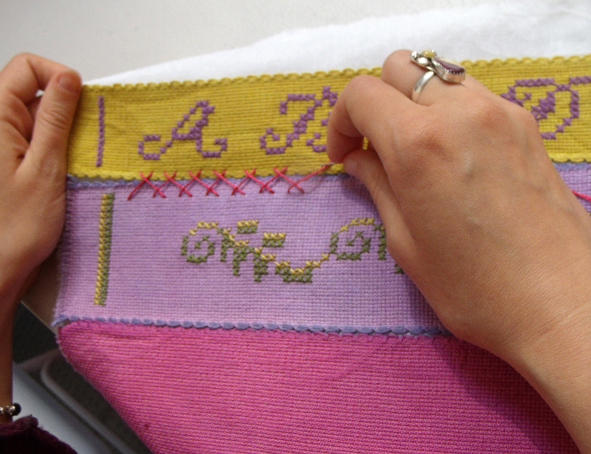
it is interesting how the maker’s character soon emerges from their choice of colour and letter forms, above Helen’s looks strong and directional while Sophie has chosen elegant letter forms and motifs ; the colour combinations are similar but the proportions are very different
cross stitched bands being cross stitched together
By the THIRD WORKSHOP the patchworks are starting to look very rich and there is less uncertainty about colour choices, everyone seems to be enthralled by this process and are bringing in finished pieces that they have developed at home alone….everyone comments on how good it is to just stop for a time and concentrate on their stitching.
2 finished ribbon patches with 3rd ready to be embroidered
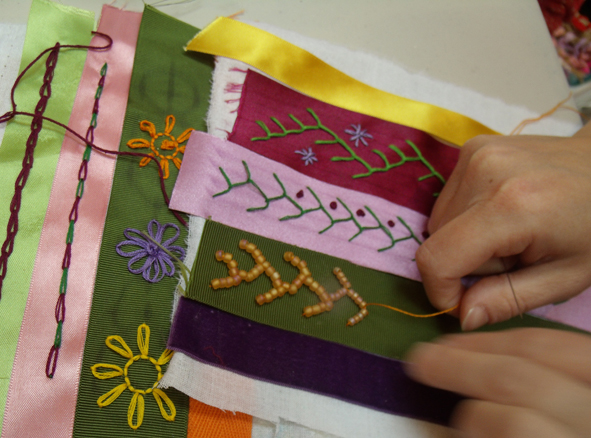
The third week is supposed to be looped stitches – chains and lazy daisies and feather, but we have to spend some time catching up on herringbone as the counted cross stitch took up most of the last class at the studio.
looped stitch patch of chain, lazy – daisies with feather variation being worked in beads
The patches are now starting to harmonise together by careful use of colour; everyone really enjoys the frivolity of stitching with multi-coloured threads to make up the herringbone variations
herringbone stitch variations plus feather stitch rows that are beaded
By the LAST WORKSHOP we have got a small range of patches ready to be worked into a whole square.
Anne’s collection of patches ready to stitch together.
The piecing together of the patches for the last class was easier because of the colour co-ordination of the embroideries, but the strict oblong patches made for geometric patterns for the final piece. Maybe for the next session of this class I will give each person a triangle as well as oblongs and squares of fabrics to apply the embroidered ribbons on.
geometric patterned patchwork for final piecing
I just didn’t have the heart to ask them to cut up their embroideries to look like a more authentic crazy, even so each person had completely different patchworks –
the inspirational crazy patchwork sampler is pinned together
This group of students want to learn more stitches and techniques so I am running an advanced course for them – and other more experienced embroiderers can drop in for single sessions. Considering that this group had only 5 classes for 3 hours each they have really advanced their practice in many ways and not just by learning how to stitch. I think that they have caught my bug – the embroidery bug – and are now developing their own libraries and stashes of materials ready to try out new techniques and new ways of expressing themselves.
vintage DMC book of counted cross stitches bought by Jo after seeing my old battered version with her almost completed Crazy Sampler