I have just spent a couple of days doing a proper embroidery – stitching flowers and spots onto a table-cloth for Hanne Rysgaard to display her ceramics. She is showing large selection of her current work in the Aberystwyth Arts Centre shop, from mid August to mid September. I offered do this the last time I was working in her studio, as she was just preparing to make all the stock for this exhibition. I thought that a stitched version of her pieces would make a good centre-piece for the collection.
first ball point drawings for Hanne's table cloth
While speaking to her over a cup of tea, I put a few ideas down in my work-book; this is real “back of the envelope” stuff, using a ball point pen – which is always good to draw with, but the sometimes the line it leaves is a bit sleazy – and as often happens the very first idea was the one I used. Hanne immediately liked the whole idea, actually I think she just liked me drawing it out for her. But I do feel that when you get the initial idea for a piece of work, the first drawings, even if just scribbles, contain an energy that subsequent studies don’t, and if referred back to they can often re-assure you through the inevitable time when you doubt your decision to make the work.
The next drawings were on the linen tea-cloth in water erasable pen, Hanne made the actual pieces for me to work from and I took them home to my studio and set them out to draw around.
table cloth set out in studio
The tiny flower arrangement was quite a challenge to stitch, it was a bunch of roses and auriculas with a few forget-me-nots, quite difficult to copy within a 2 cm. spot and this had to be repeated 13 times…..by comparison the spots were easy-peasy though they are all slightly wonky.
stitched sample for spots and flowers.
While the flowers and spots had to be stretched for the embroidery I always prefer to stitch without a hoop and the outlines of the ceramics are freely stitched, so much easier to handle. I feel that the hand stitching looks right for the hand-made quality of the ceramics.
embroidering the outlines on the un-stretched linen
Once the embroidery was finished, washed and pressed I delivered it and it was a relief when Hanne just whooped with delight when she saw it. It was immediately set out at the back of the gallery/shop atBlaze, where we both set about taking pictures.
Hanne looking impressed with my embroidered version of her work
Here is a close up of a section of the cloth complete with the embroidered cake fork, the real butter knife used as the reference, can just be seen in the background.
close up of embroidered tea cloth
and here is a view of the whole set with the magnificent 4 tiered cake stand.
I am slowly including all my recent stitched work into the blog. Sorting through the Embroidered Enamels for the Gallery Pages I thought I should show the research underpinning what has become a main preoccupation for me, enamel fabric or fabric enamel – whichever way round – they are difficult, expensive and time consuming to make but I will never tire of developing them.
first page of enamel research work book
The first pages of my enamel research book show how I referenced fabrics to pattern and construct the strips of enamelled copper to look and behave like fabric. This now looks very focused and organised, but I only remember being absolutely lost amidst the wealth of ideas and accompanying technical information I was having to assimilate. The temperatures of the kiln were mind numbing; I cook on an AGA so have no idea of any cooking temperatures, what exactly does 800 degrees feel like – pretty damned hot – more to the point, an open kiln at that temperature looks scary as well.
workbook page of stitched copper plate and mesh samples
At the research department at UWE. Bristol I was surrounded by researchers into enamel who were were making such exciting and unusual things and I didn’t realize at the time that I was working with enamellers at the forefront of innovation into this craft, and I was being given the chance to develop textile techniques within their research area. I was both excited and daunted but decided to stick with what I knew, stencilling and stitching. I used lace, Broidery Anglaise, crochet, any fabric that was patterned with hole and I drilled holes in the metal plates, prior to enamelling, in order to stitch. I hated this drilling; to stitch even moderately neatly you have to drill very neatly and you have to sort out all the placements first…my work books are full of stitch diagrams ….so how else can I get these plates onto the fabric without the drilling?
enamelled copper shapes appliqued as shisha mirrors onto drawn - thread worked heavy linen groundmetallic leather applique and cut work sample
It ocurred to me that the small metal shapes were like shisha mirrors, found on Indian fabrics so I started to applique them into position using this technique. Fabric grounds were really too lightweight to carry the metal shapes and when they are heavy enough they become very coarse so I tried other materials; the metallic leathers were the most successful and I have several large hides waiting for an opportunity to be decorated. Meanwhile I decided look at metal fabrics which, being woven, are more amenable to being worked like traditional textiles.
work book with drawn thread and insertion stitched samples
I bought some amazing woven metal fabrics fromThe Cloth Clinic, the owner – and at the time a fellow researcher at UWE Bristol, Janet Stoyel – let me buy some of her specially woven fabrics – sadly no more were made available to me after this. But I used these particular fabrics to make a series or samples based on traditional white work sewing. The embroidered scrap of copper below is from this collection of metals as are most of the metal fabric samples in the work books; although some of these metals are available elsewhere the Cloth Clinic’s fabrics are really special and worth looking our for. But cost and unavailability of these metal fabrics made me rethink how I could develop these ideas, I even thought of taking up weaving some for myself from copper and steel wire on a small frame…still a possibility…….
scrap of copper fabric with drawn thread work and printed foil.
Eventually, after about 18 months I felt confident to design and make a stainless steel, white enamel sampler .It is based on white-work traditional embroidery designs and vintage fabrics have been used as stencils. The different colours are made by heat reacting with the copper at different temperatures of the individual kiln firings and only white enamels were used for this. The applique and shisha techniques were again used and the ground has had drawn – thread – work worked into it – very hard on both the eyes and the fingers – the stitching is in steel and copper wire.
larger enamelled copper and stainless steel white work samplerupside down detail of steel sampler. detail of enamelled copper mesh heart - well what other emblem did you expect to find?
Another idea which I had also been developing is patchwork enamel, I had quickly worked out that this was the easiest way to produce enamel fabric, but the thought of drilling all those holes to stitch the plates together, put me off – but now I was used to working with the metals so I returned to a small sample I had made in the first year of my enamelling experiments.
patchwork enamel sampler stitched and embroidered in wire.
I made a larger and simpler version of the sample above and the piece of fabric is about 90cms square, a yard of fabric.The separate plates are stencilled and then stitched together with white coated copper wire, suddenly I had a piece of fabric that draped when held in my hands. Below is the page from my research book with one of the stretched crocheted fabrics used to stencil patterns onto the copper plates.
workbook record of first large patchwork enamel fabric panel
I looked again at other types of samplers which could be developed into drape- able fabrics…this small design below was for embellishing espadrilles in a book I had written called White on White by Coats Crafts UK now sadly out of print. I developed a strip sampler as with this type of construction the stitched strips of enamel can be rolled and it behaves much more like fabric, this led me to many more developments, one of which will be used for the Severn Seas Skies hangings featured in the last posting on the blog.
small sample for espadrille decoration
workbook page of stitched strip samples for white work patchwork.
The size of the copper strips has recently become much larger as I have experimented with the amount of weight that the rows of stitched wire can carry. I can eventually make very large sheets of fabric using this method, at present they are about 2 metres long but only 34 cms. wide, this is all my small kiln will accomadate, but I could get up to half a metre wide in my large kin – it would weigh an awful lot though.
trying out stencil designs for the Black Work Patchwork hanging
detail of top of Black Work Patchwork, with stitched and stencilled enamel.
For the past 22 years I have simply enjoyed the views over the Bristol Channel, which flows past a salt marsh just beyond the garden wall of our house in Portishead, North Somerset.My husband, Stephen Jacobson, has regularly painted the views of the sea and landscapes which surround the house, while I have simply enjoyed the ever-changing light, skies and tidal waters of the estuary.
Red Sail & Sunset, Stephen Jacobson, oil on boardmost recent early morning drawing of sky - June 2010
But about a year ago I started to make notes of the early morning and late evening skies looking towards the Welsh hills. At first when ever I woke up very early and just before rolling over back to sleep, I made quick notes of the colours, they were so stunningly beautiful I just wanted to remember them later – the notes were really just lists or stripes of colour, the marsh, the water, the hills, the sky striations of clouds or simply the blend of colours from reds of the sunrise up through to the blues of the morning sky. Then I made pastel colour studies from the pencilled lists later on, before the image in my head had disappeared.
pastel colour studies made from pencil notes
In the evenings I took photographs of any good sunset, well just after it had set, as the sky lights up in warm gold and pink striations as the light catches the underside of the clouds and vapour trails. I then started to take photographs during the day, trying to keep a record of the changing light and tides. But interestingly, when we had the recent ban on air travel due to the Volcanic dust threat, the skies here were not at all spectacular, it appears that most of these striations are in reality, vapour trails.
September sky looking towards Wales.early evening sky at high tide
I had no idea or real wish to make any work from these notes, I just kept them in a work book and sometimes cropped the photographs to make them conform to same shape as the scribbled morning lists. I did think that they reminded me of the strips of coloured yarns in my various colour charts and pinned some of them into a work-book. The strip shape, I realised later, has been suggested by a narrow window strip made by glazing bars on either side of the main windows of the house, this design is a feature of many of the older houses in the town.
studies of skies in work book with embroidery thread colour chart
Then late last year I went to see an exhibition at Tate Liverpool called Colour Chart: Reinventing Colour, 1950 to Today, and it was full of colour chart paintings from the early American painters of the 50’s and 60’s. Here were simple colour strips and squares on white grounds, they were just like the embroidery thread charts. I decided that at the first opportunity I would develop some larger pieces of work, using the charts as a device for putting the strips of colour together but was it to be in enamel or embroidery?
Eventually the opportunity has presented itself, I am going to make a series of large enamel panels which can hang in other people’s gardens, evoking the wonderful skies we get here. They will be made for the North Somerset Arts Week, as an open studio exhibition. Six other artists who live in this area of Portishead and are inspired by the estuary to make their work, are exhibiting under the title of The Severn Sea – the old name given to this particular wide stretch of the Bristol channel formed by the confluence of the rivers Severn and Avon. So watch this space for further developments, I have about 10 months to produce the new work and it has to be done in odd moments between my other projects and commissions. Meanwhile I will leave you with yet another striped sky taken a few days ago.
The latest after - sunset over the Welsh hills - taken early June 2010.
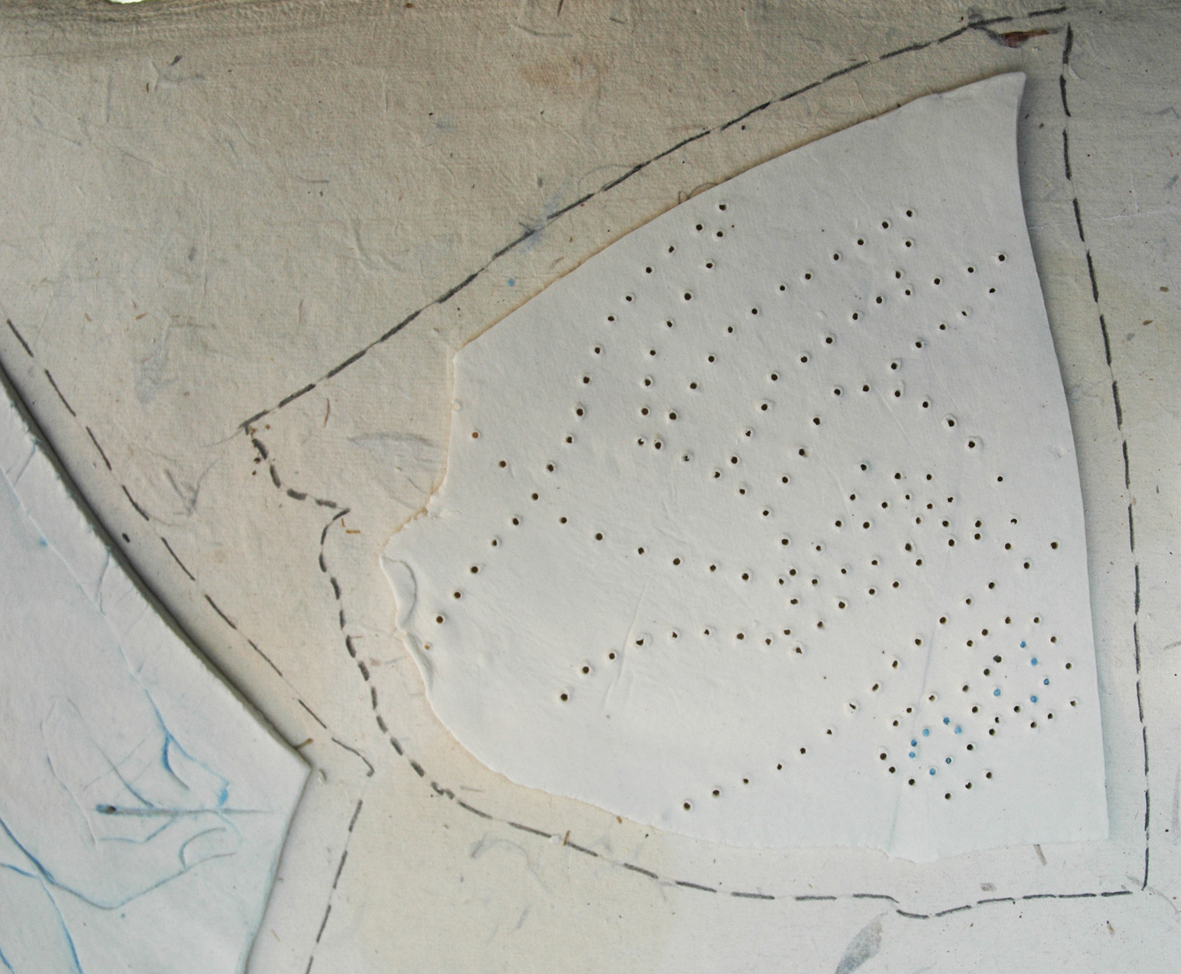
Today I went to Blaze gallery and studio to collect some of the fired paper porcelain samples from Hanne Rysgaard, (see Archive for first Stitched Ceramics post) and brought them to my studio here to colour and stitch. I am primarily testing how much the porcelain shrinks when fired; Hanne calculates at 20% shrinkage but that I need to see what that looks like. Then I can decide how big to make the dishes for the stencils and the shapes to impress into the surface – but even more importantly calculate the size of the holes I will eventually stitch.
drill bits with sizes and resulting size changes after one high firing. The dotted outline surrounding the sample is the original unfired size of the paper porcelain
It appears that the smaller the hole the less it appears to reduce and after firing they seem to fit the next smaller size – so a 2.5 bit will now fit -just- into a 3.sized hole and as they all need smoothing with a file that seems easy enough. I chose to make most of the holes at 1.5 size drill bit and now this easily admits a medium sized crewel needle – a sharp pointed needle with a long eye for threading thicker yarns.
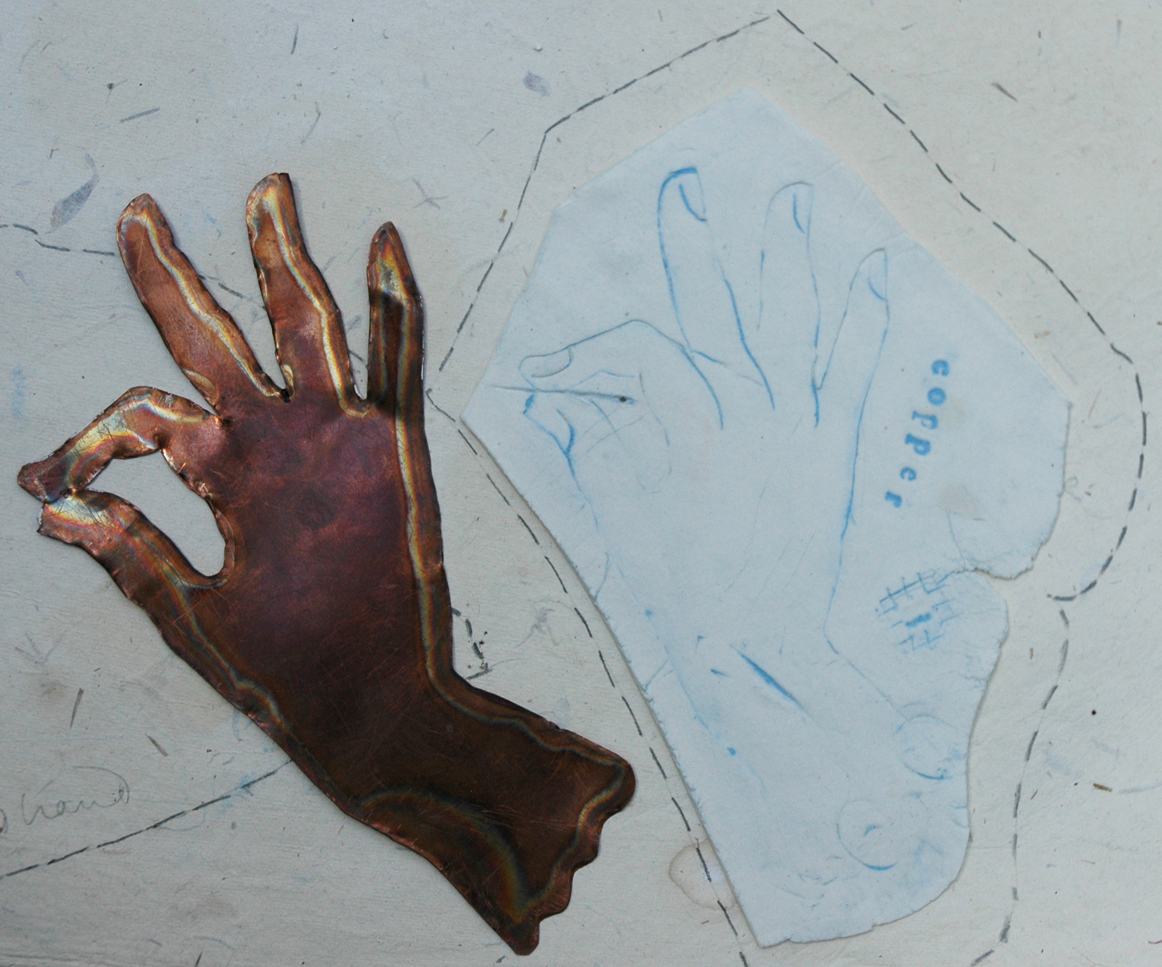
drawing for ceramic dishes, drawn around my own hand; stitched wire flowers
sketches for hands, flowers and mending broken hearts dishes.
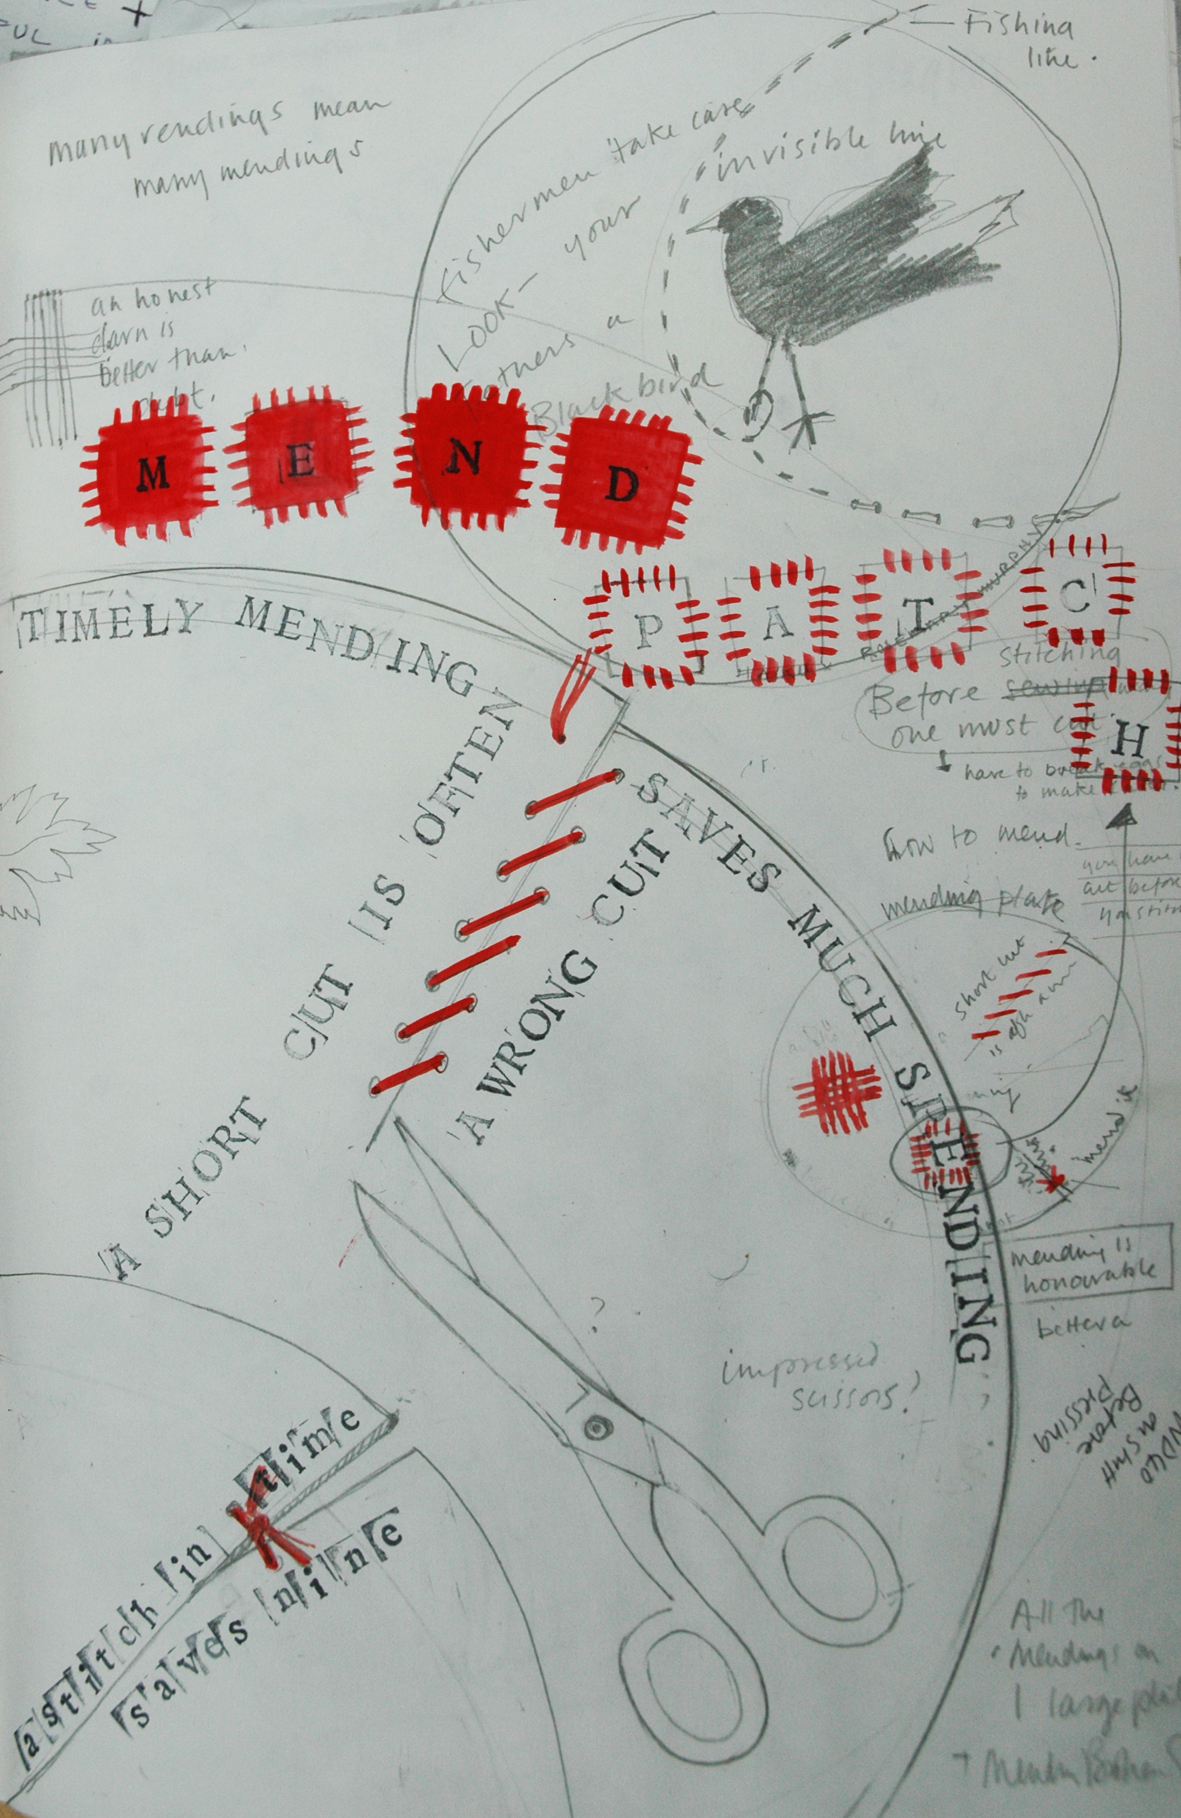
I made several pages of drawings for poems, mainly haiku on the subjects of flowers and hearts, written by a friend Rosemary Murphy, but also I liked the sayings about mending – now there’s a surprise! Anyway samples are made for the mending hands designs and the poems as this is the set of ideas that I have decided to develop into porcelain plates and dishes.
I also wanted to impress the hands as I had previously impressed the lace in the large sample plate – see first blog on Stitched Ceramics – so I used a hand that I had previouslycut out of copper sheet using my plasma cutter, this was adapted from my letterhead which I have used for over 20 years. I also am waiting for another cardboard hand impression to be fired to make a comparison between metal and card.
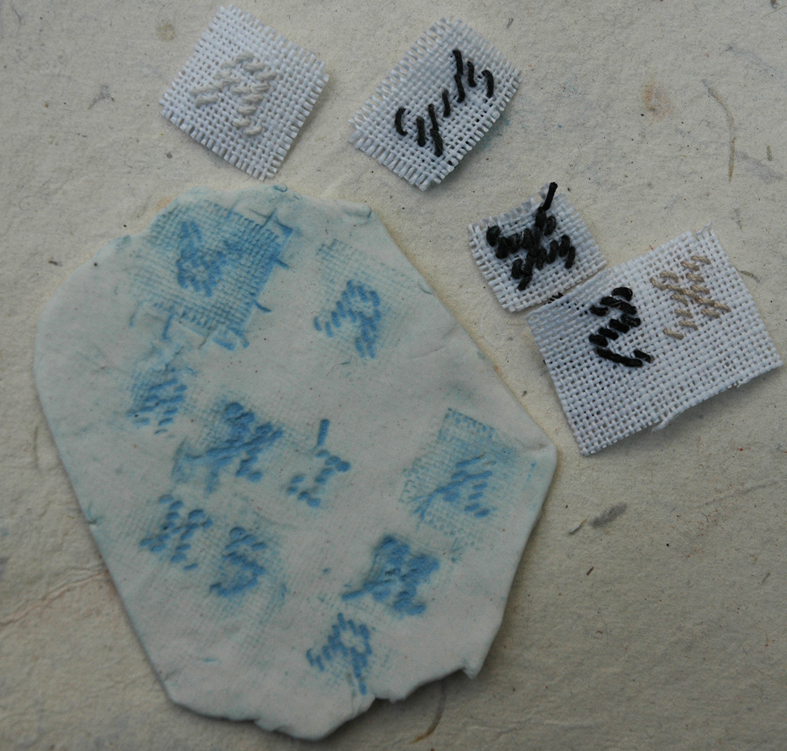
The impressed hand is coloured with pale blue powdered enamel so that the outlines are seen more clearly, I think that this colour relates to the embroidery patterns I have been using as references in some of my other stitched work. I am also considering how I want the lettering of the mottoes and poems written and below is a sample of a some stitched letters from a whole alphabet I had considered sewing in order to make individual stitched letter impresses, but they appear too indistinct at this tiny scale – I may return to this idea though for other works in porcelain or enamel.
So I will use the commercial stamped letters for the writing in this series of work, I like the way that the rather wonky stamps counter the more fluent and elegant hand impressions and drawings
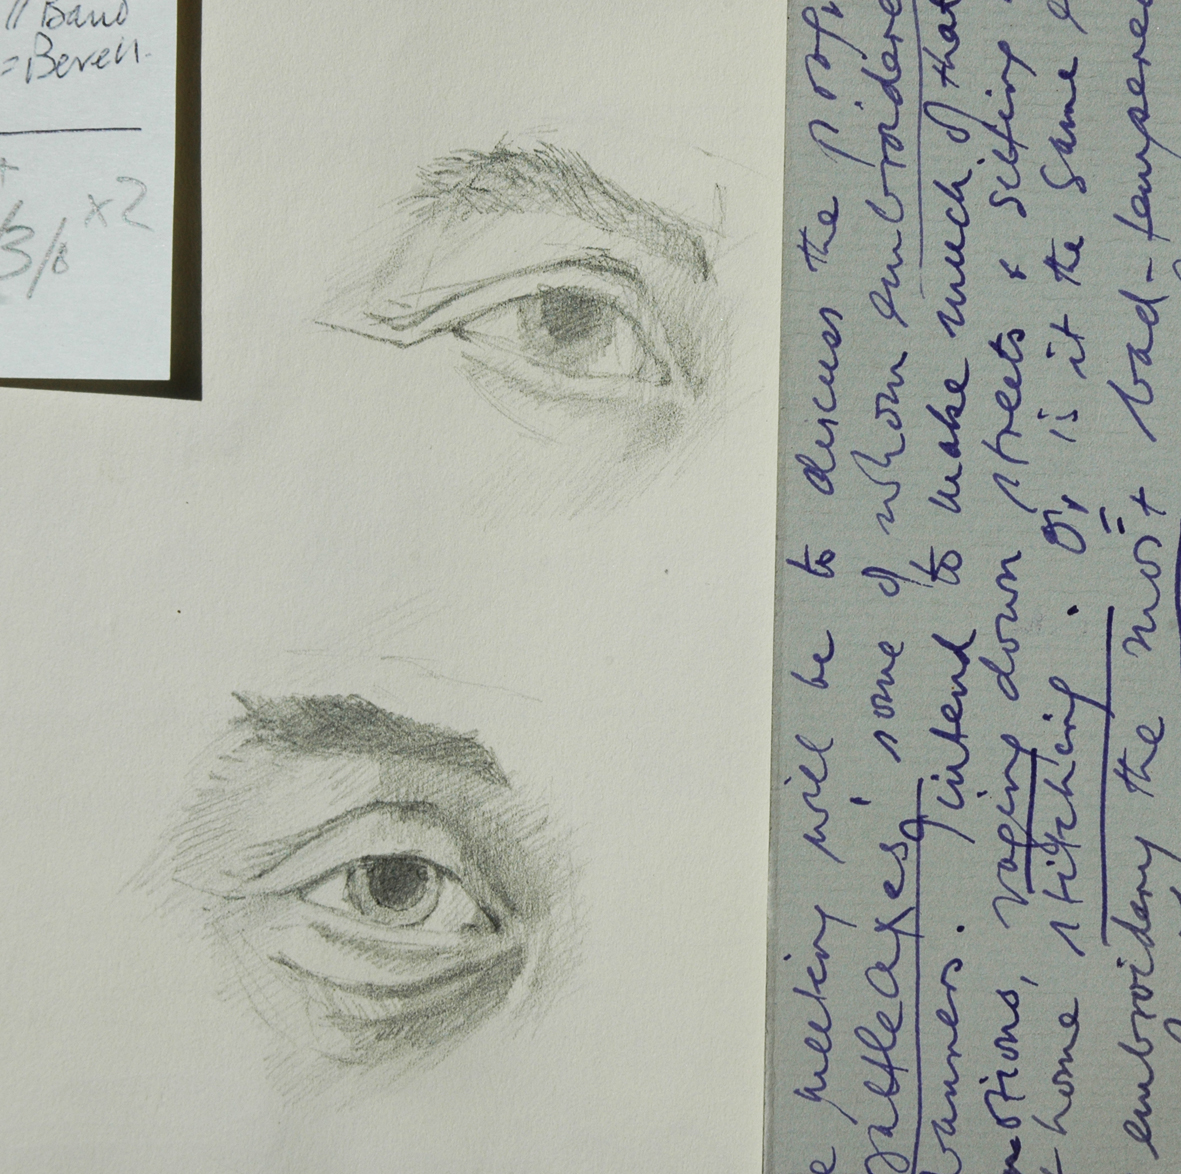
In response to the Burka Eyes page I received a comment from Rosalin Sadler, who commissioned this eye embroidery of her then husband, Howard Jacobson in the 1990’s. I remembered the piece well, it was quite a challenge, not just the small scale (approx 3cms) but the fact that a likeness had to be achieved in this one facial feature.
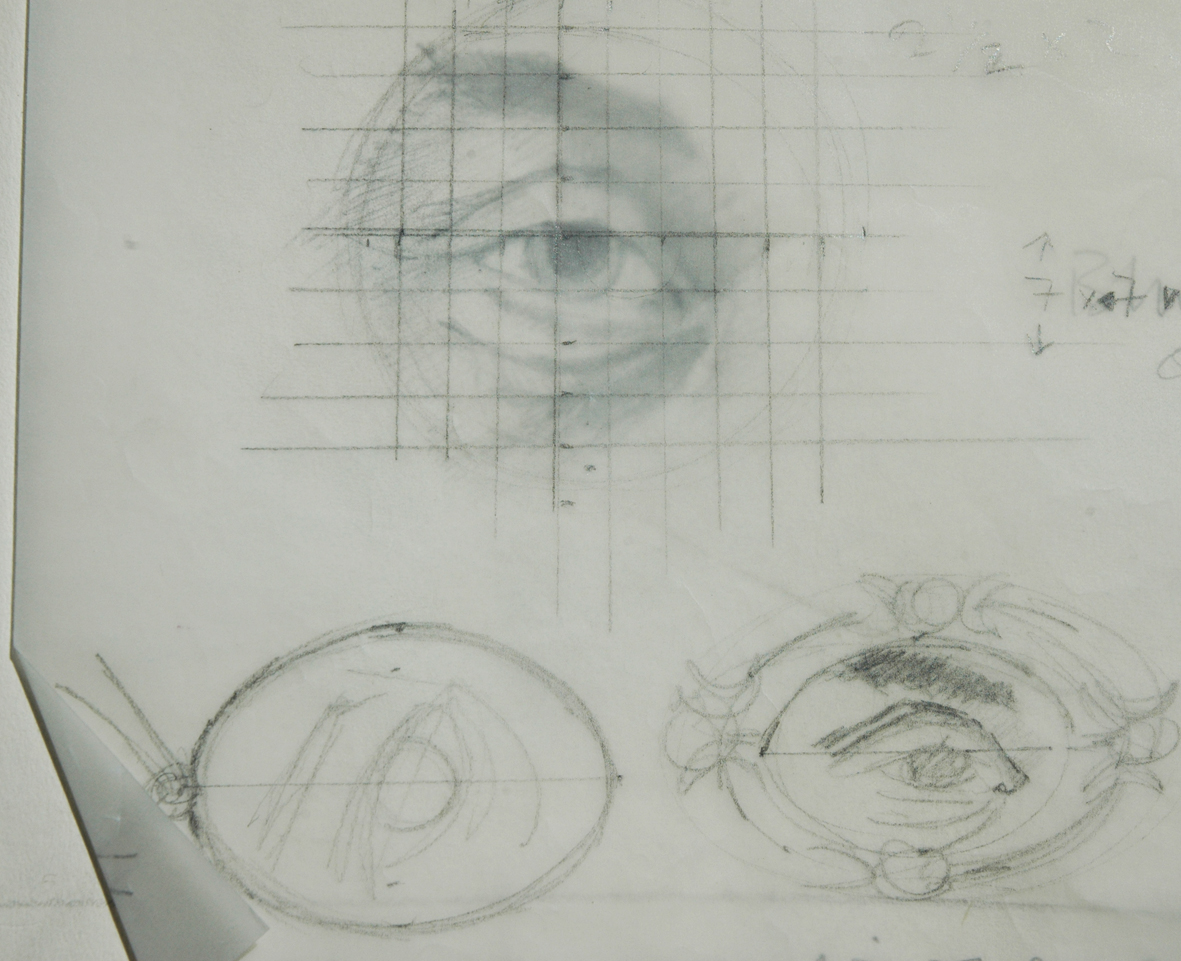
I made several pencil drawings from life, the drawings above are from my workbook from the years 1995 – 7 . The upper drawing is of my husband Stephen Jacobson’s eye, his brother Howard’s is below it and this is the drawing I worked from. At the side of the page in my book I have pinned a card from Rosalin discussing some of my other embroideries, she is asking me if I feel that embroidery is the most bad tempered of all the arts. I now remember a discussion about the precise stabbing action of stitching and how much I felt it suited my nature……
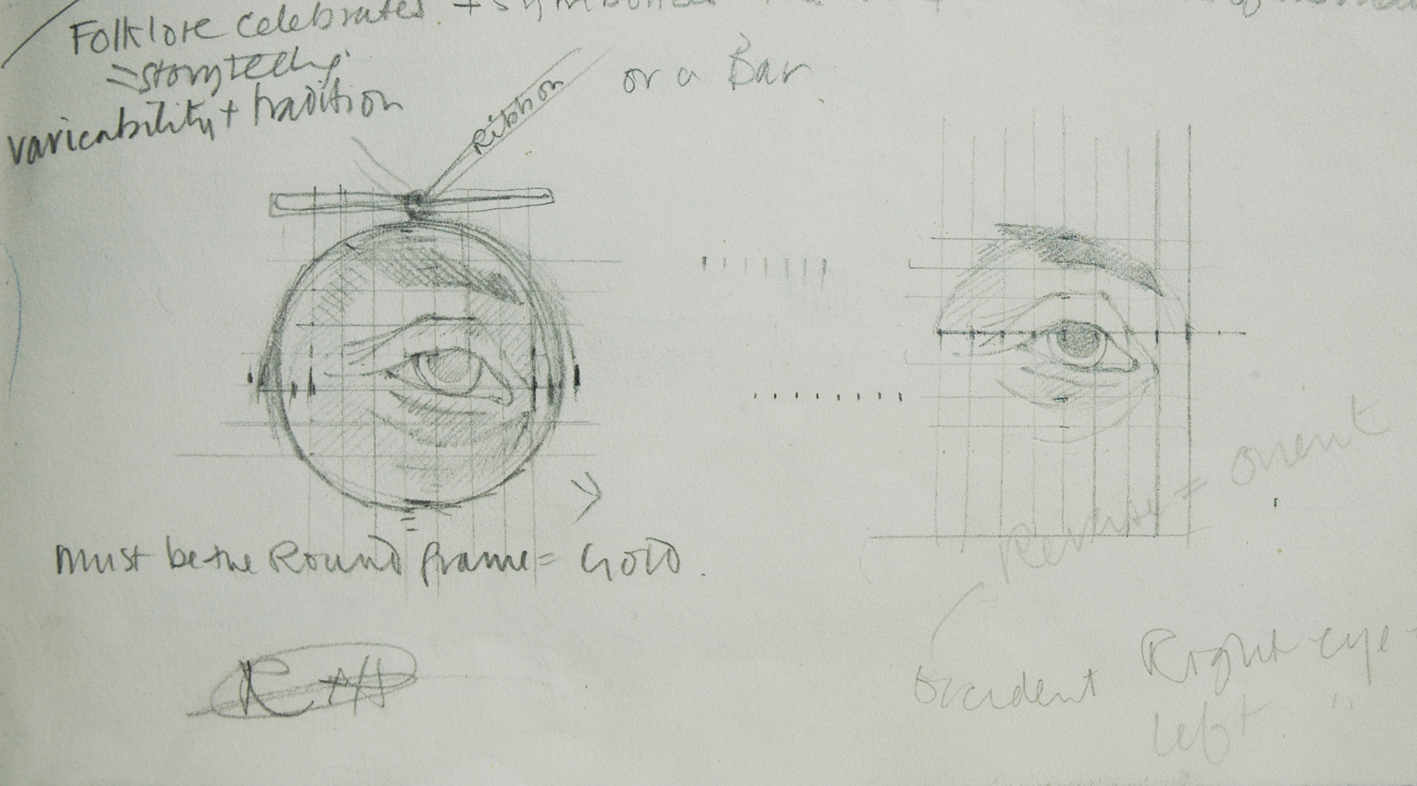
I also remember researching into eye symbolism, apparently it is believed in West, that the right eye was a symbol of the sun and the future and the left of the moon and the past ( in the East the eye meanings are reversed). The right eye that was chosen. There are also some handwritten notes suggesting colours “Blue grey – olive green flecked with ginger”
.
In her comment Rosalin mentions the mount, which I also have a note of, it was gold, antique and bought in Bristol, where l was living at the time.
What has been really interesting is finding so much information about an old piece of work, both her reminiscences and my working information. I am now becoming very thankful that I have kept my samples and working drawings for most of my working life, they may become very useful as I continue this to write this blog. And here, possibly, is evidence of the beginning of my fascination with eye symbolism.