The last week of my exhibition Inspired to Stitch at Hidcote Gardens and this week ,taking stock of the whole experience, I find myself reflecting on, amongst other things, what sells and why. My small prints of the Birds in Skirts are still selling well and in a few weeks will be winging (sorry) their way to their new owners.
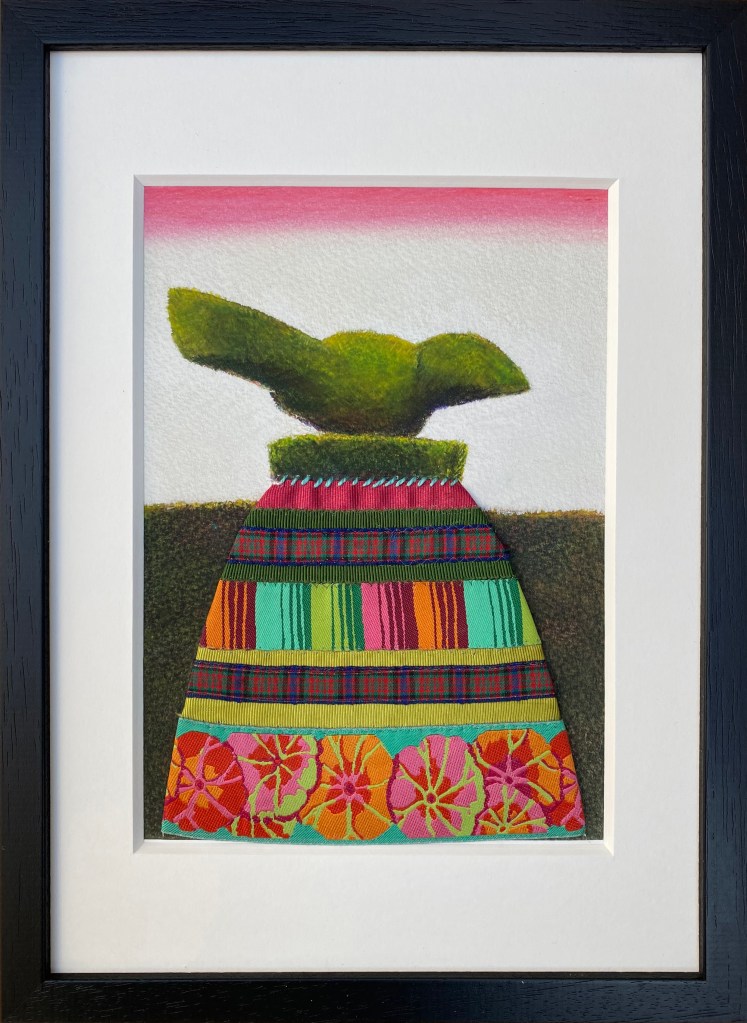
But it is often the case that the works I have most affection for (or would like to keep for myself) often do not sell immediately. I am particularly fond of the 2 larger A3 prints with the crazy patchwork skirts. I designed and made these fabrics for my first ever book, Crazy Patchwork, published by Collins and Brown in 1998. These 2 pieces were made into lampshades – yes that’s right, I made crazy lampshades – so I unpicked them from the shade shapes and used the still pristine patchworks for the large skirts.
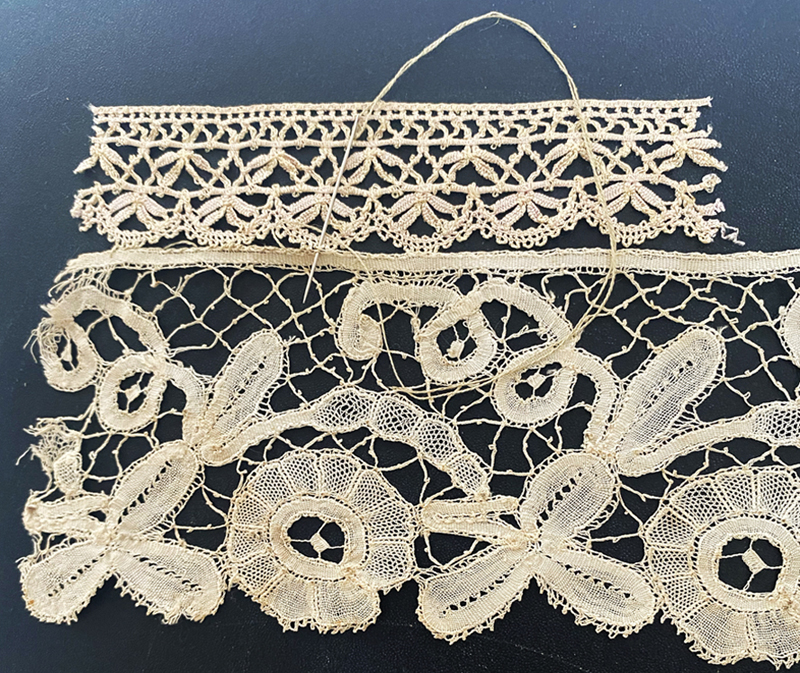
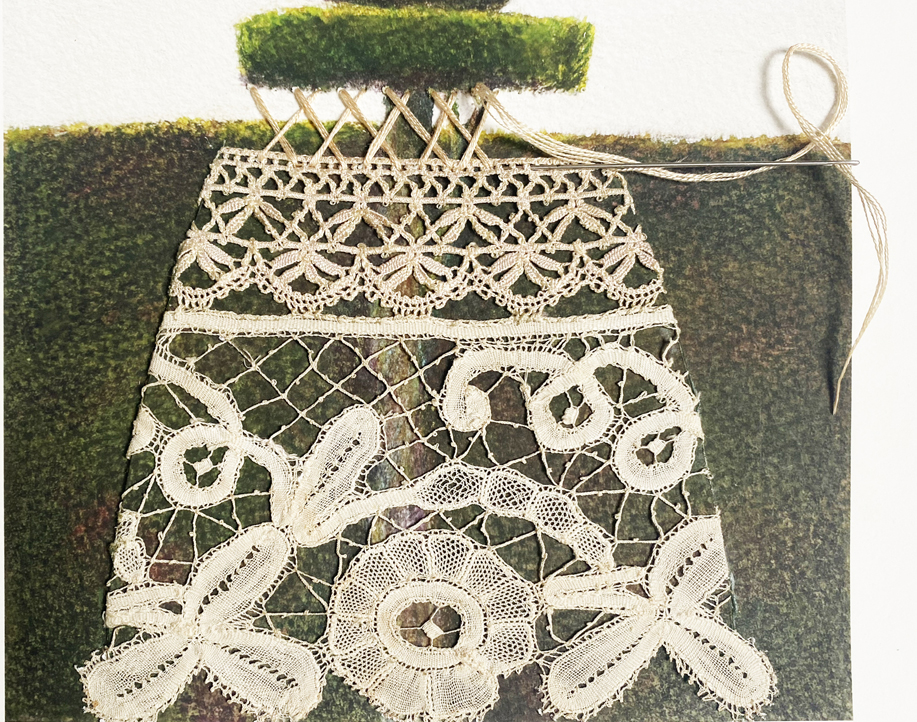
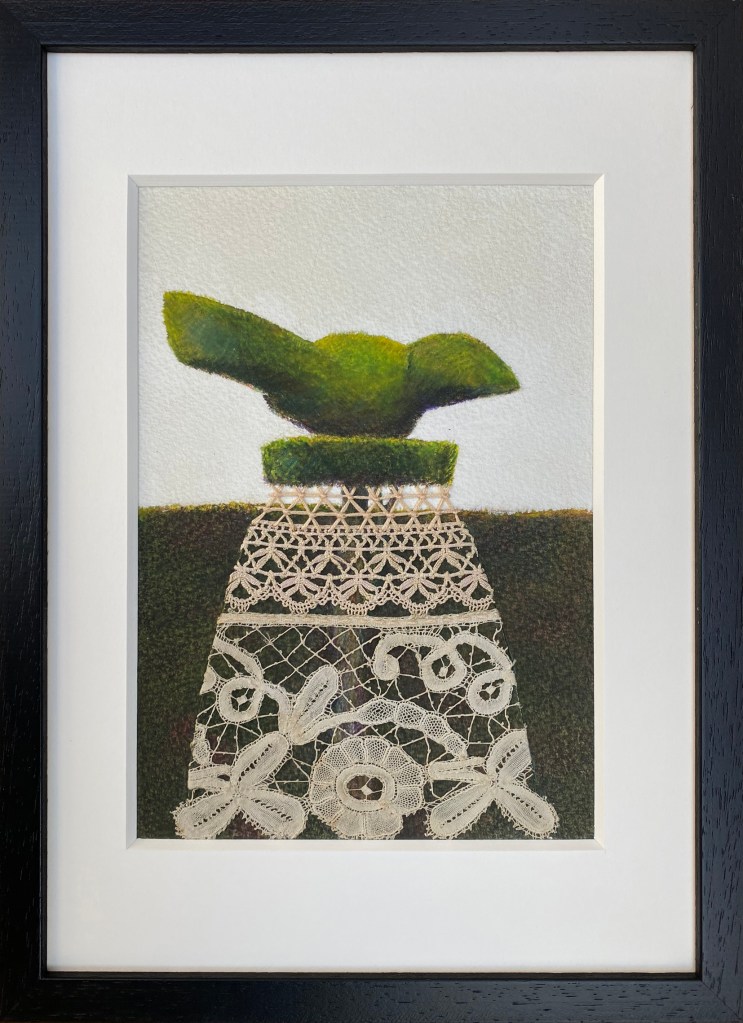
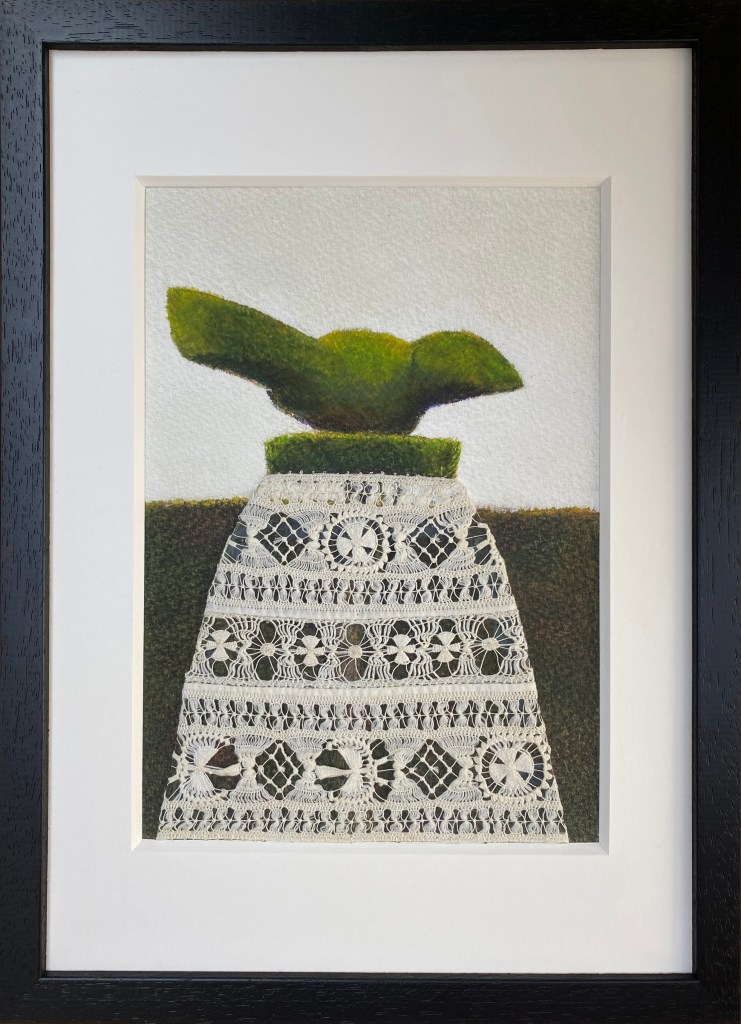
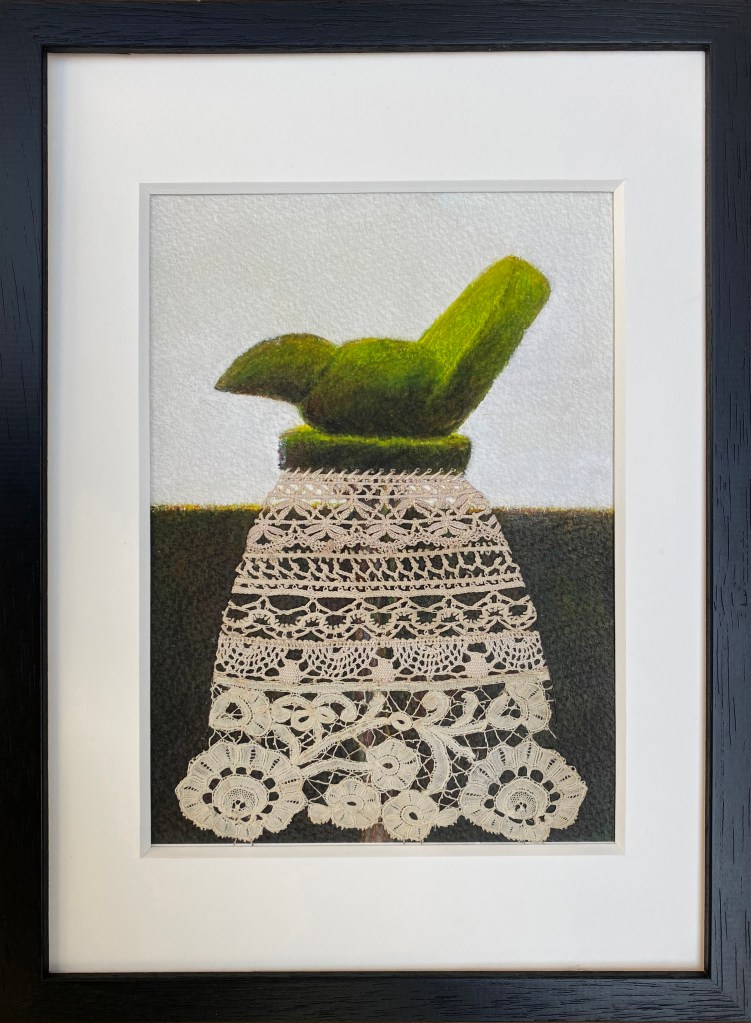
IF I was buying from this collection, I would choose the lovely old white fabric designs chosen from my collection of vintage fabrics; strips of hand embroidered tape lace, Broderie Anglaise and crochet braids and ribbons that I have lovingly hand stitched together. But not one has been ordered – hey ho! obviously have been overlooked by the more colourful iterations or maybe it is the lack of the pastel skies?
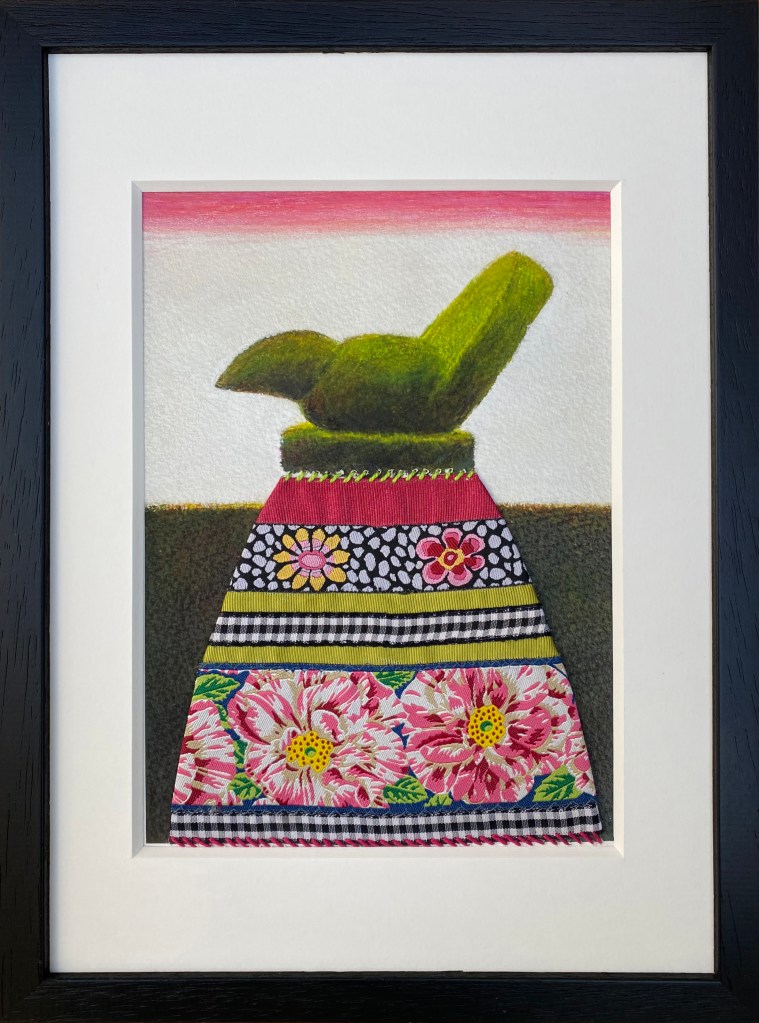
But the Beribboned birds, below, made with the more modern and beautifulcoloured ribbons by Renaissance Ribbons are still available….so what do I know?
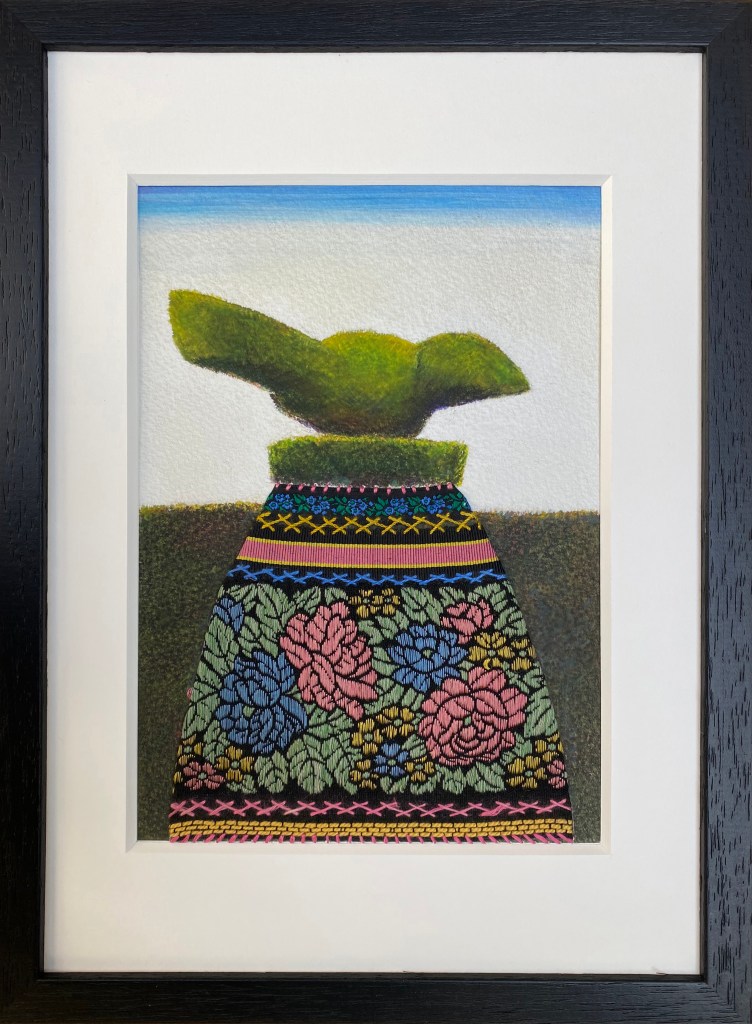
And my very first versions of designing and stitching the complicated Jacobean embroidery techniques, that took so long to research and develop, have still to find a new home – Hey Ho! But does any designer ever know what will be the most desirable objects of all their creations?
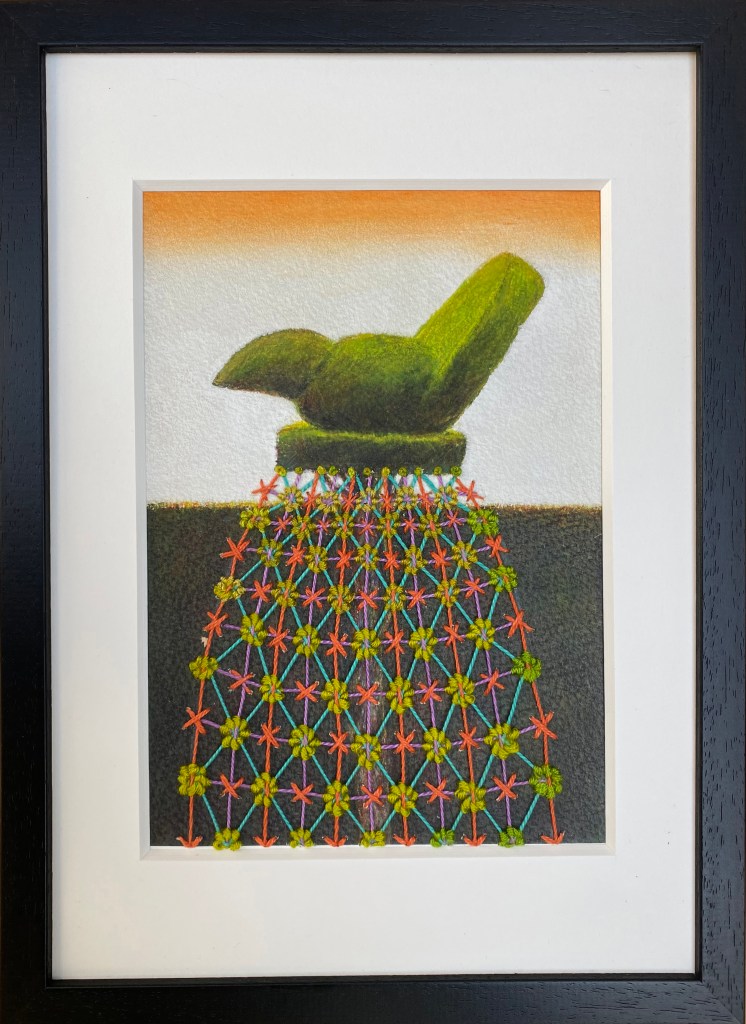
And here is my latest version of the birds, it does not appear in the exhibition but is the result of a swift video made for instagram showing how I made this woven version….maybe there will be more to come as I have recently accepted a commission for one as a special birthday present…..
opening the package of the advance copied of Heart Space Studios’ first book
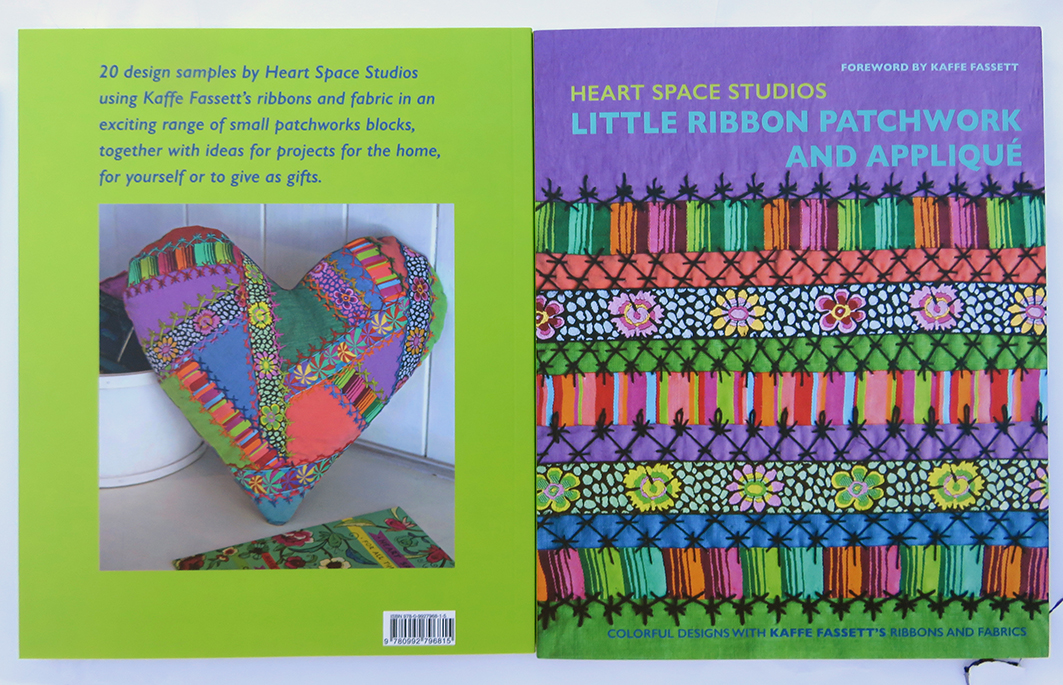
Here it is, my very first look at the proper printed books – Heart Space Studios’ Little Ribbon Patchwork and Applique, inspired by and featuring Kaffe Fassett’s wonderful ribbons. And this is the English edition, and it is published by Heart Space Studios…But oh the hopes and fears were in equal measure when I saw that neat white package of the first 10 advanced copies of the book…
all the angst and problems of getting the UK cover perfectly coloured have paid off
Originally the book was commissioned by the American publishers, Taunton Press ( and uses American terms and measurement – bliss – I was educated using inches and yards) and then I was offered the opportunity of producing a small UK edition and this is it. And as a consequence I have spent a large proportion of the last 9 months working on this and other publications involving Kaffe Fassett’s ribbons and fabrics……
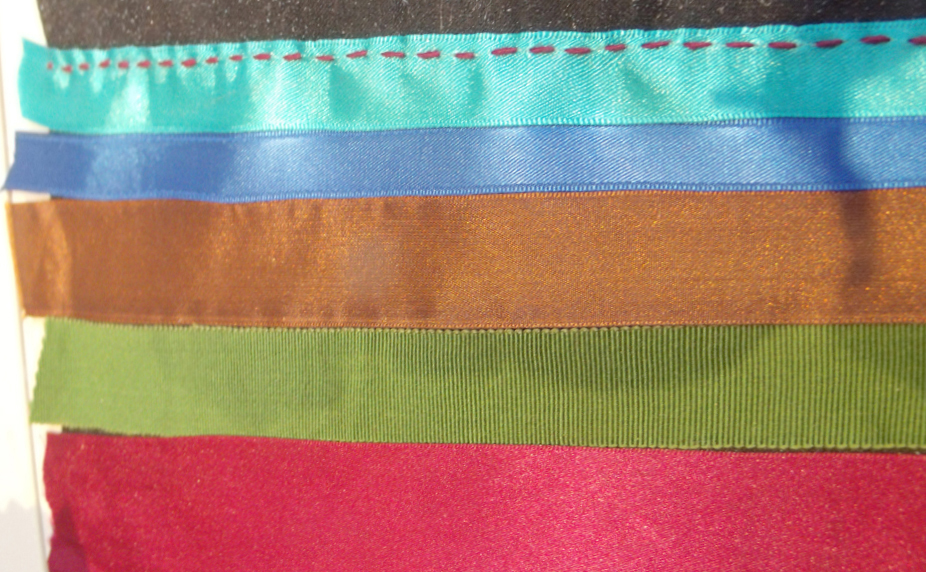
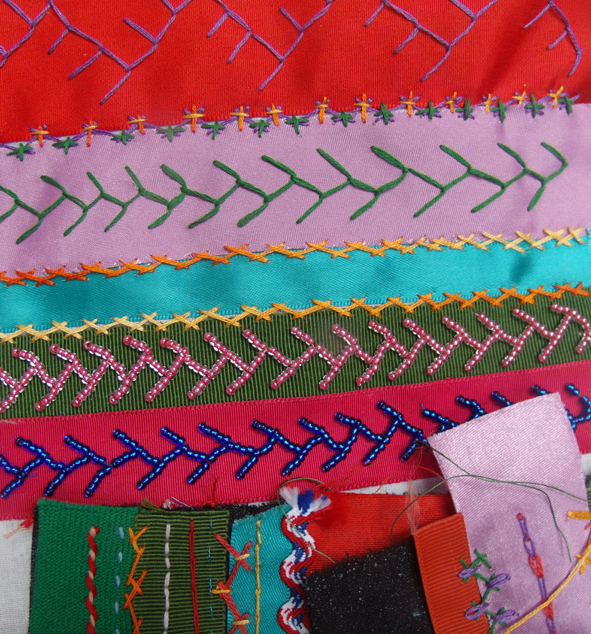
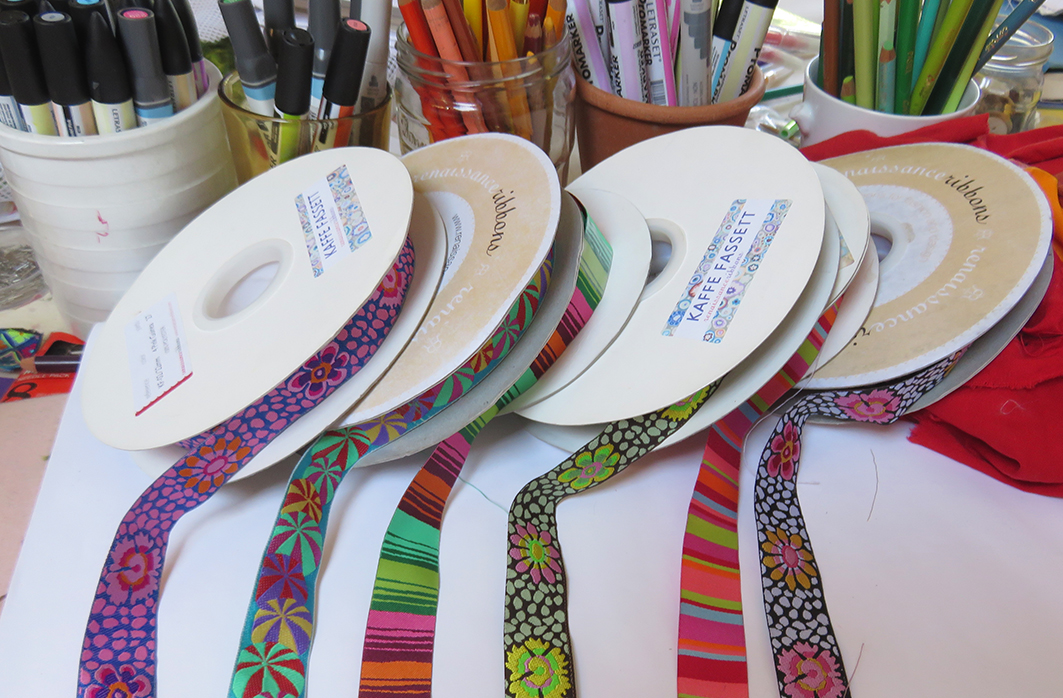
the 5 original reels of ribbon I designed with
I was first asked, by Susan Berry, a book producer concentrating on textile crafts (whom I have worked with for many years) if I had any design ideas for using the beautiful Jacquard ribbons designed by of Kaffe Fassett and produced by Renaissance Ribbons. Susan advised me to see them at his exhibition at the American Museum in Britain, that took place in 2014. Then I was sent a few reels of ribbons to ‘play’ with and this is what I came up with in the first few days….
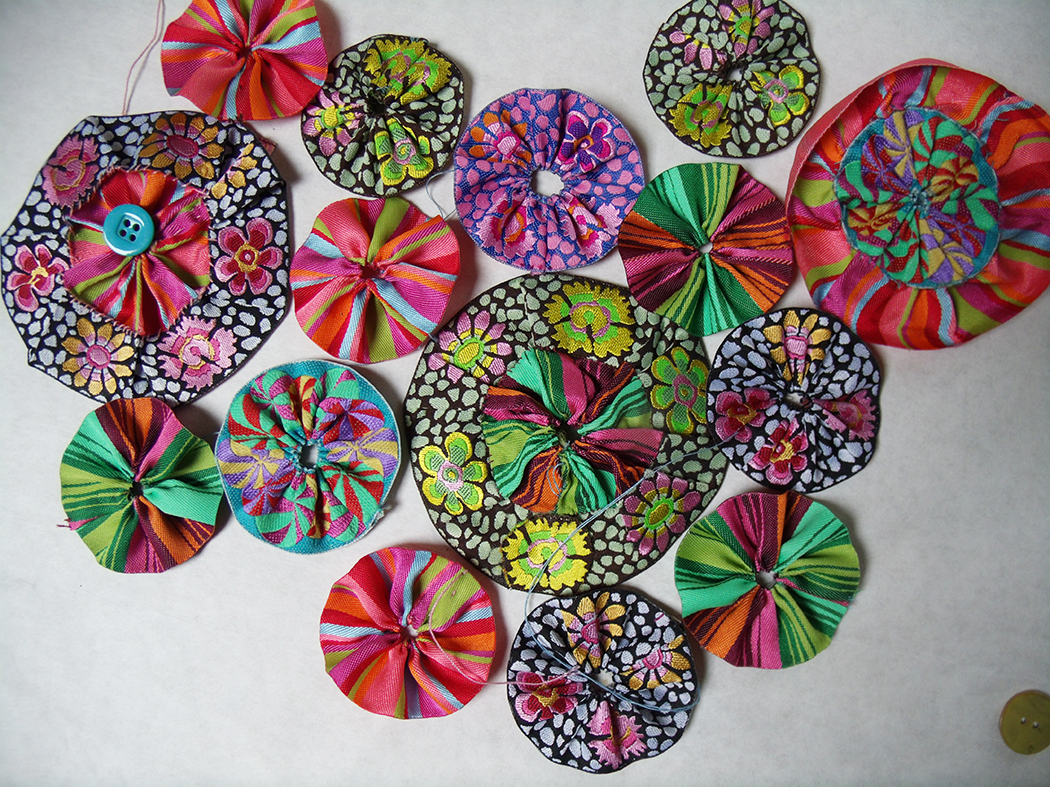
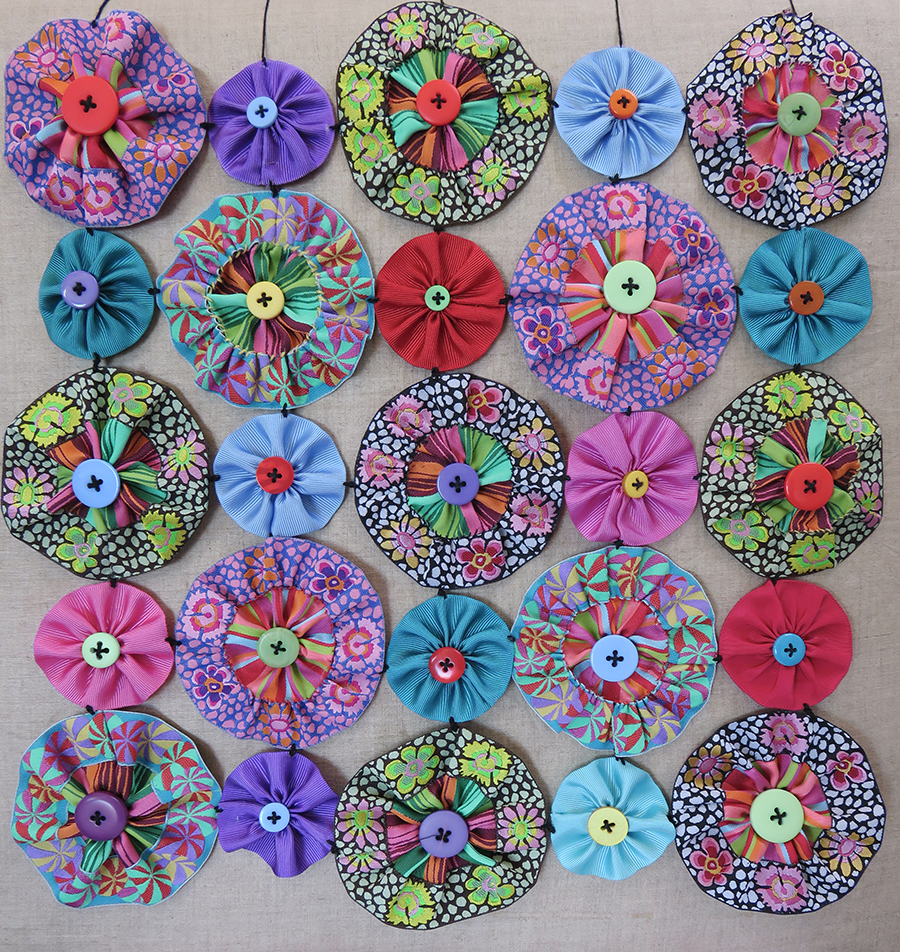
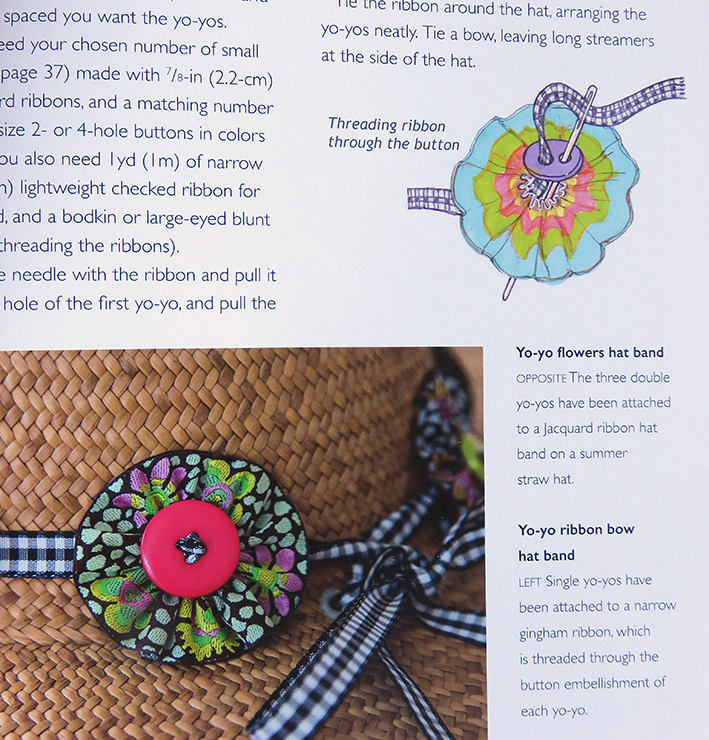
single and double ribbon yo-yos
I have a vintage – quilt hanging on my studio door and I immediately thought that this system may translate to the ribbons; so I just cut some random lengths and using running stitch gathered them up to form these pretty circles…some worked and some didn’t – see above; but it is a designers task to make them all work beautifully – so lots of samples later I made this, below, which I intended to grow into a huge throw or curtain.
yo-yo hanging – sadly this failed to make it into the book – it proved too complicated to show how to stitch together simply….
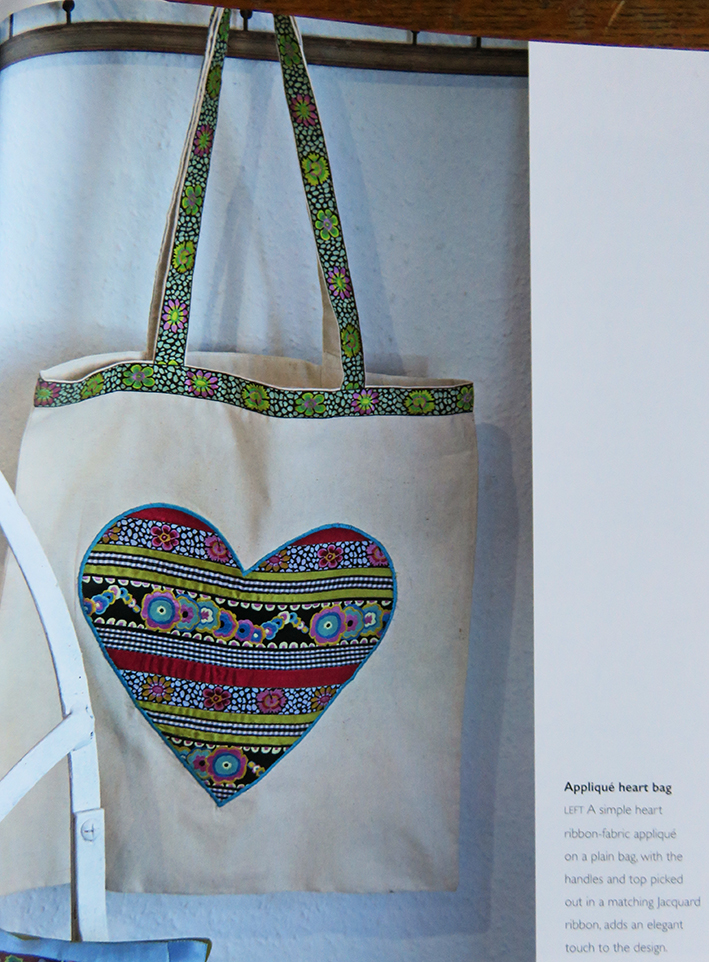
Then of course I thought of crazy patchwork, and this eventually became the heart-shaped cushion on the back of the UK edition cover
crazy patchwork with ribbons hand embroidered into position between the patches of shot cottons
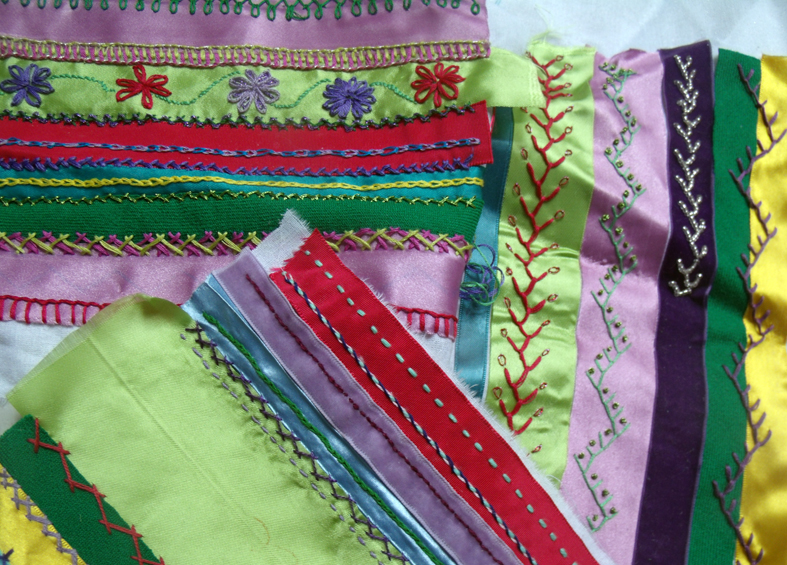
of ribbon with the loose yo yo’s, easy -peasy as these ribbons have been designed to work together – a rich mix but what else would you expect from Kaffe Fassett?
ribbon and yo-yo strips – first ideas
I just took lots of photographs as I researched, and sent them off with rough ideas for a book of small patchworks made of ribbon and plain fabrics – but the journey from playing with ideas to a finished book has been long and let’s say problematical – ideas are always easy for me to come up with, making them work for inclusion into a “how to do it” book is not easy at all.
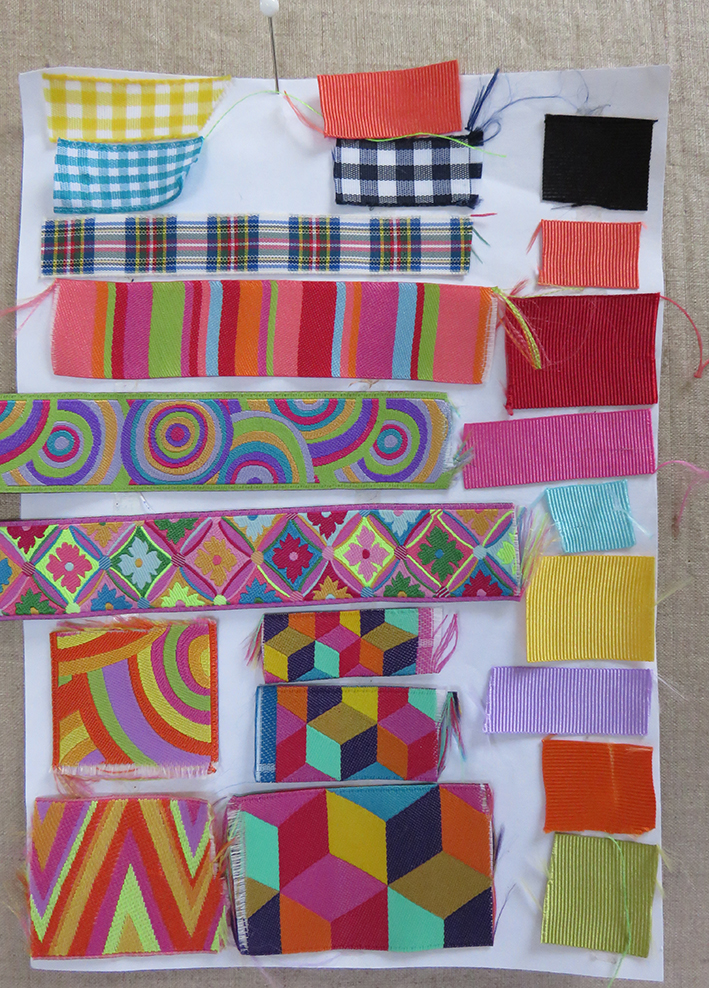
new ribbon combinations
getting the new ribbons into colour combinations – here are the brights
The first thing I realised was that I needed to put some other ribbons and fabrics with these intensely patterned Jaquard ribbons. So I included the Grosgrains, or Petershams, fine ribbed ribbons that come in many sizes and colours, Renaissance Ribbons have many different versions – and they duly sent me some and more of the new ribbons from their Kaffe Fassett range; and then I needed a ribbon that could be used to tone with the 2 brights – I chose my old favourites – tartans. Tartan ribbons are universally available now on-line, and they conform to the clan colours so I felt sure that most buyers of the book could get hold of them easily. But then which fabrics to use for the patchworks particularly the crazies?
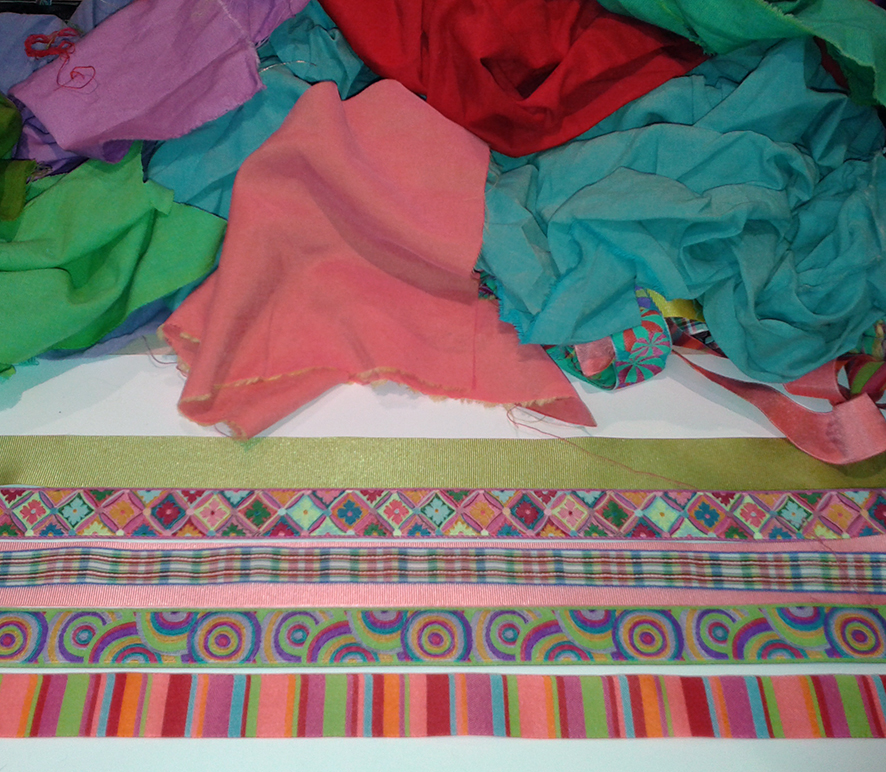
my stash of shot cottons selected to tone with the ribbons toning ribbons
I am a fabric hoarder, like most textile designers, and I found some small pieces of ‘shot’ cottons – the warp and the weft of the fabrics are different shades or even different colours from one another so the woven fabrics are subtle colours and so more easily used with other materials; and by chance who were these shot cottons designed by? Kaffe Fassett. So that was an easy decision as well and I sent off to The Cotton Patch, (who have the best user – friendly, on-line ordering fabrics service) for more samples of these lovely fabrics. I started designing approximately 20 different samples of ribbon patchworks and appliques.
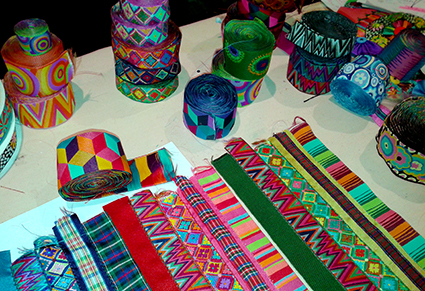
But I fist made myself some new fabrics – out of the ribbons themselves….
designing ribbon combinations for ribbon fabric
trying out different ribbon fabrics for crazy patchworks
what I needed to realise is that when you are making your own ideas for a book, it is important to be able to demonstrate by using photographs, drawings, diagrams and words how someone else, who has not got your knowledge and may even be a complete beginner, can easily follow the instructions …a lot of lovely ideas and more complicated designs got thrown out in this process.
But here are some examples of 20 samples that made it, from first ideas, through to illustrations of the steps involved and finally the 20 projects that I made with the samples. There are 4 types of patchwork and applique techniques in the boon, strips – see below, crazy, squares and yo-yo’s.
putting several ribbons together onto my work top, trying to make up a new ribbon fabric
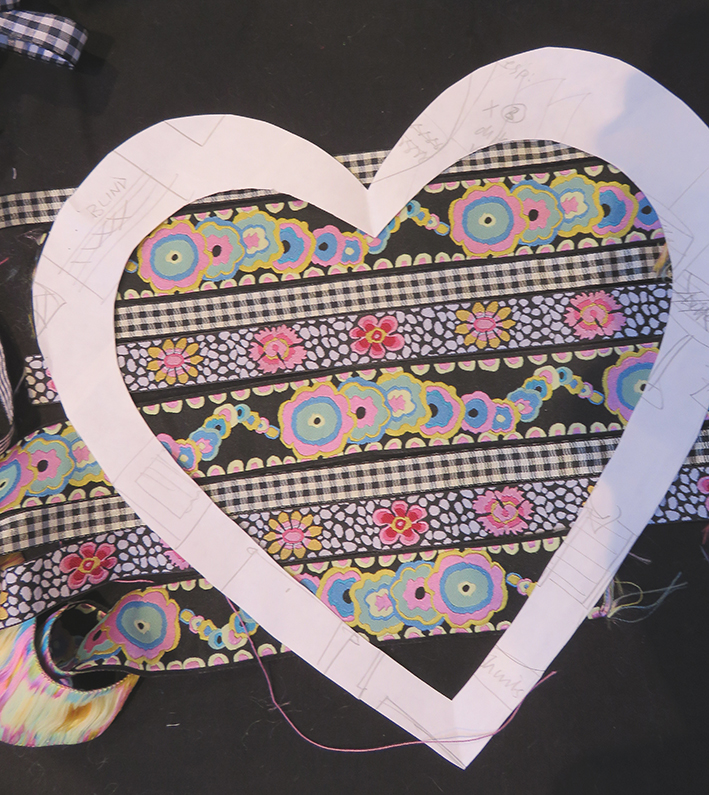
designing another variation of ribbon stripes for a heart shape applique
from the work table to the finished book in one bound!
illustration to make the ribbon fabrics
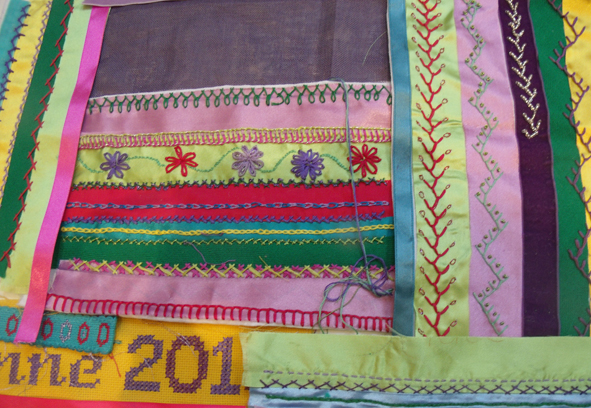
page from the book to show the heart shaped applique
and eventually this design turns up on the contents page as well….
content page of finished book completed with the same Ribbon Fabric
the yo yo designs quick and fun to make and design with, within the book they come single, embroidered….
hat band yo yo with button stitching ribbons
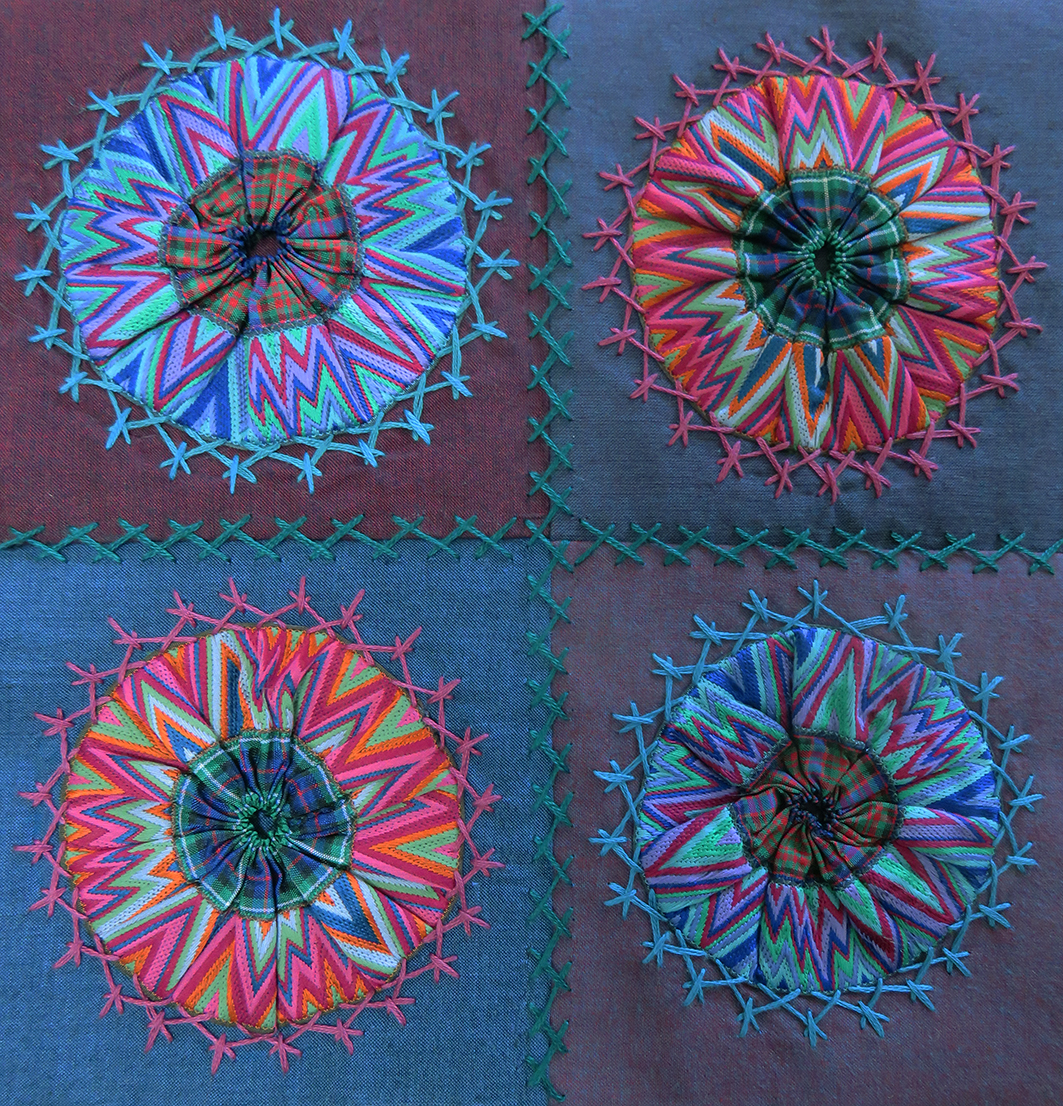
embroidered double yo yo square patchwork
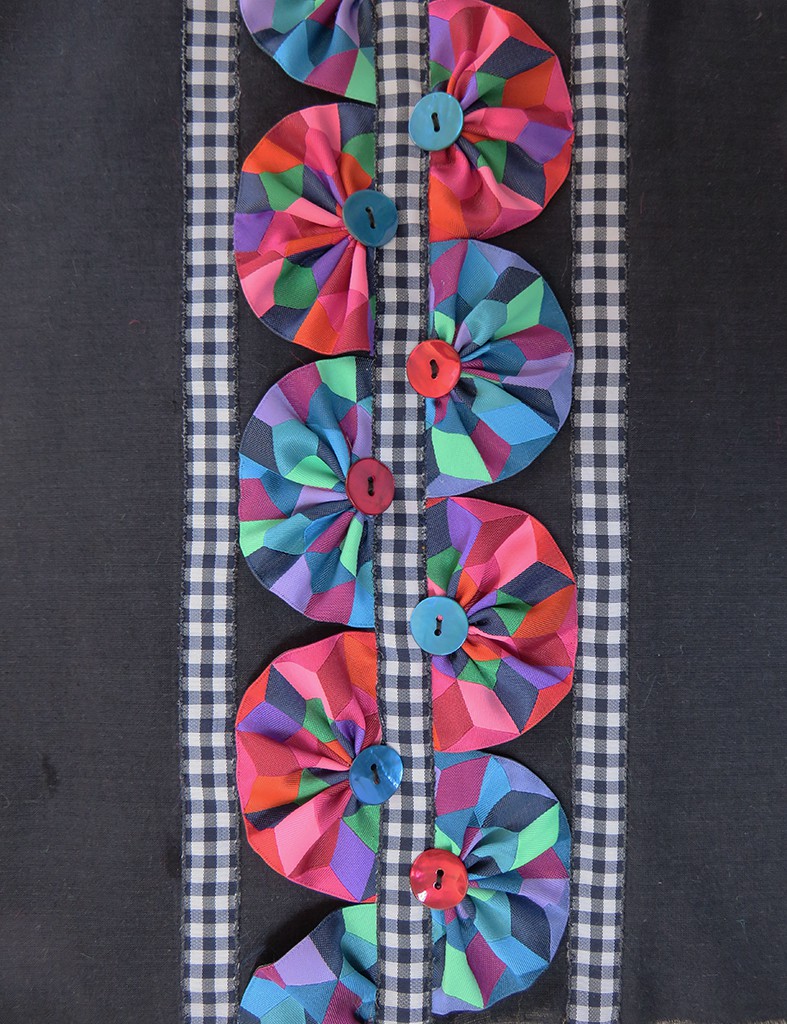
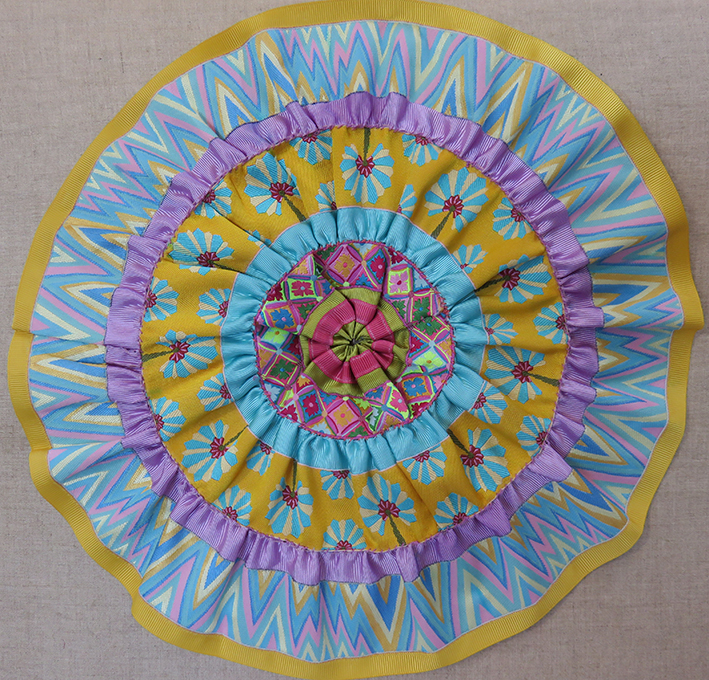
halved and giant.
half yo yo bands
and one very very big yo yo.
in fact I could have written another book about making and decorating with yo-yos
project section of the book – with lots of different things to make
I could write for days about the book and all that it contains – but then why would anyone buy it? As I write I am waiting for the large consignment of books to arrive from the printers….it is a small edition but I have plans to advertise it, it is being launched on September 15th at the American Museum in Britain, well it is full of the American Kaffe Fassett’s ribbon designs… and for this I am giving a special bead – making workshop. ( more of which in a later post )Then the book is being sold with special packs of ribbons and fabrics on the Cotton Patch stand at the Knitting and Stitching Show in October; but meanwhile we have a lovely display in the shop window of Heart Space Studios, devised by our style guru, Jane- Marie Mahy, please see below and I have devised a whole set of classes to complement the book – go to http://www.heartspacestudios.co.uk/workshops/ribbon-patchwork-hearts-half-day-class/. for more information. And eventually we will be selling the new book on our website – watch this space
Heart Space Studio window display by Jane-Marie Mahy
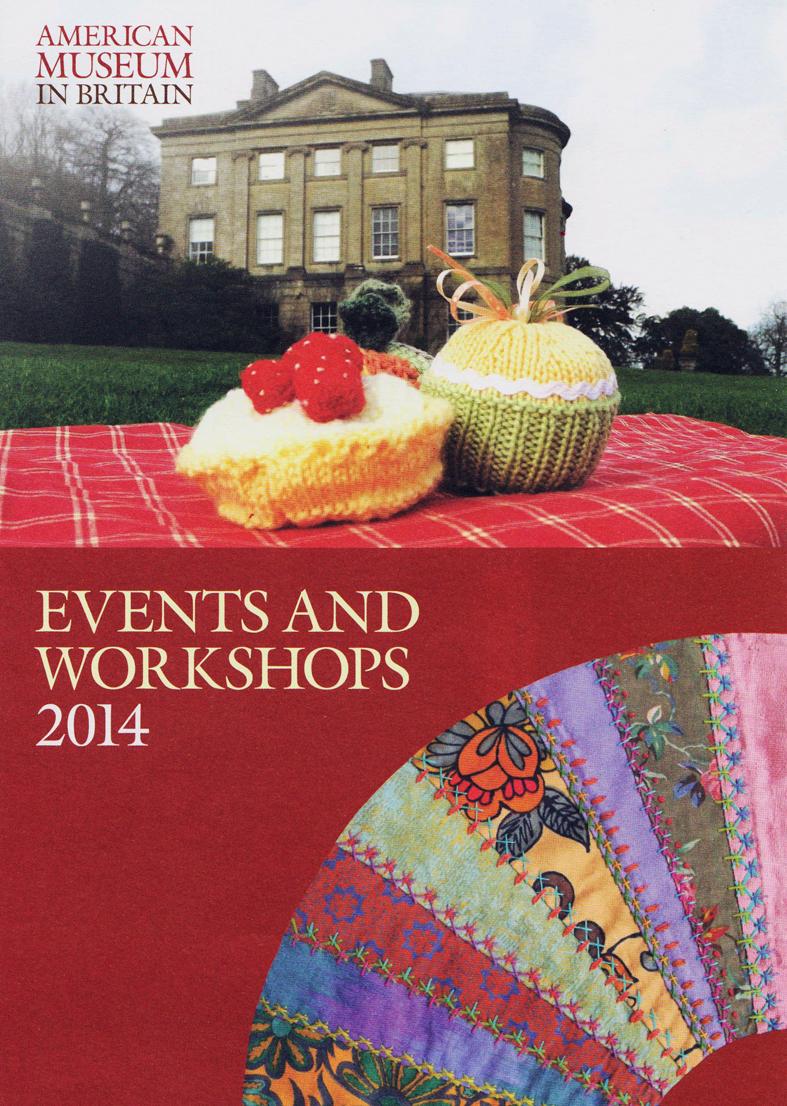
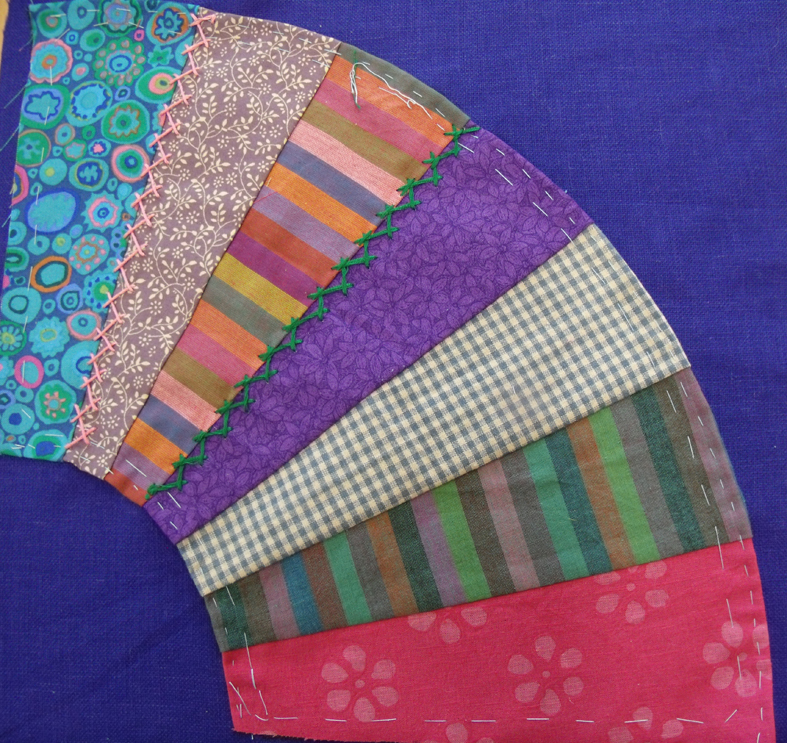
My Crazy Patchwork fan design on the cover of this season’s events catalogue at the American Museum.
I have been getting out and about recently and have been taking a workshop at the American Museum in Britain, which is situated just outside Bath. I have been asked to deliver 2 day long workshops by their education officer, Zoe Dennington (who found me via this blog). Zoe asked me to use Crazy Patchwork techniques for classes to run at the same time as the current vibrant Kaffe Fassett exhibition being held at the museum for several months.The second class is in October to make a crazy patched and beaded heart.
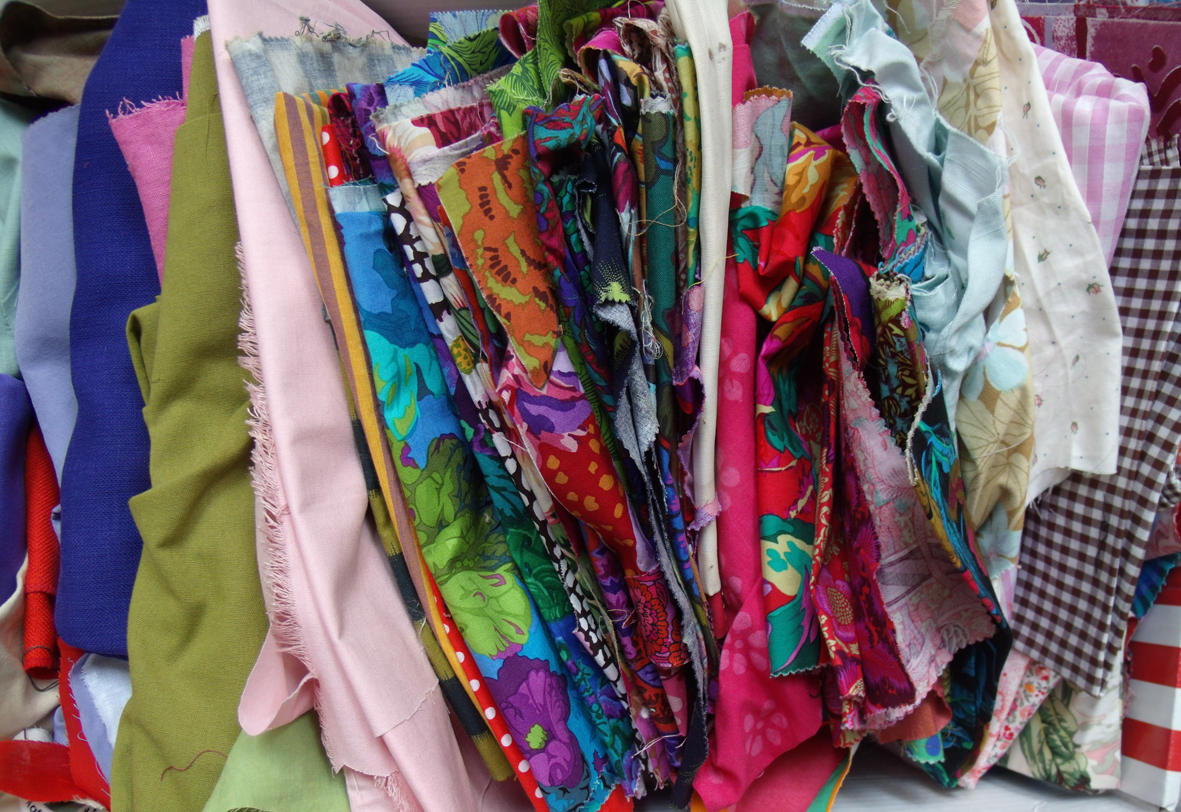
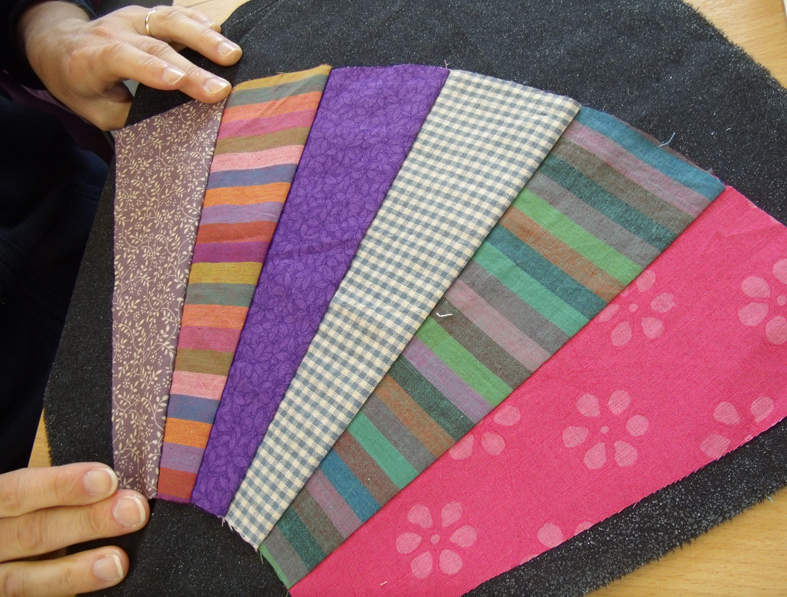
the range of fabrics that I took for use in the workshop
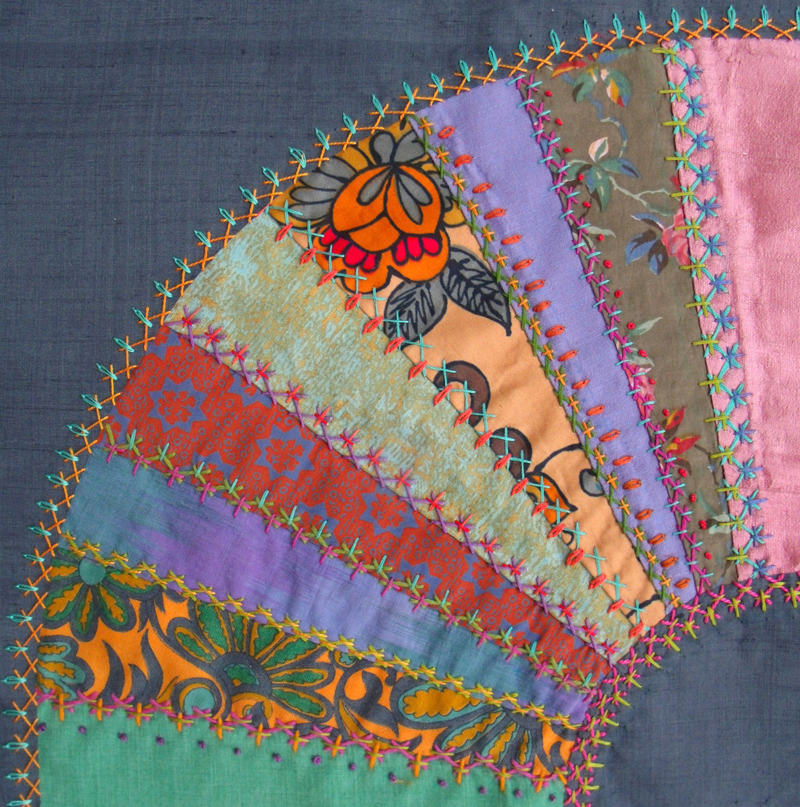
Luckily I was given a batch of cotton samples of fabrics designed by Kaffe Fassett to use in my workshop by a friend, Susan Berry ( who produces his very popular patchwork and knitting books) and they certainly livened up my Heart Space Studios fabric stash….I had designed a special project for this session, a simple design of a fan and one of the most popular motifs used in traditional of Crazy Patchworks.
the original crazy fan design used for the programme cover
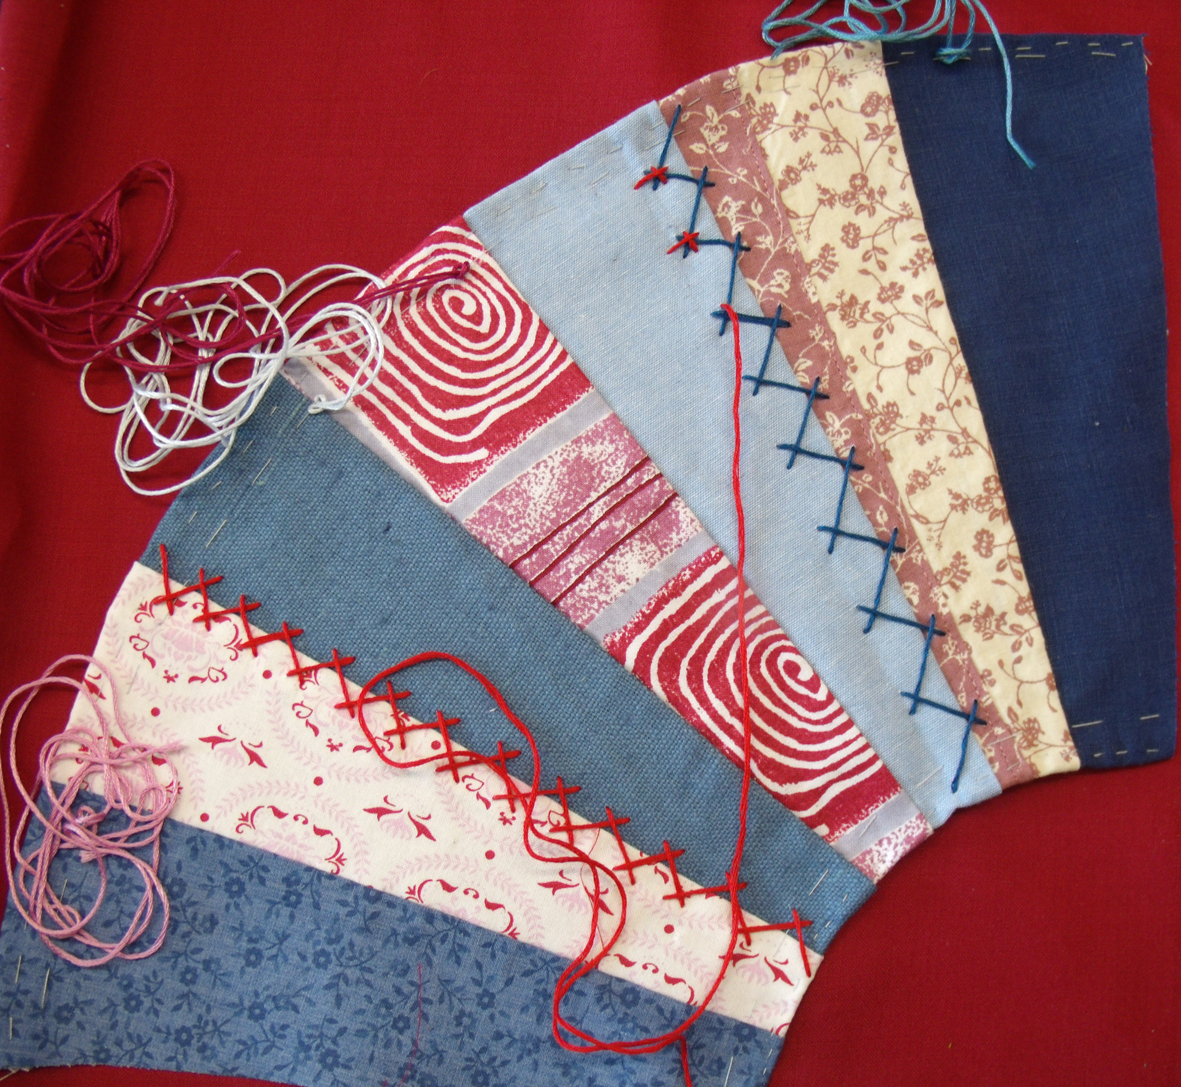
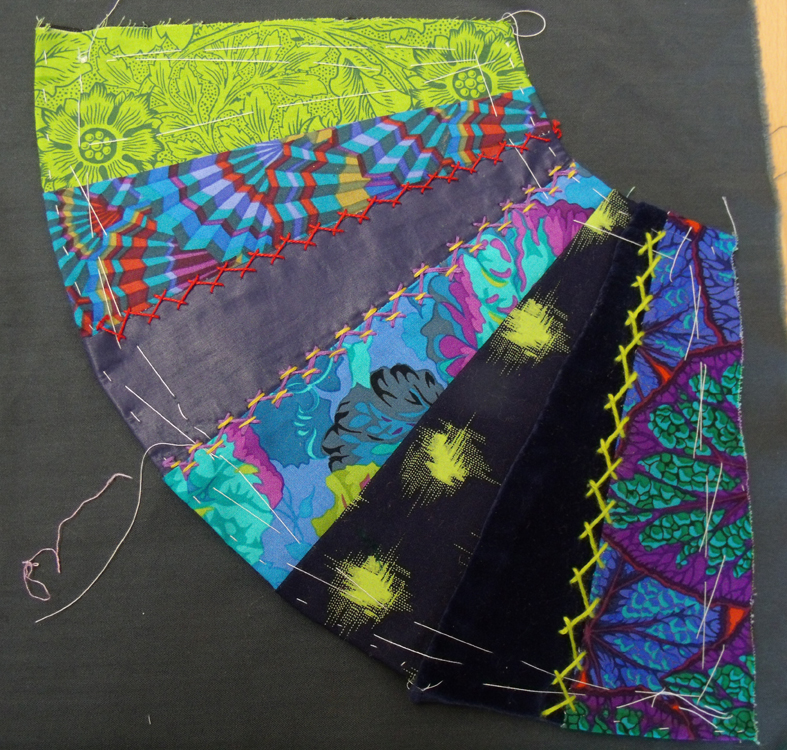
I reasoned that if I provided patterns for the patches then things might go quickly and everyone would finish – well that was the idea! We started off by choosing the fabrics for each fan – there are 7 sections in the design that I had created for the class, which means less embroidery than my sample.
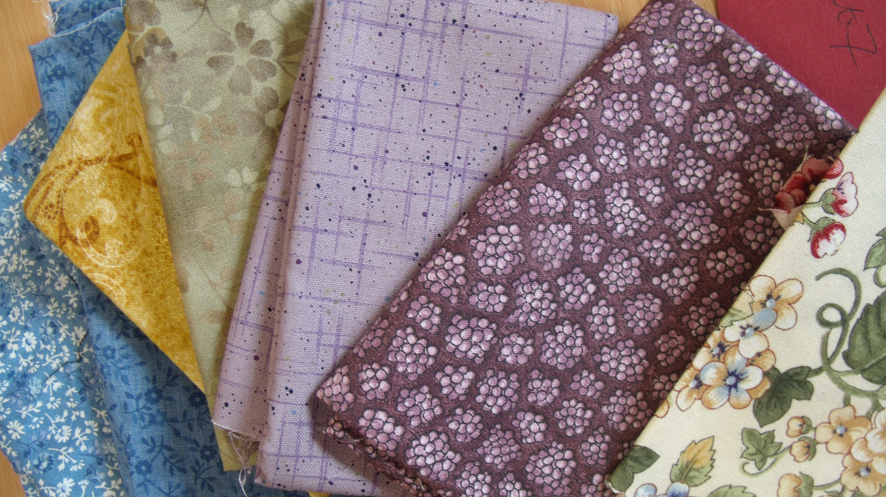
this range was chosen from the fabrics brought by me to the workshop
subtle and softly coloured fabrics brought by a student to the class
I had also asked people to bring whatever they liked of their own materials as well. The fabrics chosen were quickly organised into many different striped bands – I explained about balance of pattern to plain fabrics and crucially for a small colour scheme, to separate a few colours from the patterned fabrics and use them as plains or solids to show up the patterns. And not to worry too much about getting the colours perfect at this point as later the coloured stitching over the seams would help with the colour co-ordination of the whole piece.
vibrant fabrics for chosen for the fan design
Red white and blue – always a good clean colour combination
organising the fan sections is much easier and quicker than for usual odd shapes of crazy patches. The sections were laid over one another and then pinned and using running stitches held section by section till the fan was complete. The complete arrangement was then pressed onto the special heat activated fabric backing
Brilliant colour for the start of stitching the fan into its finished position
. Once the fan had been pressed and trimmed the next task was to find the coloured ground to applique it onto…I find that this is quite a good way to get people to appreciate the difference that different coloured grounds can make to the overall piece.
a rare shot of me teaching – explaining how to deal with coloured ground fabrics using a soft and subtle piece of patchwork.
Sometimes soft colours can be made bolder if placed on very dark grounds and brilliant colours more muted if placed on a toning ground. It is also a chance to reassess the colours prior to embroidering the seams which also fix the fan to the background
the fan shape against a black ground
same fan against a brilliant blue ground – note a new patch on the left hand side to make a more balanced fan
Now to start embroidering – I had chosen to demonstrate 1 basic row of herringbone stitch and then show how to add extra stitches or I should say decorations…it is my favourite decorative embroidery stitch as it can be developed so that it looks almost like a braid. But to begin just a couple of well spaced rows…and then the extra colours can be added.
this vibrant fan design is made even more brilliant by contrasting colours
I like to use contrasting coloured stitches on the seams – they are very obvious but then I do not think it worth doing any decorative hand embroidery if it isn’t to be noticed!
the brighter the contrasts the richer the decoration here the colours sing out
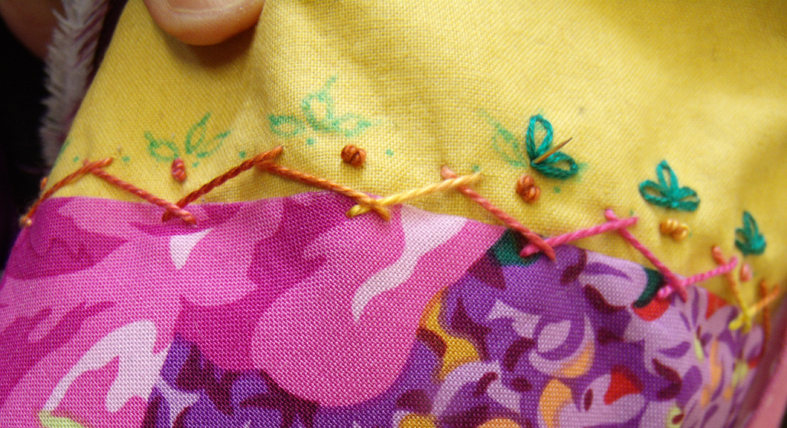
although up close and personal the colours are very vibrant the more colours added to each row of stitching the softer the colours will appear more subtle
the addition of yellow running stitch to the bright pink herringbone stitch makes it less vibrant
when soft colours are used to not much affect then the herringbone variations allow for extra emphasis – this is why I really like this particular stitch – it gives a lot of opportunity for invention
the addition of French knots and detached chain stitches enliven this row of muted herringbone
At the end of the session we put all the unfinished patchworks together on a table to assess them for further additions…. you can now see the affect that the Kaffe Fassett fabrics had on the works – but you would not think by looking at this picture of some of the group around the table that they actually liked what they are looking at !
Crazy critical assessment!
. Everyone faithfully promised me that they would finish the fans and send me photographed results – watch this space…….
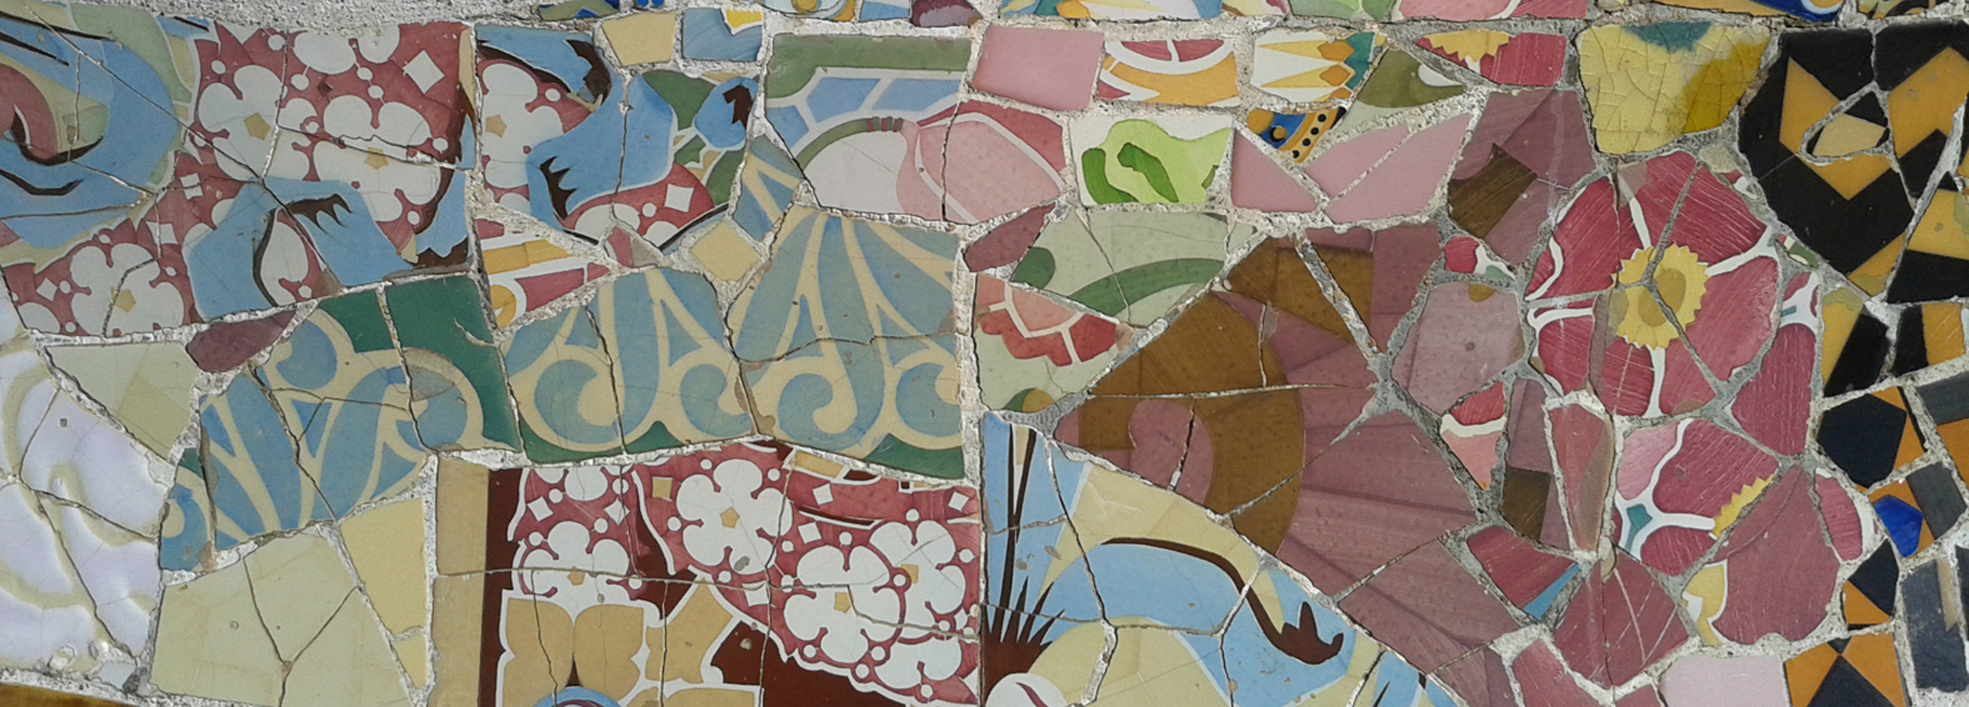
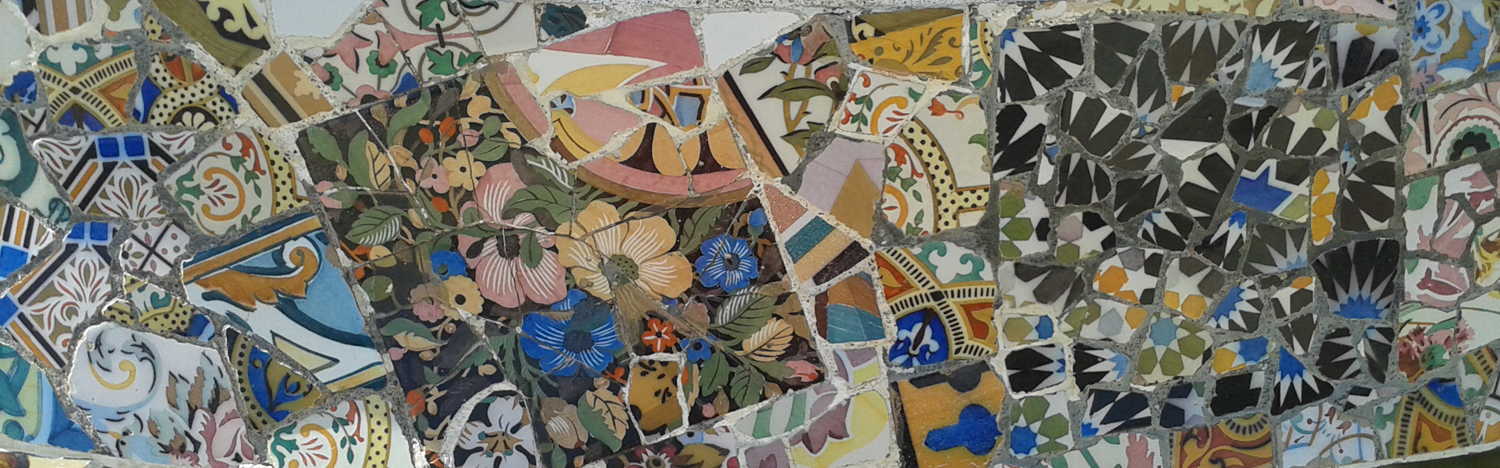
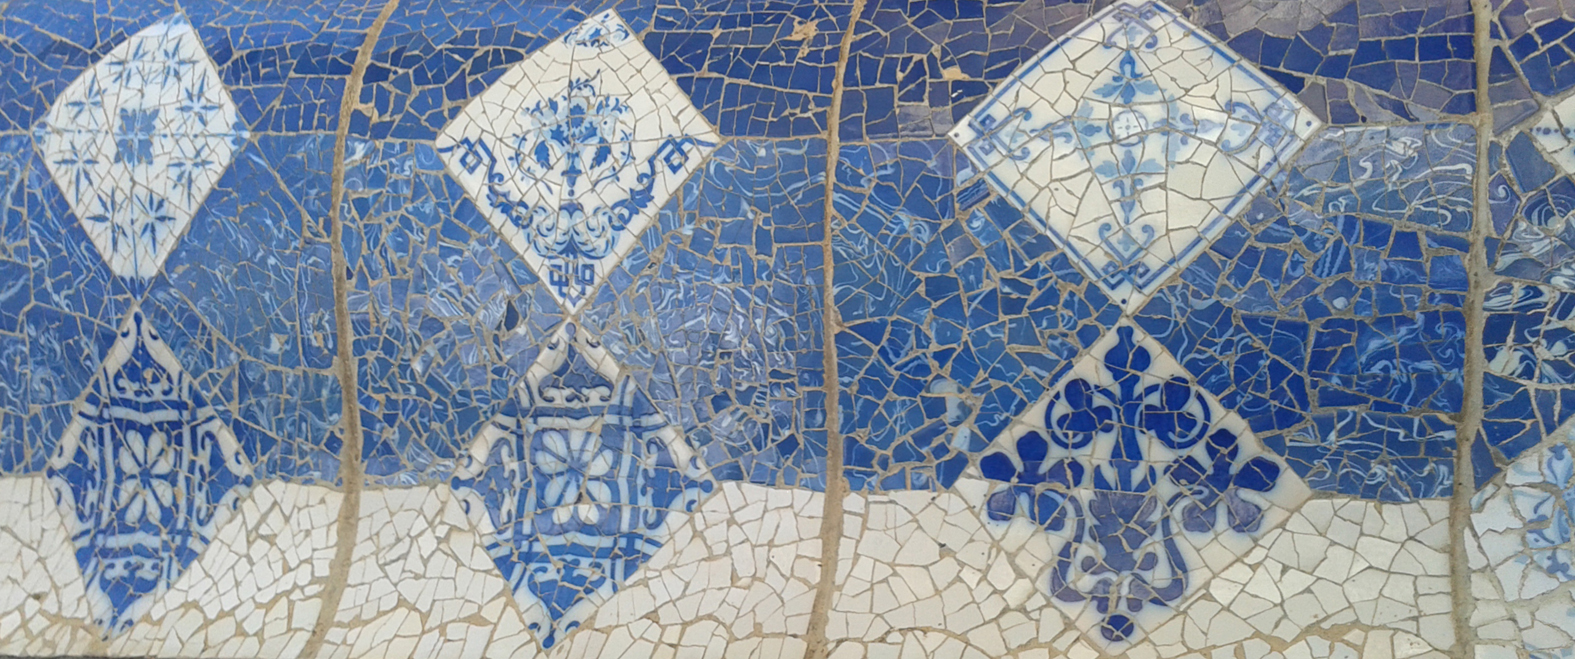
crazy mosaic by Antoni Gaudi at Parc Guell, Barcelona
Crazy Barcelona – crazy patchworks everywhere, but not in fabric – in ceramic, stone and marble. OK then, crazy mosaics, but whatever you call them there is no better place to appreciate them than at Parc Geull, designed and built by Antoni Gaudi in the first 14 years of the 19th century. I have seen images of these mosaics before but never appreciated the size and the sheer exuberance of the patterns.
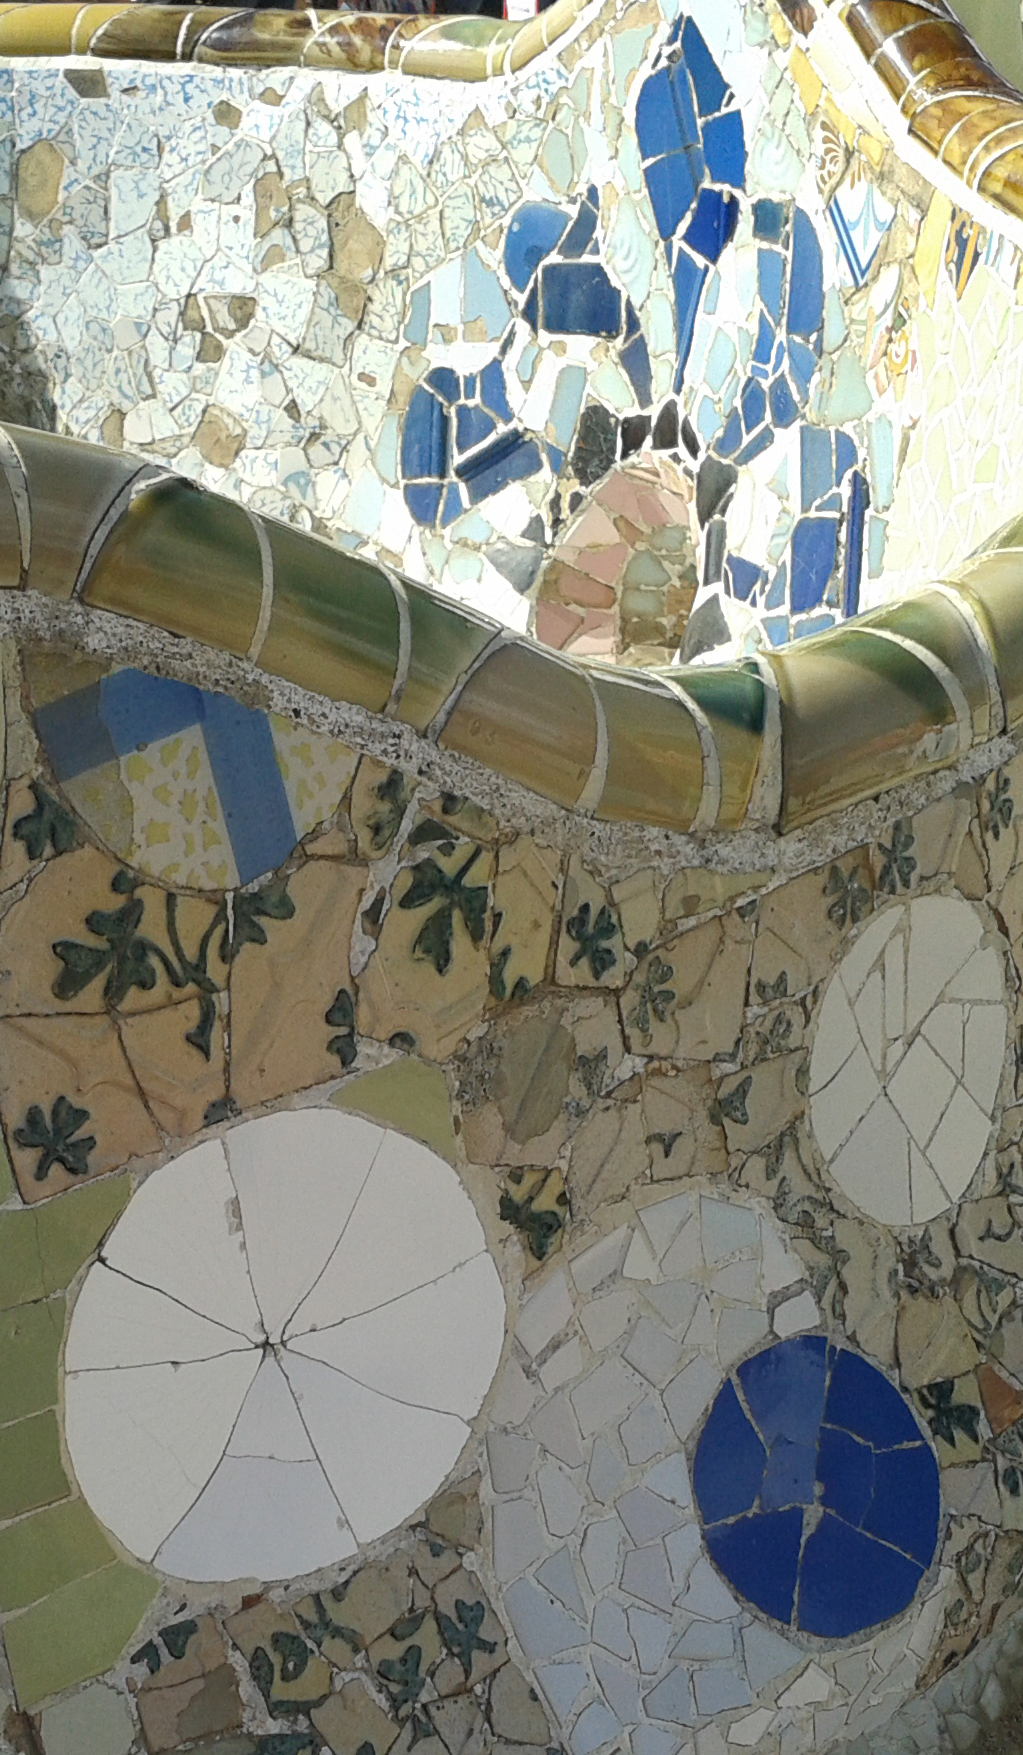
undulating crazy seating on the terrace
view of the entrance to Parc Geull from the crazy mosaic seating
I was delighted to see broken plates, tiles, and rounded roof ridge tiles put together in a myriad of ways, some where just pretty with sections with large flowers that had been broken but kept intact when cemented together and then surrounded by all shades of one background colour. Here is inspiration indeed, but immediately I thought of the Crazy Embroidery classes that I teach at Heart Space Studios, lots of new ideas to create crazy samplers.
broken flowered ceramic tiles and plates with narrow borders
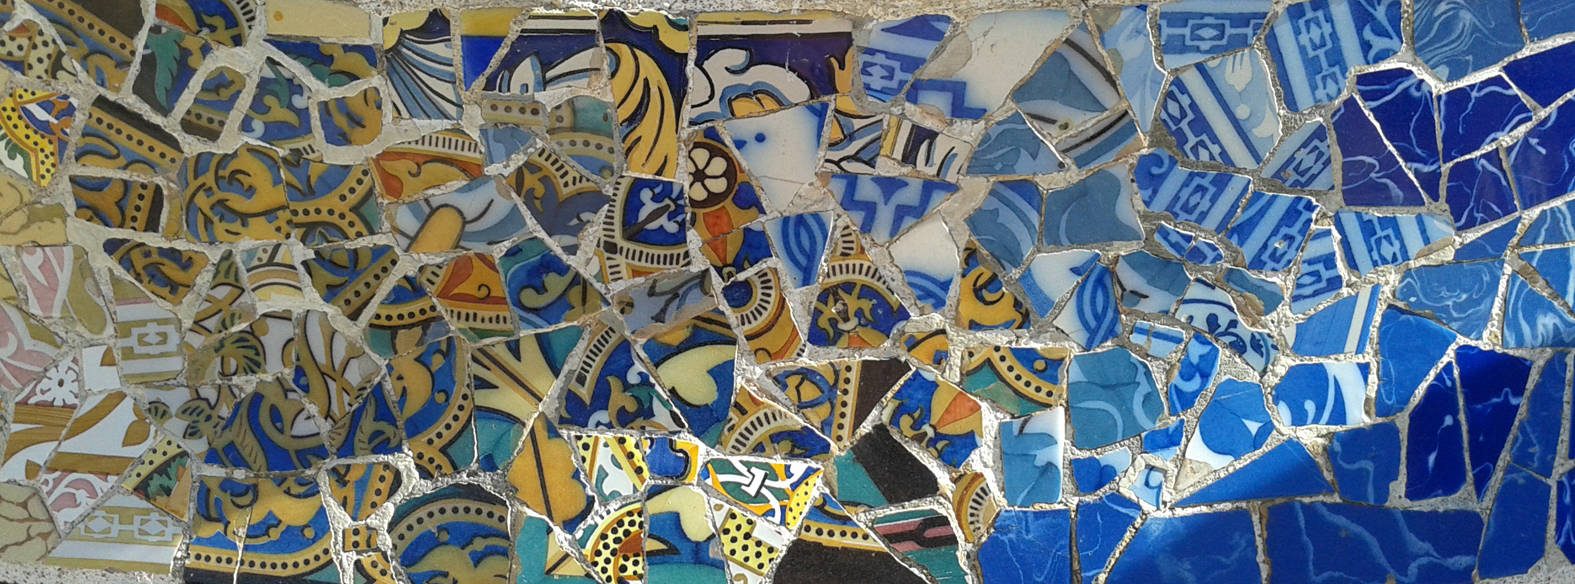
I started to see how the sustained patterning of the whole site didn’t just merge into one long visual porridge; there were sections of patterns with plain areas between them and the way that the patterns started to drift into plain areas was really brilliantly handled…
chintz patterns give way to a plain white area.
Sometimes the crazy patches were confined to simple shapes and surrounded by a sea of broken ceramics in a wide range of whites, the use of white ceramics when fired and glazed to produce many different variations is a major feature in this garden.
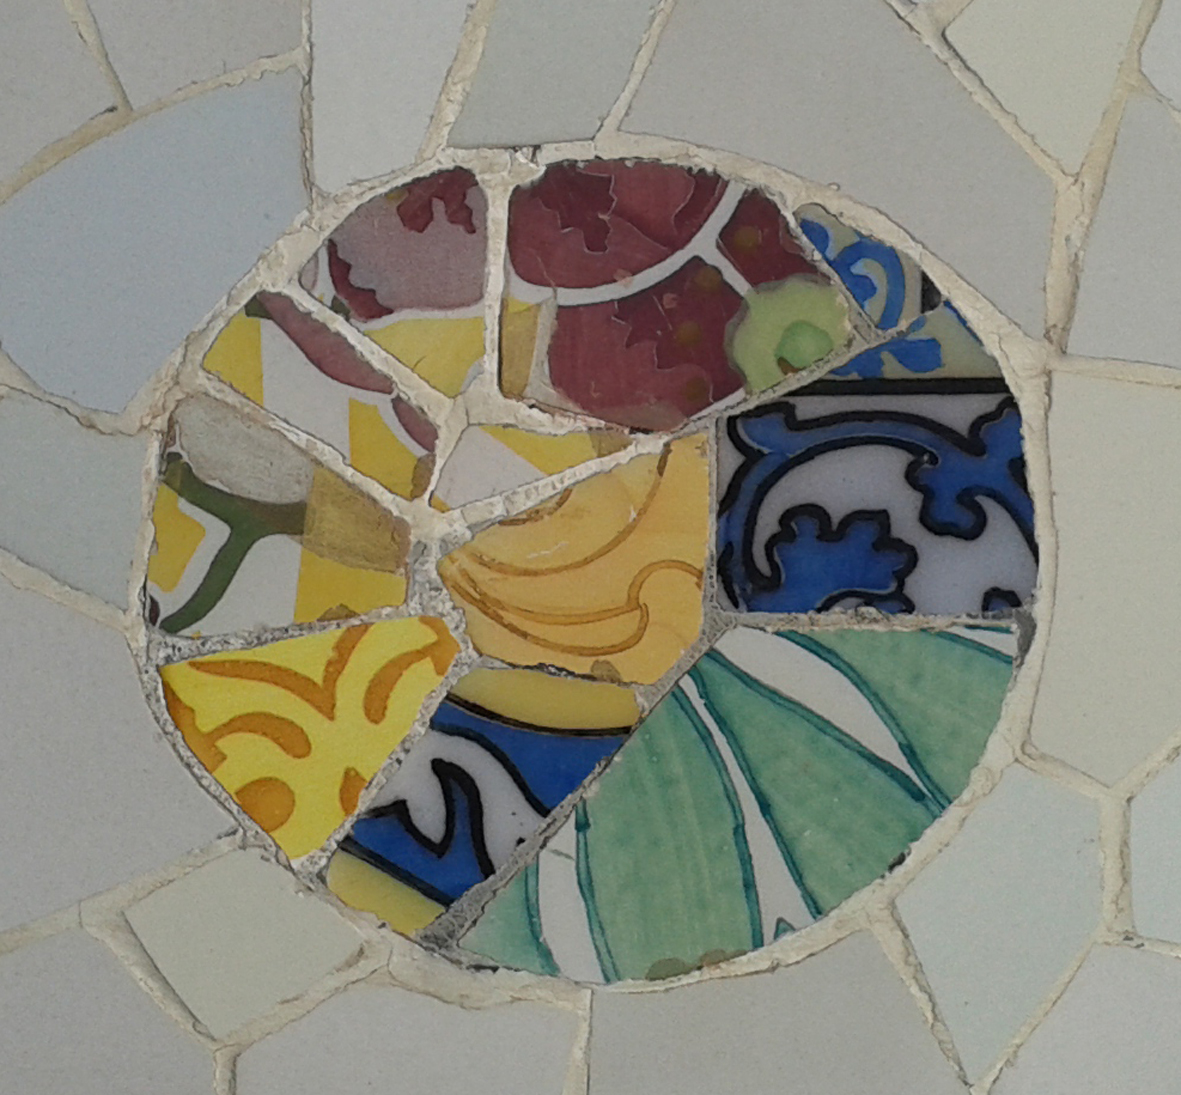
circle of crazy within white surround
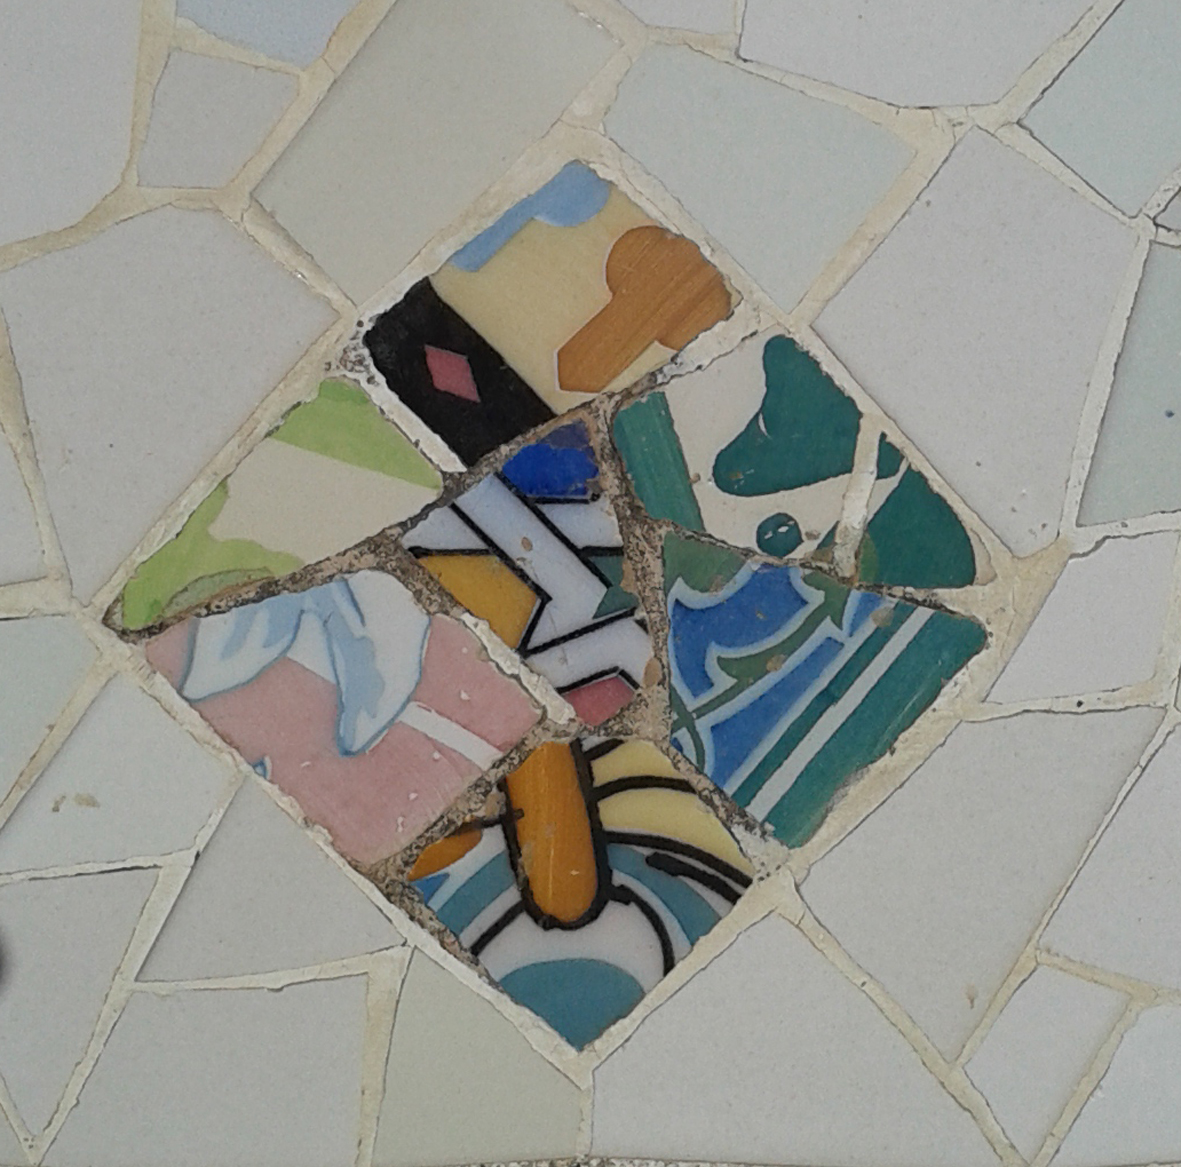
diamond of crazy with mixed white surround
many different crazy whites shapes make for gentle and cool seating surfaces
there were other more fluid shapes contained by the white ground….
amorphous paisley shapes
commas placed in a line around the base of a column
I also really enjoyed seeing patterns within patterns,
patterns within patterns
I really like these wonky squares set in a sea of crazy patterns; the makers must have had such a good time doing this work. Transitions from patterns to solid colours was just masterful in places
this transition from rich colour to single coloured patterns is masterful
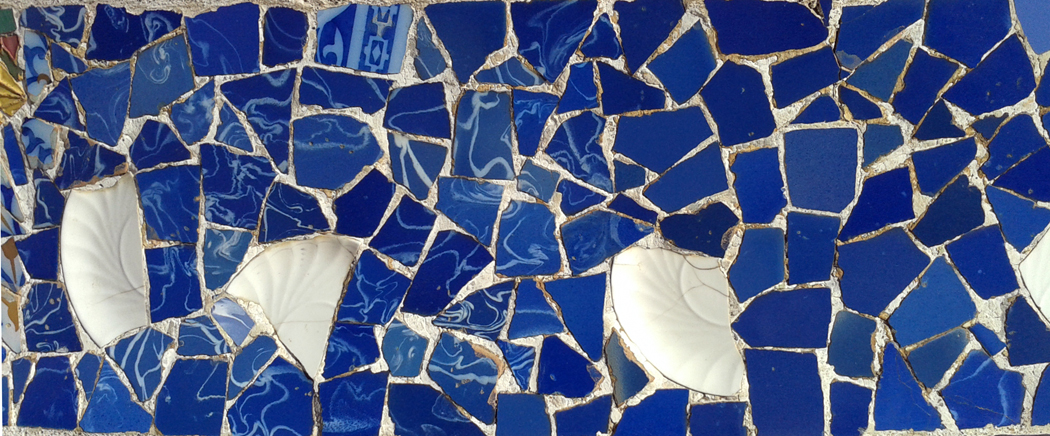
in fact the single coloured sections were simply beautiful – here is a range of crazy blue patterns
broken plates in a sea of blue
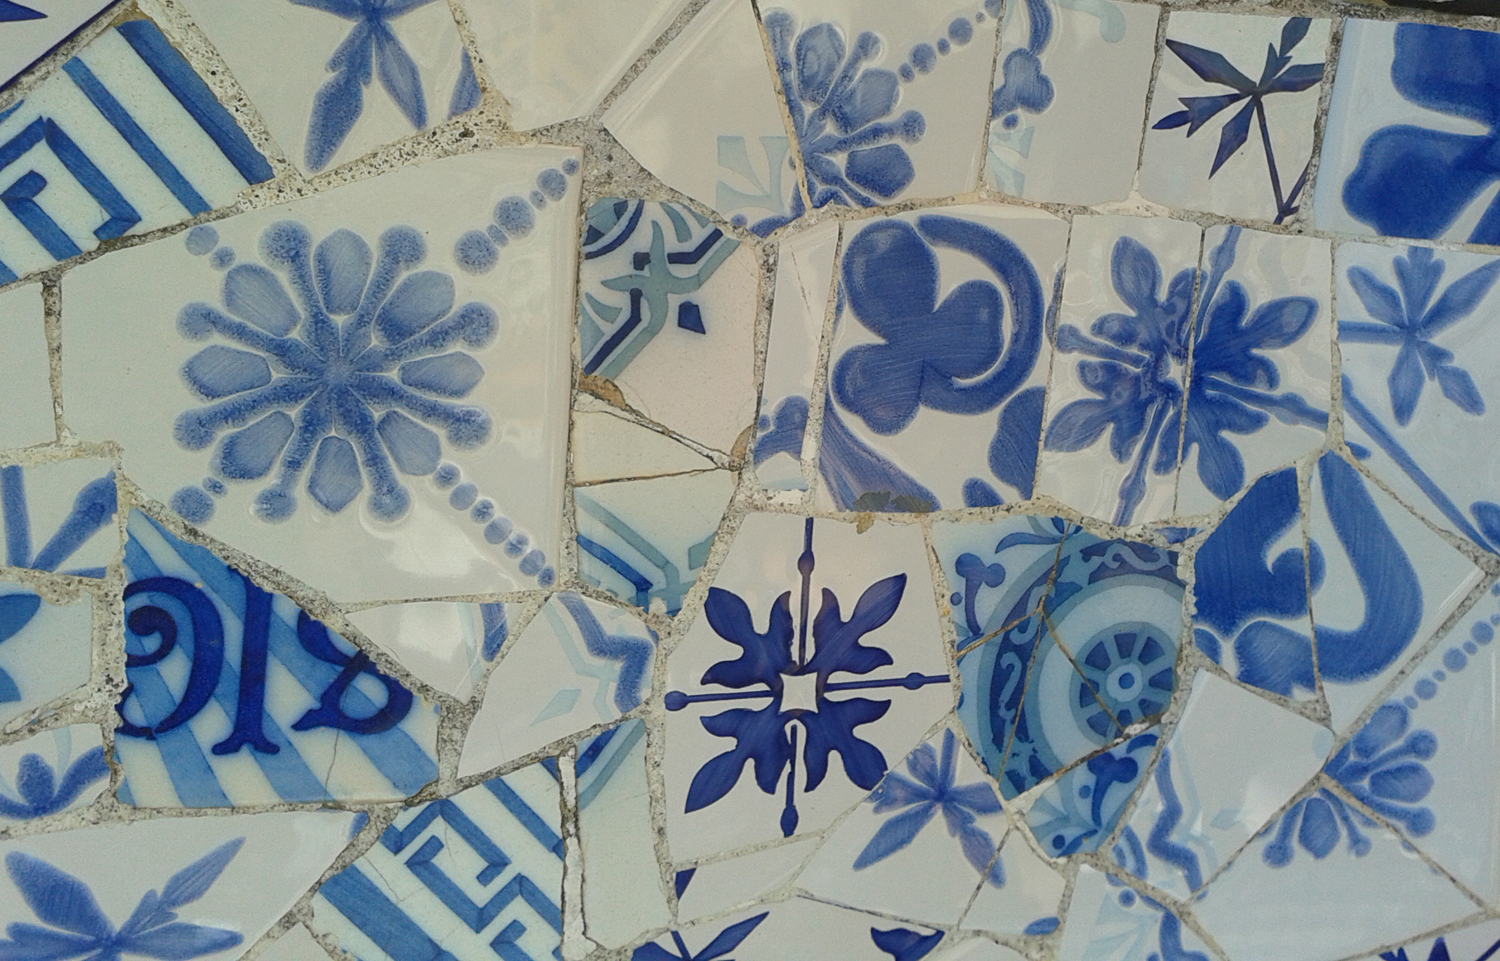
typical Spanish hand painted blue tiles
refined diamond designs on blue and white striped ground
while most of the ceramic patterns are traditional in flavour there were also some more abstract patterning to be found,
abstract patterns must have looked strange in the early 1900’s
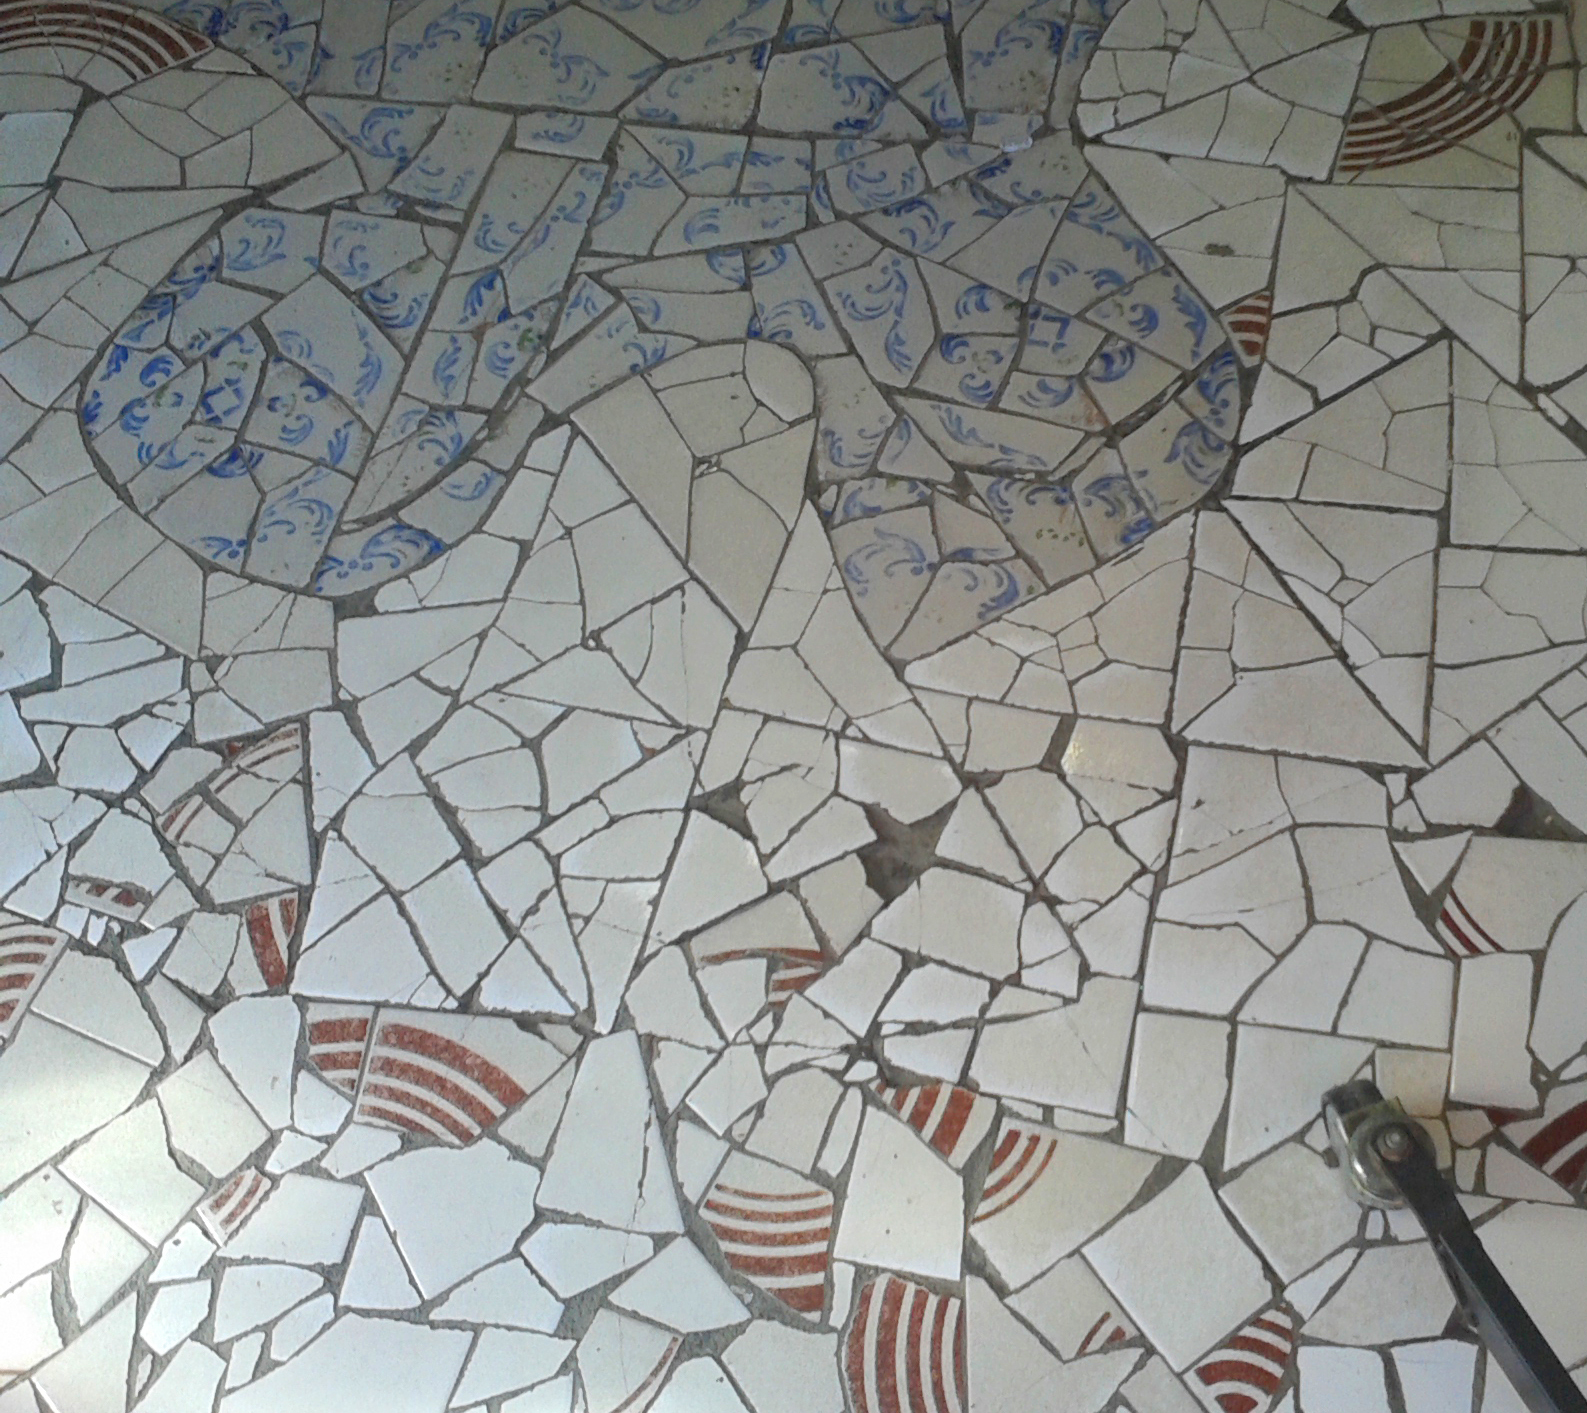
but this whole set of designs is made from re-cycled materials, apart from the abundance of beautiful old and broken patterned tiles from the Spanish ceramic factories, I was happy to see this poorly fired plate used to good effect.
poorly fired glazed plate has been put to good use.
After an hour of my visit I started to see evidence of Crazy everywhere..
the sandy ground in the park is impressed with crazy patterns
looking down at the sandy pathways I saw crazy patterns impressed by the soles of many different shoes, and once out of the park, everywhere I looked was Crazy Heaven.
the Crazy cafe floor
and the Crazy marbled walls
So now I have decided to try to develop some of these ideas into new Crazy Patchwork designs for cushion cover designs to show Hugh Ehrman at Ehrman Tapestry company for their future collections.
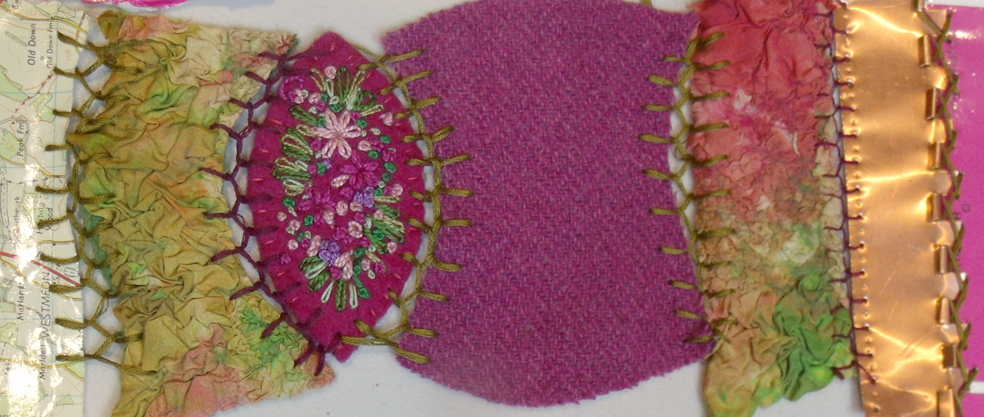
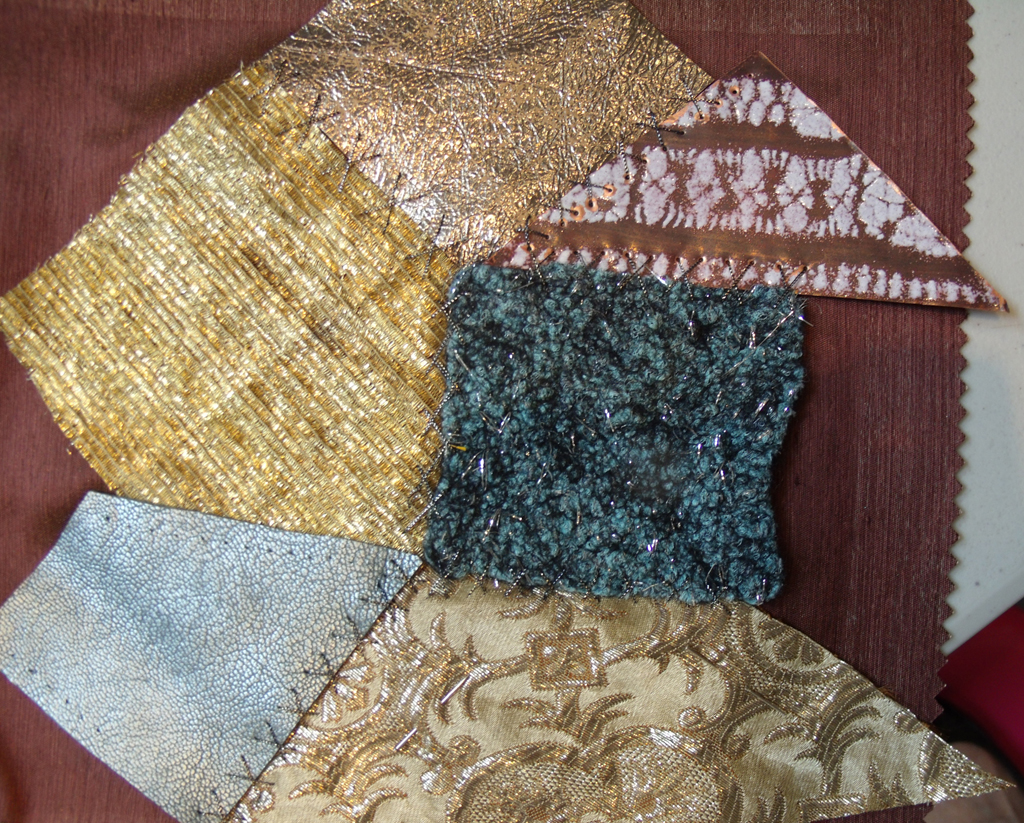
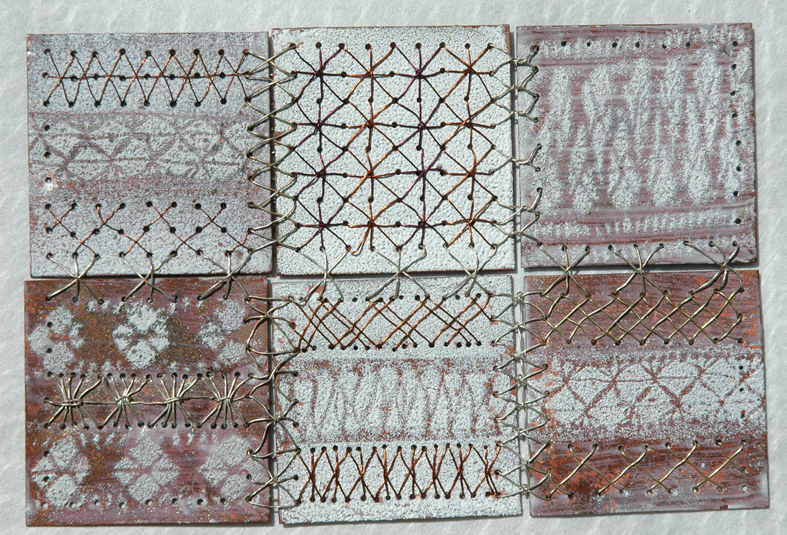
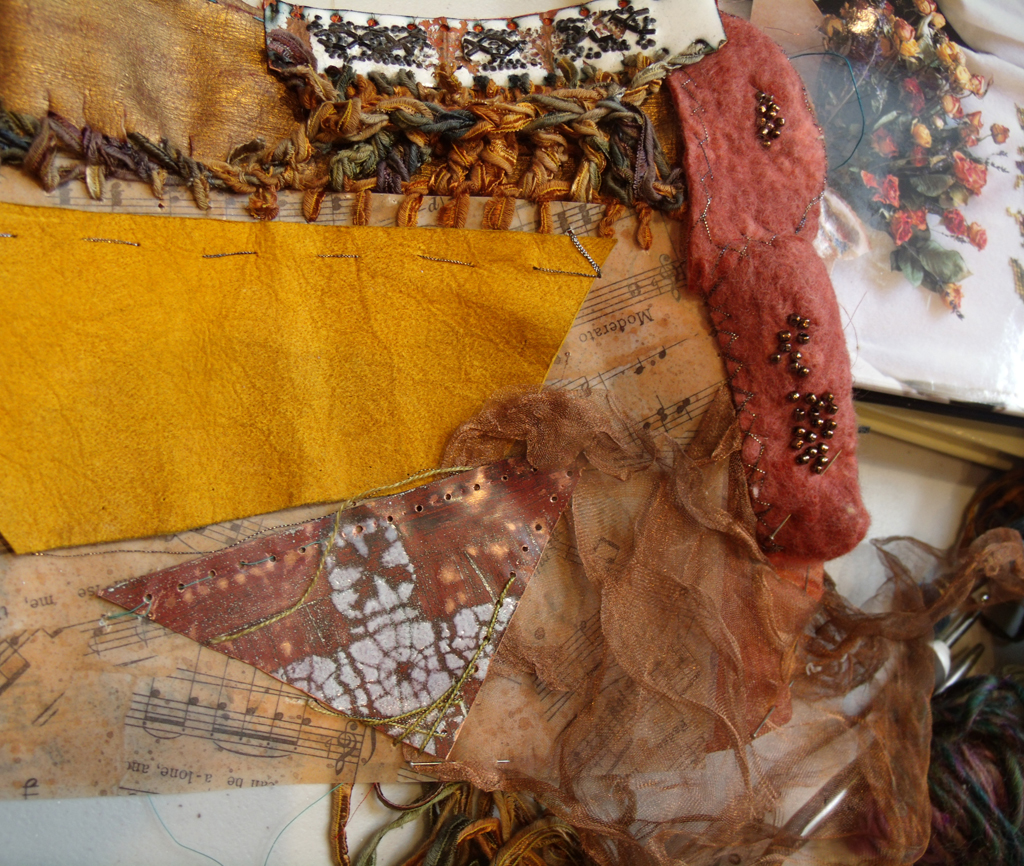
strip sampler of tweed, embroidery, nuno felt copper and paper- Kirsten Hill-Nixon
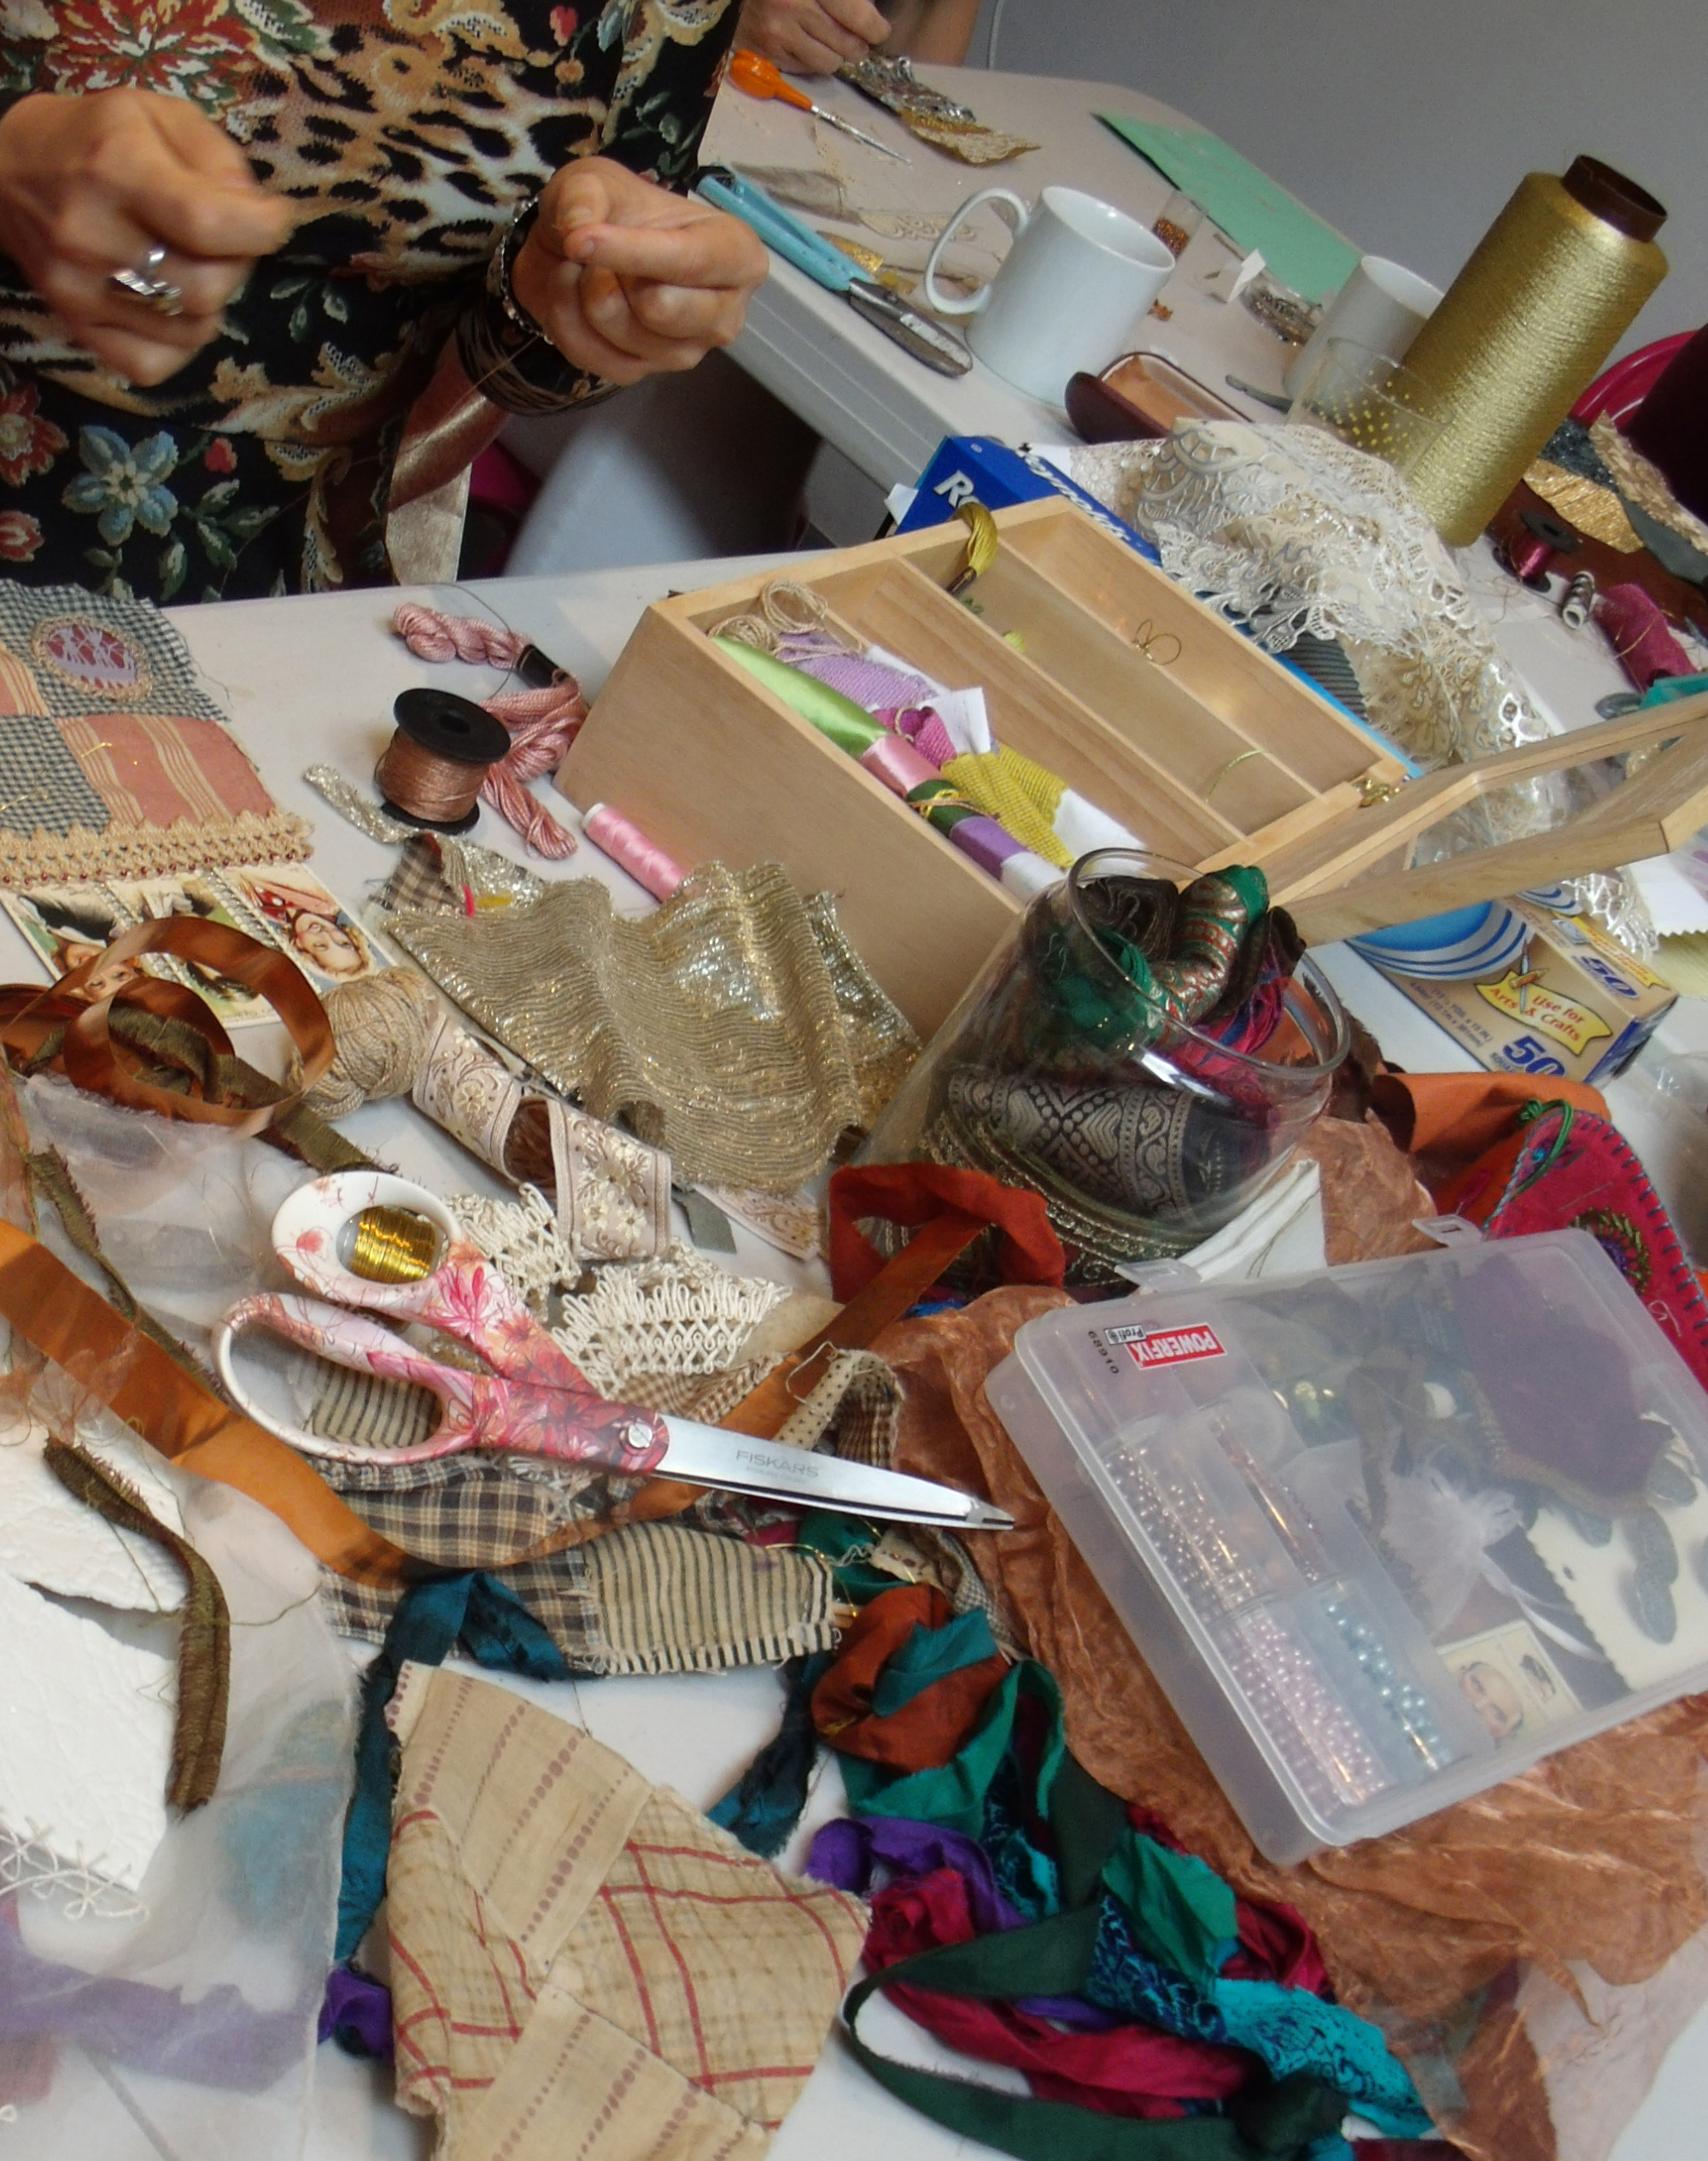
I am interested in developing a set of workshop using mixed media at Heart Space, think leathers, metals, ceramics, fabrics, glass and wood….. so I thought I could try the idea out on the people who work with us, all expert in their own field and up for a challenge.
And as Crazy Patchwork samplers have been such a success at Heart Space Studios that I decided to run an Away Day for the tutors and staff to enjoy time making together. I asked everyone who could attend, to bring their own favourite materials and their tools. Each person would make either a strip sampler or a crazy square sampler by using decorative embroidery stitches to join the materials together.
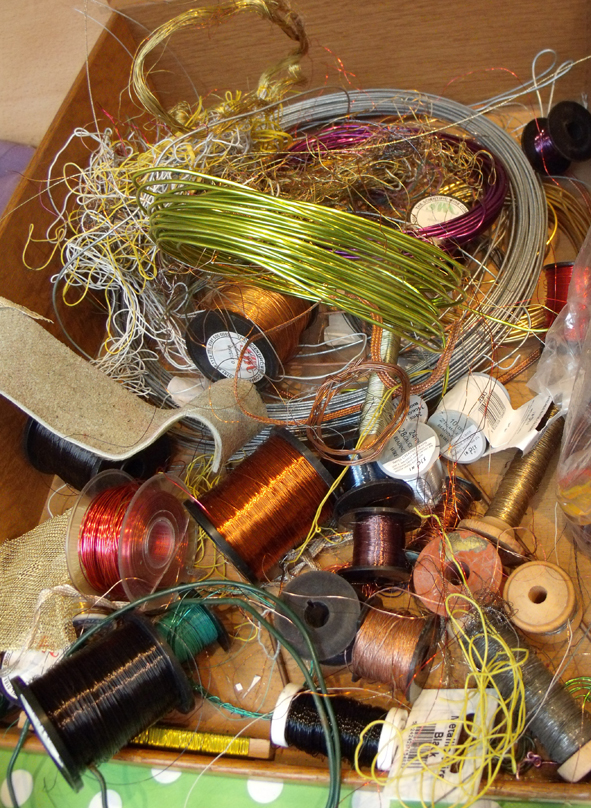
tutor’s own stash of hand made wool felt
the administrator’s collection of everything vintage
Most people brought their own stuff to share between the group, I am always impressed by the generosity of makers in workshops like this. The group dynamic is encouraged so that people really want to help one another. What is also an added bonus is finding a shared love of a particular technique or material, even makers of different ages and styles come together when they find they both appreciate a particular aspect of their chosen discipline.
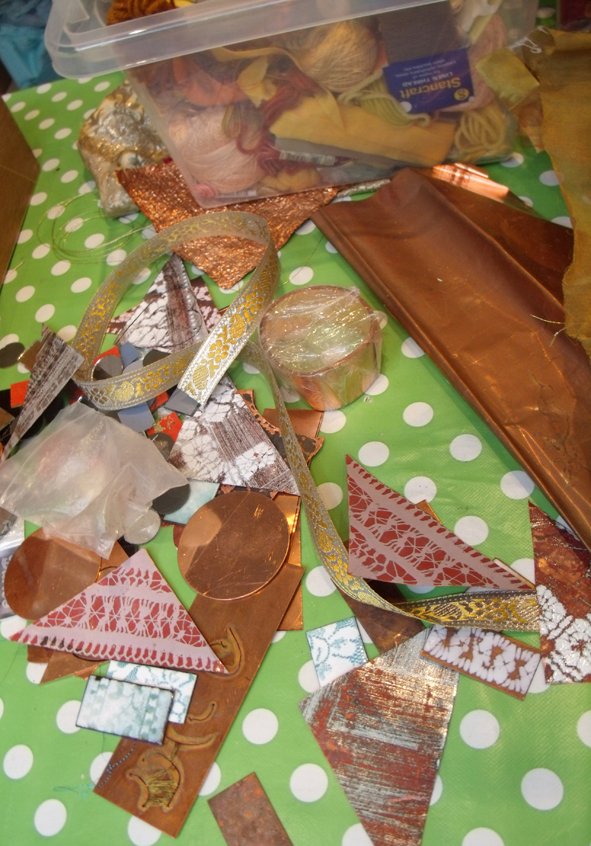
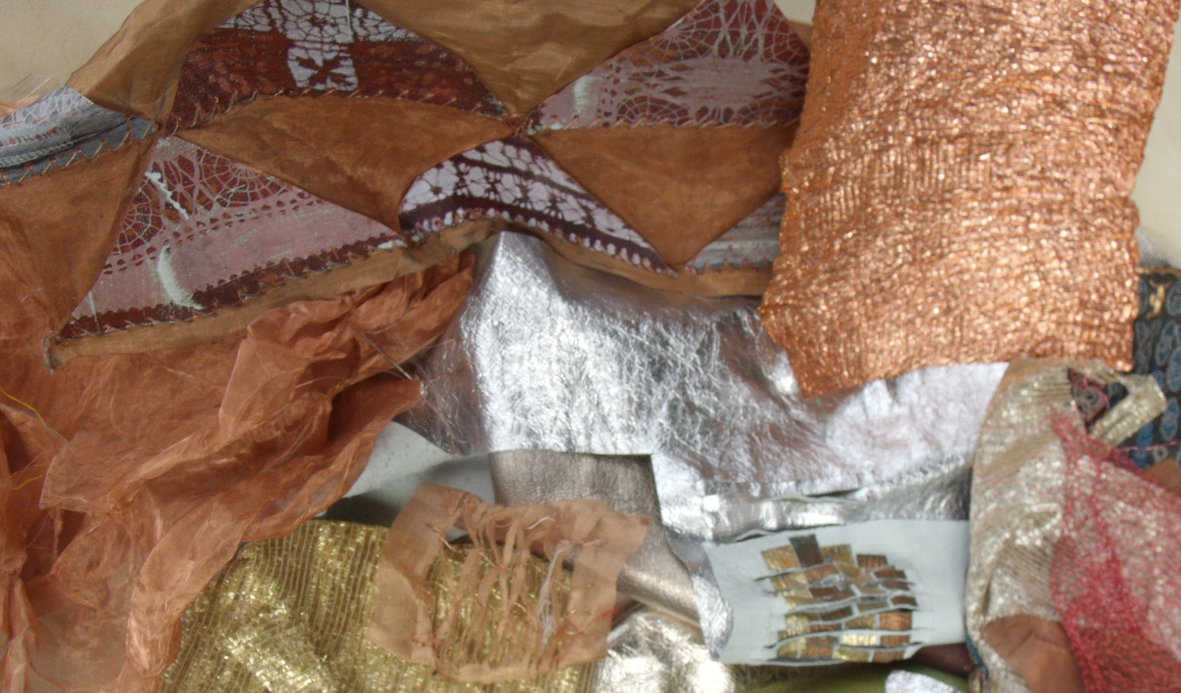
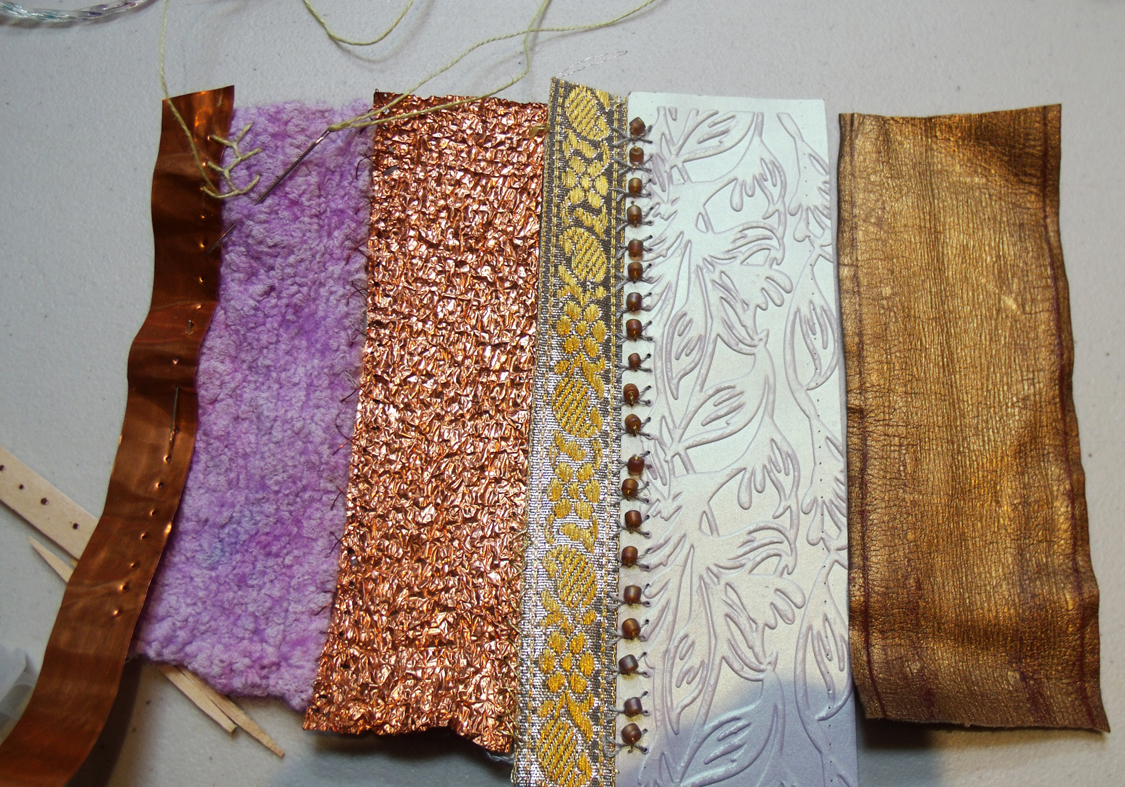
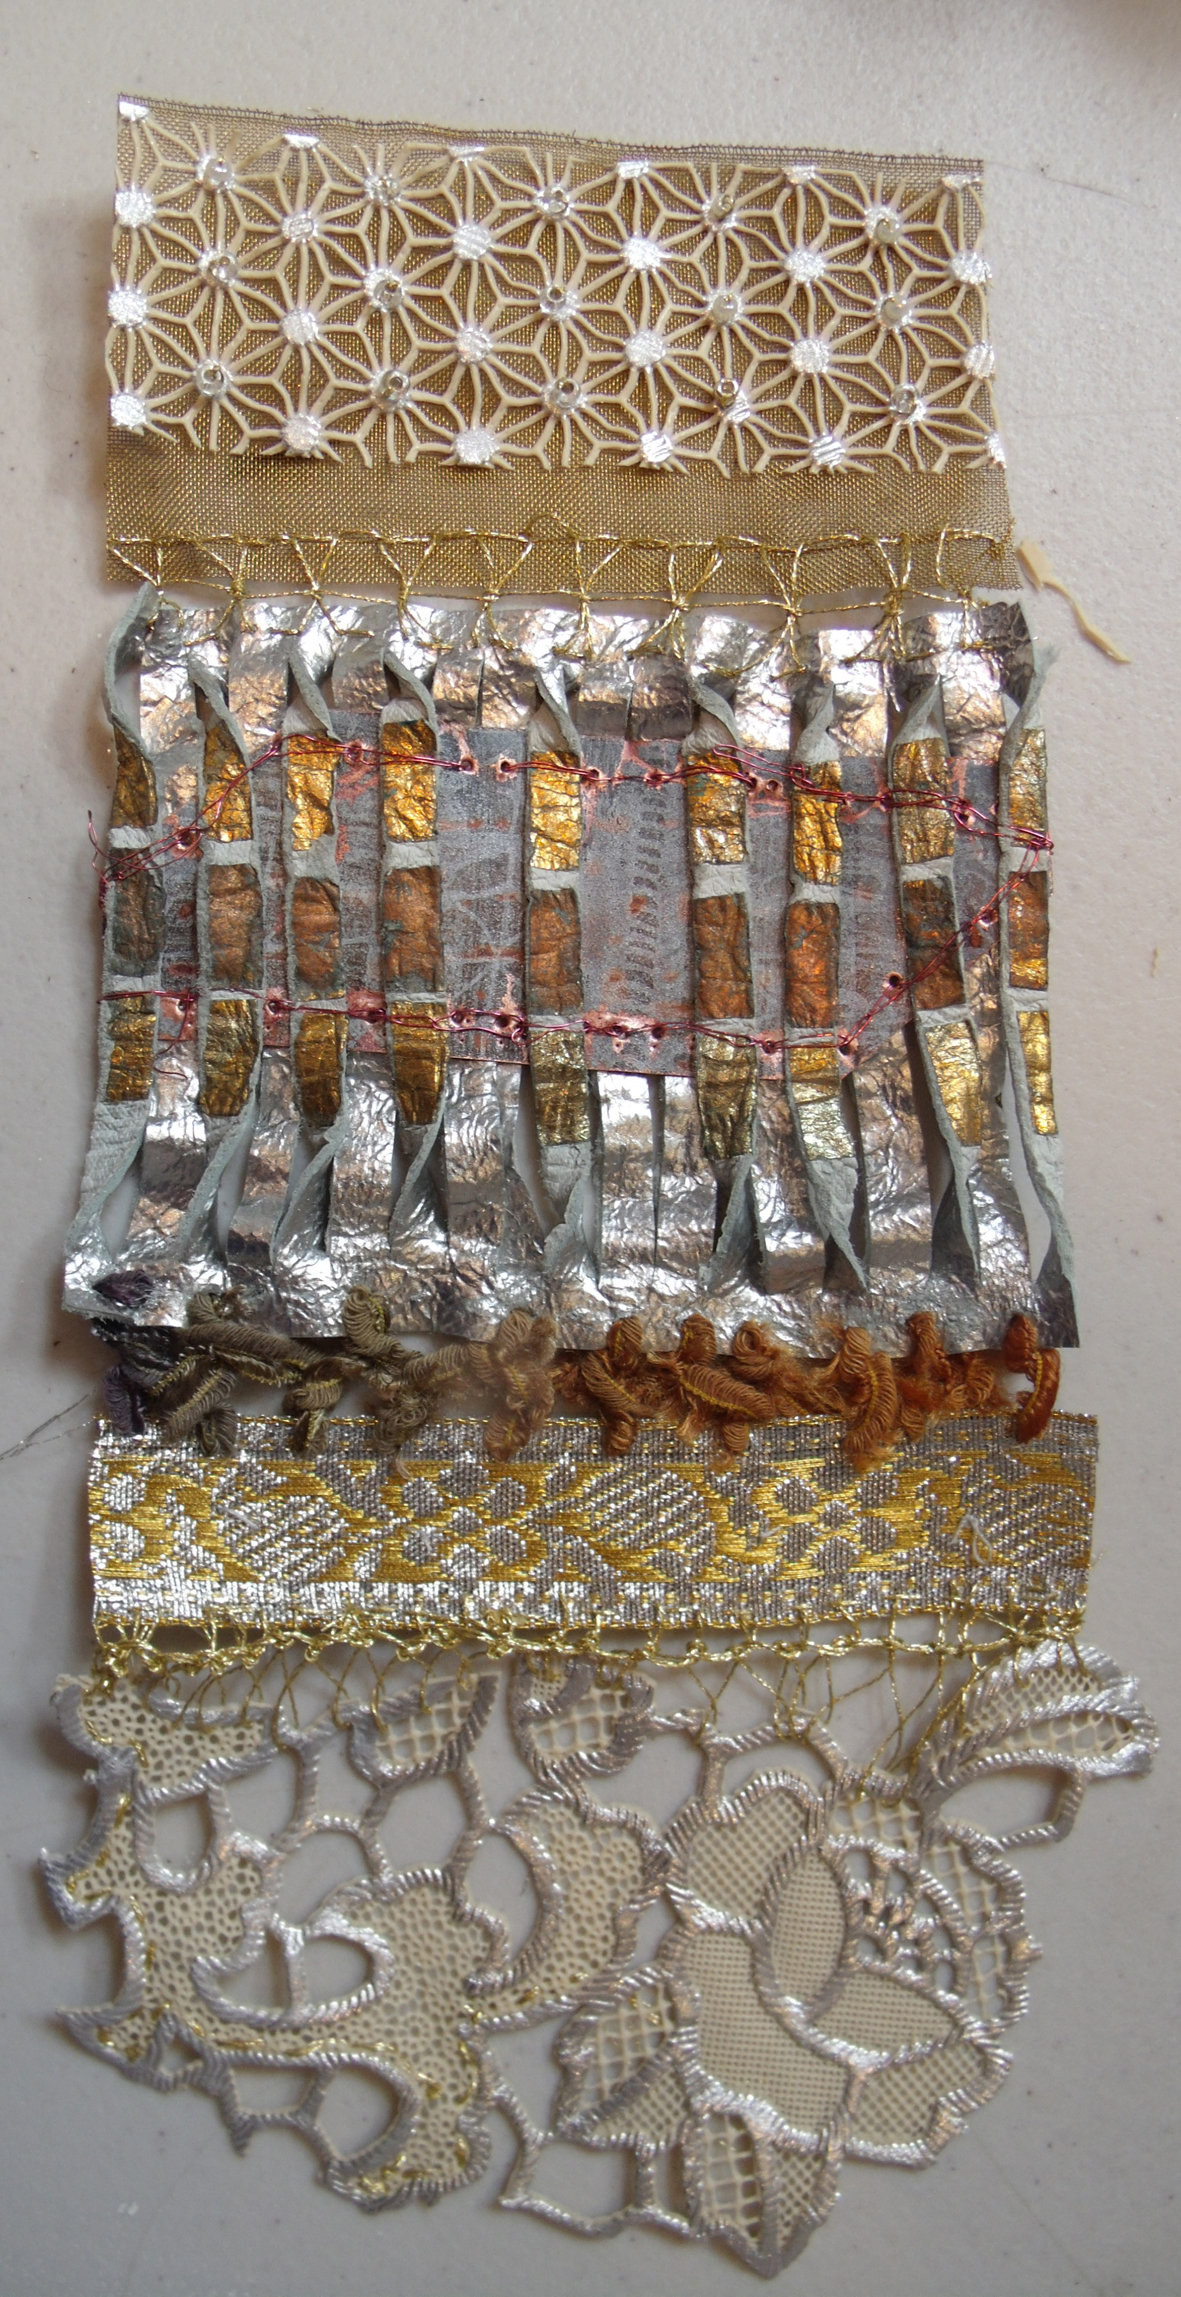
I also brought a large selection of materials from my home-based studios, all kinds of things: woven metal fabrics, stencilled enamels on copper, leathers, plastic lace, metallic damasks and other fabrics – and also the tools to drill stitch and manipulate them.
one of the best things about attending any materials based workshop is the abundance of new and unusual stuff that is introduced by people who are experienced in working with it – this can save days of researching.
my stash of copper discs, enamelled triangles and metallic braids
copper and aluminium wires for working with in any way possible.
I particularly like metallic leathers and fabrics, so I brought lots of these in for everyone to sample, as well as scraps of thin copper, some patterned with vitreous enamel. such a shame I had no time to experiment with the other tutors’ materials for this research session.
metal meshes and pressed copper foil, enamel applique and metallic leathers.
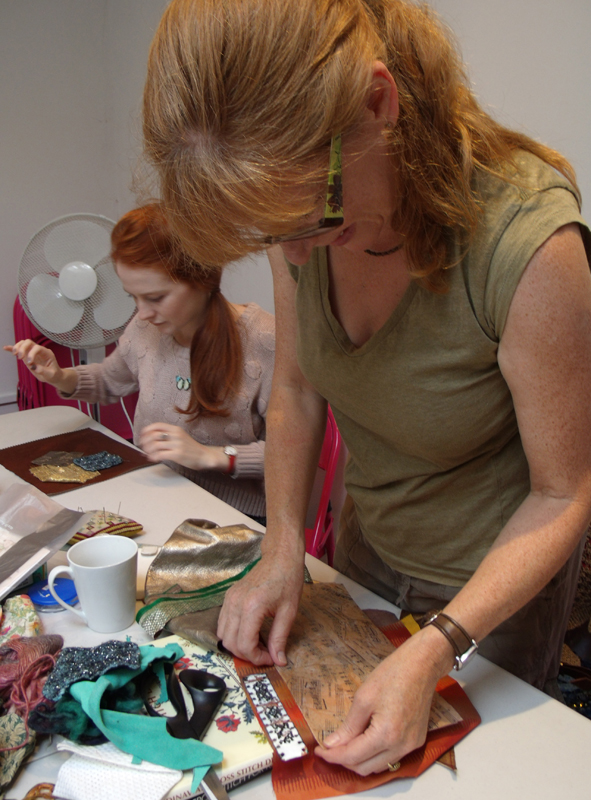
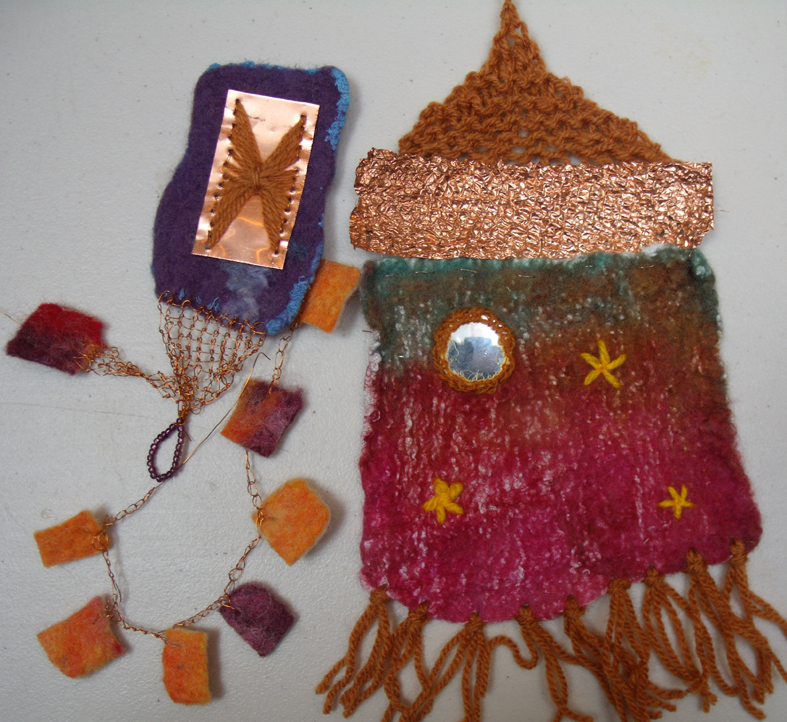
The task for the morning was to choose 3 different materials and join them together using their own preferred techniques or I would teach anyone various embroidery stitches and techniques. As the group comprised experts in knitting, stitching, crochet, felting, print as well as display, administration and even a drama student (a daughter on a flying visit), it proved to be a mixed bag of talents, attitudes and experiences. Perfect for generating new ideas and enthusiasms
colour co-ordinated mother and daughter
Everyone set to work choosing their 3 materials and laying them out, the strip sampler proved to be the most popular as it is the easiest to co-ordinate; odd crazy shapes take a lot longer to set up.For the task of joining two of the disparate materials together – colour, surface texture, weight of each material has to be considered as well as the selecting the technique.
traditional crazy shapes
strip sampler of cotton, leather and paper
I showed everyone how to make regular holes in various surfaces, involving textile techniques – a tracing wheel, an old darning needle and a hammer! It works for me every time…..and off they went with mixed but interesting results.
marking out where to make the stitching holes on copper.
At first everyone just chose a colour co-ordinated or used an unusual type of thread to work with…
metallic leather, woven braid stitched together with silky knitting ribbon, awaiting the addition of a scrap of plastic tablecloth.
only to find that when stitched it looked very different than imagined. after a relaxed start the makers’ critical faculties began to kick in!
colour co-ordinated threads and second thoughts
I noticed that the knitters worked completely differently from the stitchers; they immediately made a start by adding a linking system to one edge of a piece of material either using crochet or knit to form an edge ready to accept the next piece of material – this gave them much more contemplation time for what comes next – the stitchers are able to join 2 pieces together simultaneously. Why had I not appreciated this before? However working the wire into fine leather was a fiddly affair – see below right.
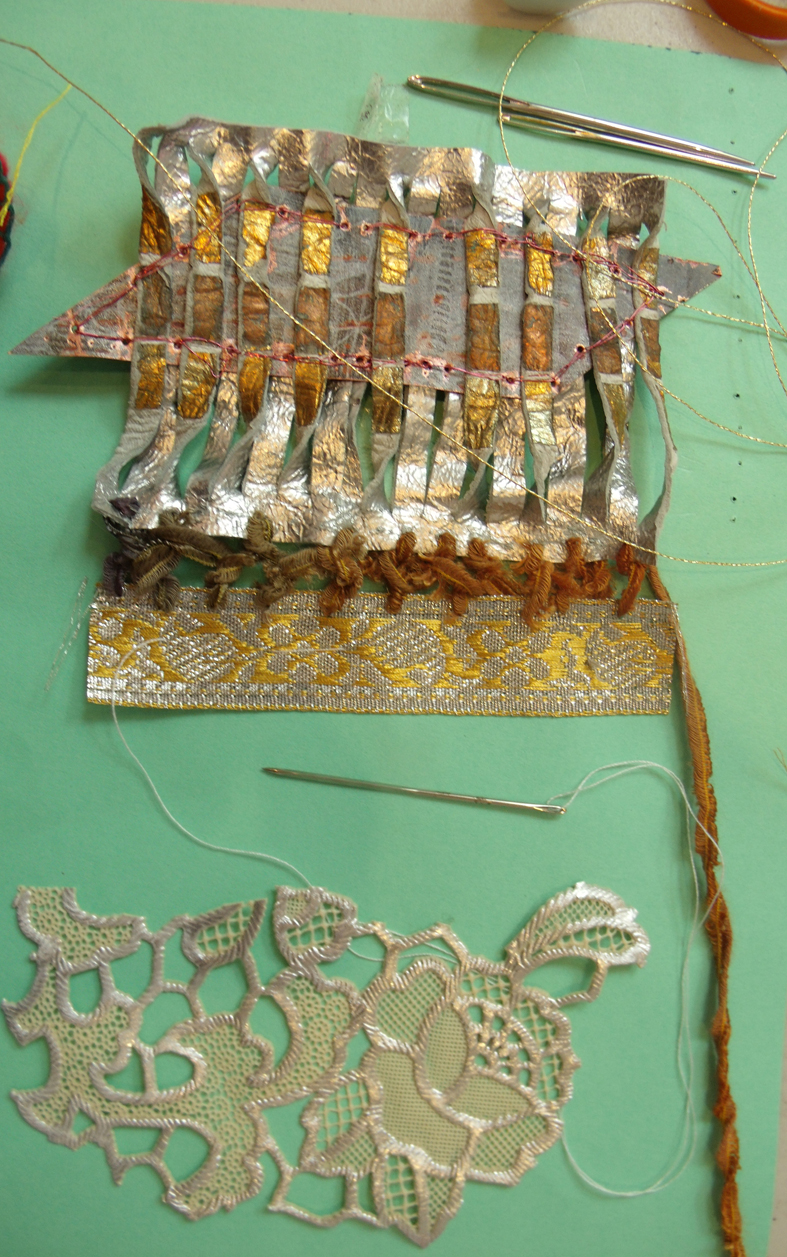
knitting wool onto a copper foil strip
developing the crochet wire joining strip
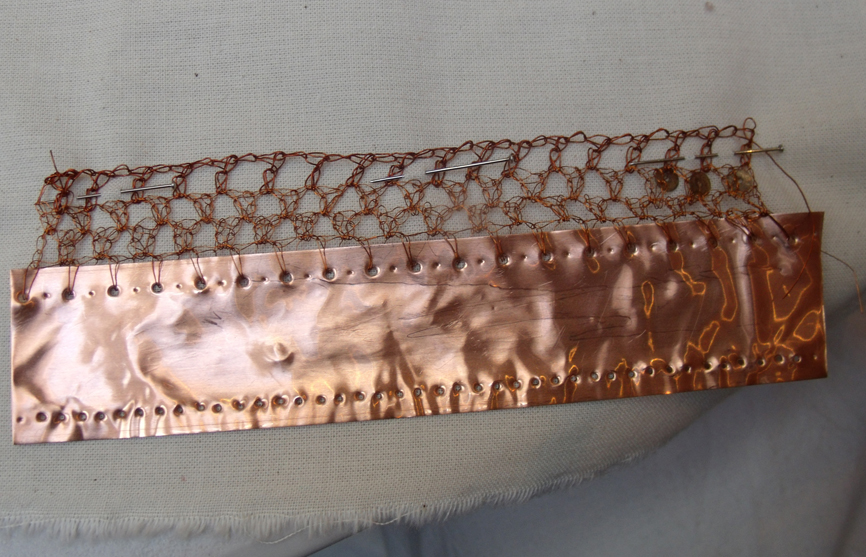
Now I really must get the knitters to teach how to do this technique. When I first attempted to join metal together using my own stitching techniques I used a different system – making rows of simple cross stitches between the strips of vitreous enamelled copper pieces, so joining each at the same time. It took me some time to try the different insertion stitches. In fact it was an aversion to drilling all the holes that put me off developing this technique for a long time – but now I happily drill rows of holes for hours at a time – well not exactly ‘happily’….maybe I will get to like crochet after all.
my very first attempt at joining metal with stitched wire
When the crochet wire was worked into some copper strips it was very successful…the strong steady base really helps achieve an even texture and the structure gives the metal wire movement and elasticity which is much more compatible to work into fabric.
copper wire crochet edge to copper foil strip
now the strips of materials are starting to look like they belong together
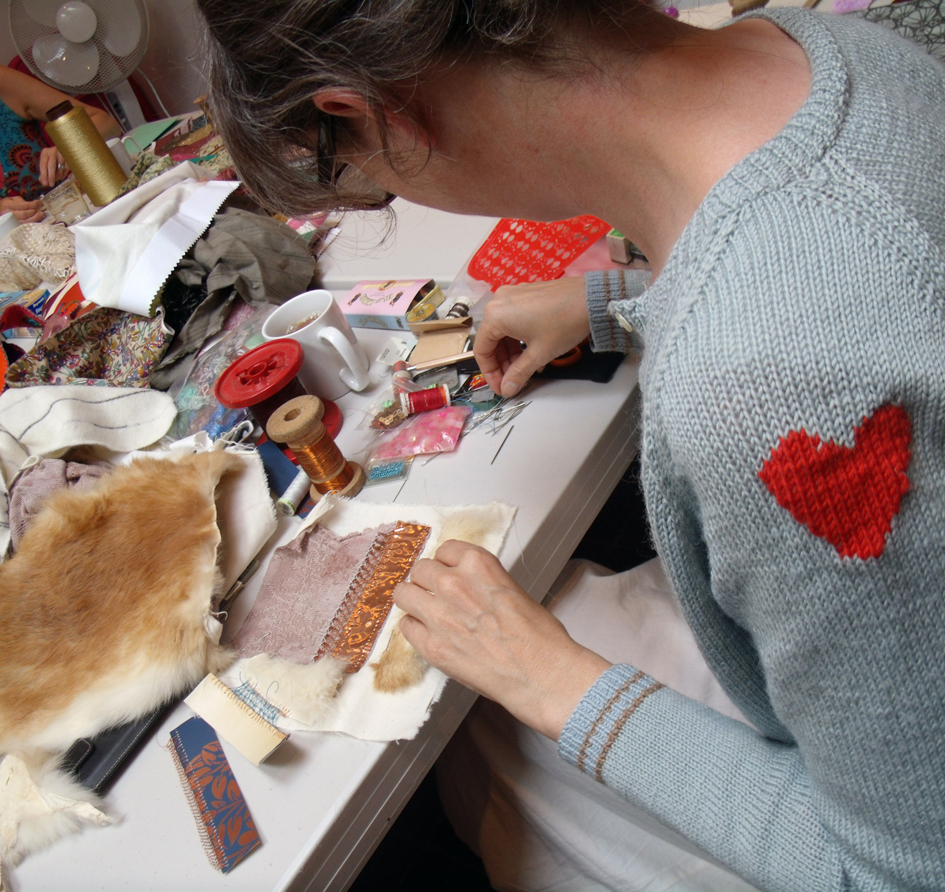
concentrating on the task in hand- and a heart on her sleeve
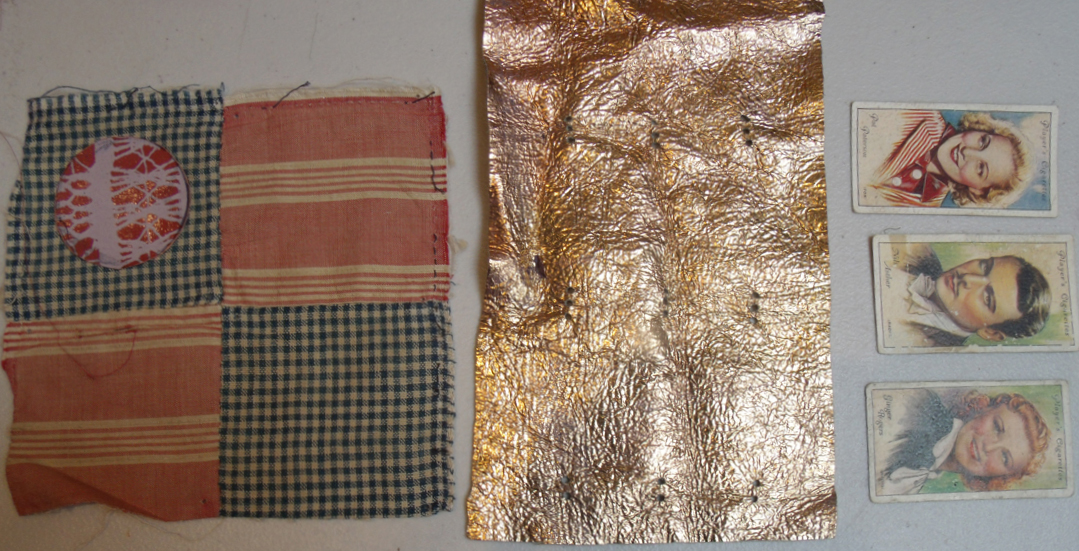
I showed several people how to embroider simple insertion stitches for a lace-like join…securing the fabric to a piece of card first to steady the gap between the pieces, a traditional technique found in my old embroidery manuals for white work.
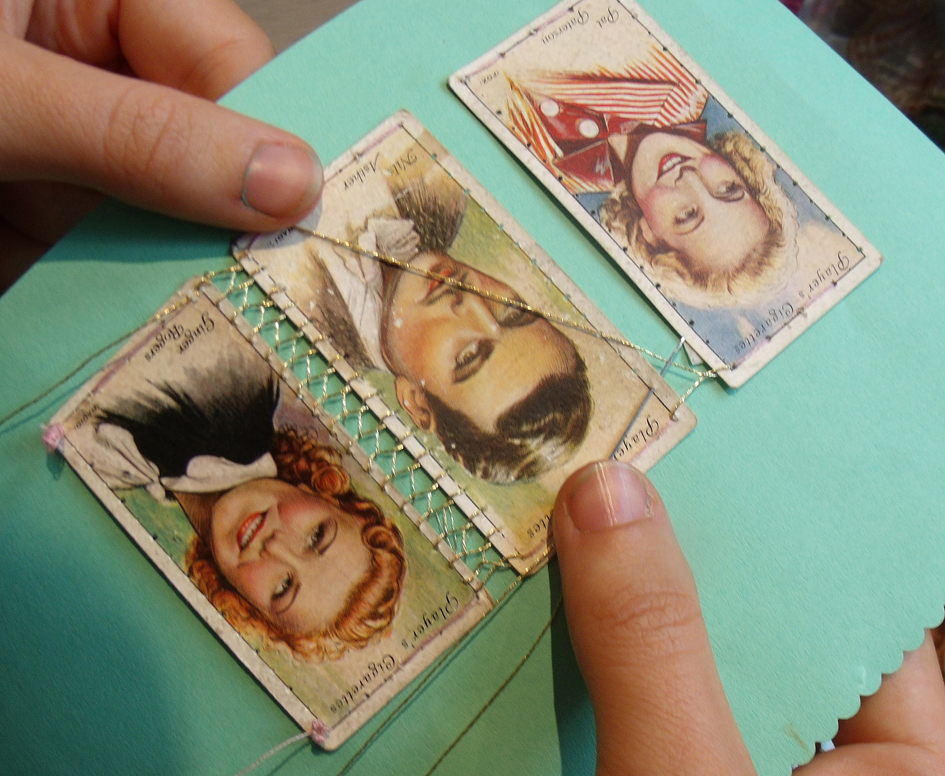
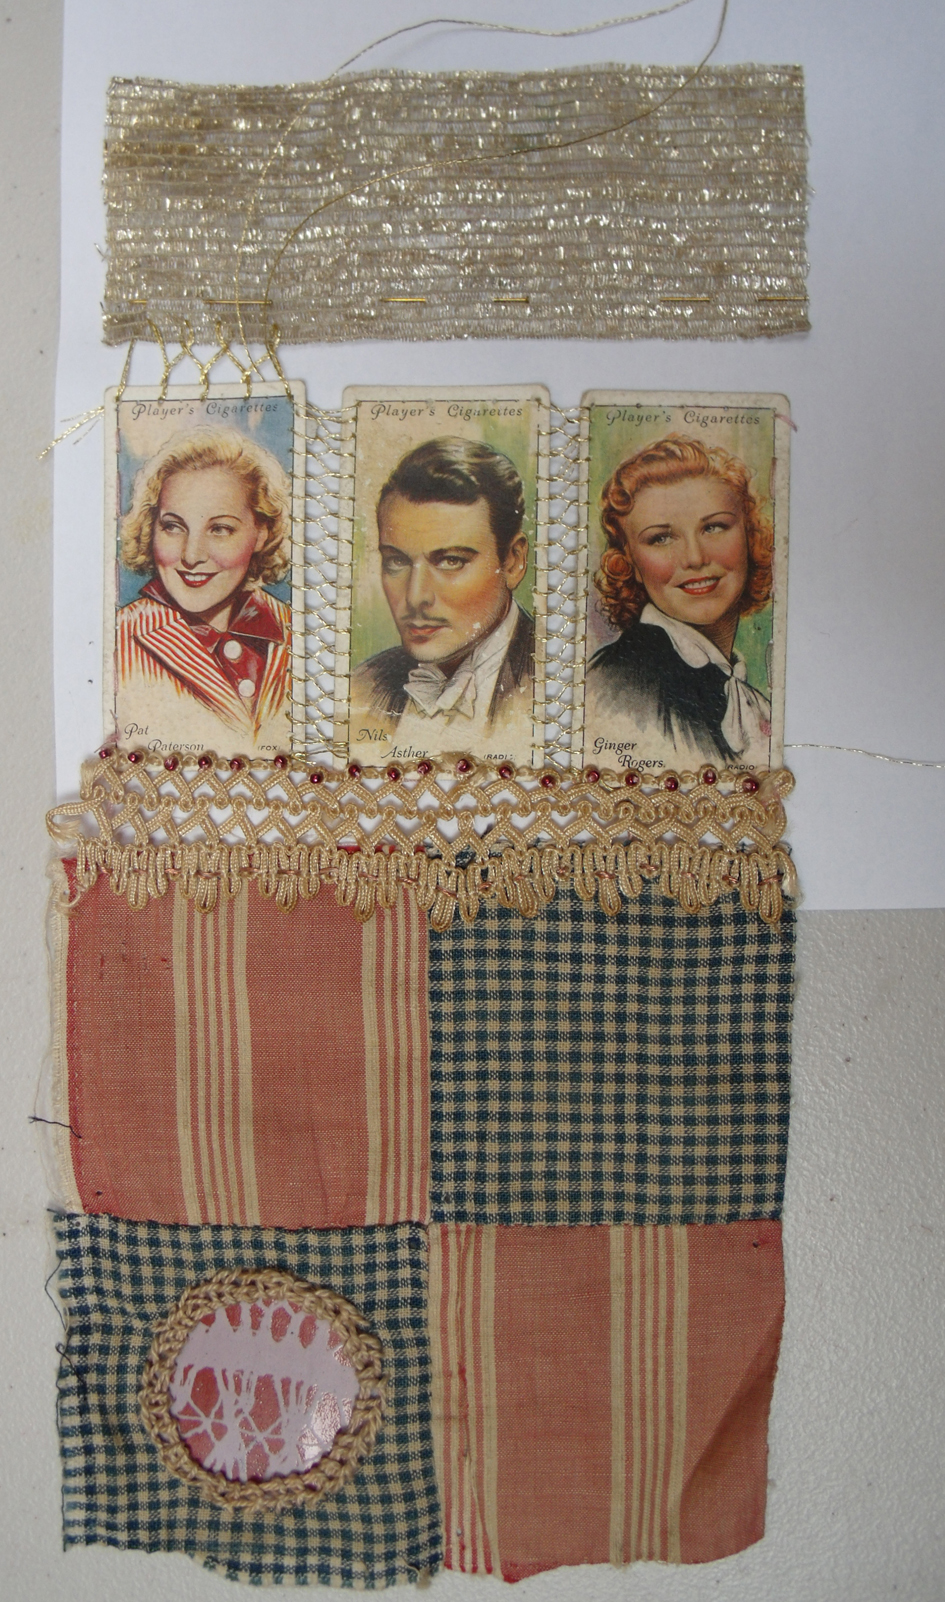
cigarette cards stitched onto paper to steady them ready for gold insertion stitching
Now the invention started to kick in…
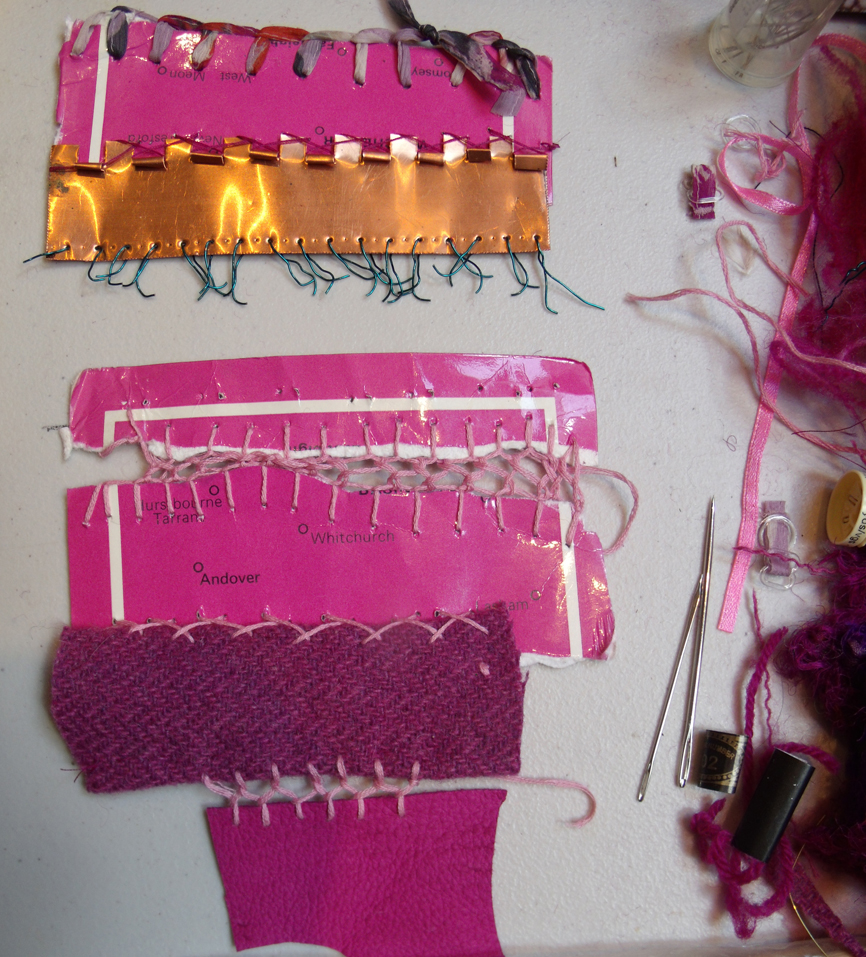
insertion stitches and beaded braid for that vintage vibe – Sophie Bristol
a really crazy mix of materials crocheted together by Avril Best
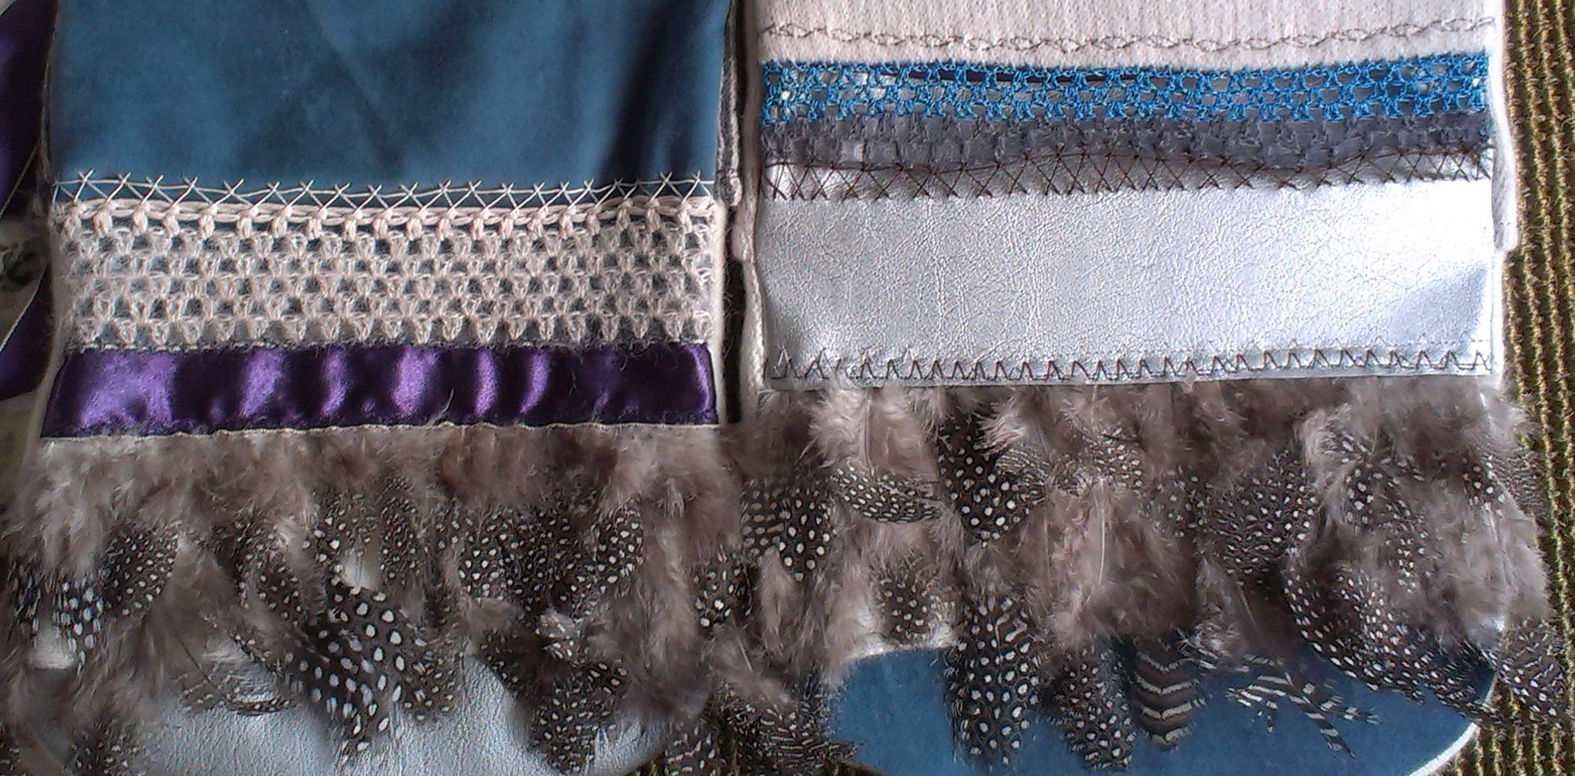
elegant beaded joining stitches between rows of leather, wallpaper, metallic braid, crumpled copper foil, nuno felted silk and drilled copper sheet – Debbie Bird
various knitted materials for joining disparate materials;- copper, copper wire, silk and wool nuno felt, shisha mirror in wool embroidery – Clare Griffel
ripped card, copper foil, nuno felted silk and wool, tweed and hand embroidery all joined together in crazy style – Kirsten Hill-Nixon.
interesting how the plastic tablecloth now looks like a precious fabric when seen with the other expensive elements, leather, woven brass and silver fabric. Jane-Marie Mahy
all things vintage – patchwork cotton, linen thread appliqued enamelled copper circle , cards and silver fabric. Sophie Bristol
pre machine knitted lace, crocheted copper wire with copper foil and wall paper – Steph Wooster.
And to prove that sampling really does inspire people here is new work from Steph – the day after the workshop she added some of the sampled techniques and materials to her range of knitted hot-water bottle-covers.
new knitted and embroidered samples – Steph Wooster
Crazy stitching on a Crazy Patchwork by Naomi Clarke from a recent workshop at Heart Space Studios
Crazy Patchwork classes have always been popular at Heart Space Studios and several people asked me to teach them more hand embroidery stitches, so I started a course called Crazy Patchwork Sampler. The course is built around the sampler that I made for my book, Crazy Patchwork, published in 1998 by Collins and Brown – it seems what goes around comes around……
my book of Crazy Patchwork ideas and designs.
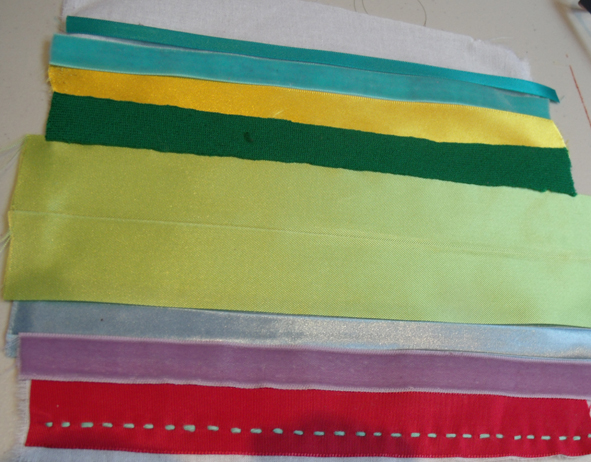
For the FIRST WORKSHOP I started off with the absolute basics, first we chose the colour scheme – I supplied various ribbons and fabrics for people to choose a small group of their favourite colours: this takes longer than anyone imagines it can and causes a lot of negative ideas to flow as people are usually very nervous about using colour, but I have learnt that this choosing is really important as eventually by using the same set of colours in various patterns and proportions the finished piece can be made harmonious.
strips of ribbon ironed on to backing fabric
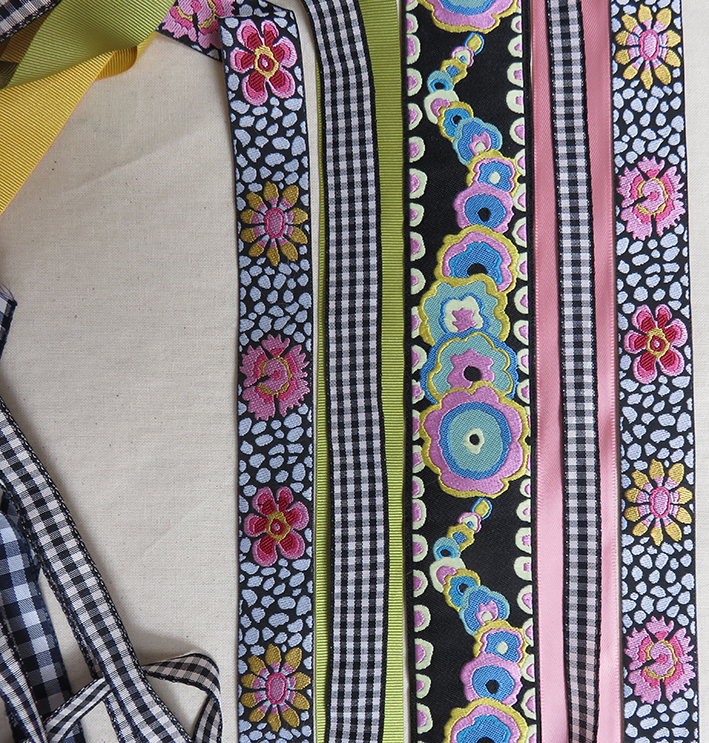
first chosen coloured ribbons
Most people, to their own surprise, choose colours similar to what they are wearing. The next choice to be made is the threads – I ask them to choose similar colours to the fabrics but to stitch in complementary coloured threads – so that the stitching will show up.
choosing complementary coloured threads
The first sampled stitches are the straight ones – running, back and all the variations, easy does it….but it also includes writing a name…very simple but very effective for the first workshop. There are various methods of writing onto fabric so that it can be embroidered and we start with the simplest by using a water-soluble pen or the old-fashioned transfer paper still used by dressmakers.
the maker’s name worked in back-stitch over water-soluble pen.
The SECOND WORKSHOPsession was cross stitch, counted and herringbone – which is the main stitch I use for joining the patches together. The group was still concerned about colours, but I assured everyone that we had a long way to go and plenty of opportunity to make the whole sampler work in harmony – I was delighted that they had all done ‘homework’ and had finished the first workshop’s ‘patch’ and found more variations to add to the straight stitches.
finished patch from first week being decorated with herringbone stitch
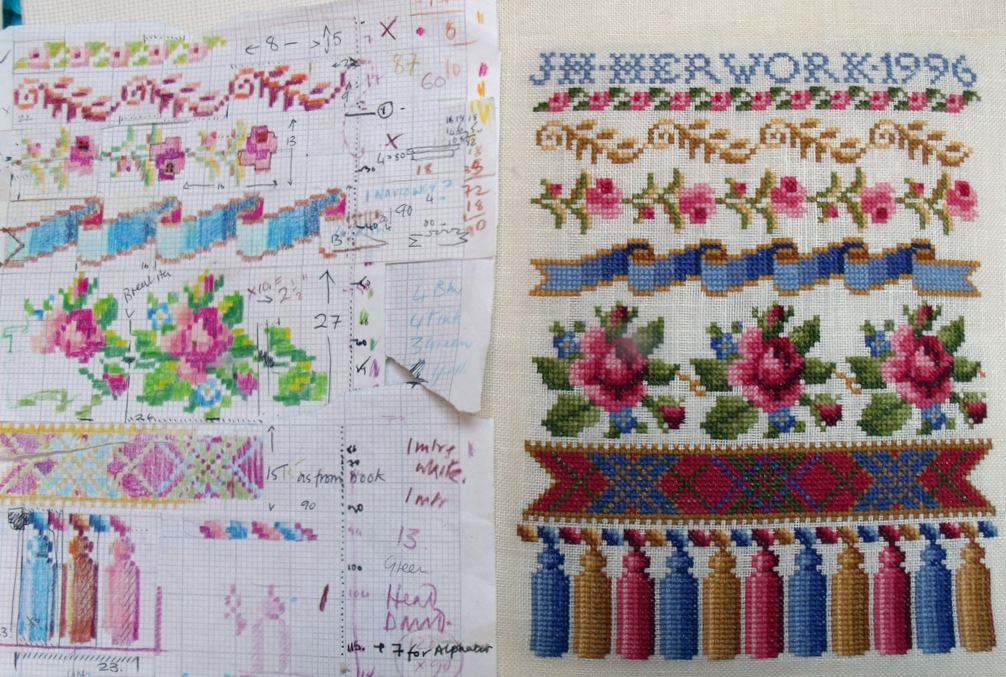
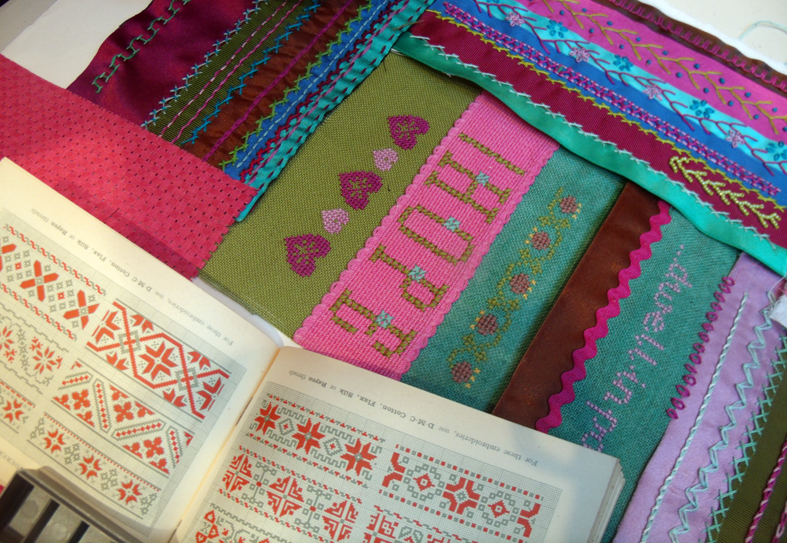
Counted cross stitch is another way of embroidering letters and numerals……
my working chart of cross stitch motifs for the accompanying sampler
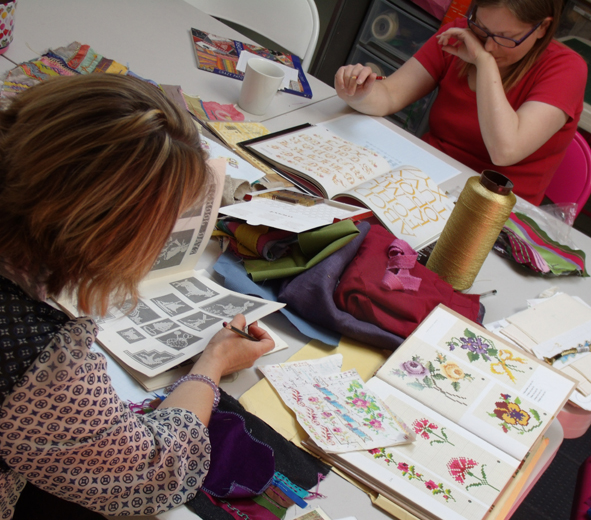
There is a whole world of cross stitch motifs and I like using the traditional ones – to illustrate the technique of charting for cross stitch I showed them some old work of mine that was designed from vintage needlework manuals. I still work as a freelance designer for a canvas embroidery company, Ehrman Tapestry, where I sometimes use similar charting for some of my designs, even though the stitch for tapestry is tent or half crass stitch. So I have lots of reference material and the group spent an hour of the 3 hour session looking at all my books and notes before they began charting their own designs.
Jo and Helen choosing cross stitch motifs and alphabets from my reference book
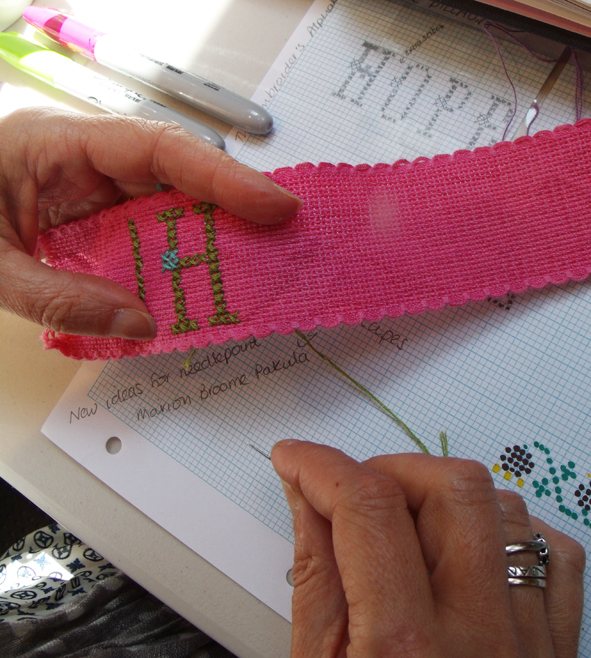
The task for this second session was to chart a name and date as well as a small multi-coloured motif and to stitch it onto the counted thread fabrics.
Jo decides to chart and stitch HOPE – she s going for an aspirational crazy sampler.
choosing the colours from a limited range of counted thread fabrics involves creative use of colour
Helen uses a shaded red thread creatively to harmonise her cross stitch samples with her first straight stitch patch
it is interesting how the maker’s character soon emerges from their choice of colour and letter forms, above Helen’s looks strong and directional while Sophie has chosen elegant letter forms and motifs ; the colour combinations are similar but the proportions are very different
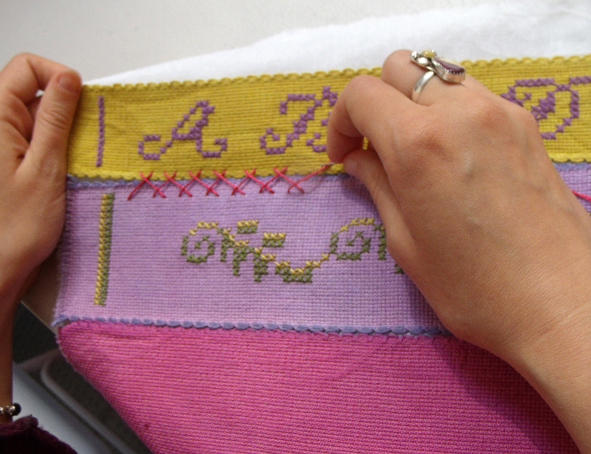
cross stitched bands being cross stitched together
By the THIRD WORKSHOP the patchworks are starting to look very rich and there is less uncertainty about colour choices, everyone seems to be enthralled by this process and are bringing in finished pieces that they have developed at home alone….everyone comments on how good it is to just stop for a time and concentrate on their stitching.
2 finished ribbon patches with 3rd ready to be embroidered
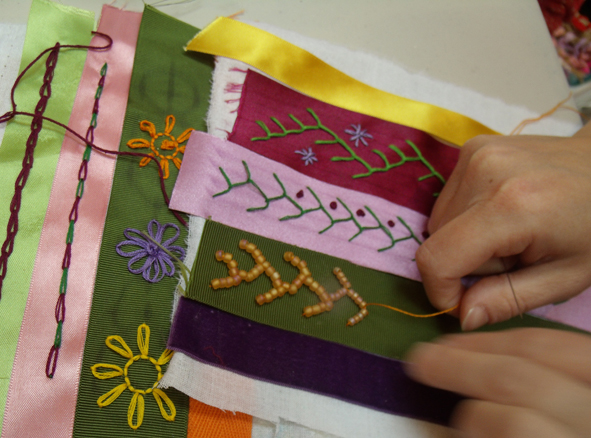
The third week is supposed to be looped stitches – chains and lazy daisies and feather, but we have to spend some time catching up on herringbone as the counted cross stitch took up most of the last class at the studio.
looped stitch patch of chain, lazy – daisies with feather variation being worked in beads
The patches are now starting to harmonise together by careful use of colour; everyone really enjoys the frivolity of stitching with multi-coloured threads to make up the herringbone variations
herringbone stitch variations plus feather stitch rows that are beaded
By the LAST WORKSHOP we have got a small range of patches ready to be worked into a whole square.
Anne’s collection of patches ready to stitch together.
The piecing together of the patches for the last class was easier because of the colour co-ordination of the embroideries, but the strict oblong patches made for geometric patterns for the final piece. Maybe for the next session of this class I will give each person a triangle as well as oblongs and squares of fabrics to apply the embroidered ribbons on.
geometric patterned patchwork for final piecing
I just didn’t have the heart to ask them to cut up their embroideries to look like a more authentic crazy, even so each person had completely different patchworks –
the inspirational crazy patchwork sampler is pinned together
This group of students want to learn more stitches and techniques so I am running an advanced course for them – and other more experienced embroiderers can drop in for single sessions. Considering that this group had only 5 classes for 3 hours each they have really advanced their practice in many ways and not just by learning how to stitch. I think that they have caught my bug – the embroidery bug – and are now developing their own libraries and stashes of materials ready to try out new techniques and new ways of expressing themselves.
vintage DMC book of counted cross stitches bought by Jo after seeing my old battered version with her almost completed Crazy Sampler
I have been working with Hanne Rysgaard sampling new work for an exhibition of the Stitch and Think research group, called Mending at the Museum which starts in November this year and runs for 6 months at Bristol City Museum and Art Gallery. Hanne does not like mended things, in fact she is fundamentally opposed to the idea of mending or using anything cracked or broken BUT she does like transformation – well as a ceramicist she would wouldn’t she ? transformation by fire is fundamental to her practice.
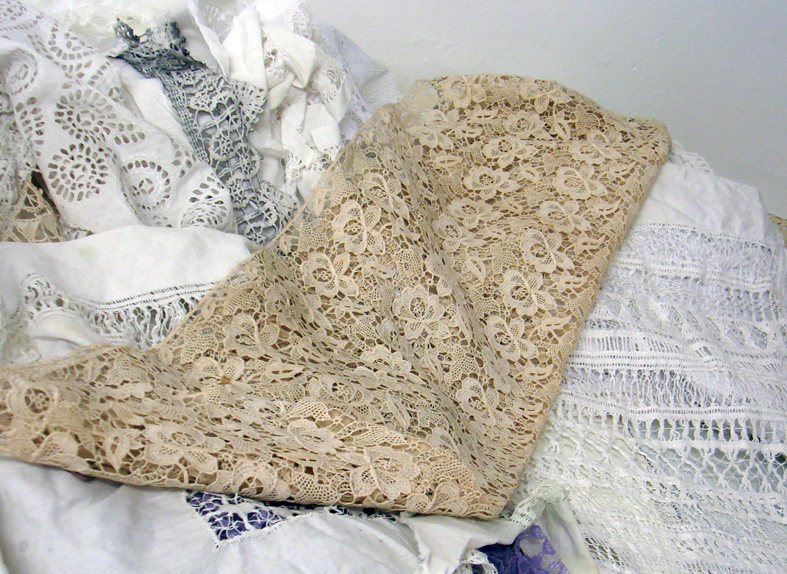
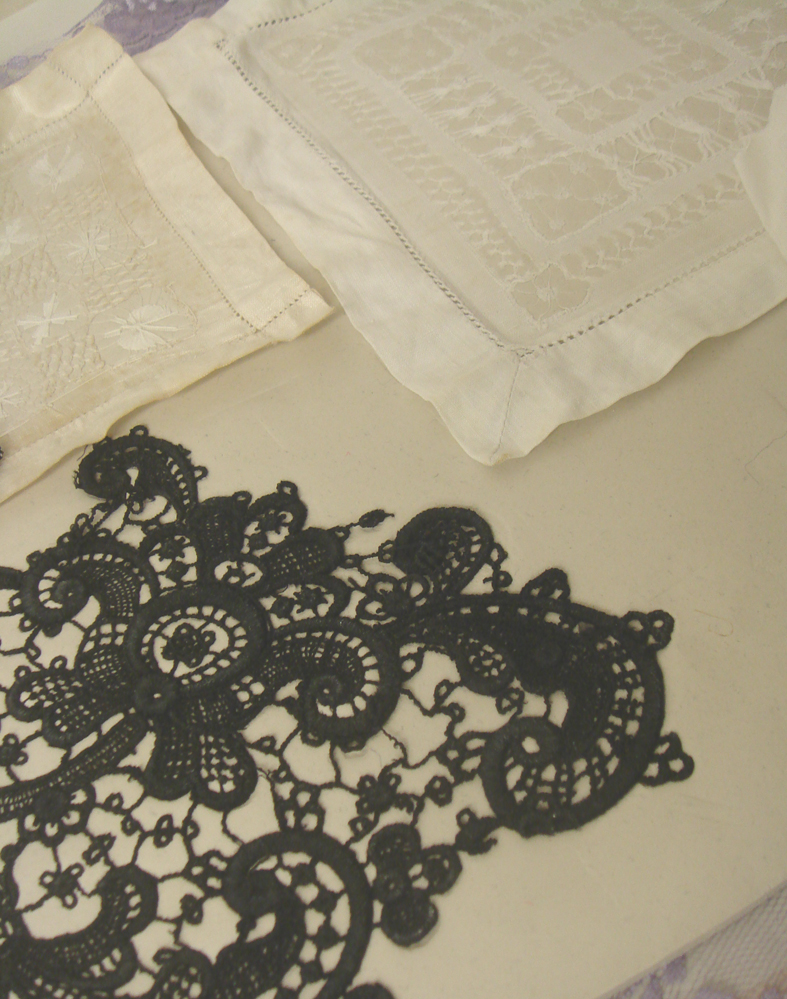
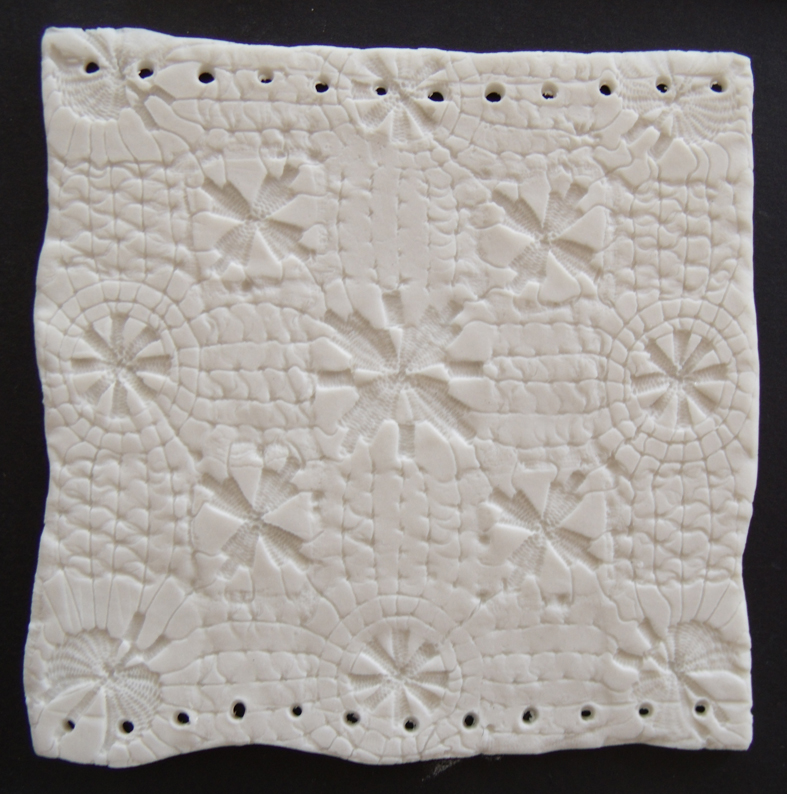
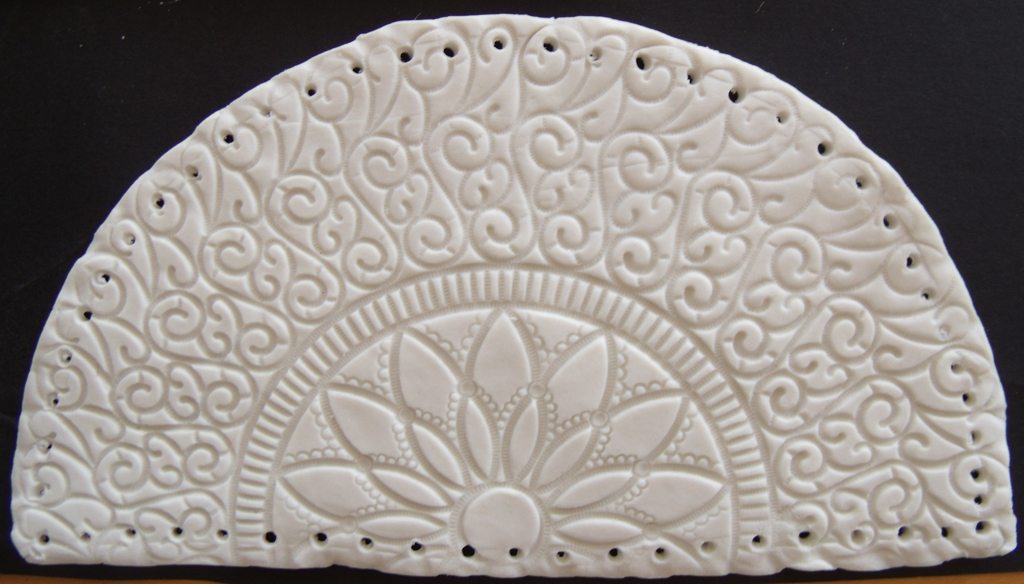
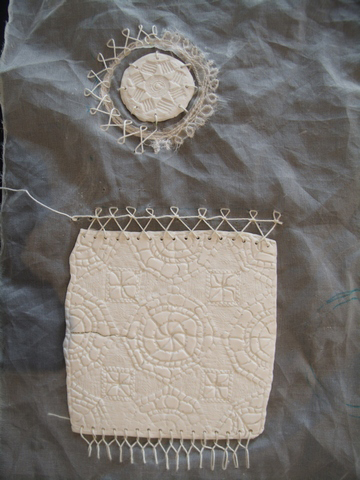
my pieces of damaged vintage guipure lace and drawn thread work
We have been trying to get together to work since our visit to the Lost in Lace exhibition in Birmingham early this year, where we determined to develop some porcelain lace work – possibly a curtain. The idea is that Hanne will transform my tattered bits of lace into porcelain and I will stitch or embroider the patches together to make fabric.
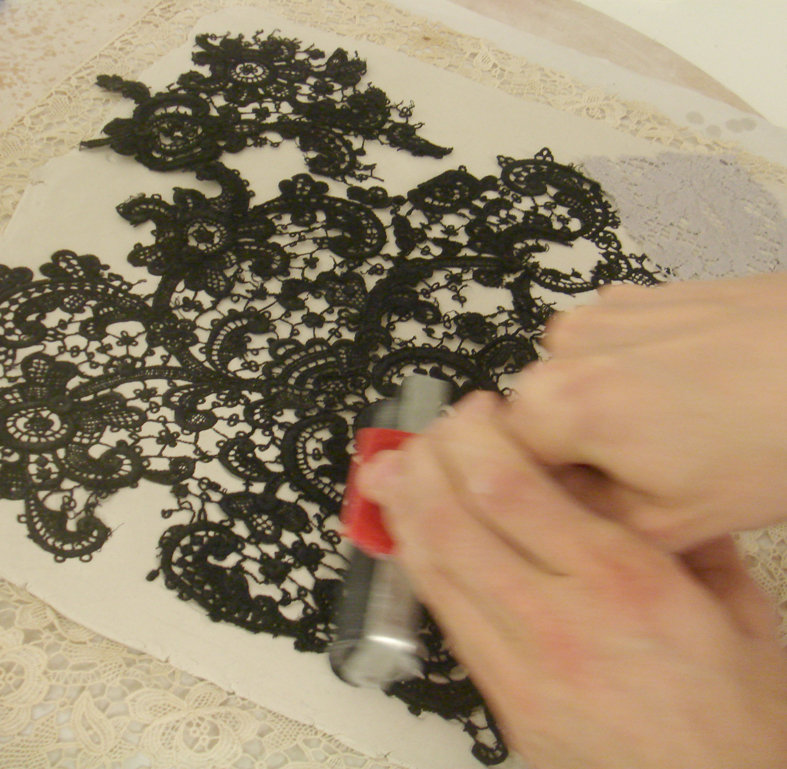
So Hanne prepared some sheets of paper porcelain for us to work on and we set to work rolling several types of lace and drawn thread work into the surface of the clay.
Hanne rolling black guipure lace into sheet of paper porcelain
She was much the stronger roller – my first attempts were really puny. We had placed the larger sheets of lace under the clay as we thought we may want the resulting ‘fabric’ to be seen from both sides. I prefer the stricter linear drawn thread work impressions but Hanne just loved the rich and romantic guipures..
guipure lace and drawn thread squares impressed into the fresh porcelain
We used all types of patterns to give ourselves a good range to sample with. We needed to ascertain how big the individual pieces could be as this would give an indication of the size of finished piece…I had envisaged a huge floor to ceiling drop of larger sheets of porcelain but Hanne explained that making hand -sized pieces of porcelain was more viable; first the pieces need to be fired without cracking and then be strong enough to be handled later when being stitched together+all my scraps of vintage lace are damaged and small sized, but how else could I have afforded to collect such lovely pieces?
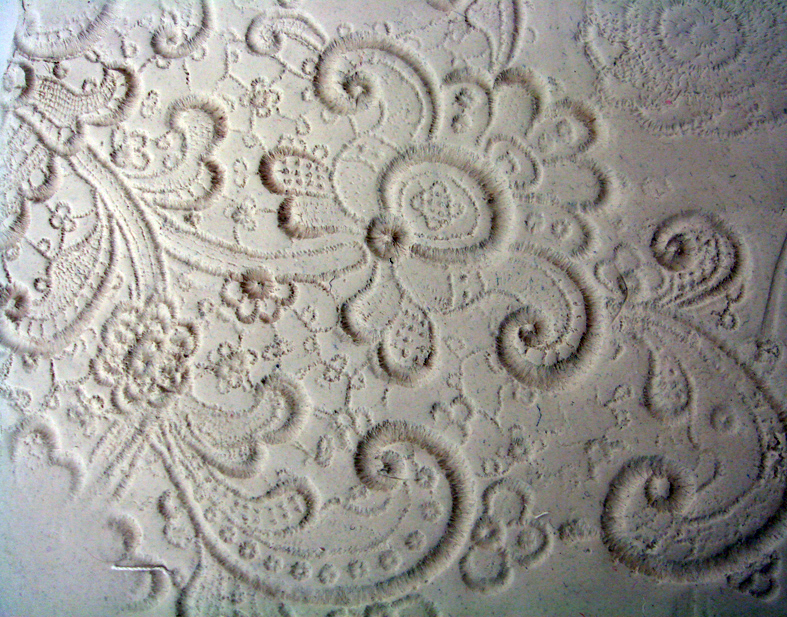
impression in damp porcelain of the black lace above
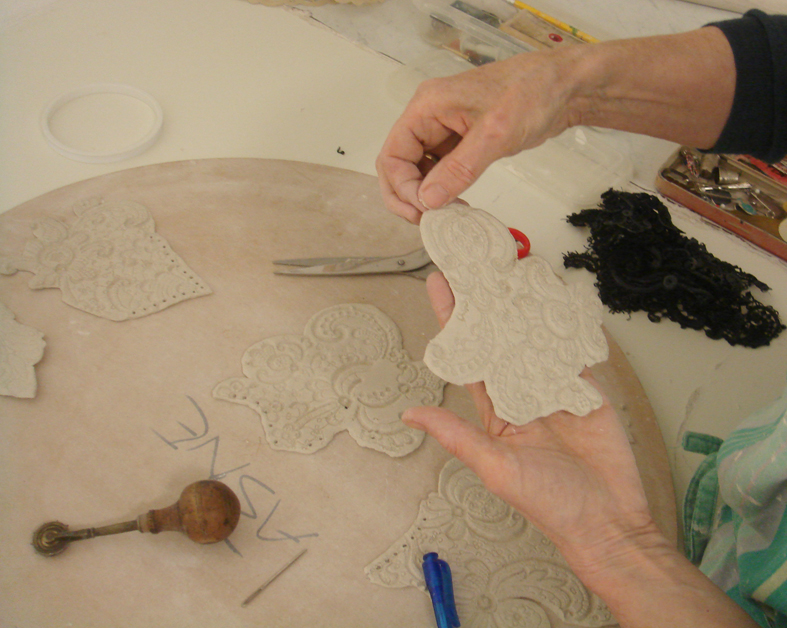
As you can see the first impression in the damp clay is stunning, so crisp and clear, we were whooping with delight at the fine detail, every stitch can be seen and this is machine made lace. We now had to cut the lace into shapes and I was amused to see Hanne pick up a pair of scissors to cut it; but first I handed her an old fashioned tailor’s tracing wheel to impress regular holes in the surface where I have to stitch. We placed the holes anywhere we thought useful – we will have to regulate these more carefully on the finished work.
fettling the edges of the cut porcelain motif
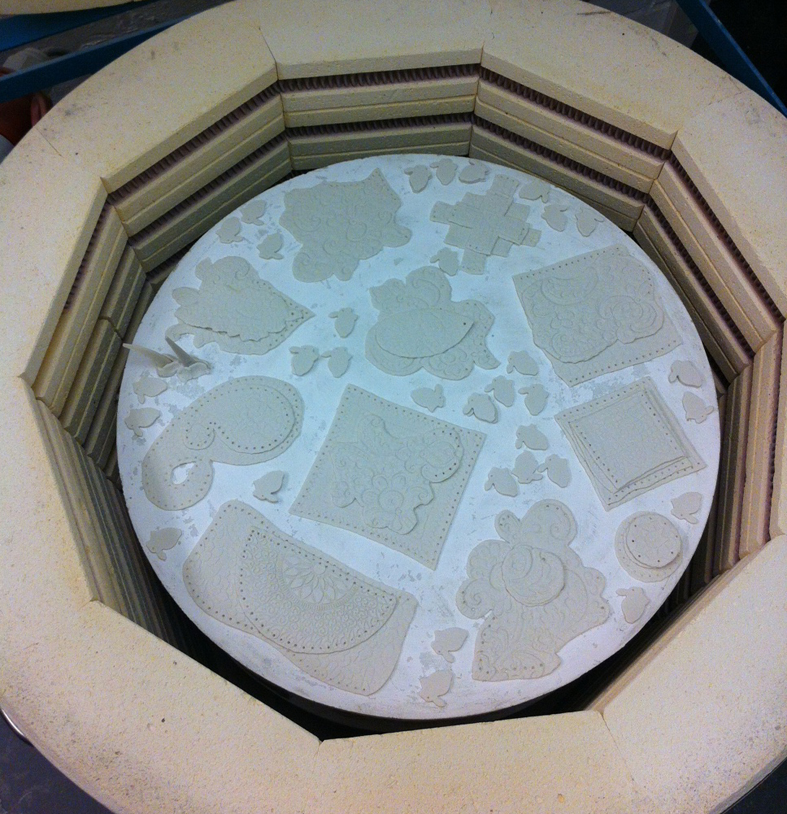
Now to the kiln…Hanne packed it….
kiln packed ready to be fired
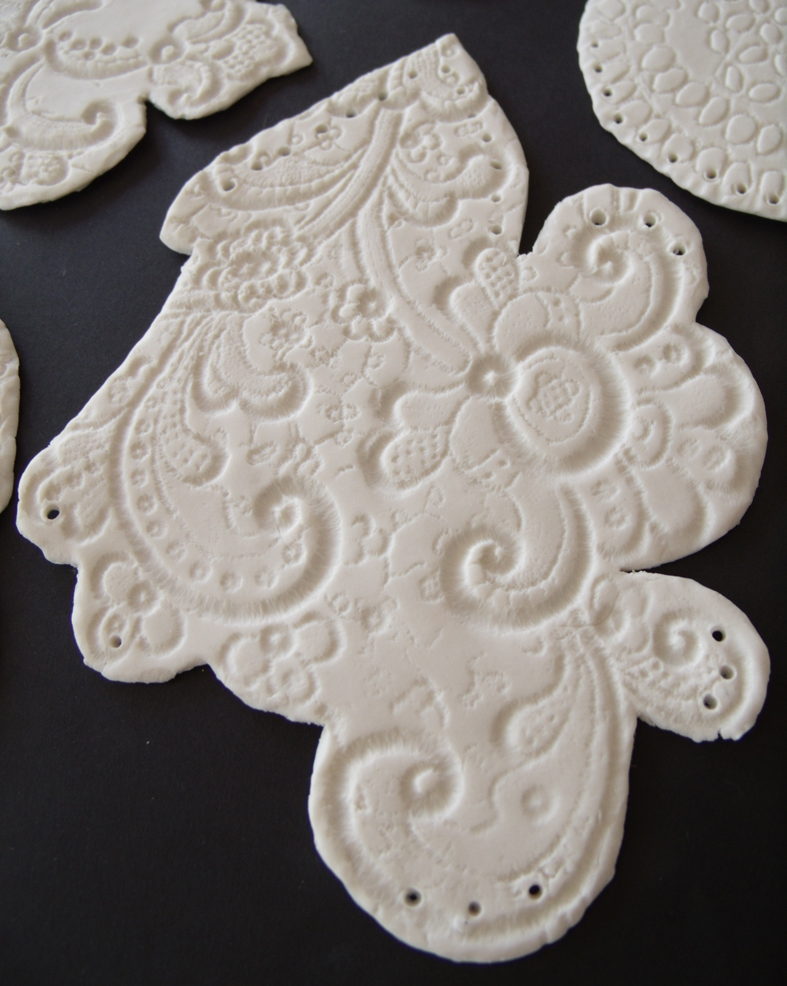
and 2 days later I returned to collect the finished motifs…
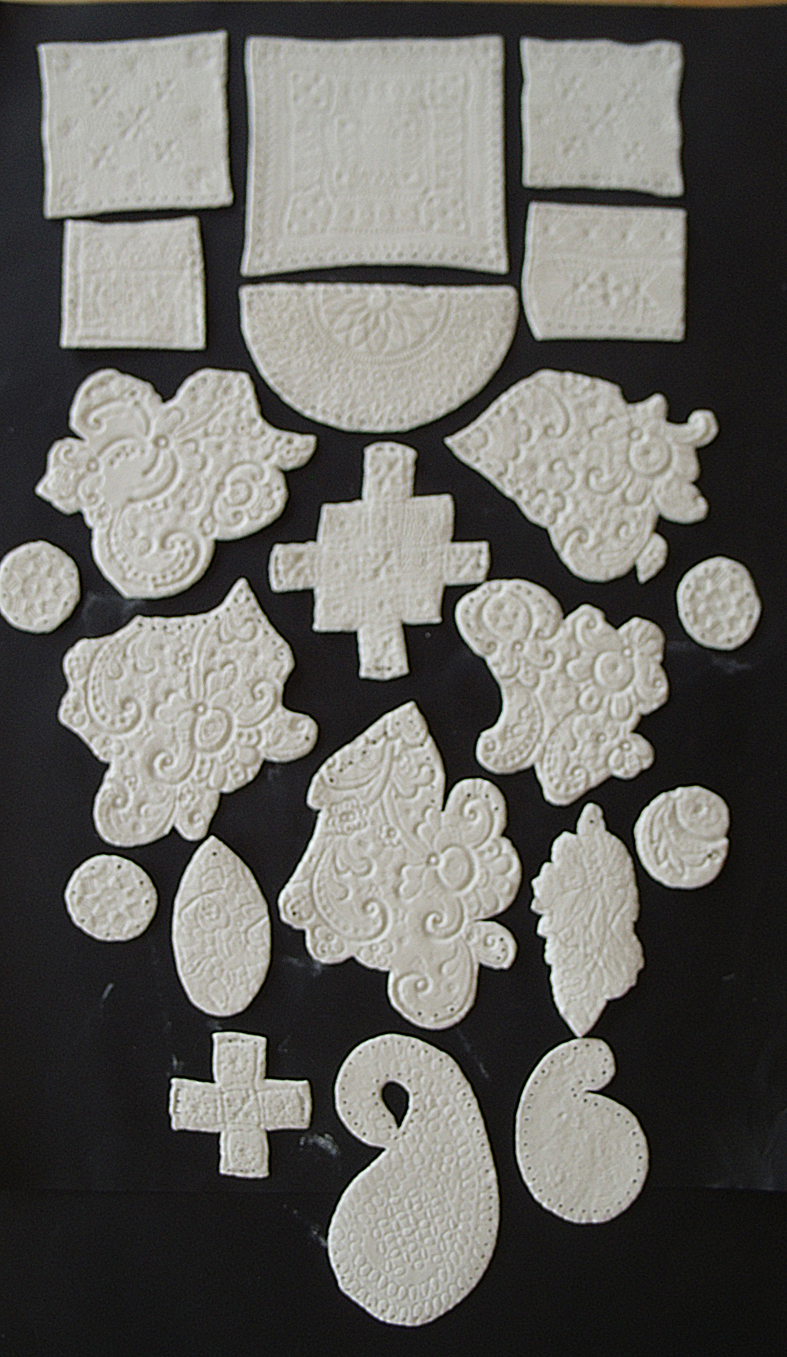
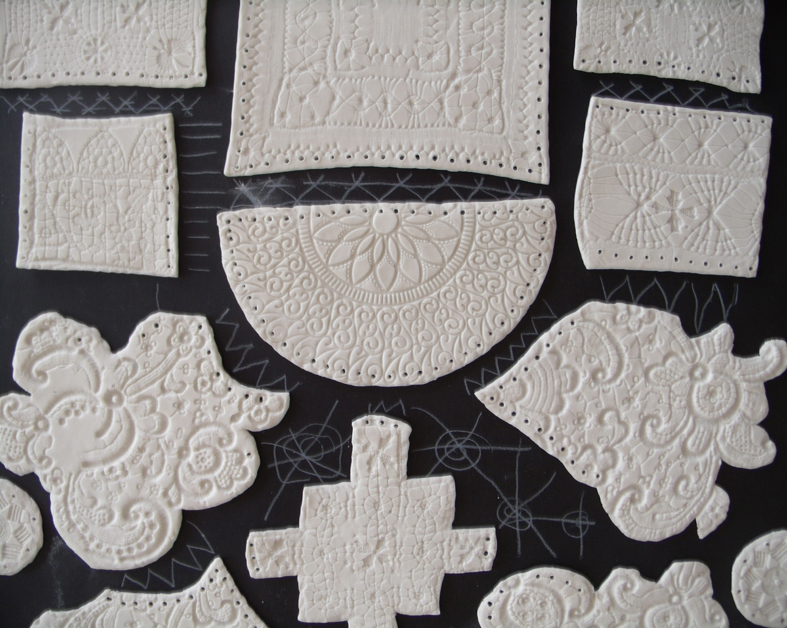
fired porcelain motifs
The pieces are slightly smaller but the holes are fine for stitching, the quality of the unglazed porcelain is so like a starchy linen fabric that the transformation is uncanny – they look like material but are brittle and now all uniformly white….ethereal.
fine linen drawn thread work square
and like similar transformations in vitreous enamel, plastic lace often makes crisps and clear impressions.
plastic lace impression
So now it is over to me to develop the new fabric, I start by placing the different pieces in formal patterns – I originally intended to use wire to stitch between the gaps using decorative lace like stitches to fill in any spaces….now I realised this was not going to be at all easy, even at this moderate scale. The wire won’t behave well – it needs careful and regular stitches to develop the rhythm required to give embroidery its formal beauty.
motifs arranged formally as a lace curtain design.
I started to draw between the pieces to try to find decorative stitches that could be used between the motifs,
drawing stitches between motifs
but it became obvious that I will need to use a backing fabric and applique the motifs onto it, this will act as some protection but it has to take the weight of the porcelain, so now I am researching silk organzas, cotton organdies and maybe netting…as we are both designers and therefor pragmatists we are liking the transparent quality of the organza first sampled – and applying lace motifs on a pre-made net ground is used as a lace making technique.
first sample of applique on organza, seen against a black background
I have a long way to go before this fabric begins to do justice to the quality of the impressed porcelain motifs…..but it has started to remind me of Crazy Patchwork
it could be a lovely airy crazy patchwork – I am now thinking of new ways to develop it further
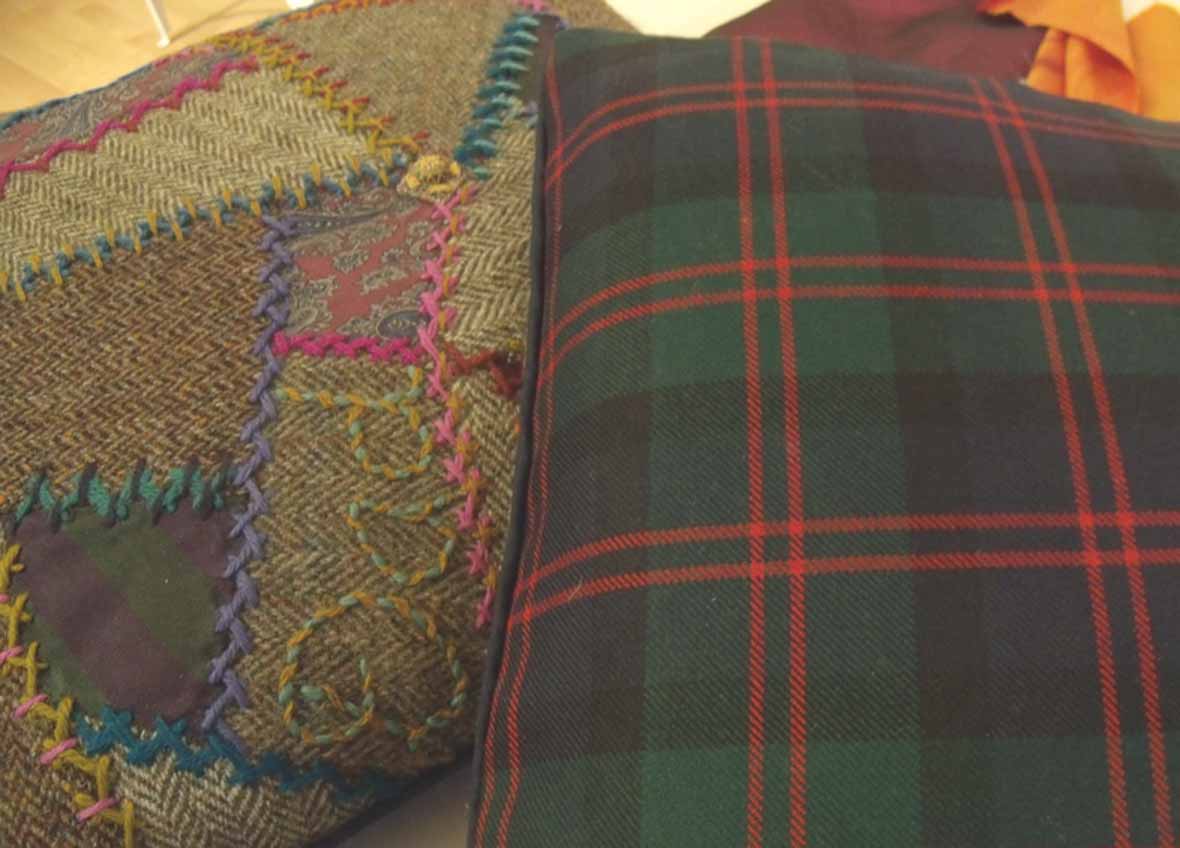
The most hits my blog has ever received in its entire life span of 18 months, was shortly after the Commemorative Crazy post, and many people contacted me saying how much they liked the content and story. So I was delighted when Jane called in to Heart Space Studios to show me the finished cushions that she had made in time for Christmas for her 2 children.
cushions showing tartan fabric backing
They were so beautifully made, using fabrics from her late husband’s sports jackets and ties, and Jane had been able to use the small piece of tartan fabric, that was her husband’s clan tartan as the backings to the cushions. (did I say that I have a tartan as well – the Hay tartan – all brilliant red and greens overlaid with a very noisy white check – nowhere near as tasteful as this one)
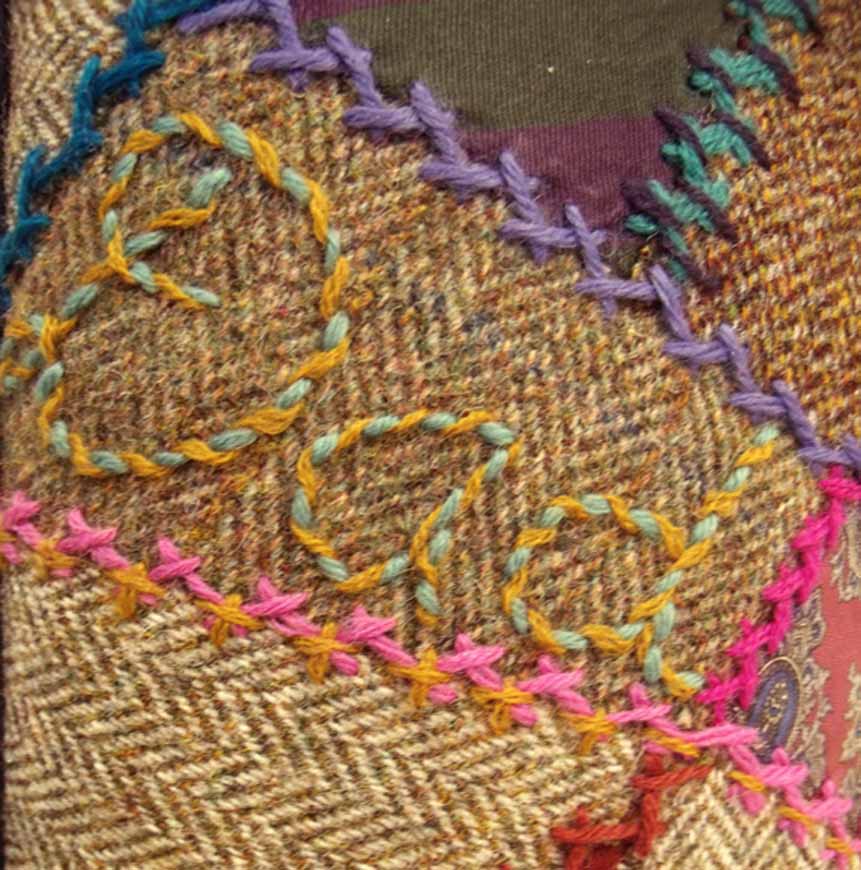
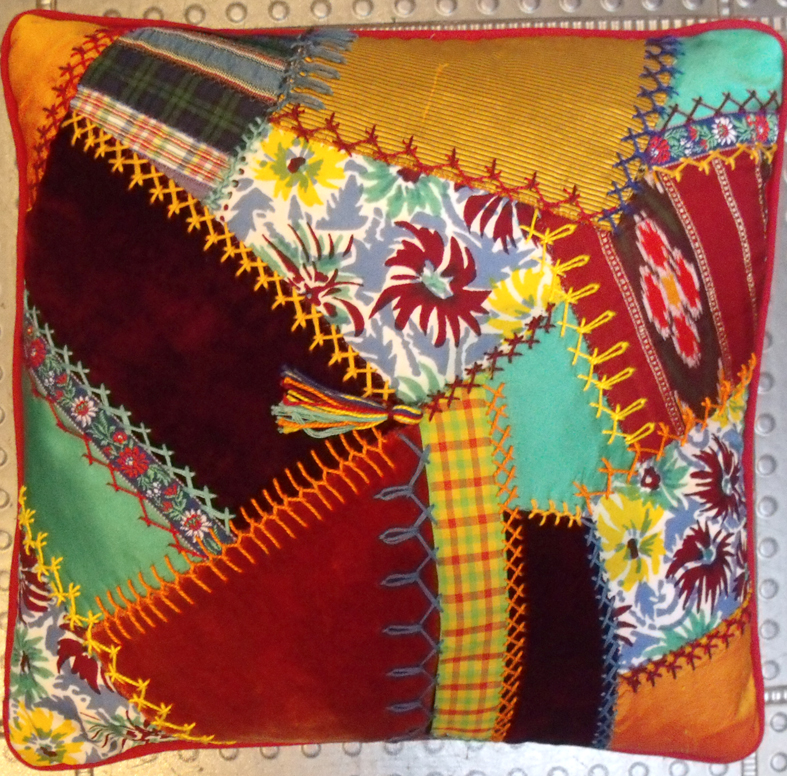
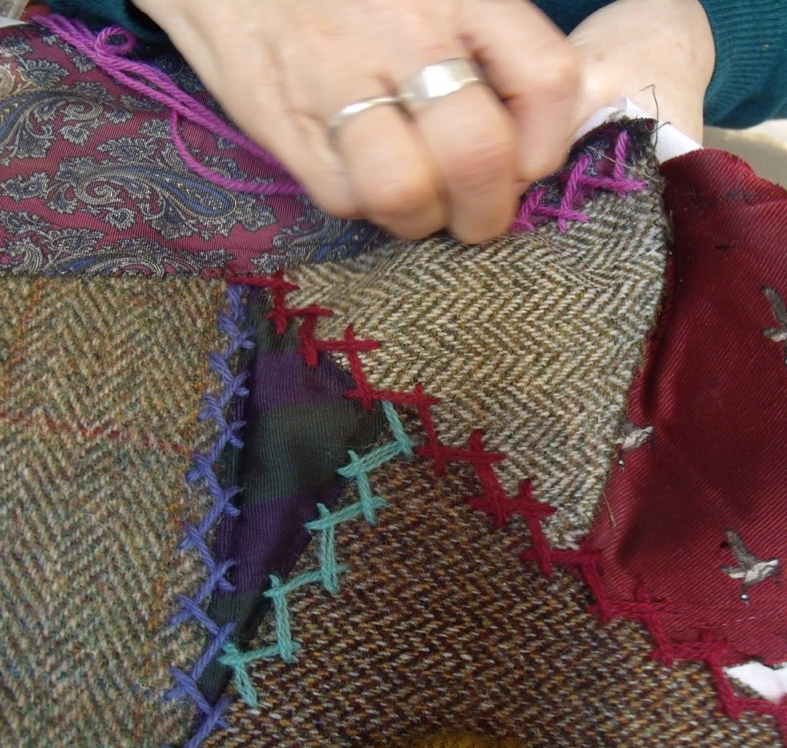
close up of the lively wool plain and tied herringbone stitches
She had embroidered “DAD” on one, at her daughter’s request, it is in whipped running stitch, very subtle and almost merges with the tweed background.
whip stitched commemoration
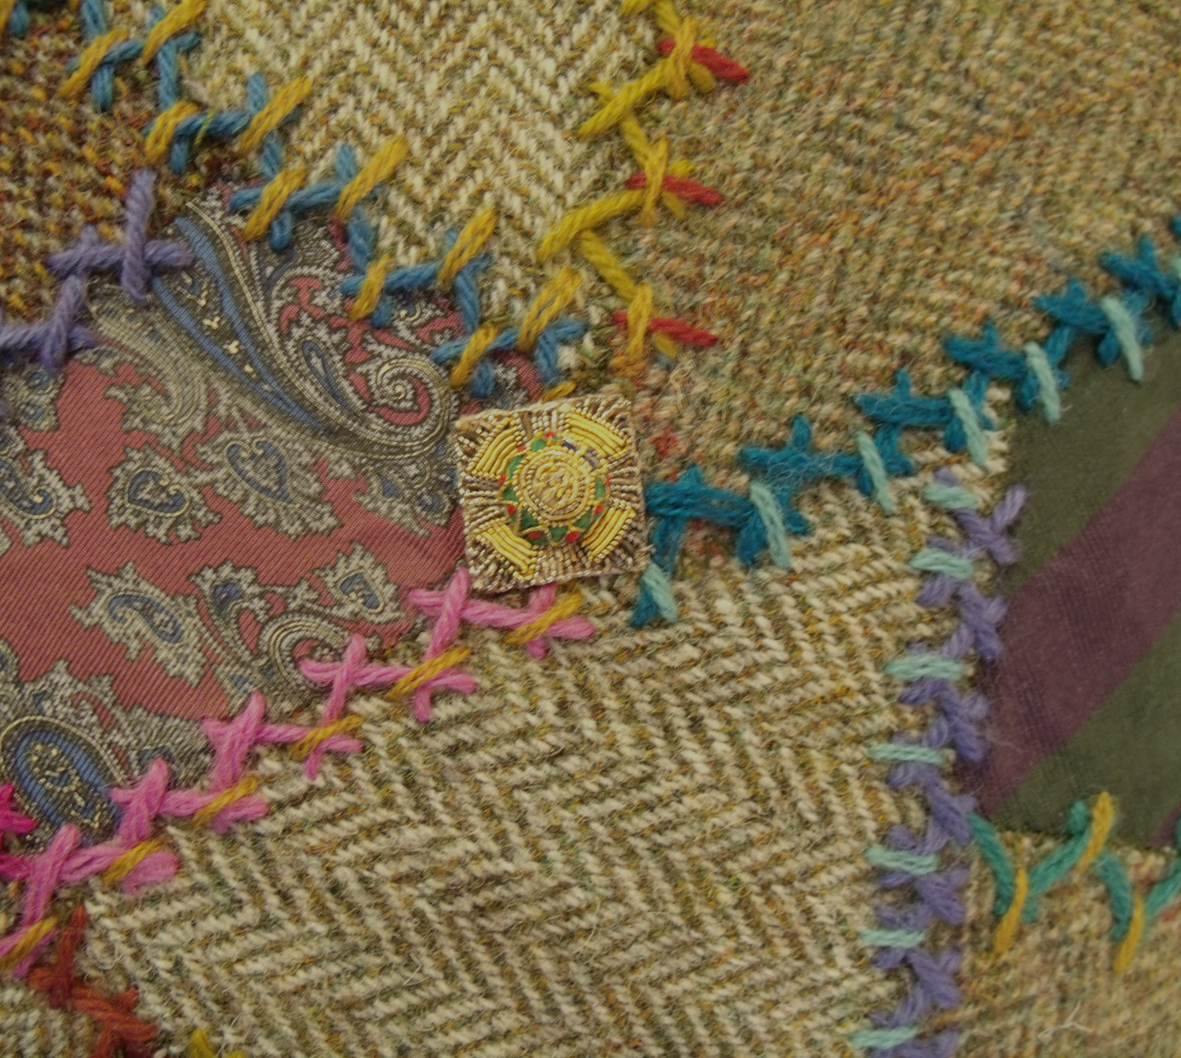
And amongst some other memorabilia, Jane found her husband’s ‘pips’, these are badges usually in the shape of a star or a crown and worn by army officers on the epaulettes of their uniforms. These particular ‘pips’ are actually stitched onto fabric in gilded thread so two of them they were put to good use at the seam joins of the crazy stitches. Usually a star is stitched at such points by the embroiderers of the traditional crazy patchworks.
gilded ‘pip’ used as a foil for the collision of several rows of embroidery
Jane has enough fabric to make another cushion for herself and even some smaller gifts for other members of the family…. and then she may decide to design and make the large throw from the remaining tweeds. I will keep a record of this progress.
Jane’s finished cushion from the original workshop
It is the 11th of the 11th 2011 and I am in commemorative spirit; yesterday at Heart Space Studios we made the beginnings of a series of commemorative crazy patchwork pieces. After the last Crazy Patchwork workshop one of the participants Jane, asked me if I could help her make some more patchworks using the beautiful tweed jackets that had belonged to her husband, she could not bring herself to throw them away after his death, but now saw a way that she might be able to use them to make gifts for their children.
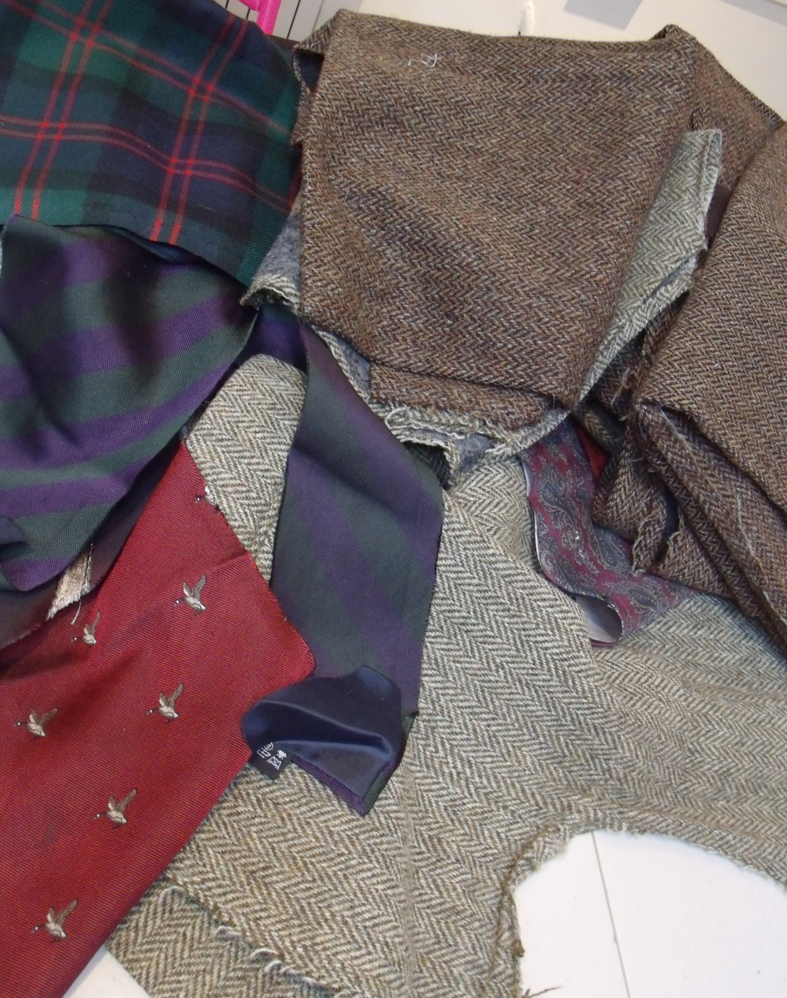
silk ties and heathery tweed unpicked jackets
I was very pleased to be asked to conduct a one-to one session with her to help cut into the jackets and organise the patchworks. I knew it would be really difficult so I volunteered to cut into them for her , suggesting that she make a start by unpicking and when she arrived she had carefully unpicked and pressed them all; 3 beautiful tweeds in soft shades of beige, grey and brown and she also brought some club and military ties that she had been unable to part with, and a piece of her husband’s Scottish clan tartan.
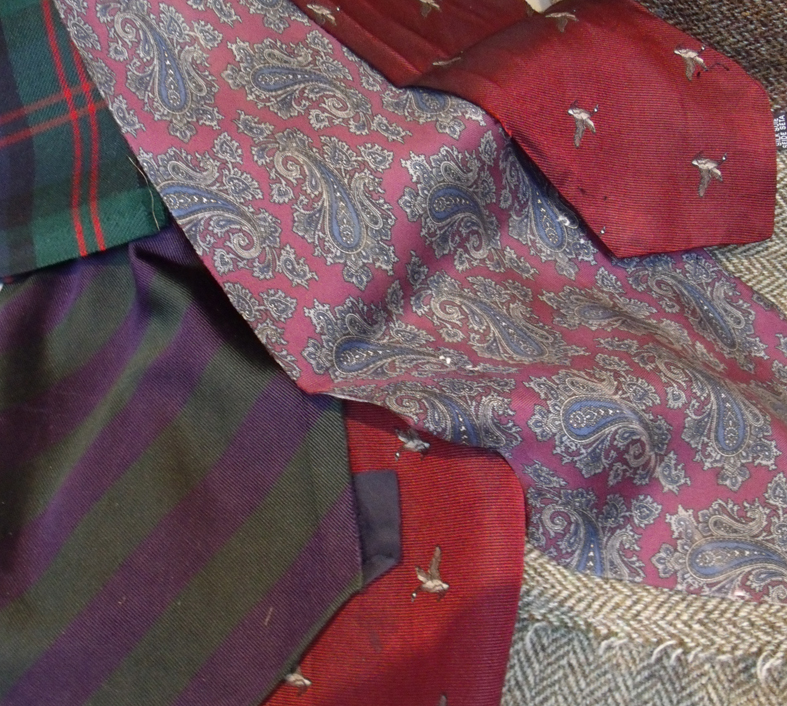
silk ties woven with memories
This is what I find so compelling about many old and used fabrics, the story behind each piece; “Make, Do and Mend” is not such a simple statement when applied to projects like this. The first thing to do was to cut the cloths to make a sample piece of patchwork. I wasn’t taking any chances with such valuable fabrics.
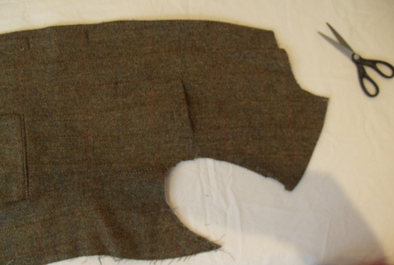
starting to cut up the tweeds
The little sample would tell us what size patches would work best, which fabrics worked well together and what the ratio of ties to tweeds was best. The clan tartan turned out to be the right size to make backings for 3 cushions….so only the ties and tweeds to be organised
sample patches bonded on a backing cloth
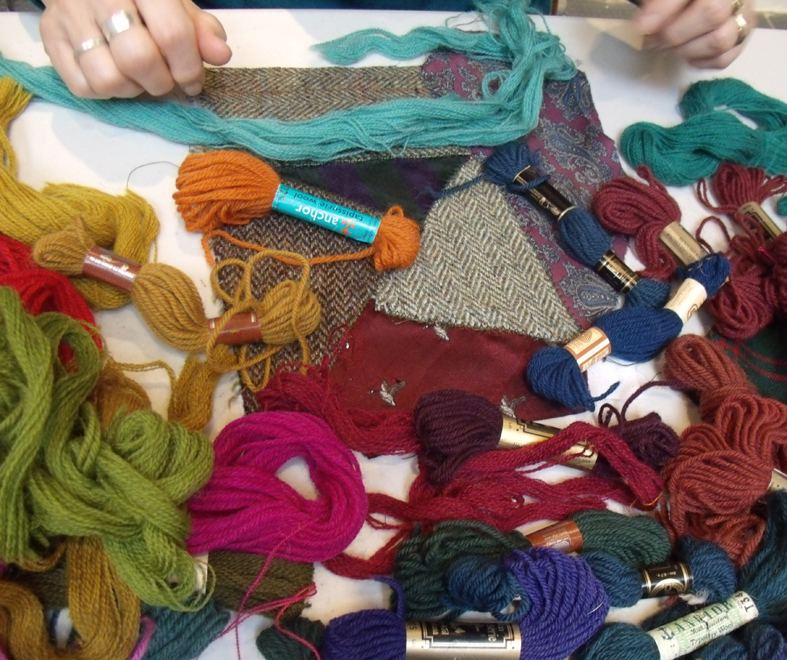
But the most important thing of all for the success of the project was selecting the colours of the embroidery yarns, they had to be chosen and tested. I had brought several types of woolen yarns for Jane to sample, the usual tapestry 4 ply and some crewel wools that can be used singly or in multiples, very useful for developing colour combinations. Looking at the colours embedded in the tweeds it was a real pleasure to try to match them ..and at first the pale turquoise crewel yarn seemed the best choice
selecting colours to complement the tweeds – check out that pink
But the colour that really delighted and just kept calling to her, was a zingy hot pink – not what you would imagine for this soft and hazy set of fabrics, but it demanded to be used, Jane kept laughing every time she picked it up.
the pink thread that just had to be used.
We also discussed putting a message or an initial onto the piece, and I explained how in the Crazy tradition there are lots of written messages..so she is writing her husband’s initials on a corner piece of each cushion, but has just emailed me to say that her daughter wants her to just write ‘Dad’ on hers.
platyng with the colour combinations
The use of the crewel yarns in the different tied herringbone stitches makes it easy to combine colours to soften and blend the brightest yarns.
Now Jane had to get brave and cut up enough to make a whole cushion square to take home with her – we distributed the tie fabrics between the tweeds…quite a bit of work ahead …
laying out the first cushion square
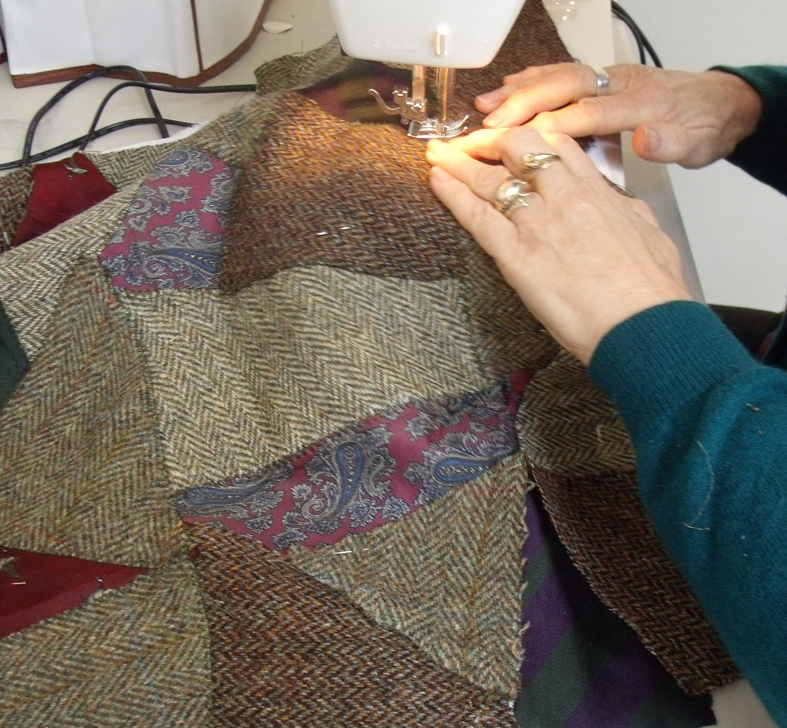
the last task before she left the studios was to machine stitch everything into place ready for the decorative stitches that are the true embroiderer’s delight in making Crazies.
matching the patches ready for decorative stitching.
During the workshop Jane explained that she had taken tailoring lessons to make her husband a coat from some tweed he had bought from Scotland, she now wondered what she should do with it – my suggestion is to combine the left over tweeds from the jackets and use them to make a huge throw or blanket using a strippy quilt design….so she is now happy that she does not have to throw it out but most importantly, when I wrote to ask her permission to use her ‘story’ she replied that she now felt that the jackets had “still got a life”. That is why I really appreciate using old and loved textiles to remake and recycle.


![photo 3[1] copy](https://janethaighherwork.com/wp-content/uploads/2025/06/bd41e-photo-31-copy.jpg)