Slow Progress

hand embroidered boot

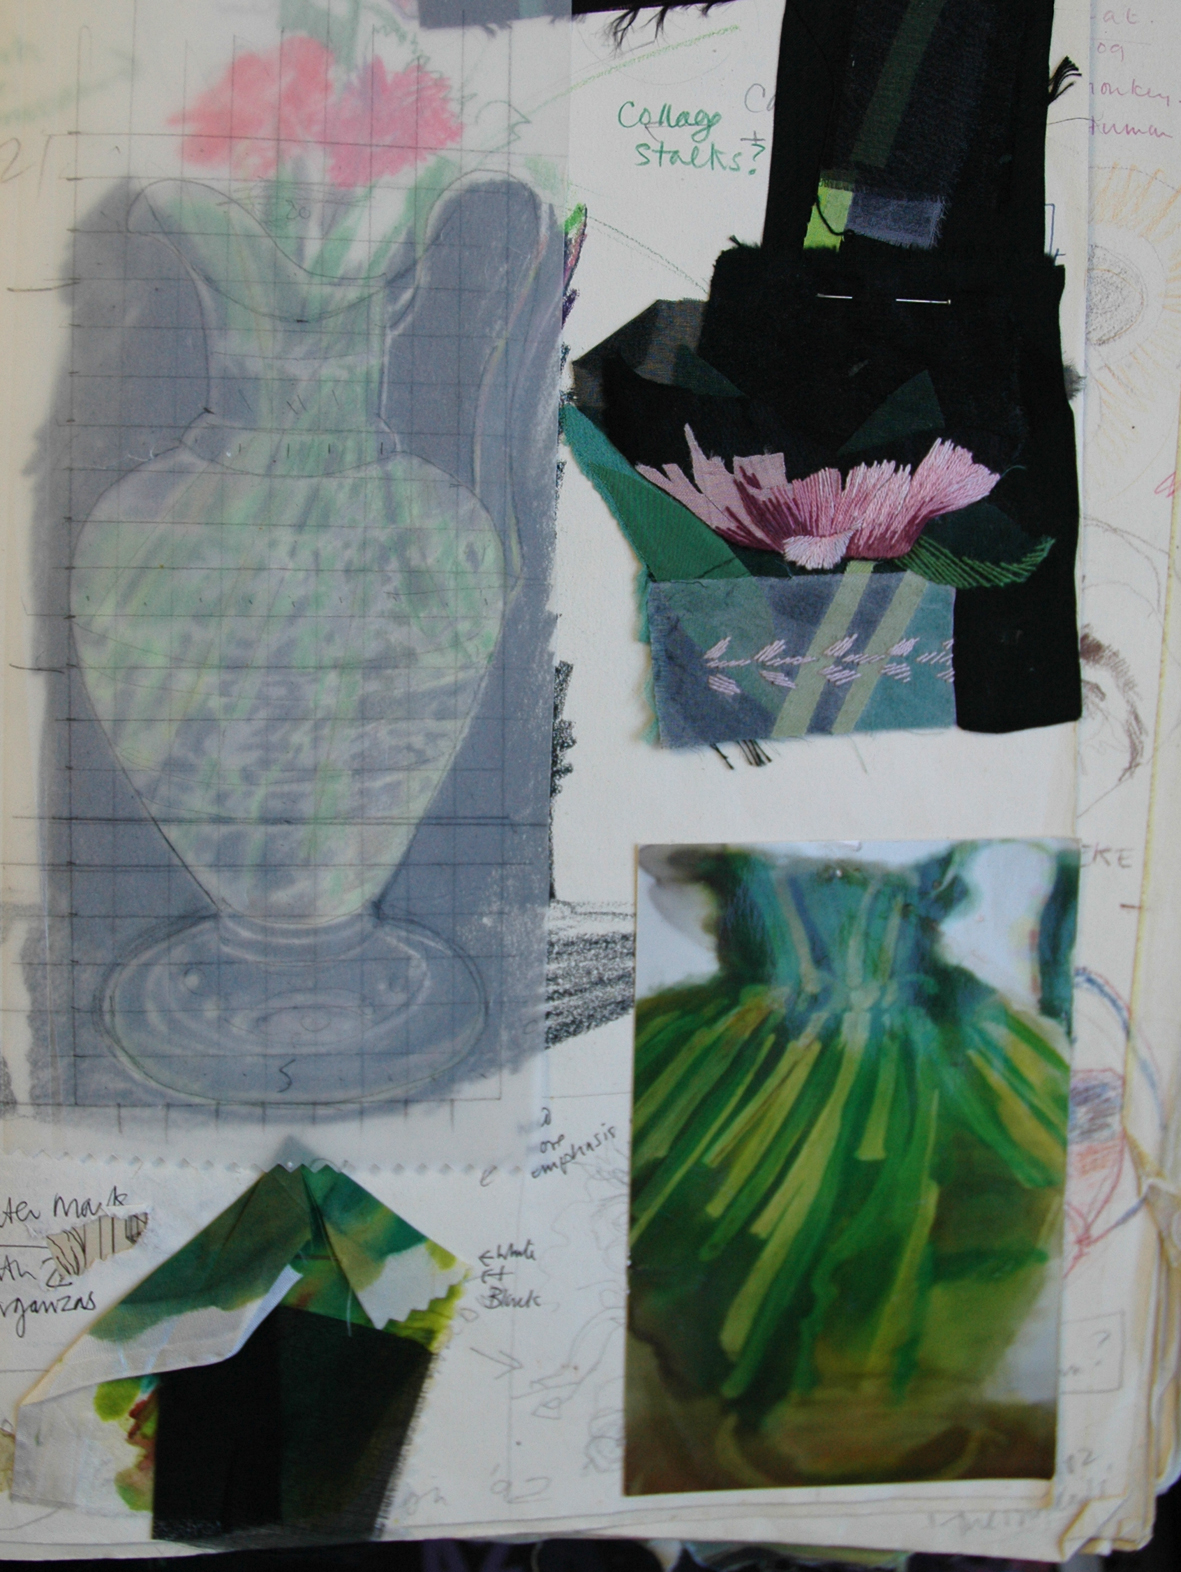
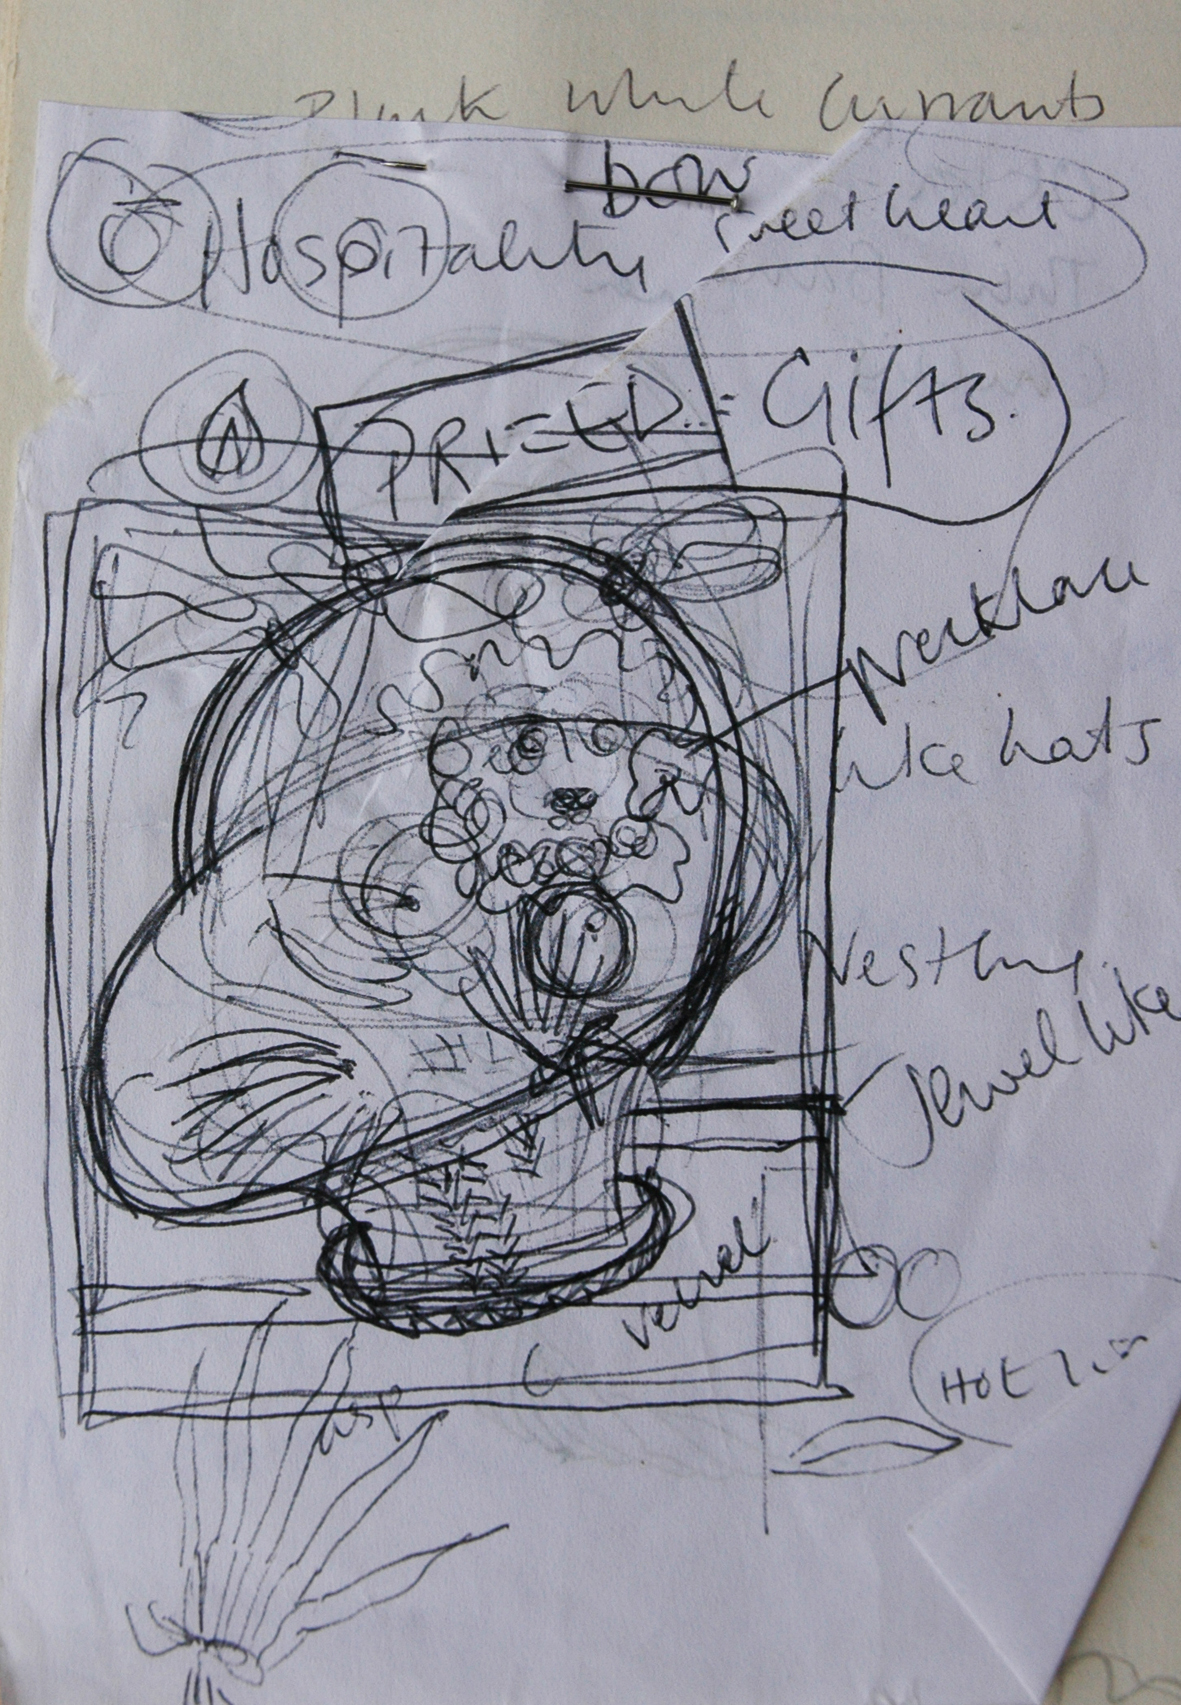
I wrote in the About page that I would show work in various stages of progress, successful or not; and as I have almost  finished the second dream embroidery for  my “Make it Through the Night” project, I thought I would show this at the “will it never ……. end”? stage.  This embroidery has been a real struggle to  make, which is so strange as I have had the drawing of my dream for over 10 years, have often looked at it and thought “one day”.

shoe dream drawing 1998


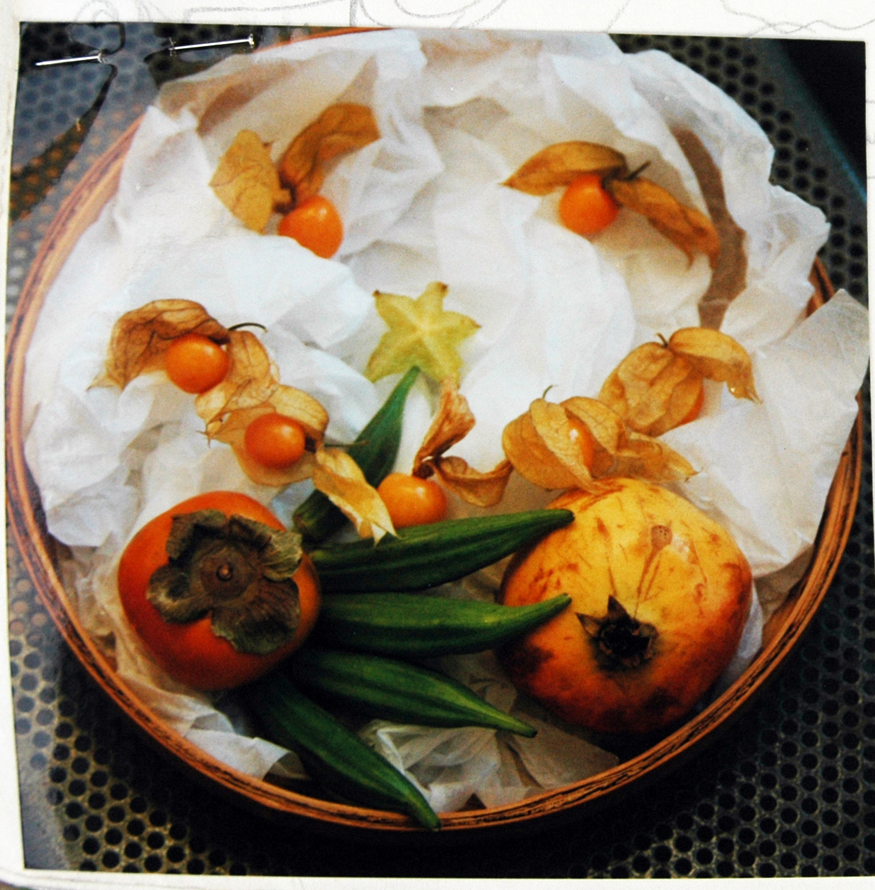
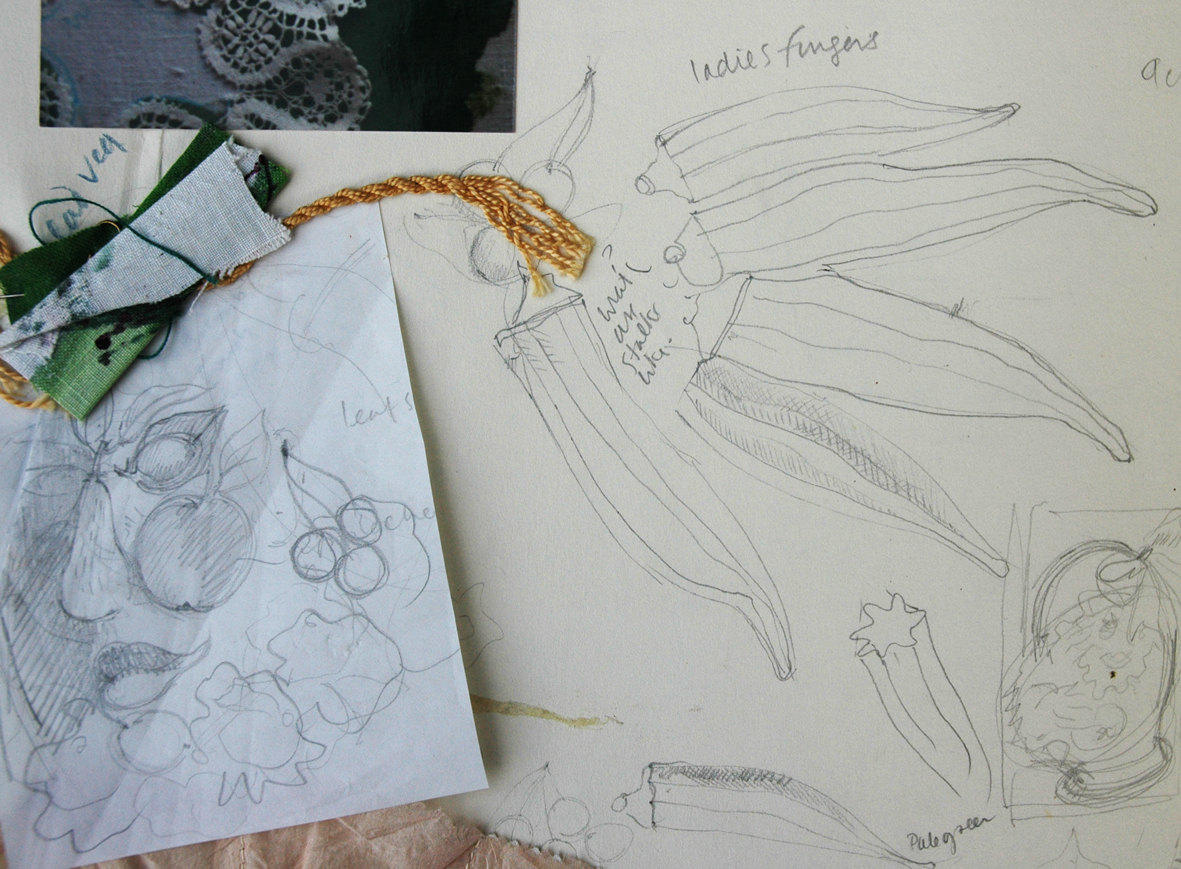
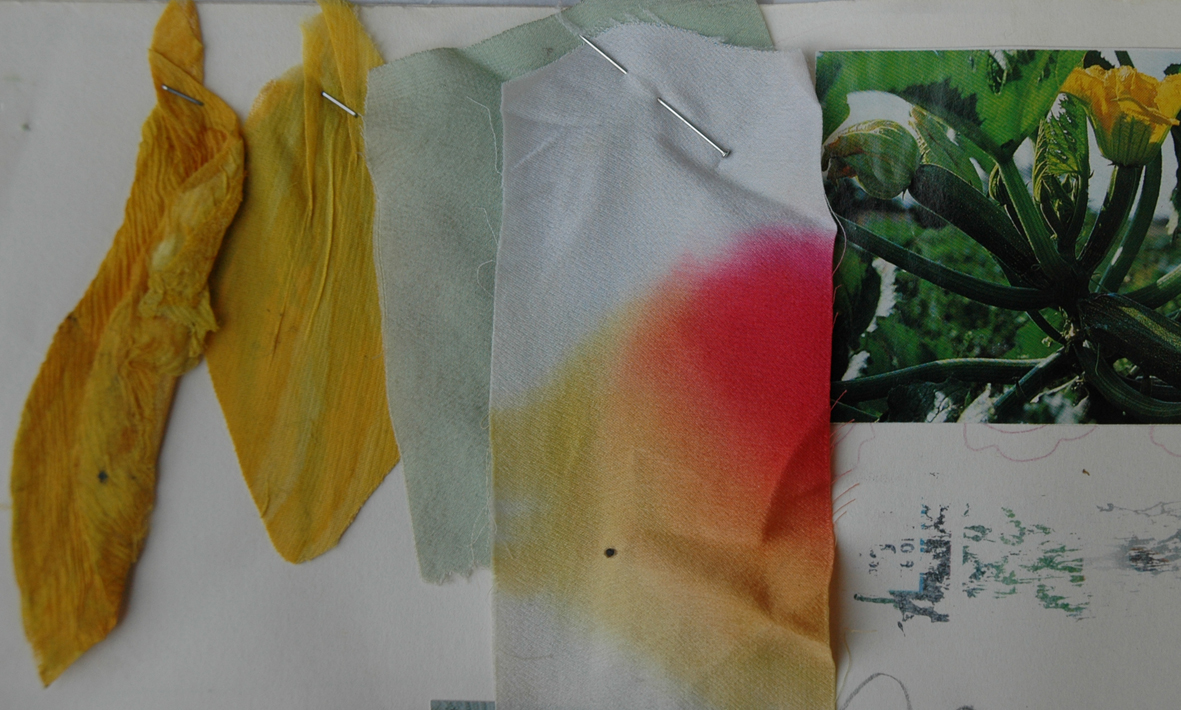
For several well considered reasons I decided to embroider it onto a bed sheet, therefor everything was life size – “a sheet of dreams” I started it in August and mention it in the blog “Samplers” and It took about one month of drawing, making patterns and sampling various techniques before I could start to make the work; then another month’s actual making before I gave it up – I thought that  if I shelved it I may eventually get the courage to continue the mammoth task of stitching it. I had made many samples and even got as far a printing an entire quilt onto the bed sheet, this took weeks so I was loathe to abandon it. But basically the sheer scale was just too daunting – I knew I had to hand stitch each shoe and there were about 10 0f them, and they were shoe sized and in a single thread, and I was losing the will to live at the thought of it. I didn’t blog about it at the time as I was unsure of why I was experiencing such difficulties and I certainly didn’t have the heart to write about it.

life size sample for sheet of dreams.

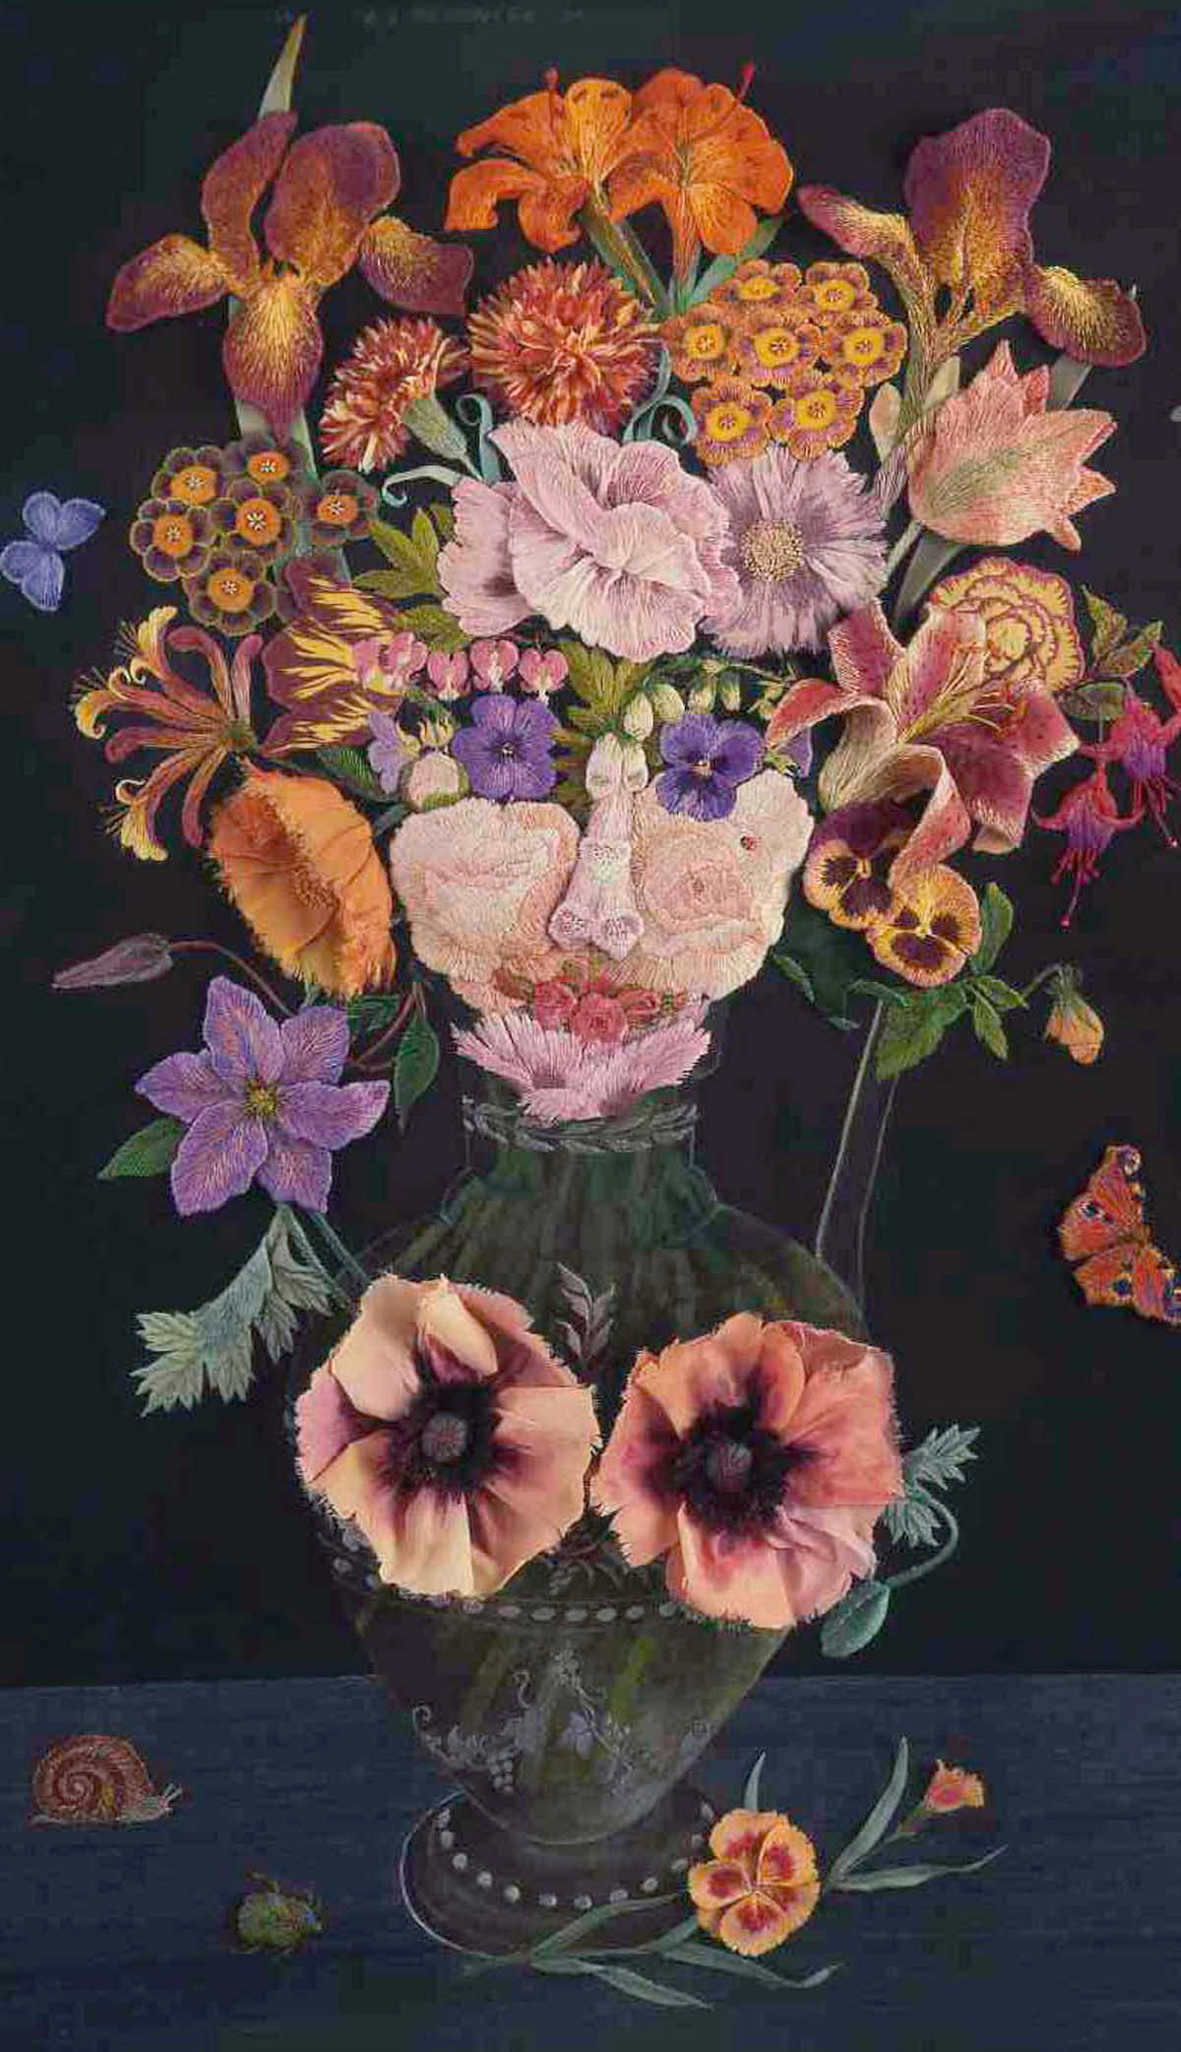
Meanwhile I made other works – some commissioned pieces which can’t be blogged until they are published….and so generally let the problem lie at a low level, to be absorbed knowing that eventually it would re-emerge…this is how work often resolves itself; you just have to be patient and let it suggest its own way forward…..then I made some handkerchieves for the same project, and realising how good it was to work small and quickly again – I thought I could maybe make the work smaller and embroider a” pillow of dreams” – after all, I reasoned, this is where you lay your head and where all the action stems from.

original drawings from August with revelation about how to progress in October

So I set to work again restitching the whole image onto a vintage linen Oxford pillowcase. The drawings remained exactly the same but now I used running stitches to make the quilt then padded it like a trapunto technique to emphasises the body shape that emerges from the distorted “patchwork”. This was all so really interesting to work, I was now on the right track and gone were the misgivings of “copping out” for a smaller scale.

I really wanted to get on with the shoes though, the drawings were taken from many old sketches and my own collection –

drawing of the my own shoes and embroidered pillow in progress.

Some shoes I cannot bear to throw away and have used them for years for drawing classes – if you can draw shoes you can draw most things put in front of you.

a collection of my own shoes, the high laced brown boots were bought in 1973 - a great expense but we enjoyed some very lively times together
shoes stitching still in progress last week

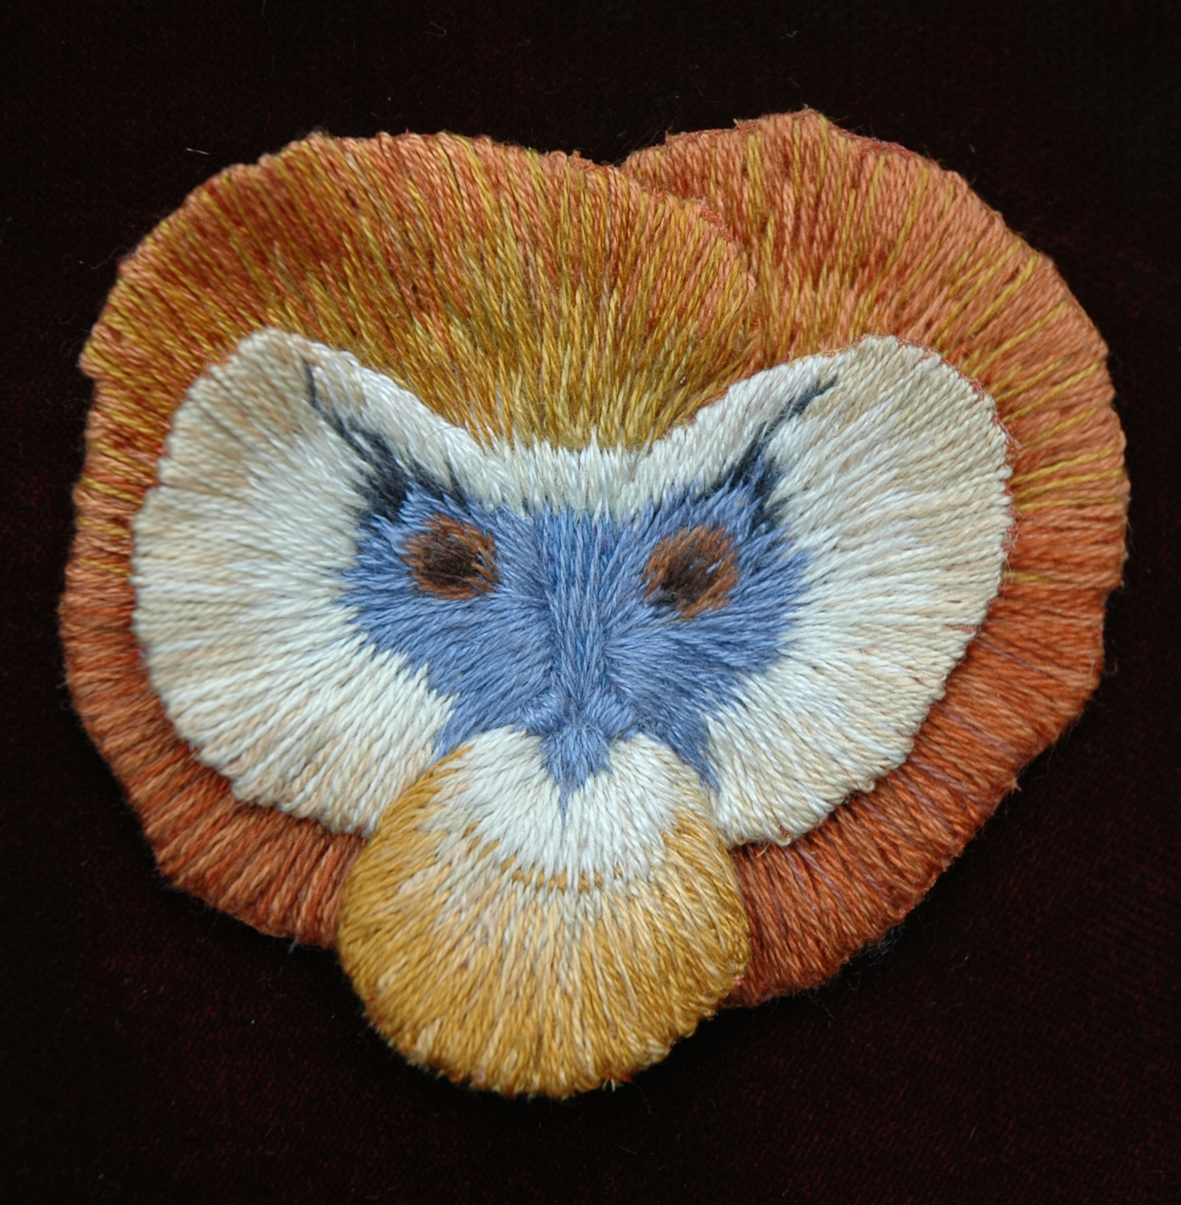
Eventually I got to embroidering the shoes, they are quite small about 10cms / 2 inches long and are stitched in one strand of  silk, cotton or metal threads, I love glitzy shoes.

gold shoe tramme
other gold shoe stitched


Of course the whole point of the dream was that I couldn’t wear the shoes any more, look closely at the lack of feet….yet  to be embroidered – I will address this issue later when I publish the finished work in the Ongoing Work pages. But meanwhile I set to to do the rest of the shoes – they take between 3 and 8 hours to work each one, but it is now driving me to distraction, I really dislike the days spent stitching these shoes……

Ironically I constantly bang on about how stitching is like meditation and I am presently running a project called “Stitching and Thinking” with a group of makers where we are considering the state of mind reached when the world goes away and its just you and your thoughts and the work; sometimes called a state of Flow, or old hippies used to say ” In the Zone” – wherever it is it is wonderful.


I loved the paler inside lining
embroidery of my old suede boots


I haven’t been there for a few weeks while battling with these embroidered shoes…and I blame an “acquaintance” of mine, Nigel Hurlstone, who is a tutor on a course where they still embroider –  Manchester Met (MMU). He gave me a much needed and requested  mentoring session on the whole ‘Make it Through the Night’ set of work whose progress he has been following – we have a reciprical arrangement where he crits my stitched work and I crit his new written story – telling work.

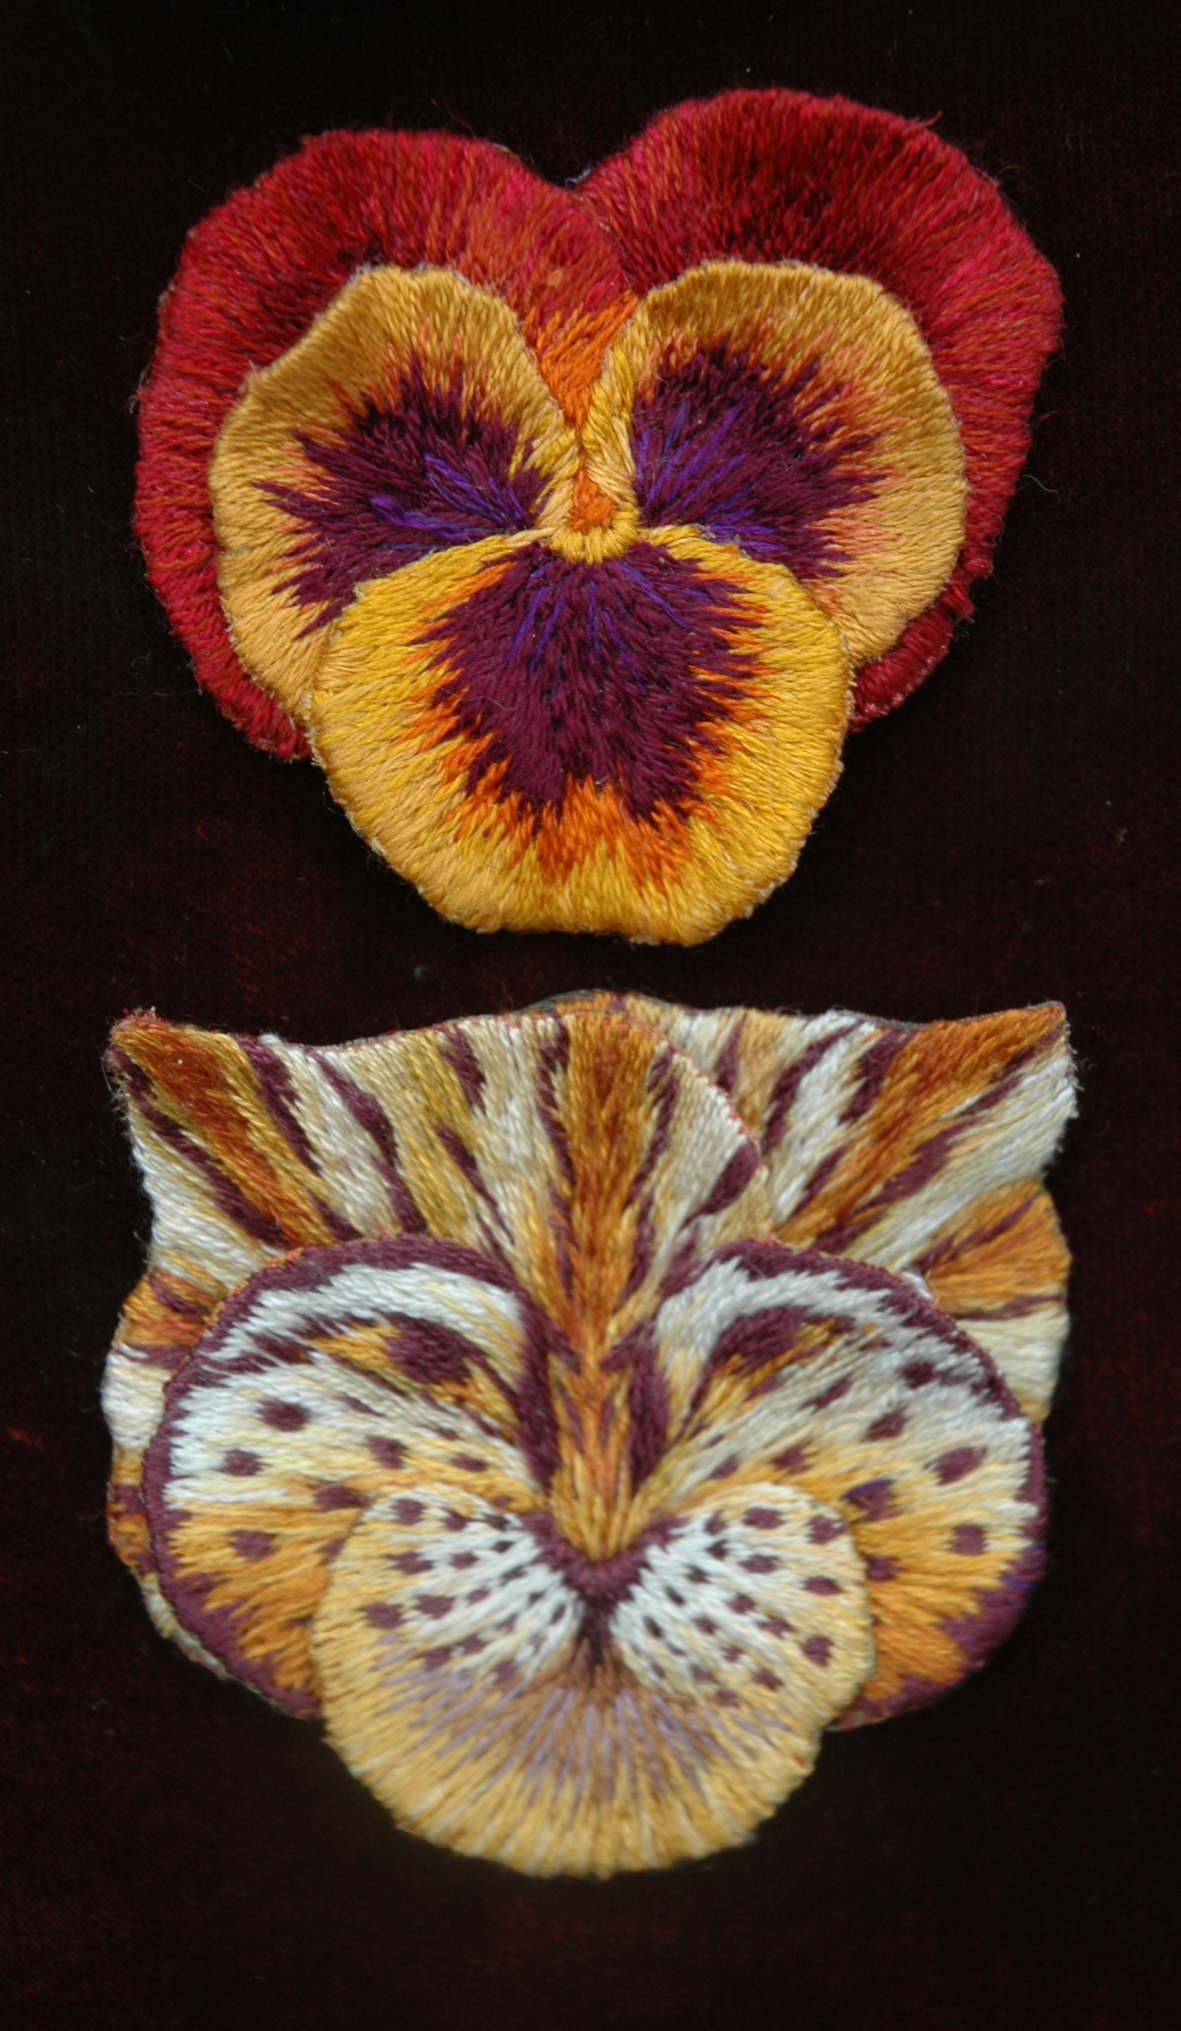
But he inadvertently said something that absolutely made me loose faith in how I have made this piece of work – “what is really fascinating and worth you considering is that these shoes LOOK as if they have been stitched on the multi – head machine – but they haven’t ” – and he was right! The long and short stitches are so neat and precise they look machine made – I have been overtaken by technology. So I now have to rethink for what and how I stitch by hand….. how will this machine – made perception affect the way people appreciate my work?

One of the ideas underpinning my current practice is the notion of time taken: to hand stitch something which is very slow and therefor valued means that the subject or concept is worth consideration……but meanwhile I have to finish this piece of work – but am I wasting precious time when I could just give it to some one to machine it for me – I am not about to learn how to use a multi -head. But it does make me wonder how I can change my whole way of working in cloth when anyone can “draw” with stitch.


Flower Face

This face of flowers has haunted me for years, I am fascinated by the loveliness which is coupled with the unease I feel every time I see it – delighting in the delicious idea of a face made of flowers but this looks more like a tattoo, it’s scary. Arcimboldo, court painter in 16th century Vienna, is widely acknowledged to be the father of surrealism; he made ‘likenesses’ of people from all manner of objects, a librarian’s face made of his books, a cook’s portrait in a dish of food, today modern advertising still use the same clever devices to spectacular visual effects.

So I decided to make a face of embroidered flowers picked from my own garden ( as you do). I started with a collage to see what I would need to find to make it convincing, the man’s face in the bottom left corner is also by Arcimboldo, a portrait of his patron Rudolph ll as Vertumnus,the god of the harvest 1590.(You can also see my version of a Vegetable Man). I had to resort to all sorts of flowers to make the face – but the expression of vague alarm on this first face of flowers should have warned me what was coming……….I started to draw the flowers from my garden, searching out  roses for cheeks, pansy eyes, rosebud mouth…how innocent it all was; by the end of this embroidery I had more many ideas due to my research both visiting flower shows and studying the history of Florists – the growers, showers and  developers of our modern day flowers. Slowly the work became a whole series of embroideries about man’s manipulation of nature with beautiful and terrible results……….however to start at the very beginning.

This is the vase of flowers that I used for the drawing above, the pansy eyes, the foxglove nose and eyebrow, the carnation mouth are faithfully recorded, not exactly in the same spaces – but if you squint the face can just be seen in the bunch below left. But I had a problem – I didn’t have the right flowers to use in my garden to develop this further so some more would have to be bought.

I had put them in a lovely old (and mended) hand blown glass decanter and this made me think of the beautiful Dutch paintings of vases of flowers – it was studying these closely that made me realise that none of these actual painted bouquets ever existed, they were portraits of individual flowers painted when they were in season and assembled by the artists  – how else do you get tulips with fully blown roses with ears of corn with anemones all in one vase – in the 17th century.

Now I knew how to get what I needed, I designed the face and searched for flowers to fill in the features. I drew each flower as I found it, embroidered it on dark silk organza ready to be cut out and assembled when I had enough  – this took several months. I started with a drawing of Iris from my garden – I knew she (by now she had become Flora, the Roman goddess of spring) had to have my colour hair, this iris was perfect a sort of reddish blonde. In the drawing I have recorded the striations of colour so that I can develop my stitches in the same directions.

I picked, drew and sampled all the flowers I could find, it was a lovely summer of work. Friends and neighbours started to bring me flowers they thought I would like to include, the search was on for  all sorts of auburn and orange flowers for the hair,

flesh coloured roses and poppies for the skin, rosebuds for the mouth.

Slowly, by  travelling around to see specialist flower shows and drawing from all kinds of resources I pieced together the face; the pastel drawing I worked from and the ongoing recorded collage can also be seen below.

So now this face had to have a body, the old glass decanter was perfect, with a swelling rounded shape and elegant proportions, easy enough to draw, but how do I embroider it?

Placing tracing paper over the drawing to get a pattern for the vase I suddenly realised this was how to achieve the effect of seeing stalks though water and glass, I painted the stalks on silk with dye then bonded embroidered silk organza onto the surface –

I lost most of the painting in the process but the effect is both subtle and sinks into the black ground and so does not distract from Flora’s stupendous poppy breasts.

So here she is in all her splendour. But she is short lived; surrounded by things that will harm and ultimately destroy her, the rose-cutter bee will eat her cheeks, the butterfly will lay eggs and the larvae will feed from her, the beautiful beetle feeds off rose leaves and the snail will first slime then devour her. Only her beauty spot, the lady bird, will protect her – from greenfly.

Heart Felt – Heart Fest.

I was asked to make this snail heart  for the Heart Felt exhibition, currently on at Centre Space Gallery Bristol. Paul, whose story I am symbolising is shown holding it aloft; he seems delighted – but I think mainly because it gave him an excuse to stop climbing ladders for a few moments, he was putting up poles for us to hang up the hundreds of hand -made hearts. I only read the first bit of his story which was attached to a photograph of a snail which, was all I had to work    but like most of them I suspect it is a sad tale…………you can buy the excellent catalogue to read them all, “Heart Felt, Life Changing Moments” it’s compiled by Jan Connett and available from her .

happy snail holder

I arrived on Thursday afternoon to help a team get the exhibition hung; it was the usual scene of everyone standing round looking a bit stunned and wanting a cup of tea; but within half an hour we were all working away to plans by Jan Connett who organised the whole project. There were about 10 people in all coming and going – most of them in for a long night, I had only a few hours but had volunteered for card making duty when I got home. Everything goes towards 3 charities the Children’s Hospice South West, the British Heart Foundation and the African Street Children Organisation and most of the hearts can be bought from as little as £5.00

the hanging team hard at work - hardly a heart in sight!

I was given the job of hanging the first wall of hearts with a partner; they had all  previously been strung out on lengths of fishing line with an elegant weight at the end – our first job was to unravel  the lines and get them into order on the floor –

the un-ravelled lines of hearts


As soon as they emerged from their boxes I started to photograph them on the floor, they were all so different but all full of vitality. they each had a label written with their own stories ( if you enlarge the image by clicking on  it –  some of the stories can be read).


when I left the exhibition was coming together, it was starting  to look really exciting – but what else is going to happen with that bike to make it suggest a heart felt moment?

5.30pm evening before the show.

the next morning this is what had emerged………….

she sure loves her bike!

The whole space had been transformed, 4 long rows of suspended hearts were gently swaying, twisting and turning, the whole room seemed to be swooning with hearts

strings of hearts with labels waiting to be read.

I just loved the whole room – now there’s a surprise! it was white and airy with small brilliantly coloured hearts with messages to be read hanging from them;some sad about the death of a friend or family member, some about the loss of pets, there were many heart memorials.

exquisite super real heart with a sad, sad message.

cats lovers look away.

Some are poignant about the loss of a loved parent to Alzheimer’s, now gone out of reach and recognition – others about the loss of self due to illness and broken relationships – but most are joyous – happy snippets of remembered times, seasons, gardens, fishes – anything and everything worth celebrating by making a heart.


Most heart warning are the hearts that celebrate a long loving relationship, the button heart is for 55 years of happiness and a birth of a great grandchild; the ivy wreath heart is dedicated to a life lived with “electric touch, shared pleasure, constancy and truth”


the Fish heart has a label saying “only dead fish go with the flow” and the funny face is for a well remembered and much loved grandmother


the 2 contrasting hearts below are for joy,  of watching seeds grow and the joy of finding a safe key holder for her heart…..


But my favourite heart of all is the one I found revealed on the worn painted floor as I was tidying up at the back of the gallery.

my favourite heart in the exhibition


Heart Felt Forum

enamel heart complete with paper label

I have just made this broken and mended vitreous enamel heart for an exhibition, Heartfelt Bristol, which is being held between Friday 19th and Wednesday 24th November at the Centrespace Gallery, Leonard Lane, Bristol. The Heartfelt exhibition has been co-ordinated by Bristol textile maker  Jan Connett and she has been working on this project for the last 9 months. Each exhibitor has been asked to make a heart to commemorate their own heartfelt moment and complete it with a label that tells the story that inspired it – so far Jan has over 500 hearts complete with their messages.

I have made this in the nick of time in response to a notice given at the last meeting of the steering committee of Textile Forum South West, which I chair. Jan is a member of TFSW and her work can be seen with many other members on the website. A group of us set up the Forum several years ago when some of the delegates and speakers at the Brunel Broderers‘ conference “No Man’s Land” sat down and talked together over lunch. We enjoyed meeting and speaking to fellow enthusiasts so much that we decided to continue to discuss and meet together in the future and try to include as many other textile practitioners, historians, lecturers and students as possible in the region. Sonja Andrew was the major driving force behind this move; she has since left the area to return to her native Yorkshire, but continues to keep in touch with us.

At the quarterly meeting recently held at rooms at Bath Spa University, Corsham Court, I looked round the room where 8 of the regular steering committee members were discussing our next conference “Mapping the Future – Where are you now?” to be held in March next year. I thought how totally different we all are in our own practice, but we all pull together because we just love textiles..not matter what our discipline we can’t talk enough about the “stuff”.

  • hedgerow.buds.turning.pink. paint and thread on organdie Liz Harding


    From the original group who formed TFSW there are 3 of us left and 2 of them were originally part of the Bunel Broderers group, Liz Harding who is currently studying for a PhD in at Bath Spa Uni and Brenda Miller who has recently completed an MA in Textiles at Goldsmiths University, London. Liz is at present the committee secretary and Brenda is heading up the exhibitions committee. The next exhibition later this month at the Centre for Contemporary Arts and the Natural World, and is called Material Actions which TFSW developed with  Plymouth University Arts.

    digitally knitted panel from video installation. Brenda Miller

    Also at the meeting and studying at Bath Spa for their doctorates, were Kay Swancutt, our strict treasurer, and Alison Harper. Alison had her work selected for the Material Actions exhibitions and it is shown here, she made lengths of “yarn” from discarded crisp packets – those sheeny-shiny coloured ones, winding them into skeins all ready for working with and to quote her in an email to me – “I am currently researching the ways in which textile art and processes can contribute to an ethical dialogue between art, materials and social and cultural change ! so there”

    "Pass Me Another Crips Packet" skeins of prepared crisp packets ready for knitting - Alison Harper.

    I have featured Kay’s work before in an earlier blog, she is looking at the whole idea of re-working patchwork – it’s getting very organic – I share with her the fascination of the written pattern papers still held in old English mosaic patchworks.

    Patchwork in progress. Kay Swancutt

    Jo Beal working in her studio.
     

    We are constantly looking for ways to sustain the activities of the forum and recently had a grant from the South West branch of the Arts Council – ACESW – where we have been assessing the audience and/or members’ requirements to grow and develop the Forum. Jo Beal is the person in charge of the bidding for grants and she oversees all our applications, we were having to give an account of the money in a written report and this meeting dealt with it. However her own work is varied, she  stitches but she also draws and has her own pages on Flickr.

    This just leaves me with 2 other members of the committee at the meeting, Jan Truman who works in beaded metal wire, I think she would term herself a knitter – but not as we know it.  The image below is ” just one of several projects on the go at the moment. This is part of my 2010 jewellery collection for the Barbican. I exhibit there, with the Designer Jewellers Group each year, so make a special pearl range for the show. Our exhibition this year runs from 11th Nov 2010 to 5th Jan 2011″.

    The "creative clutter" in her workroom - Jan Truman

    And then last but not least – Liz Hewitt  who does a whole lot of different things for the Forum. Her title is membership secretary but she also keeps us all up to date by sending out masses of news clippings and opportunities available between the bi- monthly newsletters posted by the Forum – a round up of everything going on in the textile world – it is worth being a member of the Forum just for these services alone. Also at present Liz is co-ordinating our next conference, as well as showing her dyed and stitched work in  many exhibitions, throughout the country.

    Hand dyed and stitched cotton cloth - Liz Hewitt.

    And Liz and I are meeting together at my studio later this week to talk about the possibility of running workshops in stitching and drawing in the Bristol area, so watch this space….

    But I am leaving you  pictures of the sampling session in the lunch break, where we tried out an idea of Alison’s to make pom poms as an idea for a workshop at the Mapping conference  – the Yarnpomming project. If you are interested in joining TFSW – out of area members welcome as well please go to the website and check in with us.

    Liz hewitt, Brenda Miller and Alison Harper making pom poms

    up close engaging with the "stuff"


    Pansy Faces

    Winter flowering pansies are in the shops now, but I have a set of embroidered pansies in flower all year round…the Pansy Faces from the Flora Embroideries.

    So just how did the rust and gold pansy on the left turn into the tiger below? I will try and show you.

    Visiting the many different flower shows whilst researching The Flora, I was struck by the way the pansies were displayed – they are arranged separately in trays, not as the usual bunch of flowers in a vase, but just the heads placed poking out of a board on a tray – why? I like to think that it really makes you look carefully at the difference in each wonderful flower head; but I suspect it may be because one of the criteria for a show pansy is to try to grow the petals to form a perfect circle. Then “heads” and “pansy faces” came together in my mind, so I started to photograph the trays at all the shows I visited, as you can see below the standard of presentation is often patchy and there seems to be no attempt at colour co-ordination!

    I fantasised that if I could breed flowers I would develop the pansies further by changing the shapes of the petals and regulating their colours. I tried also to keep the changes to a minimum to show the stages  of metamorphoses from flower to face. You can see that in the drawing below I started with a butterfly. which was fairly easy, and then moved onto the owl..he was a bit trickier and the problem of making this metamorphosis became apparent – whilst drawing and inventing from the research everything was clear,  but whilst stitching the flowers/birds/ animals my mind became confused between whether I was stitching an ear or a petal…..and this got more confusing as I developed the series.

    I then developed the cat or tiger;  the stripes were fascinating to depict as they could follow through the growth patterns of the petals  and it was a delight to invent and stitch, as was the monkey – the dog was not made – if I could have drawn a wire fox terrier as  pansy I would have included him that but I could only manage a shitzu – I have  always thought of them as pansy faced dogs.

    I then decided that this was all too innocent, while I was happily playing and exercising total control over  inert materials – the plant breeders and agricultural scientists were not. What would happen if it all went horribly horribly wrong? The ultimate goal for mankind seems to be to become like god and make make everything for our own benefits and in our own likeness. This was  hard decision to make  and I knew from the start that I would have to eventually develop a human face; I at first thought it could be a nice face – another beauty like Flora and the Edible Woman.

    But really all along I had known it had to be a self portrait to make sense of my idea. I first appear drawn in grey pencil amongst my lovely colourful animals and fairy faces – and yes I do recognise that it is a sign of vanity – but I have never ever liked to see pictures of  myself. Friends have learned not to show me any photographs they have taken of me – I rip the heads off them – I want only to be known by the images in my work – so a control freak as well…I know I know.

    But back to the plot – below is a page of  drawings for the final pansy face, a horrid version of me …

    The Aubergine Love Child

    I am imagining that the aubergine I bought yesterday in a wrapped pack of two, from Sainsbury’s supermarket in Whorle, is the love child of my Giant Vegetable Man and Edible Woman ( see my previous post and Flower Show). I think he has his mother’s nose and his father’s chin; the two of them have been shut away for several months in a studio cupboard so who knows what goes on in the dark seclusion of storage?

    Viewed face – on he has a sort of boyish charm and his hair is really rather cute – it looks as if he may make a good rugby player when he grows up, he already has the broken nose.

    Several people have mentioned his resemblance to an Easter Island figure so here is my favourite photograph of him –  on top of the garden wall gazing out over the estuary towards the Welsh hills – I haven’t the heart to cook and eat him just yet. Ratatouille will have to wait.

    The Edible Woman

    This is Harvest Festival time and in celebration of the season I am featuring the Edible Woman, alternatively The Prize.  She is a member of  the Flora Embroideries and was first imagined as a mate to The Giant Vegetable Man in the Flower Show blog. He had to have a mate made for him, even though he is pug-ugly, it would be sad to let all that male vitality and virility go to waste.

    The first idea I had for her was as an earth goddess, all burgeoning breasts and stomach, lascivious and wanton…a good match for him. I made several drawings but couldn’t bring myself to actually embroider them; she was not to be a figure of ribald humour like him and I did not want her to be sniggered at in the giant vegetable show .

    The  breeders and exhibitors of flowers and fruit for prizes, prefer perfection of form to any other consideration. So she had to have some sort of beauty and so I thought she  could possibly become an old man’s darling, kept for her beauty and breeding potential – a trophy wife. But as such she is vulnerable as is an edible woman.

    I thought of the lovely dishes of fruit displayed at the local flower shows often arranged on paper lace doilies and also the bowls of water containing heads of flowers arranged in patterns so delicately displayed.

    I then remembered that my mother used to win baskets of fruit at the local whist drives when I was a child. She would invariably come home with either a bottle of sweet sherry or more often a wonderful exotic basket of fruit. Well the basket was exotic, a large straw affair – what I now call a “lady basket” – which had to be given back the next week; it was always tied with a ribbon on the handle and the various fruits culled from village gardens were made valuable by the beautiful presentation –  a proper prize.

    My lady was beginning to take shape in my mind, but how to make her face from edible things?I bought some exotic fruit and tried to arrange them into a face – this was not easy, the first attempt was really dreadful, like a fat unhappy drunk pumpkin woman, the only things that worked were the 5 okra as ladies fingers and the pomegranate and persimmon looked hopeful as breasts…….

    But I decided to sort it out by drawing..I would work with what I could and let the rest take shape around this, while stitching samples I had plenty of time to think.

    I don’t remember when I decided to make the fingers from asparagus, I know why though, they look more like painted pink fingernails. The painted silk is shown below above another edible personification, but who would want to marry her?

    So here she is – my Prize – the Edible Woman in all her glory; displayed for your delectation in a ruched fabric marquee, usually reserved for weddings but often used for the classier northern England flower shows. You could eat all of her, from her apple cheeks to her cherry lips, dip her asparagus fingers into melted butter and nibble you way through the sweet salad flowers of her hair; scrunch your teeth through her pear nose while contemplating her dark nipples before you peel your way into her luscious ripe breasts……

    Now here’s a challenge – would any of the cooks out there like to concoct a recipe from her, or for her,  maybe a menu would be easier….the asaparagus doesn’t lend itself to inclusion in fruit salads – but then what do I know? I don’t cook puddings I only ever embroider them.

    mending more hearts

    GEDSC DIGITAL CAMERA

    You know when you get an idea and a light goes on in your head and you think – why did it take me so long to see this? Well this has just happened to me – last weekend I was looking at the stitched ceramic dishes I had made for the Museum Mending project and thought – why don’t I just stitch these images onto cloth? The mottoes, the hearts, the hands….all these relate to my personal project Make It Through the Night so why don’t I include these into this? DUH!

    I have done all the research, found the mending mottoes and sorted out the drawings of the hands, but what will I stitch them onto? Well when you are broken- hearted what do need to mop up the tears – a handkerchief – which is a ready- made square of cotton or linen – perfect.  And when I looked through my white fabric stash I found a packet of 4  table napkins left over from another project – hem stitched in linen – perfect. I always take these pieces of luck as a sign that I am on the right track.

    Counterpane/Counterpain

    I thought I should  try to match the mends with the mottoes and to use the broken and mended heart as a link to the Counterpane/Counterpain embroidery which features in the Make It Through the Night project in Work in Progress section of the blog. I decided to keep the same stitching techniques and colour.

    I started with a cut and darned heart, which would need considerable strengthening at the edge of the handkerchief, so the motto had to be ” that which does not kill you makes you stronger” a proverb that I think has a stoical attitude. Having drawn out my design and checked the correct darning system in an old sewing manual, and taking courage into both hands, I cut from the edge of the handkerchief straight into the heart, tacked a run and fell seam and set to work sewing it.

    sewing manual and darning sampler which provide both the information and inspiration

    I chose to sew it in red thread as in the little household sewing sampler that I had bought years ago from an Oxfam shop.  It is probably from middle of the 20th century and made as part of an infant school sewing class. The choice of red for stitching is a swine as every single stitch glows out whether rightly or wrongly placed, I started to dislike the original needlework teacher – why impose this on to  your pupils?  – well discipline of course….and suddenly my little basic sewing sampler looked like the work of a consumate needlewoman – poor girl –  unlike me she didn’t choose to do it.

    finished handkerchief pinned to studio wall

    You can see by the finished piece above just how personal this embroidery got for me I have hand written “me”  instead of ” you”.   This was quite a difficult piece of darning even though I have worked this technique several times before;  the plain hem stitching on the run and fell seam above the heart was really tricky to get even on both sides. I would choose something easier for the next one………

    I found the motto, ” Red is the ultimate cure for sadness”  and decided to use a patching system using a scrap of scarlet linen, I withdrew the threads and darned them onto the heart. Easy Peasy it wasn’t!


    withdrawing the threads from the red patch.

    The finished red darning piece can be seen pinned to my studio wall, to the side of it can be seen a sample of Darning as Jewellry by Dail Behennah.

    red darned patch handkerchief

    Dail Behennah’s tiny samples in copper and gold wire for Darning as Jewellry, was also made for the museum mending project

    The next piece was also patched, much simpler this time a basic inset patch of fine linen.

    mending manual and school sampler

    cross stitch embroidered patch ready for insertion

    On the left can be seen the set of instructions for basic darning with the sample of the same system next to it. There are many old sewing manuals with all this information in them, up until about the 1960’s when they begin to just talk about machine stitching for  darning

    For this handkerchief I decided to cross stitch the motto onto the patch beforehand, and on the left can be seen the embroidered patch prior to cutting and inserting it onto the heart on the handkerchief, below.

    The image of the small pink and red  broken and mended heart pinned above the handkerchief below is a photograph of a set of 50 enamel badges I made for an ETC project several years ago. Maybe I should make some more?

    patched cross stitch motto

    By the time I got around to stitching the 4th mending motto I thought Mend It or End It was a suitable finish to this series, the  finished piece is the seen at the head of this blog, simple and effective the simple cross – way darn also makes a good warning symbol to make your mind up – the type of real advice my friends actually do give me when I am dithering about anything…I think these mending mottoes will lead to other handkerchiefs, I particularly like the one about the colour Red, I wonder what other mottoes there are about colours?

    first 3 mending mottoes handkerchiefs on my studio wall.

    Mending Mottoes

    sketchbook of first mending mottoes idea

    I have eventually found the time to get back to the Stitched Ceramics story.  Hanne Rysgaard and I found a few odd days to work together during the past months to develop samples of the plates I want to make. The first thing we did was make some new molds, well actually Hanne made new molds while I took the pictures…….

    edited idea from the poetry plate

    Meanwhile I got on with drawing out designs for different plates, I had really liked the poem by W.H.Auden and the broken heart image (see the Category Archive, Stitched Ceramics May 18th)  I wanted to repeat this design but with a motto instead of the poem or find a poem I could use without having to deal with the copyright restrictions…but Hanne had recommended not writing a great deal as the porcelain would probably dry out too much for me to be able to manipulate the clay into the tears and holes for later mending.

    I made several drawings at this stage and some of these initial ideas did survive intact to the finished sample stage – others have been rather rearranged and one has been mended  – for real.

    several more sketches for the mending motto plates

    Hanne rolling out the porcelain on her new bit of kit.

    When I returned to the ceramics studio, Hanne rolled out the porcelain for me, gave me the molds she had prepared earlier and went upstairs to look after Blaze gallery.

    I had drawn and cut some stitching hands from card for impressing onto the clay and I also used the copper blanks I had previously plasma cut for enamelling, these proved to be the best at making the right amount of depth for the impressions. Using the working drawings, which were pretty basic, see above, I started to work. Nerve wracking stuff – as the slightest mark is not easily erased, so I was forced to be more controlled learning to rely on my instincts – if you make a wrong move you will have to redress it either now or later when it is fired – or discard it – I was NOT about to discard anything I had been given to work with and which had been so lovingly prepared for me; time to get a grip.

    card hand placed on freshly rolled porcelain

    I started out quite well, the first hand impress although  a bit weak, was simple and effective, the finished dish  looks more or less as I imagined it would – see below   no blocked stitching holes, no cracks, no loss of shape  – I should be thankful for beginners’ luck!

    finished plate, no problems!

    And the rest of the day went well, I made 2 more dishes, well one and a half…I had not enough clay for a whole third plate so started to get inventive….I thought that a half a plate with the holes pierced for stitching another material to it would be interesting…I used a crazy patchwork technique for this.

    half a porcelain plate with half made linen crazy patches in my studio

    This half dish had lost its shape in the kiln, so I had nothing to lose by experimenting with it and although I feel this version is not working due to the pull of the linen fabrics over the curve of the dish, which may be eradicated by cutting them on a different grain,  I feel that there is a lot potential here;  Liz Hewitt, another embroiderer, told me about a kind of felt that can be molded when wet and will dry to shape – and it  can be stitched ….so I will try this  idea again – maybe – if I get the time.

    first and unsuccessful sample of crazy patched plate...

    But the dish that was to test me most was just simple and pure white with a motto and stitching hand, it needed no further colour, just taking home and darning.

    darned dish before firing.....

    There was one small problem, several of the holes I had pierced had fused together; I set about filing them out…. I was oh so careful, when one push too far through the actual needle eye and KERACK..the whole plate split in two, right through the hand but, thankyou universe, the darning patch as well.

    You know when you just feel sick, sorry and stupid! I wanted to weep, but just had to carry on – Araldite, fast drying Araldite came to my aid. And YES I do appreciate the irony of this…..but I still had to hold the 2 pieces together in my hands for more than 30 minutes and imagine trying to do this when your are telling yourself to just chuck the whole lot away and forget you ever had any ambitions and isn’t this what you always do – mess up because you want too much control…and you desperately need to pee.

    Anyway when it finally felt safe to loosen my grip after walking round my studio a dozen times, I tightly bound it in some strips of fabric and left it overnight – unusually I took no photographs of this episode – too sick about it all.

    finished double mended plate

    After a turbulent night’s sleep, and when I finally stoned off all the last vestiges of glue from the wound and the back of the dish and my hands…and filled the tiny gap with red making it “bleed” under the darned area. I realised that I have discovered another way of working with the ideas of breaking and mending and which I am now really interested in pursuing for the Museum Mending project

    But I am leaving you with another motto which just makes me laugh ruefully each time I turn it up in my research book, this needs a very special dish making for it….